
002.05 屏幕上的点量测 - PsSimleGUI 的应用
0 / 1 / 创建于 5年前 /
 Jason990420 的个人博客
相关软件信息:
| Win 10 | Python 3.7.2 | PySimpleGUI 4.6.0 |
说明:所有内容欢迎引用,只需注明来源及作者,本文内容如有错误或用词不当,敬请指正.
前言
最近看了一个PySimpleGUI, 基础是来自Tkinter, 我想他们建立这一个库, 主要的目的在于, 可以方便或简单的方式建立GUI. 事实上, 的确是很简单而直接, 代码又短 (如果你没有太多自己的想法或意见). 举个简单的例子, 以下的个窗口, 如果要用Tkinter来布局, 估计得好几百行才能搞定, 而且挺花时间的.
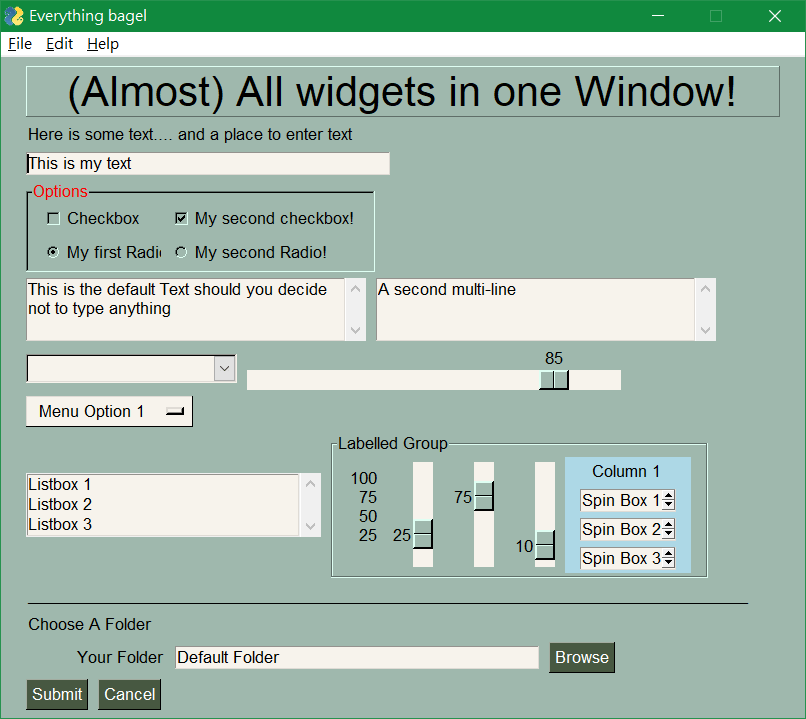
但是使用PySimleGUI, 只用了70行, 而且可能不懂PySimpleGUI的人也可以看懂以下大致的内容.
范例
#!/usr/bin/env python
'''
Example of (almost) all widgets, that you can use in PySimpleGUI.
'''

import PySimpleGUI as sg

sg.change_look_and_feel('GreenTan')

# ------ Menu Definition ------ #
menu_def = [['&File', ['&Open', '&Save', 'E&xit', 'Properties']],
            ['&Edit', ['Paste', ['Special', 'Normal', ], 'Undo'], ],
            ['&Help', '&About...'], ]

# ------ Column Definition ------ #
column1 = [[sg.Text('Column 1', background_color='lightblue',
                    justification='center', size=(10, 1))],
           [sg.Spin(values=('Spin Box 1', '2', '3'),
                    initial_value='Spin Box 1')],
           [sg.Spin(values=('Spin Box 1', '2', '3'),
                    initial_value='Spin Box 2')],
           [sg.Spin(values=('Spin Box 1', '2', '3'),
                    initial_value='Spin Box 3')]]

layout = [
    [sg.Menu(menu_def, tearoff=True)],
    [sg.Text('(Almost) All widgets in one Window!', size=(
        30, 1), justification='center', font=("Helvetica", 25),
        relief=sg.RELIEF_RIDGE)],
    [sg.Text('Here is some text.... and a place to enter text')],
    [sg.InputText('This is my text')],
    [sg.Frame(layout=[
        [sg.CBox('Checkbox', size=(10, 1)),
         sg.CBox('My second checkbox!', default=True)],
        [sg.Radio('My first Radio!     ', "RADIO1", default=True, size=(10, 1)),
         sg.Radio('My second Radio!', "RADIO1")]], title='Options',
             title_color='red',
             relief=sg.RELIEF_SUNKEN,
             tooltip='Use these to set flags')],
    [sg.MLine(default_text=
            'This is the default Text should you decide not to type anything',
            size=(35, 3)),
     sg.MLine(default_text='A second multi-line', size=(35, 3))],
    [sg.Combo(('Combobox 1', 'Combobox 2'), size=(20, 1)),
     sg.Slider(range=(1, 100), orientation='h', size=(34, 20), default_value=85)],
    [sg.OptionMenu(('Menu Option 1', 'Menu Option 2', 'Menu Option 3'))],
    [sg.Listbox(values=('Listbox 1', 'Listbox 2', 'Listbox 3'), size=(30, 3)),
     sg.Frame('Labelled Group', [[
         sg.Slider(range=(1, 100), orientation='v', size=(5, 20), default_value=25,
            tick_interval=25),
         sg.Slider(range=(1, 100), orientation='v', size=(5, 20), default_value=75),
         sg.Slider(range=(1, 100), orientation='v', size=(5, 20), default_value=10),
         sg.Col(column1, background_color='lightblue')]])
    ],
    [sg.Text('_' * 80)],
    [sg.Text('Choose A Folder', size=(35, 1))],
    [sg.Text('Your Folder', size=(15, 1), justification='right'),
     sg.InputText('Default Folder'), sg.FolderBrowse()],
    [sg.Submit(tooltip='Click to submit this form'), sg.Cancel()]]

window = sg.Window('Everything bagel', layout,
    default_element_size=(40, 1), grab_anywhere=False)

event, values = window.read()
sg.popup('Title',
         'The results of the window.',
         'The button clicked was "{}"'.format(event),
         'The values are', values)

window.close()
簡單说明
说不如作, 自己实作一下, 果然发现有好有坏, Tkinter就像一砖一瓦, 你想怎么盖房子都可以自己搞, 而PySimpleGUI就像组合屋一样, 你只能拼图, 但很方便, 而且又简单又快, 不过很多Tkinter的东西没有被包进来, 如果你也要使用PySimpleGUI, 不要问我为什么…Tkinter可以设置某些选项, 或有什么功能, PySimpleGUI就不能改或没有这些功能 ? “半成品”和”材料”肯定是不一样的啊.
还有一件事, PySimpleGUI原则上不用写Callback, 自己可以写while回圈重复检查GUI的结果来动作, 因为 PySimpleGUI窗口中的event及values, 可以read()的方式读出, 以供处理.
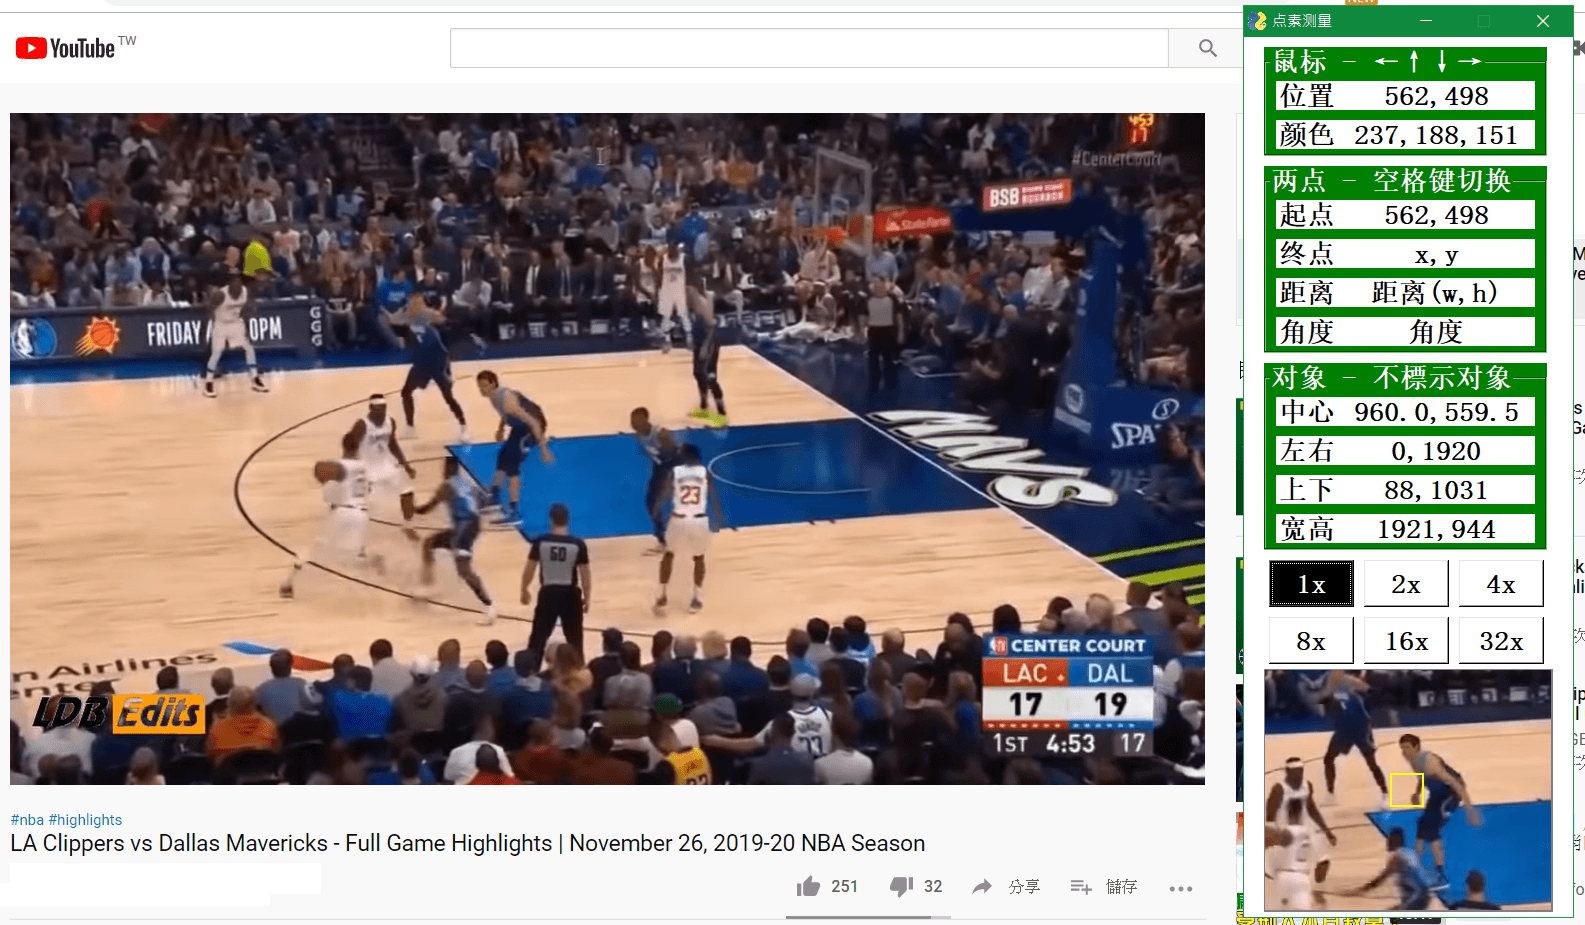
下面附上自己写的一个小软件, 用来检查桌面上, 每个点的坐标, 颜色, 以及距离, 也能检查桌面上一些应用框的位置, 尺寸等等. 没有在我的窗口外画线以及应用框标示方框以利点选, 虽然看起来少点感觉, 但在使用上来说, 应该没有太多问题. (事实上, 这里的版面排版只用了54行, 其他都是内部处理的程序)
代码
from threading import Timer                 # Thread function
from PIL import Image, ImageGrab, ImageTk   # Image processing
import PySimpleGUI as sg                    # Easy library as Tkinter
import win32api                             # API for Windows Platform
import win32gui                             # GUI for Windows Platform
import ctypes                               # C data types library
import sys                                  # System parameters and functions
import math                                 # Mathematical functions

# Confirm Windows System
if not sys.platform.startswith('win'):
    sg.popup_error('Sorry, you gotta be on Windows')
    sys.exit(0)

font_size = 16
font = 'simsun '+str(font_size)+' bold'
stop_flag = False                           # thread stop flag
width = 143                                 # half width of view window
height = 120                                # half height of view window
graph_size=(width*2+1, height*2+1)          # size of view window
x_old, y_old = 0, 0                         # record old position of cursor
bttn_color = ('black', 'white')             # Normal Button
bttn_color_select = ('white', 'black')      # Selected Button
box_color=['yellow', 'blue']                # box color on view window
index = 0                                   # box color index
scale = 1                                   # scale of view window
resize = ('1x','2x','4x','8x','16x','32x')  # scale text
im = None                                   # image of view window
period = 0.05                               # Thread Timer
point = 'start'                             # start point of line

# Set the unit of position as pixel
ctypes.windll.user32.SetProcessDPIAware()

# Set the view styple of window layout
sg.change_look_and_feel('Reds')
# sg.change_look_and_feel('GreenTan')

def button_click(string):

    # Change colors of buttons to show the selection
    global scale
    window[str(scale)+'x'].update(button_color=bttn_color)  # Old one
    window[string].update(button_color=bttn_color_select)   # new one
    scale=int(string[:-1])                                  # set scale

def capture():

    # Get cursor position, pixel color, and grab image on screen
    global x_old, y_old
    flags, hcursor, (x, y)  = win32gui.GetCursorInfo()  # Get cursor position
    x_old, y_old = x ,y
    w = int(width/scale)
    h = int(height/scale)
    im=ImageGrab.grab(bbox=(x-w, y-h, x+w+1, y+h+1))    # Grab image on screen
    color = im.getpixel((w, h))                         # Get pixel color
    if scale!=1:
        im=im.resize(graph_size, resample=Image.NEAREST)# resize
    im = ImageTk.PhotoImage(im)
    return im, x, y, color

def mouse():

    # Thread for mouse movement
    global image, stop_flag, im, point, start_x, start_y, index

    # Stop thread or not
    if stop_flag:
        return
    # capture mouse position, pixel color and image
    im, x, y, color = capture()
    r, g, b = color

    # update image, cursor position and pixel color
    position = '{},{}'.format(x,y)
    window['Graph'].TKCanvas.itemconfig(image, image=im)
    window['position'].update(position)
    window['color'].update('{},{},{}'.format(r, g, b))
    # update start and end position of a line
    window[point].update(position)

    # start point
    if point=='start':
        start_x = x
        start_y = y
        window['distance'].update('距离(w,h)')
        window['angle'].update('角度')
    # end point
    else:
        # Calculate the distance and angle of line
        distance = '{},{}'.format(abs(x-start_x)+1, abs(y-start_y)+1)
        degree = - math.degrees((math.atan2(y-start_y, x-start_x)))
        if degree < 0:
            degree += 360
        # Update the distance and angle of line
        degree = '{:+.1f}度'.format(degree)
        window['distance'].update(distance)
        window['angle'].update(degree)

    # Get information of frame on mouse position
    handle = win32gui.WindowFromPoint((x,y))
    x1,y1,x2,y2 = win32gui.GetWindowRect(handle)

    # Get position of center point and four corners, also the width and height
    center = '{:.1f},{:.1f}'.format((x1+x2)/2, (y1+y2)/2)
    left_right = '{},{}'.format(x1,x2)
    top_bottom = '{},{}'.format(y1,y2)
    width_height = '{},{}'.format(abs(x2-x1)+1,abs(y2-y1)+1)
    window['center'].update(center)
    window['left_right'].update(left_right)
    window['top_bottom'].update(top_bottom)
    window['width_height'].update(width_height)

    # update a flash box on view window
    index = 1 - index
    line_color = box_color[index]
    window['Graph'].TKCanvas.itemconfig(box, outline=line_color)

    # Thread again after period time
    thread = Timer(period, mouse)
    thread.start()

def text(string, key=None, size=(13,1)):
    # Define a Text element to avoid long statement
    return sg.Text(text=string, size=size, font=font, key=key,
                   text_color='black', background_color='white',
                   border_width=0, justification='center', pad=(0, 5),
                   auto_size_text=False)

def button(string):
    # Define a Button Element to avoid long statement
    return sg.Button(button_text=string, border_width=2, size=(5,1),
                     button_color=('black', 'white'), font=font, pad=(5,5),
                     auto_size_button=False, focus=False)

def frame(frm, title):
    # Define a Frame Element to avoid long statement, also for alignment of text
    return sg.Frame(layout=frm, title=title, pad=(0,5), font=font,
                    element_justification='left', background_color='green',
                    border_width=2)

def graph():
    # Define a Graph Element, almost same as Tk.Canvas
    return sg.Graph(background_color='gray', canvas_size=graph_size,
                     graph_bottom_left=(0,0), key='Graph', pad=(0,0),
                     graph_top_right=graph_size)

# Frame 1 for Cursor Information - Position / Color
frame1 = [[text('位置', size=(4,1)), text('x,y',       key='position')    ],
          [text('颜色', size=(4,1)), text('RR, GG, BB',key='color')       ]]

# Frame 2 for start_point and end_point of a line - Position/Distance/Angle
frame2 = [[text('起点', size=(4,1)), text('x,y',       key='start')       ],
          [text('终点', size=(4,1)), text('x,y',       key='end')         ],
          [text('距离', size=(4,1)), text('距离(w,h)', key='distance')    ],
          [text('角度', size=(4,1)), text('角度',      key='angle')       ]]

# Frame 3 for object information at cursor position - center/coners/dimensions
frame3 = [[text('中心', size=(4,1)), text('x,y',       key='center')      ],
          [text('左右', size=(4,1)), text('x1,x2',     key='left_right')  ],
          [text('上下', size=(4,1)), text('y1,y2',     key='top_bottom')  ],
          [text('宽高', size=(4,1)), text('宽度,高度', key='width_height')],]

# Final layout for windows
layout = [[frame(frame1, '鼠标 - ←↑↓→')],
          [frame(frame2, '两点 - 空格键切换')],
          [frame(frame3, '对象 - 不標示对象')],
          [button(resize[i]) for i in range(0, 3)],
          [button(resize[i]) for i in range(3, 6)],
          [graph()]]

# Create window per layout
window = sg.Window('点素测量', layout=layout, background_color='white',
                    finalize=True, return_keyboard_events=True)

# Initial image on view window
# function of image type is not good for PySimplyGUI
# Use internal steps in PySimpltGUI.py, not by method directly
im, x, y, color = capture()
converted_point = window['Graph']._convert_xy_to_canvas_xy(width, height+1)
image = window['Graph']._TKCanvas2.create_image(converted_point, image=im)
window['Graph'].Images[image] = im

# Draw a rectangle on center of view image for cursor position
box = window['Graph'].DrawRectangle((width-16, height-16),(width+16, height+16),
                    line_color='black', line_width=2)

# 1x scale for initial setting of zoom
button_click('1x')

# Start thread for mouse information and updates
mouse()

# Event loop
while True:
    # Read action on window
    event, values = window.read(timeout=100)

    # event:None for window close event - 'x' icon
    if event==None:
        # Stop thread
        stop_flag = True
        break

    # No event
    elif event == sg.TIMEOUT_KEY:
        continue

    # Button clicked and return the button texts '1x',...,'32x' as event
    elif event[-1] == 'x':
        # Process button clicked
        button_click(event)

    # Space key for switching beteen start_point and ene_point of line
    elif event == ' ':
        if point == 'start':
            point = 'end'
        else:
            point = 'start'

    # Use Left/Right/Up/Down arrow key to move cursor by 1 pixel
    # especially for exact pointing when 32x scaling
    elif event == 'Left:37':
        win32api.SetCursorPos((x_old-1,y_old))
    elif event == 'Up:38':
        win32api.SetCursorPos((x_old,y_old-1))
    elif event == 'Right:39':
        win32api.SetCursorPos((x_old+1,y_old))
    elif event == 'Down:40':
        win32api.SetCursorPos((x_old,y_old+1))

# Close window
window.close()本作品采用《CC 协议》,转载必须注明作者和本文链接


 关于 LearnKu


推荐文章: