
3D 移动
1 / 0 / 创建于 6年前 /
 Jason990420 的个人博客
建立日期: 2020/05/02
修订日期: 2020/05/08 (Revised for Tool.py PEP8)
相关软件信息:
| Win 10 | Python 3.7.6 | PySimpleGUI 4.18.2 | PIL/Pillow 7.1.1 |
说明: 本文请随意引用或更改,只须标示出处及作者,作者不保证内容绝对正确无误,如造成任何后果,请自行负责.
前言
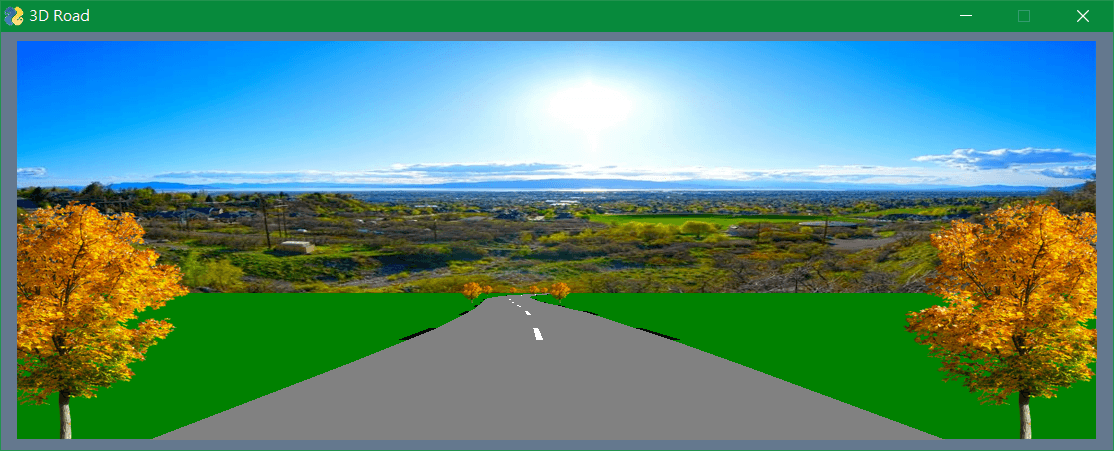
一个3D 移动的程序, 169 行.
内容说明
- 固定的远景
- 马路
- 分路线
- 路边
- 路樹
- 其他绿地
- 向前移动
- 3D
输出画面
代码及说明
- 库的导入
import PySimpleGUI as sg
import math
from pathlib import Path
from Tool import read_URL, mapping
from PIL import Image
from io import BytesIO- 其本参数设定: 物件长寛, 颜色及数量, 摄像头位置, 屏幕位置,
class GUI():

    def __init__(self):
        self.boxes = 51
        self.box_height = 50
        self.x0, self.y0, self.z0 = 0, 150, -50
        self.z1 = 0
        self.gap_width = 860
        self.road_width = 800
        self.line_width = 20
        self.offset = 0.5
        self.road_color = 'grey'
        self.gap_color = 'black'
        self.line_color = 'white'
        self.figures = []
        self.count = 0
self.Create_Window()- 建立画布物件
    def Create_Canvas(self):
        self.width = 1080
        self.height = 400
        return sg.Graph((self.width, self.height), (-self.width//2, 0),
(self.width//2, self.height), key='Graph')- 建立 GUI 视窗, 从网络上下载景及树木的图片, 并画上背景
    def Create_Window(self):
        self.window = sg.Window('3D Road', layout=[[self.Create_Canvas()]],
            return_keyboard_events=True, finalize=True)
        self.draw = self.window.FindElement('Graph')
        self.Load_Background()
        self.Load_Tree()
self.Draw_Background()- 下载图片, 并以要求的尺寸存盘
    def Download_Picture(self, url, file, size):
        if not Path(file).is_file():
            sg.popup(f'First time to load {file} from web ...', no_titlebar=True,
                auto_close=True, auto_close_duration=2)
            response, data = read_URL(url, byte=True)
            if data:
                with open(file, 'wb') as f:
                    f.write(data)
                im = read_file(file)
                im = im.resize(size)
                im.save(file)
                sg.popup(f'{file} loaded ...', no_titlebar=True,
                    auto_close=True, auto_close_duration=1)
            else:
                sg.popup(f'{file} load failed...', no_titlebar=True,
                    auto_close=True, auto_close_duration=2)
                self.window.close()
quit()- 转换图片文件成适合显示的数据
    def Load_Data(self, file):
        im = Image.open(file)
        with BytesIO() as output:
            im.save(output, format='PNG')
            data = output.getvalue()
return (data, im.width, im.height)- 载入背景图片
    def Load_Background(self):
        url = 'https://ae01.alicdn.com/kf/HTB18XRYXBv0gK0jSZKb762K2FXaF.png'
        file = 'background.png'
        size = (self.width, 300)
        self.Download_Picture(url, file, size)
        self.background, self.background_width, self.background_height = (
self.Load_Data(file))- 载入树木图片
    def Load_Tree(self):
        url = 'https://www.vippng.com/png/full/458-4585828_fall-tree-png.png'
        file = 'tree.png'
        size = (250, 250)
        self.Download_Picture(url, file, size)
        self.tree = Image.open(file)
self.tree_width, self.tree_height = self.tree.size- 转换 3D 座标成 2D 座标
    def Point_To_2D(self, point):
        x, y, z = point
        s1 = (z-self.z1)/(z-self.z0)
        X = x + (self.x0 - x)*s1 - self.x0
        Y = y + (self.y0 - y)*s1
return [X, Y]- 根据左下角的标及其变化, 生成框的四个角座标
    def Point_To_Box(self, x, y, z, dx, dy, dz, dx2):
        return [[x, y, z], [x+dx, y, z],
[x+dx+dx2, y+dy, z+dz], [x+dx2, y+dy, z+dz]]- 显示背景图片
    def Draw_Background(self):
        self.background_figure = self.draw.DrawImage(data=self.background,
location=(-self.background_width//2, self.height))- 显示一个填色的框
    def Draw_Box(self, x, y, z, dx, dy, dz, dx2, color):
        points = self.Point_To_Box(x, y, z, dx, dy, dz, dx2)
        points = mapping(self.Point_To_2D, points)
self.figures.append(self.draw.DrawPolygon(points, fill_color=color))- 显示绿地
    def Draw_Grass(self, x, y, z, dx, dy, dz, dx2, color):
        points = self.Point_To_Box(x, y, z, dx, dy, dz, dx2)
        points = mapping(self.Point_To_2D, points)
        points[0][0] = points[3][0] = -self.width//2
        points[1][0] = points[2][0] = self.width//2
self.figures.append(self.draw.DrawPolygon(points, fill_color=color))- 显示左右两边的树木, 并按比率缩小
    def Draw_Tree(self, x, y, z, dx, dy, dz, scale=1):
        w = max(1, int(self.tree_width*scale))
        h = max(1, int(self.tree_height*scale))
        im = self.tree.resize((w, h))
        with BytesIO() as output:
            im.save(output, format='PNG')
            data = output.getvalue()
        X, Y = self.Point_To_2D([x, y, z])
        figure = self.draw.DrawImage(data=data,
            location = (X-self.tree_width*scale/2, Y+self.tree_height*scale))
        self.figures.append(figure)
        X, Y = self.Point_To_2D([x+dx, y+dy, z+dy])
        figure = self.draw.DrawImage(data=data,
            location = (X-self.tree_width*scale/2, Y+self.tree_height*scale))
self.figures.append(figure)- 删除记录中所有已显示的物件
    def Delete_Figures(self):
        for figure in self.figures:
            self.draw.DeleteFigure(figure)
self.figures = []- 屏幕更新
- 先删除已画的物件
- 画绿地
- 由远到近把路边, 马路, 中线以及树画出
- 马路的中心位置由sin函数来调整
- 马路高低也由sin函数来调整
- 树的放大比率也随着距离变化
    def Update_All(self):
        self.Delete_Figures()
        self.Draw_Grass(-self.width//2, 0, self.offset,
            self.width, 0, self.boxes*self.box_height, 0, 'green')
        for box in range(self.boxes-1, -1, -1):
            center = -500*math.sin(2*(box+self.count)/self.boxes*math.pi)
            dx = -500*math.sin(2*(box+self.count+1)/self.boxes*math.pi)-center
            dy = center/2-250
            z = box*self.box_height
            if (box+self.count)%3 == 0:
                self.Draw_Box(center-self.gap_width//2, 0, z, self.gap_width,
                    0, self.box_height, dx, self.gap_color)
            self.Draw_Box(center-self.road_width//2, 0, z, self.road_width,
                    0, self.box_height, dx, self.road_color)
            if (box+self.count)%3 == 0:
                self.Draw_Box(center-self.line_width//2, 0, z, self.line_width,
                    0, self.box_height, dx, self.line_color)
            if (box+self.count)%10 == 0:
                scale = 1- (z-self.z1)/(z-self.z0)
                self.Draw_Tree(center-self.gap_width//2-50, 0, z,
                    self.gap_width+100, 0, 0, scale)
        self.count += 1
        if self.count == self.boxes:
            self.count = 0
self.x0 = center- 简单的GUI事件处理回路
G = GUI()
while True:

    G.Update_All()
    event, values = G.window.Read(timeout=100)

    if event == None:
        break

    elif event in ['Left:37', 'Right:39', 'Up:38', 'Down:40']:
        pass

G.window.close()本作品采用《CC 协议》,转载必须注明作者和本文链接


 关于 LearnKu


