
微信小程序+laravel8 实现文件上传七牛云
2 / 0 / 创建于 4年前 /
 QQ糖的音符 的个人博客
1.wxml代码:
<l-image-picker count="3" bind:linchange="onChangeTap" />2.js代码:
onChangeTap(e){
    //获取所有的图片,类型是一个数组
    var image=e.detail.all
    var _this=this
    //循环这个数组
    for(var i=0;i<image.length;i++){
      // 微信小程序内置的上传文件的方法
      wx.uploadFile({
        //单个图片
        filePath: image[i],
        //传到后台的名字
        name: 'image',
        //请求的网址
        url: 'http://www.d.com/home/Image/uploads',
        //请求成功后回调函数
        success: function(res){
          //进行转义,否则图片无法正常显示
          var name=JSON.parse(res.data)
          //给转义后的名字覆给一个变量
          var n=name.path
          //追加到data中提前定义好的list数组中
          _this.data.list.push(n)
        }
      })
    }
  }
3.利用composer下载依赖包
composer require itbdw/laravel-storage-qiniu 打开 config 文件夹下的 app.php 文件,在 providers 中加入一下代码
itbdw\QiniuStorage\QiniuFilesystemServiceProvider::class, 打开 config 文件夹下的 filesystems.php 文件,在 disks中加入一下代码
'qiniu' => [
            'driver'    => 'qiniu',
            'domain'    => '',  //你的七牛域名
            'access_key'=> '',    //AccessKey
            'secret_key'=> '',   //SecretKey
            'bucket'    => '',    //Bucket名字,即七牛云存储空间名称
        ],
在控制器里面进行上传
function file(Request $request){

        $disk = \Storage::disk('qiniu'); //使用七牛云上传

        $time = date('Y-m-d');

        $filename = $disk->put($time, $request->file('file'));//上传 这里的file是前端的name值,自己来定

        if(!$filename) {
            echo "上传失败";
        }

        $img_url = $disk->getDriver()->downloadUrl($filename); //获取下载链接

        return $img_url;
    }
laravel 关于安装七牛后,删除图片报错问题解决方案
用laravel框架安装七牛云安装包的,再删除图片时多少会遇到删除图片报错的问题,我也是通过同事的经验将此方法分享给大家,希望能够帮助到你们。
解决方法:
①打开项目根目录的/vendor/qiniu/php-sdk/src/Qiniu/Storage/BucketManager.php这个BucketManager.php文件,大约590行

②把delete($bucket, $key)防范里面的内容改变下
//原来的
public function delete($bucket, $key)
{
   $path = '/delete/' . \Qiniu\entry($bucket, $key);
   return $this->rsPost($path);
}

//现在的
public function delete($bucket, $key)
{
   $path = '/delete/' . \Qiniu\entry($bucket, $key);
   list(,$error) = $this->rsPost($path);
   return $error;
}
3.改完之后保存,基本有效了
多图片上传
WXML代码
<!-- 多文件上传 -->
<!-- 使用弹性布局 -->
<view style="display: flex; flex-wrap: wrap;">
  <!-- 循环展示上传的图片 -->
  <block wx:for="{{arr}}" wx:key="item">
    <image src="{{item}}" style="width: 160rpx; height: 160rpx; margin-right: 10rpx; margin-bottom: 10rpx;"></image>
  </block>
  <!-- 上传图片的小框框,有点击事件 -->
  <view style="width: 160rpx; height: 160rpx; border: 2rpx solid gray; text-align: center; line-height: 160rpx; margin-right: 10rpx; margin-bottom: 10rpx;" bindtap="pic">+
  </view>
</view>
JS代码
pic(){
    let _this=this
    wx.chooseMedia({
      //可一次上传三张照片
      count: 3,
      success(res){
        let pic=[]
        res.tempFiles.map(x=>{
          //赋值
          let url=x.tempFilePath
          let icon=x.tempFilePath.split('.')
          let picArr=['jpg','png','jpeg','gif']
          if(!picArr.includes(icon[1])){
            wx.showToast({
              title:'必须上传图片',
              icon:'error'
            })
            return;
          }
          wx.uploadFile({
            filePath: url,
            name: 'file',
            url: 'http://www.dd.com/index.php/api/img',
            success(res){
              pic.push(res.data)
              _this.data.pic=pic
              _this.setData({
                arr:pic
              })
            }
          })
        })
      }
    })
  }
现在进行七牛云上传操作
下载 composer 第三方包
composer require itbdw/laravel-storage-qiniu打开 config 文件夹下的 app.php 文件,在 providers 中加入一下代码
itbdw\QiniuStorage\QiniuFilesystemServiceProvider::class, 打开 config 文件夹下的 filesystems.php 文件,在 disks 中加入一下代码
'qiniu' => [
            'driver'    => 'qiniu',
            'domain'    => '',  //你的七牛域名
            'access_key'=> '',    //AccessKey
            'secret_key'=> '',   //SecretKey
            'bucket'    => '',    //Bucket名字,即七牛云存储空间名称
        ],
后端PHP代码
 public function apiImgs(Request $request){
        $disk = \Storage::disk('qiniu'); //使用七牛云上传

        $time = date('Y-m-d');

        $filename = $disk->put($time, $request->file('file'));//上传 这里的file是前端的name值,自己来定

        if(!$filename) {
            echo "上传失败";
        }

        $img_url = $disk->getDriver()->downloadUrl($filename); //获取下载链接

        return $img_url;

    }
身份证信息验证上传
<view>
  <view class="tip">
    <text class="iconfont icon-approve"></text>
    <text>身份认证将提高成功率!</text>
  </view>
  <form>
    <view>
      <label>真实姓名</label>
      <input name="truename" placeholder="真实姓名" />
    </view>
    <view>
      <label>身份证号</label>
      <input name="card" type="idcard" placeholder="身份证号" />
    </view>
    <view class="tip-msg">
      添加手持身份证照片
      <text>(照片仅用于身份认证)</text>
    </view>
    <view class="uppic">
      <text class="iconfont icon-jiahao" bindtap="click"></text>
    </view>
    <block wx:for="{{upfile}}" wx:key="index">
      <image src="{{item}}" style="width: 150rpx;"></image>
    </block>
    <view class="sendbtn">
      提交信息
      <button type="primary" form-type="submit">提交信息</button>
    </view>
  </form>
</view>
JS代码
//图片上传
 click(e){
  let _this = this
  let arr =[]
  var token = wx.getStorageSync('token')
  let header = {
    'Authorization':"Bearer"+" "+token}
  wx.chooseImage({
    count: 3,
    sizeType: ['original', 'compressed'],
    sourceType: ['album', 'camera'],
    success (res) {
      const tempFilePaths = res.tempFilePaths
      tempFilePaths.forEach(item=>{
        wx.uploadFile({
          url: 'http://www.dd.com/api/apiRenting/apiImgs',
          filePath: item,
          name: 'file',
          header:header,
          formData: {
            'id': wx.getStorageSync('id')
          },
          success (res){
            arr.push(res.data)
            wx.setStorageSync('arr',arr)
          _this.setData({
            upfile:arr
          })
          }
        })
      })

    }
  })
},
PHP代码
public function apiImgs(Request $request){
        $disk = \Storage::disk('qiniu'); //使用七牛云上传

        $time = date('Y-m-d');

        $filename = $disk->put($time, $request->file('file'));//上传 这里的file是前端的name值,自己来定

        if(!$filename) {
            echo "上传失败";
        }

        $img_url = $disk->getDriver()->downloadUrl($filename); //获取下载链接

        return $img_url;

    }
如果出现报错
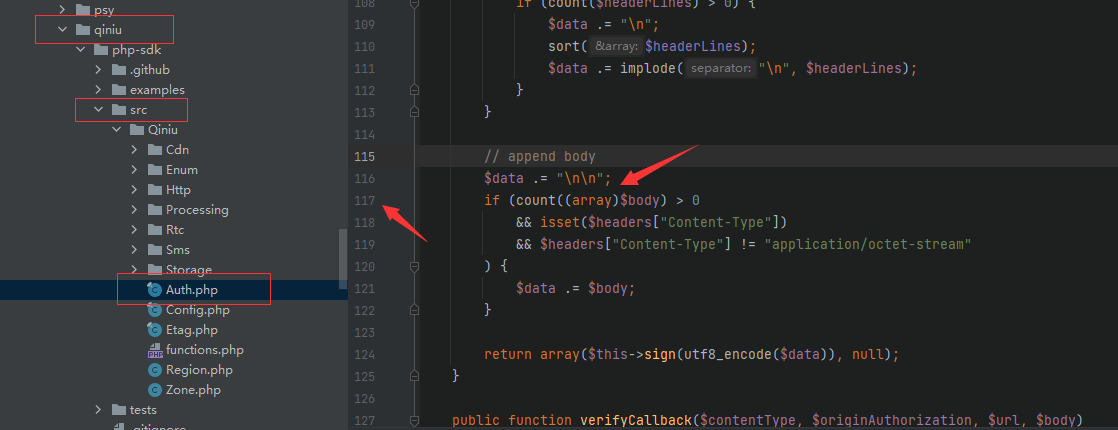
ErrorException: count(): Parameter must be an array or an object that implements Countable in file
解决方案:
只需在vendor/qiniu/php-sdk/src/Qiniu/Auth.php文件
第117行$body前加上(array)
简单整理,不喜勿喷
本作品采用《CC 协议》,转载必须注明作者和本文链接


 关于 LearnKu


