
用dockerfile搭建php+mysql+redis+swoole环境,使用docker-compose up启动
8 / 0 / 创建于 4年前
 meigo 的个人博客
一、编写dockerfile文件
编写dockerfile构建镜像,主要是一些php的扩展
FROM php:7.4-fpm


ENV TZ=Asia/Shanghai
RUN ln -snf /usr/share/zoneinfo/$TZ /etc/localtime && echo $TZ > /etc/timezone


RUN apt-get update && apt-get install -y \
        --no-install-recommends libfreetype6-dev libjpeg62-turbo-dev libpng-dev curl \
        && rm -r /var/lib/apt/lists/* \
        && docker-php-ext-configure gd \
        && docker-php-ext-install -j$(nproc) gd opcache pdo_mysql gettext sockets


RUN pecl install redis \
    && pecl install swoole \
    && docker-php-ext-enable redis swoole


ENV COMPOSER_HOME /root/composer
RUN curl -sS https://getcomposer.org/installer | php -- --install-dir=/usr/local/bin --filename=composer
ENV PATH $COMPOSER_HOME/vendor/bin:$PATH

WORKDIR /data
构建镜像:
docker build -t malina-php-project .运行之后: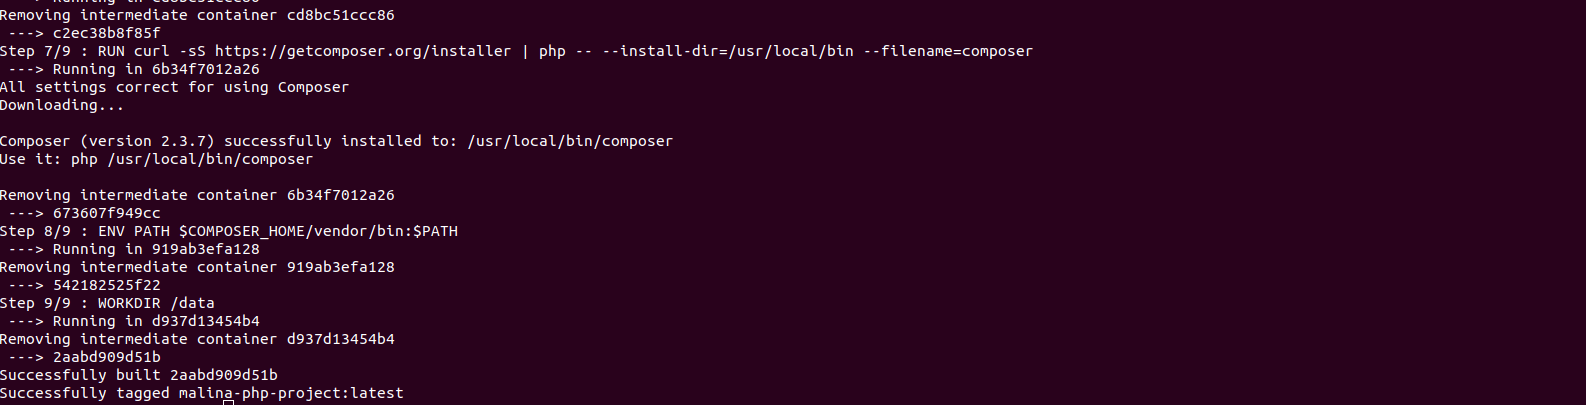
说明镜像构建成功
二、编写docker-compose.yaml
一定要注意层次与空格,严格按照yaml格式进行编写
在project文件夹中创建project1
在project1中创建docker-compose.yaml
version: '3.0'
services:
  nginx:
    image: "nginx:latest"
    ports:
      - "80:80"
    volumes:
      - /home/malina/project/project1:/usr/share/nginx/html
  php-fpm:
    image: "malina-php-project"
    volumes:
      - /home/malina/project/project1:/usr/share/nginx/html
  mysql:
    image: "mysql:latest"
    environment:
      MYSQL_ROOT_PASSWORD: root
      MYSQL_USER: admin
      MYSQL_PASSWORD: admin
  redis:
    image: "redis:4.0"
执行:docker-compose up -d
到此,docker-compose 就已经启动好了
查看运行的镜像:docker ps
三、查看容器的docker ip 地址
docker inspect -f '{{.Name}} - {{range .NetworkSettings.Networks}}{{.IPAddress}}{{end}}' $(docker ps -aq)
四、对nginx不能正常访问
把nginx.conf拷贝出来进行修改
server {
    listen       80;
    server_name  localhost;

    #access_log  /var/log/nginx/host.access.log  main;

    location / {
        root   /usr/share/nginx/html;
        index  index.html index.html index.htm;
    }

    #error_page  404              /404.html;

    # redirect server error pages to the static page /50x.html
    #
    error_page   500 502 503 504  /50x.html;
    location = /50x.html {
        root   /usr/share/nginx/html;
    }

    # proxy the PHP scripts to Apache listening on 127.0.0.1:80
    #
    #location ~ \.php$ {
    #    proxy_pass   http://127.0.0.1;
    #}

    # pass the PHP scripts to FastCGI server listening on 127.0.0.1:9000
    location ~ \.php$ {
        root      /usr/share/nginx/html;
        fastcgi_pass  172.20.0.2:9000;#此处需要填写你的php容器的docker内部通讯ip
        fastcgi_index index.php;
        fastcgi_param  SCRIPT_FILENAME  $document_root$fastcgi_script_name;
        fastcgi_param  SCRIPT_NAME      $fastcgi_script_name;
        include    fastcgi_params;
      }
    #
    #location ~ \.php$ {
    #    root           html;
    #    fastcgi_pass   127.0.0.1:9000;
    #    fastcgi_index  index.php;
    #    fastcgi_param  SCRIPT_FILENAME  /scripts$fastcgi_script_name;
    #    include        fastcgi_params;
    #}

    # deny access to .htaccess files, if Apache's document root
    # concurs with nginx's one
    #
    #location ~ /\.ht {
    #    deny  all;
    #}
}
修改完配置之后再导入docker里面
docker cp nginx.conf project_nginx_1:/etc/nginx/conf.d/default.conf对nginx容器进行重启
docker container stop project_nginx_1
docker container start project_nginx_1 #重启nginx容器使配置文件生效
容器内安装vim
apt update
apt install vim
localhost/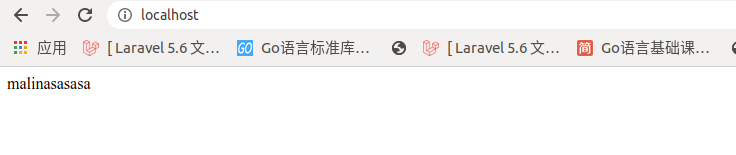
此时可以访问到/usr/share/nginx/html/index.html的内容
如果遇到可以访问html  不可以访问php
需要进入容器,查看/etc/nginx/conf.d/default.conf配置是否正确

访问文件时,html可以正常访问,php文件访问不了,不防换个浏览器试一下

fastcgi_pass 172.20.0.2:9000可更改为fastcgi_pass php-fpm:9000本作品采用《CC 协议》,转载必须注明作者和本文链接


 关于 LearnKu


推荐文章: