
 Laravel 简单开发指南
 本书未发布
3.1. 使用 JWT 处理 API 认证
介绍
就目前而言,比较常见的授权方式大概有以下几种:
- JWT 认证
- OAuth2 授权码模式认证
- 其他认证
这一小节我们主要介绍一下 JWT 认证。
安装 jwt 包
创建一个jwt_dev分支,用来区分其他认证方式;
$ git checkout -b jwt_dev安装tymon/jwt-auth包:
$ composer require tymon/jwt-auth:1.0.0-rc.5生成 jwt 的 secret ,运行下面命令会在.env文件中生成一个 secret:
$ php artisan jwt:secret相关配置
修改 config/auth.php,将 api guard的 driver 改为 jwt:
.
.
.

 'guards' => [
        'web' => [
            'driver' => 'session',
            'provider' => 'users',
        ],

        'api' => [
            'driver' => 'jwt',
            'provider' => 'users',
            'hash' => false,
        ],
    ],
.
.
.
user 模型需要继承 Tymon\JWTAuth\Contracts\JWTSubject 接口,并实现接口的两个方法 getJWTIdentifier()和 getJWTCustomClaims(),如下:
<?php

namespace  App\Models;

use Illuminate\Contracts\Auth\MustVerifyEmail;
use Illuminate\Foundation\Auth\User as Authenticatable;
use Illuminate\Notifications\Notifiable;
use Tymon\JWTAuth\Contracts\JWTSubject;

class User extends Authenticatable implements JWTSubject
{
    use Notifiable;

    /**
     * The attributes that are mass assignable.
     *
     * @var array
     */
    protected $fillable = [
        'name', 'email', 'password',
    ];

    /**
     * The attributes that should be hidden for arrays.
     *
     * @var array
     */
    protected $hidden = [
        'password', 'remember_token',
    ];

    /**
     * The attributes that should be cast to native types.
     *
     * @var array
     */
    protected $casts = [
        'email_verified_at' => 'datetime',
    ];

    /**
     * Get the identifier that will be stored in the subject claim of the JWT.
     *
     * @return mixed
     */
    public function getJWTIdentifier()
    {
        return $this->getKey();
    }

    /**
     * Return a key value array, containing any custom claims to be added to the JWT.
     *
     * @return array
     */
    public function getJWTCustomClaims()
    {
        return [];
    }
}
你可以运行下列命令发布配置文件,用来修改其他配置,我们这里使用默认值:
$ php artisan vendor:publish --provider="Tymon\JWTAuth\Providers\LaravelServiceProvider"编写逻辑代码
1. 编写路由
routes/api.php
<?php

use Illuminate\Http\Request;

/*
|--------------------------------------------------------------------------
| API Routes
|--------------------------------------------------------------------------
|
| Here is where you can register API routes for your application. These
| routes are loaded by the RouteServiceProvider within a group which
| is assigned the "api" middleware group. Enjoy building your API!
|
*/

Route::prefix('v1')->name('api.v1.')->namespace('Api')->group(function() {

    Route::post('login', 'AuthorizationsController@login');//登陆
    Route::group([
        'middleware' => 'jwt.auth',
        'prefix' => 'auth'
    ], function ($router) {
        Route::post('logout', 'AuthorizationsController@logout');//退出登陆
        Route::post('user_info', 'AuthorizationsController@userInfo');//用户信息
    });
    Route::middleware('jwt.auth')->group(function ($router) {
       //这里存放需要通过验证的路由
    });
});
2. 登陆相关
创建控制器,为了区分,我们把控制器放在api文件夹下:
$ php artisan make:controller Api/AuthorizationsController 创建验证表单类:
$ php artisan make:request AuthorizationRequest编写验证逻辑:
<?php

namespace App\Http\Requests;

use Illuminate\Foundation\Http\FormRequest;

class AuthorizationRequest extends FormRequest
{
    /**
     * Determine if the user is authorized to make this request.
     *
     * @return bool
     */
    public function authorize()
    {
        return true;
    }

    /**
     * Get the validation rules that apply to the request.
     *
     * @return array
     */
    public function rules()
    {
        return [
            'username' => 'required|string',
            'password' => 'required|alpha_dash|min:6',
        ];
    }
}
迁移表中添加phone字段:
.
.
.
 $table->string('phone')->unique();
 .
 .
 .
运行迁移:
$ php artisan migrate编写登陆逻辑:
<?php

namespace App\Http\Controllers\Api;

use App\Http\Controllers\Controller;
use App\Http\Requests\AuthorizationRequest;
use Illuminate\Http\Request;

class AuthorizationsController extends Controller
{
    /**
     * @param AuthorizationRequest $request
     * @return array|string[]
     */
    public function login(AuthorizationRequest $request){
        $username = $request->username;

        //php7.0新东西,FILTER_VALIDATE_EMAIL为php自带的email过滤器
        filter_var($username, FILTER_VALIDATE_EMAIL) ?
            $credentials['email'] = $username :
            $credentials['phone'] = $username;

        //接收传来的值
        $credentials['password']=$request->password;

        //验证密码是否正确
        if (!$token = \Auth::guard('api')->attempt($credentials)) {
            abort('用户账号或密码错误',403);
        }

        return response()->json([
            'access_token' => $token,
            'token_type' => 'Bearer',
            'expires_in' => \Auth::guard('api')->factory()->getTTL() * 60
        ])->setStatusCode(201);
    }
}
测试
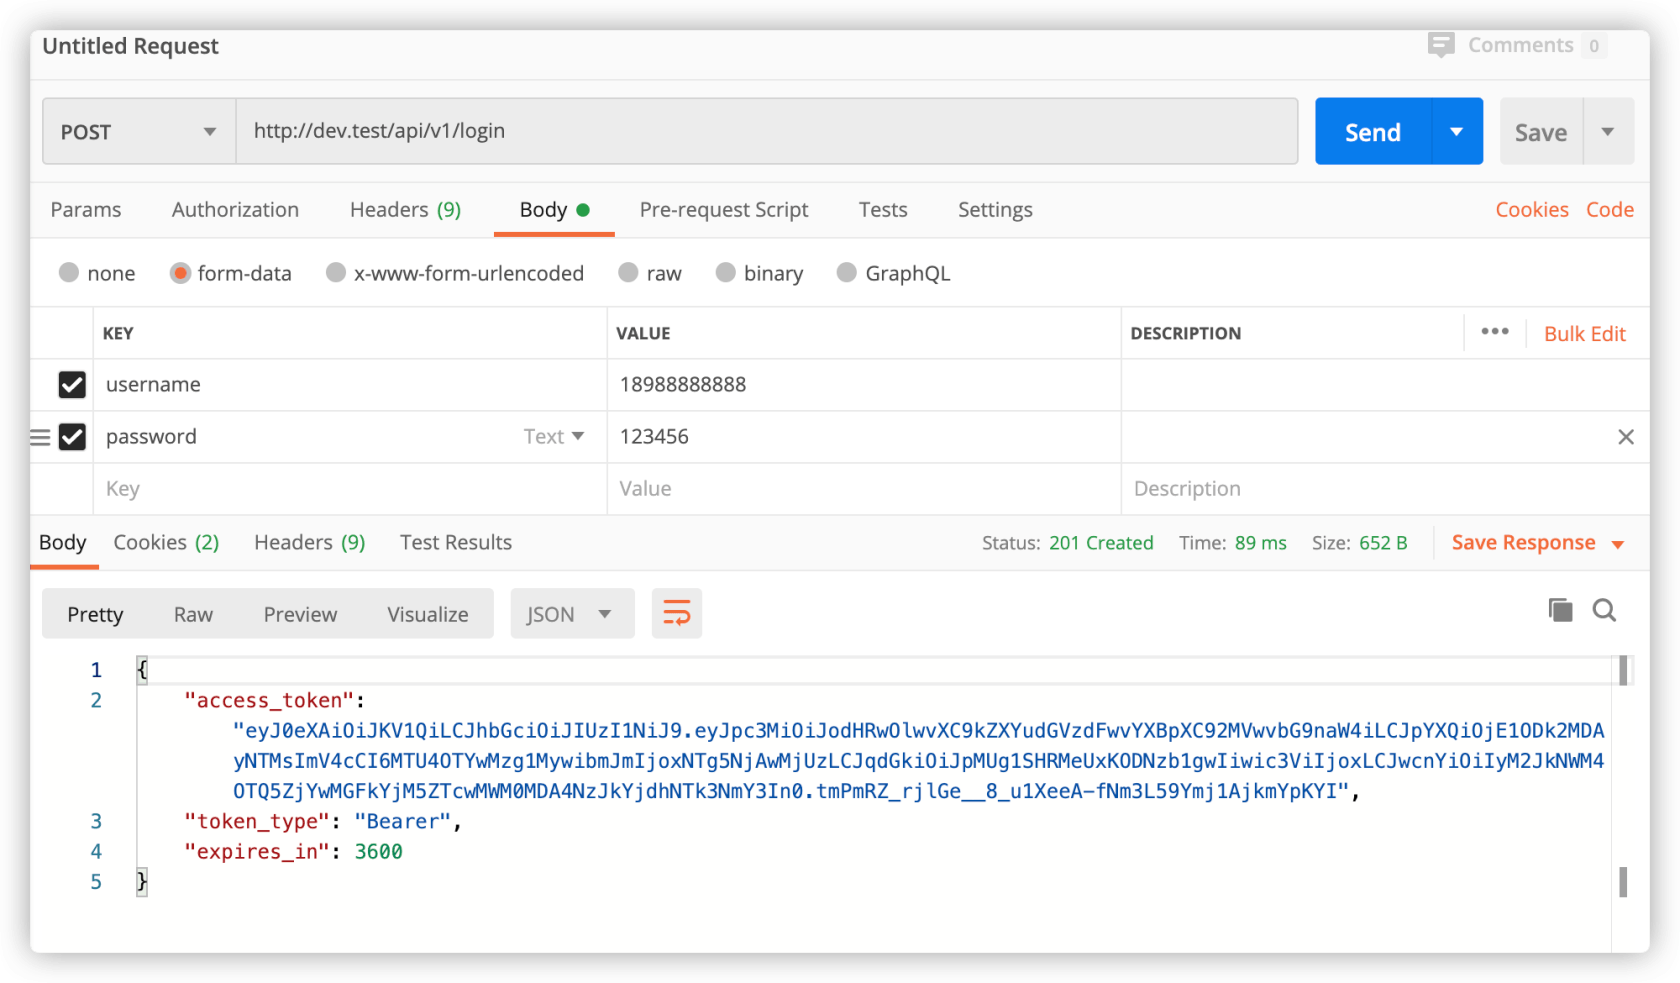
我默认录入了一个账号,结下来我们会用它进行测试。
获取token:
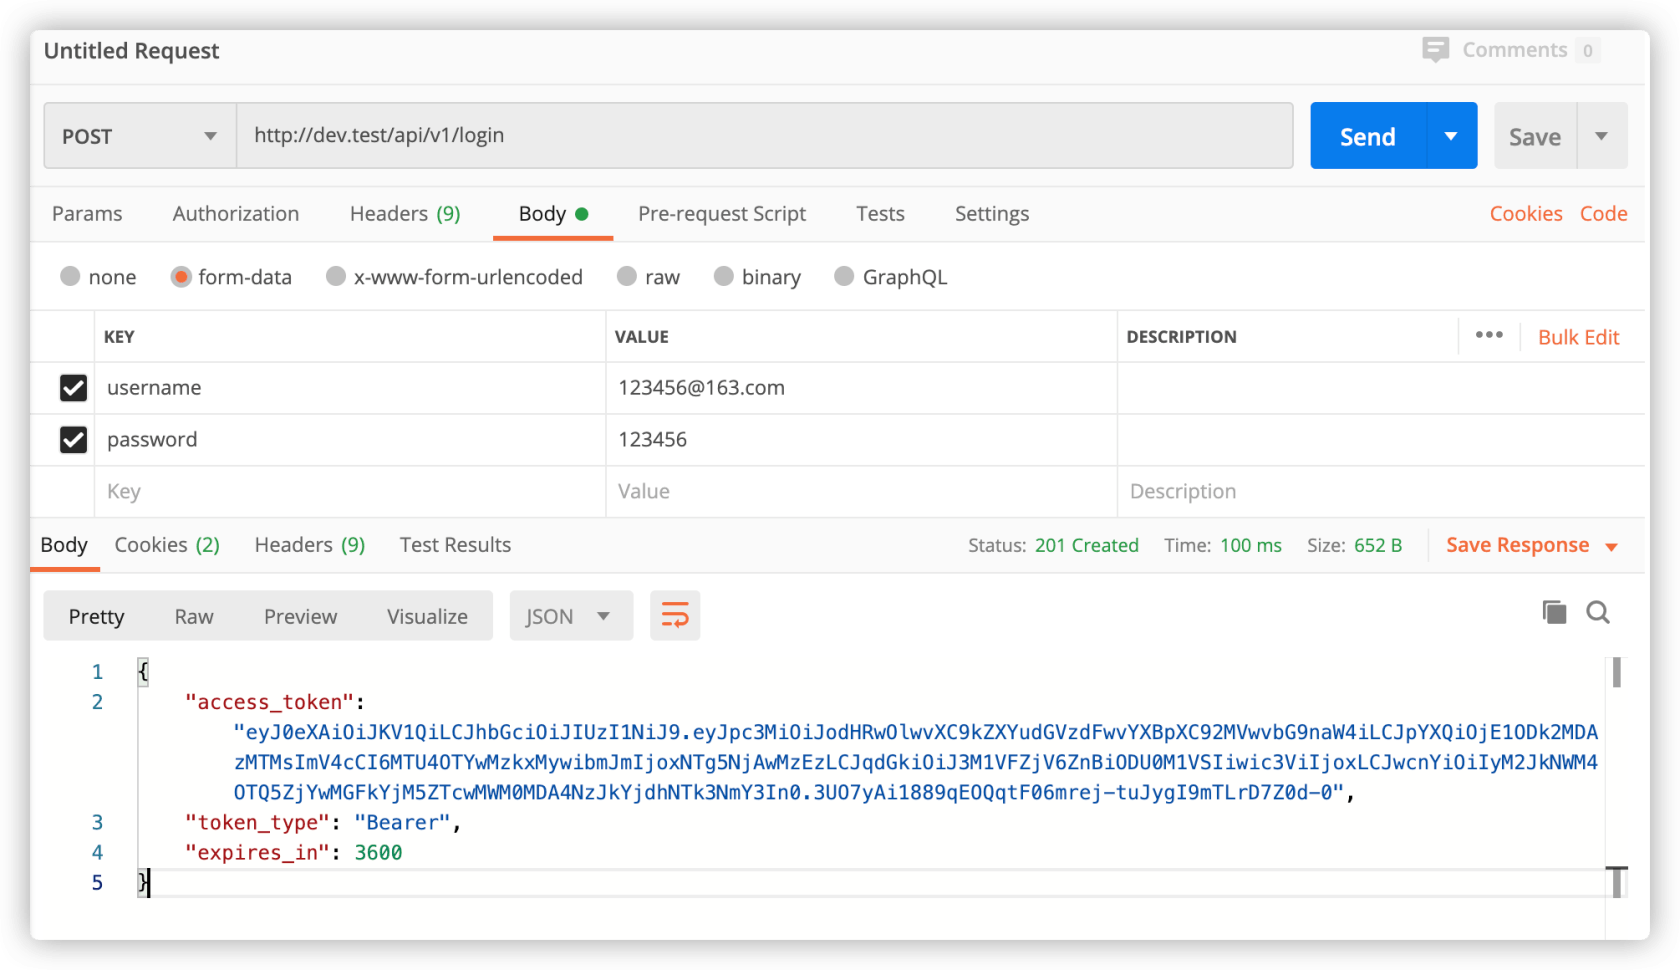
使用邮箱:
失败返回:

大家可以看到,返回并不友好,我们将在下一章中处理这个情况。
提交git
$ git add -A
$ git commit -m "JWT 做登陆认证"


 关于 LearnKu


推荐文章: