# 通知系统
- [简介](#introduction)
- [生成通知](#generating-notifications)
- [发送通知](#sending-notifications)
- [使用 Notifiable Trait](#using-the-notifiable-trait)
- [使用 Notification 门面](#using-the-notification-facade)
- [指定发送渠道](#specifying-delivery-channels)
- [队列通知](#queueing-notifications)
- [按需发送通知](#on-demand-notifications)
- [邮件通知](#mail-notifications)
- [格式化邮件消息](#formatting-mail-messages)
- [自定义发件人](#customizing-the-sender)
- [自定义收件人](#customizing-the-recipient)
- [自定义主题](#customizing-the-subject)
- [自定义邮件发送器](#customizing-the-mailer)
- [自定义模板](#customizing-the-templates)
- [附件](#mail-attachments)
- [添加标签和元数据](#adding-tags-metadata)
- [自定义 Symfony 消息](#customizing-the-symfony-message)
- [使用邮件类](#using-mailables)
- [预览邮件通知](#previewing-mail-notifications)
- [Markdown 邮件通知](#markdown-mail-notifications)
- [生成消息](#generating-the-message)
- [编写消息](#writing-the-message)
- [自定义组件](#customizing-the-components)
- [数据库通知](#database-notifications)
- [前提条件](#database-prerequisites)
- [格式化数据库通知](#formatting-database-notifications)
- [访问通知](#accessing-the-notifications)
- [标记通知为已读](#marking-notifications-as-read)
- [广播通知](#broadcast-notifications)
- [前提条件](#broadcast-prerequisites)
- [格式化广播通知](#formatting-broadcast-notifications)
- [监听通知](#listening-for-notifications)
- [短信通知](#sms-notifications)
- [前提条件](#sms-prerequisites)
- [格式化短信通知](#formatting-sms-notifications)
- [自定义发送号码](#customizing-the-from-number)
- [添加客户端引用](#adding-a-client-reference)
- [路由短信通知](#routing-sms-notifications)
- [Slack 通知](#slack-notifications)
- [前提条件](#slack-prerequisites)
- [格式化 Slack 通知](#formatting-slack-notifications)
- [Slack 交互功能](#slack-interactivity)
- [路由 Slack 通知](#routing-slack-notifications)
- [通知外部 Slack 工作区](#notifying-external-slack-workspaces)
- [本地化通知](#localizing-notifications)
- [测试](#testing)
- [通知事件](#notification-events)
- [自定义渠道](#custom-channels)
## 简介
除了支持 [发送邮件](/docs/laravel/13.x/mail),Laravel 还支持通过多种渠道发送通知,包括邮件、短信(通过 [Vonage](https://www.vonage.com/communications-apis/),原 Nexmo)和 [Slack](https://slack.com)。此外,社区还构建了多种 [通知渠道](https://laravel-notification-channels.com/about/#suggesting-a-new-channel),支持通过数十种不同渠道发送通知!通知也可以存储在数据库中,以便在 Web 界面中显示。
通常,通知应是简短的信息性消息,用于告知用户应用中发生的事情。例如,开发账单应用时,你可能会通过邮件和短信渠道向用户发送「发票已支付」通知。
## 生成通知
在 Laravel 中,每个通知由一个独立的类表示,通常存储在 `app/Notifications` 目录中。如果应用中没有这个目录,不必担心:运行 `make:notification` Artisan 命令时会自动创建它:
```shell
php artisan make:notification InvoicePaid
```
该命令会在 `app/Notifications` 目录中创建一个新的通知类。每个通知类都包含一个 `via` 方法,以及若干消息构建方法(如 `toMail` 或 `toDatabase`),用于将通知转换为适合特定渠道的消息。
## 发送通知
### 使用 Notifiable Trait
通知可以通过两种方式发送:使用 `Notifiable` trait 的 `notify` 方法,或使用 `Notification` [门面](/docs/laravel/13.x/facades)。应用的 `App\Models\User` 模型默认包含 `Notifiable` trait:
```php
notify(new InvoicePaid($invoice));
```
> [!NOTE]
> 请记住,你可以在任何模型上使用 `Notifiable` trait,并不仅限于 `User` 模型。
### 使用 Notification 门面
你也可以通过 `Notification` [门面](/docs/laravel/13.x/facades) 发送通知。当需要向多个可通知实体(如用户集合)发送通知时,这种方式很有用。要通过门面发送通知,请将所有可通知实体和通知实例传给 `send` 方法:
```php
use Illuminate\Support\Facades\Notification;
Notification::send($users, new InvoicePaid($invoice));
```
还可以使用 `sendNow` 方法立即发送通知。即使通知实现了 `ShouldQueue` 接口,该方法也会立即发送通知:
```php
Notification::sendNow($developers, new DeploymentCompleted($deployment));
```
### 指定发送渠道
每个通知类都有一个 `via` 方法,用于确定通知的发送渠道。通知可以通过 `mail`、`database`、`broadcast`、`vonage` 和 `slack` 渠道发送。
> [!NOTE]
> 如果想使用 Telegram 或 Pusher 等其他发送渠道,可以查看社区维护的 [Laravel Notification Channels 网站](http://laravel-notification-channels.com)。
`via` 方法接收一个 `$notifiable` 实例,即通知发送目标的类实例。你可以使用 `$notifiable` 来确定通知应通过哪些渠道发送:
```php
/**
* 获取通知的发送渠道。
*
* @return array
*/
public function via(object $notifiable): array
{
return $notifiable->prefers_sms ? ['vonage'] : ['mail', 'database'];
}
```
### 队列通知
> [!WARNING]
> 将通知加入队列之前,应先配置队列并 [启动队列工作进程](/docs/laravel/13.x/queues#running-the-queue-worker)。
发送通知可能需要一些时间,尤其是在渠道需要调用外部 API 时。为了加快应用的响应,可以让通知类实现 `ShouldQueue` 接口并使用 `Queueable` trait,将通知加入队列。使用 `make:notification` 命令生成的所有通知类都已导入该接口和 trait,因此你可以直接在通知类中使用它们:
```php
notify(new InvoicePaid($invoice));
```
将通知加入队列时,每个收件人和渠道的组合都会创建一个队列任务。例如,如果通知有三个收件人和两个渠道,就会向队列派发六个任务。
#### 延迟发送通知
如果想延迟发送通知,可以在实例化通知时链式调用 `delay` 方法:
```php
$delay = now()->plus(minutes: 10);
$user->notify((new InvoicePaid($invoice))->delay($delay));
```
你可以向 `delay` 方法传入数组,为特定渠道指定延迟时间:
```php
$user->notify((new InvoicePaid($invoice))->delay([
'mail' => now()->plus(minutes: 5),
'sms' => now()->plus(minutes: 10),
]));
```
也可以在通知类中定义 `withDelay` 方法。该方法应返回一个以渠道名称为键、延迟时间为值的数组:
```php
/**
* 确定通知的发送延迟时间。
*
* @return array
*/
public function withDelay(object $notifiable): array
{
return [
'mail' => now()->plus(minutes: 5),
'sms' => now()->plus(minutes: 10),
];
}
```
#### 自定义通知队列连接
默认情况下,队列通知使用应用的默认队列连接。如果想为某个通知指定其他连接,可以在通知的构造函数中调用 `onConnection` 方法:
```php
onConnection('redis');
}
}
```
如果想为通知支持的每个渠道指定队列连接,可以在通知类中定义 `viaConnections` 方法。该方法应返回一个以渠道名称为键、队列连接名称为值的数组:
```php
/**
* 确定每个通知渠道使用的连接。
*
* @return array
*/
public function viaConnections(): array
{
return [
'mail' => 'redis',
'database' => 'sync',
];
}
```
#### 自定义通知渠道队列
如果想为通知支持的每个渠道指定队列,可以在通知类中定义 `viaQueues` 方法。该方法应返回一个以渠道名称为键、队列名称为值的数组:
```php
/**
* 确定每个通知渠道使用的队列。
*
* @return array
*/
public function viaQueues(): array
{
return [
'mail' => 'mail-queue',
'slack' => 'slack-queue',
];
}
```
#### 自定义队列通知任务属性
你可以在通知类上定义队列属性,以自定义底层队列任务的行为。发送该通知的队列任务会继承这些属性:
```php
plus(minutes: 5);
}
```
> [!NOTE]
> 有关这些任务属性和方法的更多信息,请参阅 [队列任务](/docs/laravel/13.x/queues#max-job-attempts-and-timeout) 文档。
#### 队列通知中间件
队列通知可以 [像队列任务一样](/docs/laravel/13.x/queues#job-middleware) 定义中间件。首先,在通知类中定义 `middleware` 方法。该方法会接收 `$notifiable` 和 `$channel` 变量,让你可以根据通知的发送目标自定义返回的中间件:
```php
use Illuminate\Queue\Middleware\RateLimited;
/**
* 获取通知任务应通过的中间件。
*
* @return array
*/
public function middleware(object $notifiable, string $channel)
{
return match ($channel) {
'mail' => [new RateLimited('postmark')],
'slack' => [new RateLimited('slack')],
default => [],
};
}
```
#### 队列通知与数据库事务
在数据库事务中派发队列通知时,队列可能会在事务提交前就处理通知。此时,事务中对模型或数据库记录的更新可能尚未反映到数据库中。此外,事务中创建的模型或记录可能还不存在于数据库中。如果通知依赖这些模型,处理发送通知的队列任务时就可能发生意外错误。
如果队列连接的 `after_commit` 配置选项设为 `false`,你仍可以在发送通知时调用 `afterCommit` 方法,指定某个队列通知应在所有尚未提交的数据库事务提交后才派发:
```php
use App\Notifications\InvoicePaid;
$user->notify((new InvoicePaid($invoice))->afterCommit());
```
也可以在通知类的构造函数中调用 `afterCommit` 方法:
```php
afterCommit();
}
}
```
> [!NOTE]
> 要了解如何解决这些问题,请参阅 [队列任务与数据库事务](/docs/laravel/13.x/queues#jobs-and-database-transactions) 文档。
#### 判断队列通知是否应发送
队列通知被派发到队列进行后台处理后,通常会由队列工作进程接收,并发送给预期的收件人。
不过,如果想在队列工作进程处理通知时最终决定是否发送,可以在通知类中定义 `shouldSend` 方法。如果该方法返回 `false`,通知就不会发送:
```php
/**
* 判断是否应发送通知。
*/
public function shouldSend(object $notifiable, string $channel): bool
{
return $this->invoice->isPaid();
}
```
#### 通知发送后
如果想在通知发送后执行代码,可以在通知类中定义 `afterSending` 方法。该方法会接收可通知实体、渠道名称及渠道返回的响应:
```php
/**
* 处理已发送的通知。
*/
public function afterSending(object $notifiable, string $channel, mixed $response): void
{
// ...
}
```
### 按需发送通知
有时,你需要向未存储为应用「用户」的人发送通知。使用 `Notification` 门面的 `route` 方法,可以在发送通知前指定临时的通知路由信息:
```php
use Illuminate\Broadcasting\Channel;
use Illuminate\Support\Facades\Notification;
Notification::route('mail', 'taylor@example.com')
->route('vonage', '5555555555')
->route('slack', '#slack-channel')
->route('broadcast', [new Channel('channel-name')])
->notify(new InvoicePaid($invoice));
```
向 `mail` 路由发送按需通知时,如果想提供收件人姓名,可以传入一个数组,其第一个元素以邮箱地址为键、姓名为值:
```php
Notification::route('mail', [
'barrett@example.com' => 'Barrett Blair',
])->notify(new InvoicePaid($invoice));
```
使用 `routes` 方法,可以一次性为多个通知渠道提供临时路由信息:
```php
Notification::routes([
'mail' => ['barrett@example.com' => 'Barrett Blair'],
'vonage' => '5555555555',
])->notify(new InvoicePaid($invoice));
```
## 邮件通知
### 格式化邮件消息
如果通知支持通过邮件发送,应在通知类中定义 `toMail` 方法。该方法接收一个 `$notifiable` 实体,并应返回 `Illuminate\Notifications\Messages\MailMessage` 实例。
`MailMessage` 类提供了几个简单的方法,帮助你构建事务性邮件。邮件消息可以包含文本行和「操作按钮」。下面是一个 `toMail` 方法的示例:
```php
/**
* 获取通知的邮件表示。
*/
public function toMail(object $notifiable): MailMessage
{
$url = url('/invoice/'.$this->invoice->id);
return (new MailMessage)
->greeting('Hello!')
->line('One of your invoices has been paid!')
->lineIf($this->amount > 0, "Amount paid: {$this->amount}")
->action('View Invoice', $url)
->line('Thank you for using our application!');
}
```
> [!NOTE]
> 请注意,我们在 `toMail` 方法中使用了 `$this->invoice->id`。你可以通过通知的构造函数传入生成消息所需的任何数据。
在这个示例中,我们添加了问候语、一行文本、一个操作按钮,以及另一行文本。`MailMessage` 对象提供的方法让简单事务性邮件的格式化变得快捷方便。邮件渠道会将这些消息组件转换为美观、响应式的 HTML 邮件模板,并生成对应的纯文本版本。下面是 `mail` 渠道生成的邮件示例:
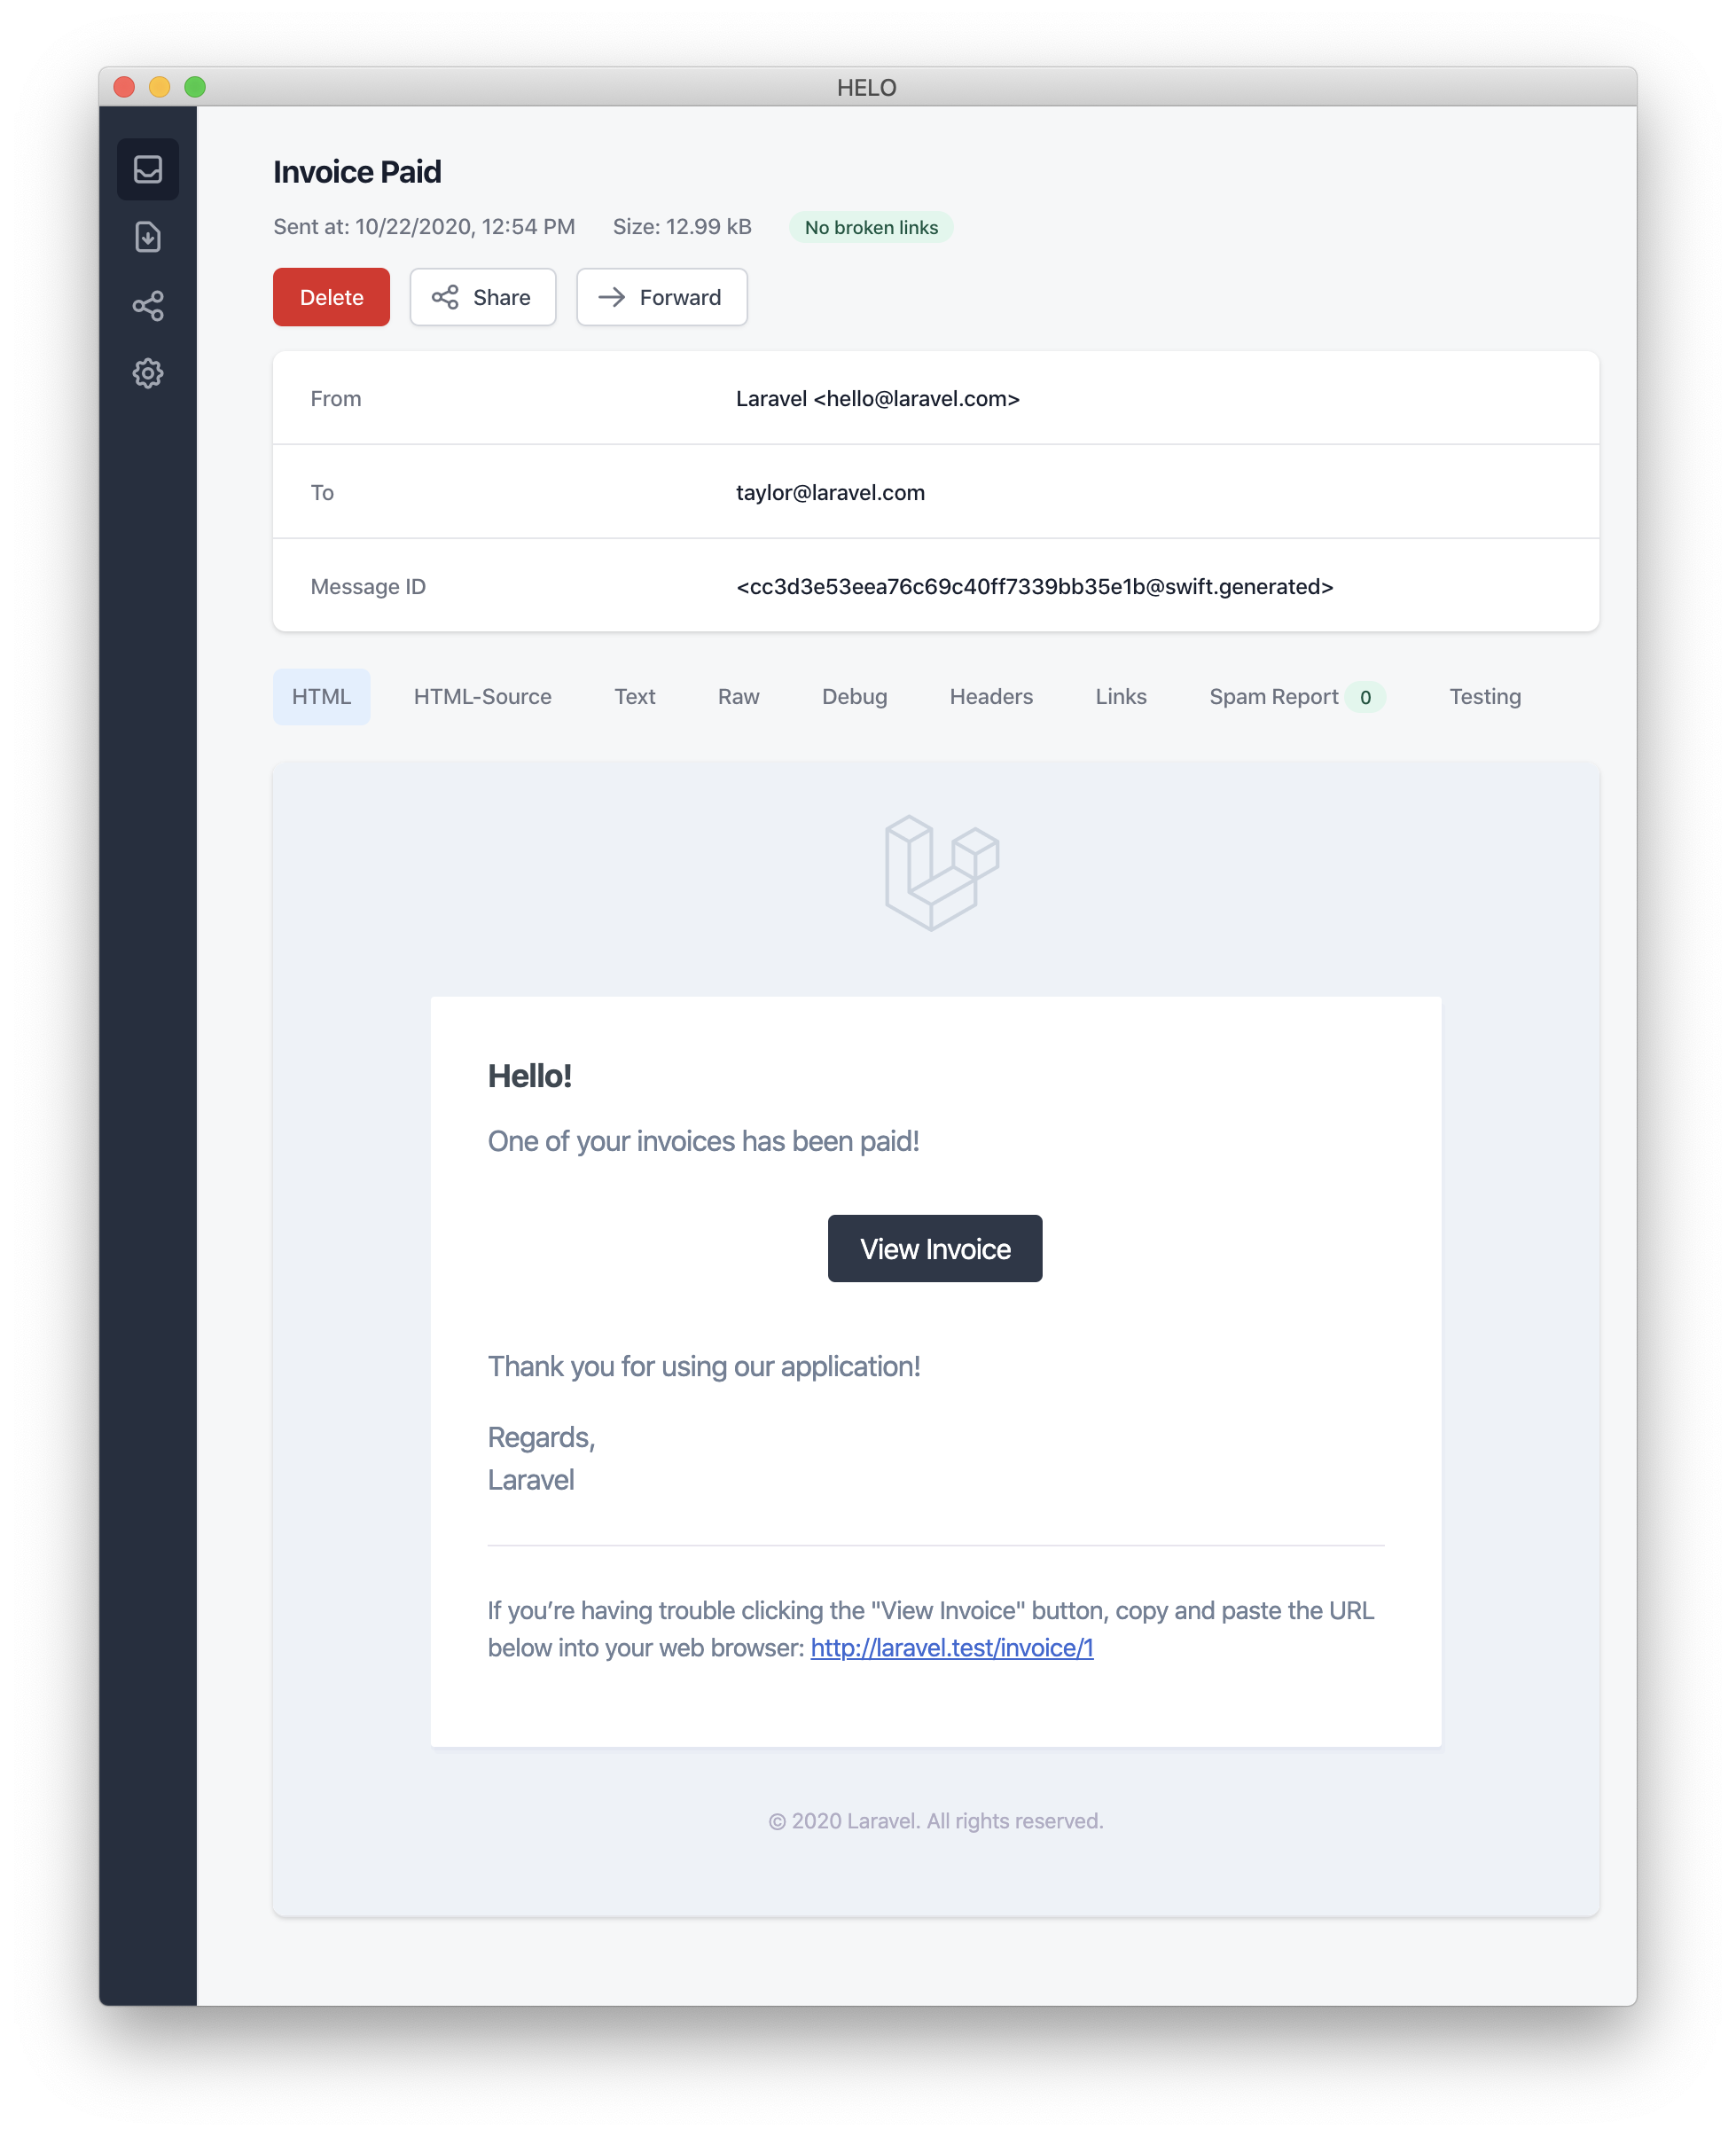 > [!NOTE]
> 发送邮件通知时,请确保在 `config/app.php` 配置文件中设置 `name` 选项。该值会用于邮件通知的页头和页脚。
#### 错误消息
有些通知用于告知用户发生了错误,例如发票支付失败。构建邮件消息时,可以调用 `error` 方法来表明这是一封错误通知。使用该方法后,操作按钮会由黑色变为红色:
```php
/**
* 获取通知的邮件表示。
*/
public function toMail(object $notifiable): MailMessage
{
return (new MailMessage)
->error()
->subject('Invoice Payment Failed')
->line('...');
}
```
#### 其他邮件通知格式化选项
你可以不在通知类中定义文本「行」,而是使用 `view` 方法指定用于渲染通知邮件的自定义模板:
```php
/**
* 获取通知的邮件表示。
*/
public function toMail(object $notifiable): MailMessage
{
return (new MailMessage)->view(
'mail.invoice.paid', ['invoice' => $this->invoice]
);
}
```
传给 `view` 方法的数组中,第二个元素可以指定纯文本视图名称,为邮件消息提供纯文本版本:
```php
/**
* 获取通知的邮件表示。
*/
public function toMail(object $notifiable): MailMessage
{
return (new MailMessage)->view(
['mail.invoice.paid', 'mail.invoice.paid-text'],
['invoice' => $this->invoice]
);
}
```
如果消息只有纯文本视图,可以使用 `text` 方法:
```php
/**
* 获取通知的邮件表示。
*/
public function toMail(object $notifiable): MailMessage
{
return (new MailMessage)->text(
'mail.invoice.paid-text', ['invoice' => $this->invoice]
);
}
```
### 自定义发件人
默认情况下,邮件的发件人 / from 地址在 `config/mail.php` 配置文件中定义。不过,你可以使用 `from` 方法为特定通知指定发件人地址:
```php
/**
* 获取通知的邮件表示。
*/
public function toMail(object $notifiable): MailMessage
{
return (new MailMessage)
->from('barrett@example.com', 'Barrett Blair')
->line('...');
}
```
### 自定义收件人
通过 `mail` 渠道发送通知时,通知系统会自动查找可通知实体的 `email` 属性。你可以在可通知实体上定义 `routeNotificationForMail` 方法,自定义接收通知的邮箱地址:
```php
|string
*/
public function routeNotificationForMail(Notification $notification): array|string
{
// 仅返回邮箱地址……
return $this->email_address;
// 返回邮箱地址和姓名……
return [$this->email_address => $this->name];
}
}
```
### 自定义主题
默认情况下,邮件主题是将通知类名转换为「标题格式」后的结果。例如,通知类名为 `InvoicePaid` 时,邮件主题就是 `Invoice Paid`。如果想指定其他主题,可以在构建消息时调用 `subject` 方法:
```php
/**
* 获取通知的邮件表示。
*/
public function toMail(object $notifiable): MailMessage
{
return (new MailMessage)
->subject('Notification Subject')
->line('...');
}
```
### 自定义邮件发送器
默认情况下,邮件通知使用 `config/mail.php` 配置文件中定义的默认邮件发送器。不过,你可以在构建消息时调用 `mailer` 方法,在运行时指定其他邮件发送器:
```php
/**
* 获取通知的邮件表示。
*/
public function toMail(object $notifiable): MailMessage
{
return (new MailMessage)
->mailer('postmark')
->line('...');
}
```
### 自定义模板
你可以发布通知包的资源,以修改邮件通知使用的 HTML 和纯文本模板。运行以下命令后,邮件通知模板会位于 `resources/views/vendor/notifications` 目录中:
```shell
php artisan vendor:publish --tag=laravel-notifications
```
### 附件
要为邮件通知添加附件,请在构建消息时使用 `attach` 方法。该方法的第一个参数接受文件的绝对路径:
```php
/**
* 获取通知的邮件表示。
*/
public function toMail(object $notifiable): MailMessage
{
return (new MailMessage)
->greeting('Hello!')
->attach('/path/to/file');
}
```
> [!NOTE]
> 通知邮件消息提供的 `attach` 方法也接受 [可附加对象](/docs/laravel/13.x/mail#attachable-objects)。请参阅完整的 [可附加对象文档](/docs/laravel/13.x/mail#attachable-objects) 了解更多信息。
为消息添加附件时,还可以将一个 `array` 作为 `attach` 方法的第二个参数,指定显示名称和 / 或 MIME 类型:
```php
/**
* 获取通知的邮件表示。
*/
public function toMail(object $notifiable): MailMessage
{
return (new MailMessage)
->greeting('Hello!')
->attach('/path/to/file', [
'as' => 'name.pdf',
'mime' => 'application/pdf',
]);
}
```
需要时,可以使用 `attachMany` 方法为消息添加多个附件:
```php
/**
* 获取通知的邮件表示。
*/
public function toMail(object $notifiable): MailMessage
{
return (new MailMessage)
->greeting('Hello!')
->attachMany([
'/path/to/forge.svg',
'/path/to/vapor.svg' => [
'as' => 'Logo.svg',
'mime' => 'image/svg+xml',
],
]);
}
```
你可以使用 `attachFromStorageDisk` 方法附加存储在特定 [文件系统磁盘](/docs/laravel/13.x/filesystem) 上的文件。该方法接受磁盘名称和文件在磁盘上的路径:
```php
use App\Mail\InvoicePaid as InvoicePaidMailable;
/**
* 获取通知的邮件表示。
*/
public function toMail(object $notifiable): Mailable
{
return (new InvoicePaidMailable($this->invoice))
->to($notifiable->email)
->attachFromStorageDisk('s3', '/path/to/file', 'invoice.pdf', [
'mime' => 'application/pdf',
]);
}
```
#### 原始数据附件
`attachData` 方法可以将原始字节字符串作为附件。调用该方法时,需要提供分配给附件的文件名:
```php
/**
* 获取通知的邮件表示。
*/
public function toMail(object $notifiable): MailMessage
{
return (new MailMessage)
->greeting('Hello!')
->attachData($this->pdf, 'name.pdf', [
'mime' => 'application/pdf',
]);
}
```
### 添加标签和元数据
一些第三方邮件服务商(如 Mailgun 和 Postmark)支持消息「标签」和「元数据」,可用于对应用发送的邮件进行分组和追踪。你可以通过 `tag` 和 `metadata` 方法为邮件消息添加标签和元数据:
```php
/**
* 获取通知的邮件表示。
*/
public function toMail(object $notifiable): MailMessage
{
return (new MailMessage)
->greeting('Comment Upvoted!')
->tag('upvote')
->metadata('comment_id', $this->comment->id);
}
```
如果应用使用 Mailgun 驱动,可以查阅 Mailgun 文档,了解 [标签](https://documentation.mailgun.com/docs/mailgun/user-manual/tracking-messages/#tags) 和 [元数据](https://documentation.mailgun.com/docs/mailgun/user-manual/sending-messages/#attaching-metadata-to-messages) 的更多信息。同样,也可以查阅 Postmark 文档,了解其对 [标签](https://postmarkapp.com/blog/tags-support-for-smtp) 和 [元数据](https://postmarkapp.com/support/article/1125-custom-metadata-faq) 的支持。
如果应用使用 Amazon SES 发送邮件,应使用 `metadata` 方法为消息添加 [SES「标签」](https://docs.aws.amazon.com/ses/latest/APIReference/API_MessageTag.html)。
### 自定义 Symfony 消息
`MailMessage` 类的 `withSymfonyMessage` 方法允许注册一个闭包,在发送消息前调用,并将 Symfony 消息实例传给闭包。这让你能够在消息投递前对其进行深度定制:
```php
use Symfony\Component\Mime\Email;
/**
* 获取通知的邮件表示。
*/
public function toMail(object $notifiable): MailMessage
{
return (new MailMessage)
->withSymfonyMessage(function (Email $message) {
$message->getHeaders()->addTextHeader(
'Custom-Header', 'Header Value'
);
});
}
```
### 使用邮件类
需要时,可以从通知的 `toMail` 方法返回一个完整的 [邮件对象](/docs/laravel/13.x/mail)。返回 `Mailable` 而非 `MailMessage` 时,需要使用邮件对象的 `to` 方法指定收件人:
```php
use App\Mail\InvoicePaid as InvoicePaidMailable;
use Illuminate\Mail\Mailable;
/**
* 获取通知的邮件表示。
*/
public function toMail(object $notifiable): Mailable
{
return (new InvoicePaidMailable($this->invoice))
->to($notifiable->email);
}
```
#### 邮件类与按需通知
发送 [按需通知](#on-demand-notifications) 时,传给 `toMail` 方法的 `$notifiable` 是 `Illuminate\Notifications\AnonymousNotifiable` 实例。该类提供了 `routeNotificationFor` 方法,可用于获取按需通知的收件邮箱地址:
```php
use App\Mail\InvoicePaid as InvoicePaidMailable;
use Illuminate\Notifications\AnonymousNotifiable;
use Illuminate\Mail\Mailable;
/**
* 获取通知的邮件表示。
*/
public function toMail(object $notifiable): Mailable
{
$address = $notifiable instanceof AnonymousNotifiable
? $notifiable->routeNotificationFor('mail')
: $notifiable->email;
return (new InvoicePaidMailable($this->invoice))
->to($address);
}
```
### 预览邮件通知
设计邮件通知模板时,像普通 Blade 模板一样在浏览器中快速预览渲染后的邮件会很方便。因此,Laravel 允许你直接从路由闭包或控制器返回邮件通知生成的任意邮件消息。返回的 `MailMessage` 会被渲染并显示在浏览器中,让你无需发送到真实邮箱就能快速预览其设计:
```php
use App\Models\Invoice;
use App\Notifications\InvoicePaid;
Route::get('/notification', function () {
$invoice = Invoice::find(1);
return (new InvoicePaid($invoice))
->toMail($invoice->user);
});
```
## Markdown 邮件通知
Markdown 邮件通知让你既能利用邮件通知预先构建的模板,又能更自由地编写较长的自定义消息。由于消息使用 Markdown 编写,Laravel 能够将其渲染为美观、响应式的 HTML 模板,同时自动生成对应的纯文本版本。
### 生成消息
要生成带有对应 Markdown 模板的通知,可以使用 `make:notification` Artisan 命令的 `--markdown` 选项:
```shell
php artisan make:notification InvoicePaid --markdown=mail.invoice.paid
```
与其他邮件通知一样,使用 Markdown 模板的通知应在通知类中定义 `toMail` 方法。不过,应使用 `markdown` 方法指定 Markdown 模板名称,而不是用 `line` 和 `action` 方法构建通知。要提供给模板的数据数组,可以作为该方法的第二个参数传入:
```php
/**
* 获取通知的邮件表示。
*/
public function toMail(object $notifiable): MailMessage
{
$url = url('/invoice/'.$this->invoice->id);
return (new MailMessage)
->subject('Invoice Paid')
->markdown('mail.invoice.paid', ['url' => $url]);
}
```
### 编写消息
Markdown 邮件通知结合了 Blade 组件和 Markdown 语法,让你可以轻松构建通知,同时使用 Laravel 预先构建的通知组件:
```blade
# Invoice Paid
Your invoice has been paid!
View Invoice
Thanks,
> [!NOTE]
> 发送邮件通知时,请确保在 `config/app.php` 配置文件中设置 `name` 选项。该值会用于邮件通知的页头和页脚。
#### 错误消息
有些通知用于告知用户发生了错误,例如发票支付失败。构建邮件消息时,可以调用 `error` 方法来表明这是一封错误通知。使用该方法后,操作按钮会由黑色变为红色:
```php
/**
* 获取通知的邮件表示。
*/
public function toMail(object $notifiable): MailMessage
{
return (new MailMessage)
->error()
->subject('Invoice Payment Failed')
->line('...');
}
```
#### 其他邮件通知格式化选项
你可以不在通知类中定义文本「行」,而是使用 `view` 方法指定用于渲染通知邮件的自定义模板:
```php
/**
* 获取通知的邮件表示。
*/
public function toMail(object $notifiable): MailMessage
{
return (new MailMessage)->view(
'mail.invoice.paid', ['invoice' => $this->invoice]
);
}
```
传给 `view` 方法的数组中,第二个元素可以指定纯文本视图名称,为邮件消息提供纯文本版本:
```php
/**
* 获取通知的邮件表示。
*/
public function toMail(object $notifiable): MailMessage
{
return (new MailMessage)->view(
['mail.invoice.paid', 'mail.invoice.paid-text'],
['invoice' => $this->invoice]
);
}
```
如果消息只有纯文本视图,可以使用 `text` 方法:
```php
/**
* 获取通知的邮件表示。
*/
public function toMail(object $notifiable): MailMessage
{
return (new MailMessage)->text(
'mail.invoice.paid-text', ['invoice' => $this->invoice]
);
}
```
### 自定义发件人
默认情况下,邮件的发件人 / from 地址在 `config/mail.php` 配置文件中定义。不过,你可以使用 `from` 方法为特定通知指定发件人地址:
```php
/**
* 获取通知的邮件表示。
*/
public function toMail(object $notifiable): MailMessage
{
return (new MailMessage)
->from('barrett@example.com', 'Barrett Blair')
->line('...');
}
```
### 自定义收件人
通过 `mail` 渠道发送通知时,通知系统会自动查找可通知实体的 `email` 属性。你可以在可通知实体上定义 `routeNotificationForMail` 方法,自定义接收通知的邮箱地址:
```php
|string
*/
public function routeNotificationForMail(Notification $notification): array|string
{
// 仅返回邮箱地址……
return $this->email_address;
// 返回邮箱地址和姓名……
return [$this->email_address => $this->name];
}
}
```
### 自定义主题
默认情况下,邮件主题是将通知类名转换为「标题格式」后的结果。例如,通知类名为 `InvoicePaid` 时,邮件主题就是 `Invoice Paid`。如果想指定其他主题,可以在构建消息时调用 `subject` 方法:
```php
/**
* 获取通知的邮件表示。
*/
public function toMail(object $notifiable): MailMessage
{
return (new MailMessage)
->subject('Notification Subject')
->line('...');
}
```
### 自定义邮件发送器
默认情况下,邮件通知使用 `config/mail.php` 配置文件中定义的默认邮件发送器。不过,你可以在构建消息时调用 `mailer` 方法,在运行时指定其他邮件发送器:
```php
/**
* 获取通知的邮件表示。
*/
public function toMail(object $notifiable): MailMessage
{
return (new MailMessage)
->mailer('postmark')
->line('...');
}
```
### 自定义模板
你可以发布通知包的资源,以修改邮件通知使用的 HTML 和纯文本模板。运行以下命令后,邮件通知模板会位于 `resources/views/vendor/notifications` 目录中:
```shell
php artisan vendor:publish --tag=laravel-notifications
```
### 附件
要为邮件通知添加附件,请在构建消息时使用 `attach` 方法。该方法的第一个参数接受文件的绝对路径:
```php
/**
* 获取通知的邮件表示。
*/
public function toMail(object $notifiable): MailMessage
{
return (new MailMessage)
->greeting('Hello!')
->attach('/path/to/file');
}
```
> [!NOTE]
> 通知邮件消息提供的 `attach` 方法也接受 [可附加对象](/docs/laravel/13.x/mail#attachable-objects)。请参阅完整的 [可附加对象文档](/docs/laravel/13.x/mail#attachable-objects) 了解更多信息。
为消息添加附件时,还可以将一个 `array` 作为 `attach` 方法的第二个参数,指定显示名称和 / 或 MIME 类型:
```php
/**
* 获取通知的邮件表示。
*/
public function toMail(object $notifiable): MailMessage
{
return (new MailMessage)
->greeting('Hello!')
->attach('/path/to/file', [
'as' => 'name.pdf',
'mime' => 'application/pdf',
]);
}
```
需要时,可以使用 `attachMany` 方法为消息添加多个附件:
```php
/**
* 获取通知的邮件表示。
*/
public function toMail(object $notifiable): MailMessage
{
return (new MailMessage)
->greeting('Hello!')
->attachMany([
'/path/to/forge.svg',
'/path/to/vapor.svg' => [
'as' => 'Logo.svg',
'mime' => 'image/svg+xml',
],
]);
}
```
你可以使用 `attachFromStorageDisk` 方法附加存储在特定 [文件系统磁盘](/docs/laravel/13.x/filesystem) 上的文件。该方法接受磁盘名称和文件在磁盘上的路径:
```php
use App\Mail\InvoicePaid as InvoicePaidMailable;
/**
* 获取通知的邮件表示。
*/
public function toMail(object $notifiable): Mailable
{
return (new InvoicePaidMailable($this->invoice))
->to($notifiable->email)
->attachFromStorageDisk('s3', '/path/to/file', 'invoice.pdf', [
'mime' => 'application/pdf',
]);
}
```
#### 原始数据附件
`attachData` 方法可以将原始字节字符串作为附件。调用该方法时,需要提供分配给附件的文件名:
```php
/**
* 获取通知的邮件表示。
*/
public function toMail(object $notifiable): MailMessage
{
return (new MailMessage)
->greeting('Hello!')
->attachData($this->pdf, 'name.pdf', [
'mime' => 'application/pdf',
]);
}
```
### 添加标签和元数据
一些第三方邮件服务商(如 Mailgun 和 Postmark)支持消息「标签」和「元数据」,可用于对应用发送的邮件进行分组和追踪。你可以通过 `tag` 和 `metadata` 方法为邮件消息添加标签和元数据:
```php
/**
* 获取通知的邮件表示。
*/
public function toMail(object $notifiable): MailMessage
{
return (new MailMessage)
->greeting('Comment Upvoted!')
->tag('upvote')
->metadata('comment_id', $this->comment->id);
}
```
如果应用使用 Mailgun 驱动,可以查阅 Mailgun 文档,了解 [标签](https://documentation.mailgun.com/docs/mailgun/user-manual/tracking-messages/#tags) 和 [元数据](https://documentation.mailgun.com/docs/mailgun/user-manual/sending-messages/#attaching-metadata-to-messages) 的更多信息。同样,也可以查阅 Postmark 文档,了解其对 [标签](https://postmarkapp.com/blog/tags-support-for-smtp) 和 [元数据](https://postmarkapp.com/support/article/1125-custom-metadata-faq) 的支持。
如果应用使用 Amazon SES 发送邮件,应使用 `metadata` 方法为消息添加 [SES「标签」](https://docs.aws.amazon.com/ses/latest/APIReference/API_MessageTag.html)。
### 自定义 Symfony 消息
`MailMessage` 类的 `withSymfonyMessage` 方法允许注册一个闭包,在发送消息前调用,并将 Symfony 消息实例传给闭包。这让你能够在消息投递前对其进行深度定制:
```php
use Symfony\Component\Mime\Email;
/**
* 获取通知的邮件表示。
*/
public function toMail(object $notifiable): MailMessage
{
return (new MailMessage)
->withSymfonyMessage(function (Email $message) {
$message->getHeaders()->addTextHeader(
'Custom-Header', 'Header Value'
);
});
}
```
### 使用邮件类
需要时,可以从通知的 `toMail` 方法返回一个完整的 [邮件对象](/docs/laravel/13.x/mail)。返回 `Mailable` 而非 `MailMessage` 时,需要使用邮件对象的 `to` 方法指定收件人:
```php
use App\Mail\InvoicePaid as InvoicePaidMailable;
use Illuminate\Mail\Mailable;
/**
* 获取通知的邮件表示。
*/
public function toMail(object $notifiable): Mailable
{
return (new InvoicePaidMailable($this->invoice))
->to($notifiable->email);
}
```
#### 邮件类与按需通知
发送 [按需通知](#on-demand-notifications) 时,传给 `toMail` 方法的 `$notifiable` 是 `Illuminate\Notifications\AnonymousNotifiable` 实例。该类提供了 `routeNotificationFor` 方法,可用于获取按需通知的收件邮箱地址:
```php
use App\Mail\InvoicePaid as InvoicePaidMailable;
use Illuminate\Notifications\AnonymousNotifiable;
use Illuminate\Mail\Mailable;
/**
* 获取通知的邮件表示。
*/
public function toMail(object $notifiable): Mailable
{
$address = $notifiable instanceof AnonymousNotifiable
? $notifiable->routeNotificationFor('mail')
: $notifiable->email;
return (new InvoicePaidMailable($this->invoice))
->to($address);
}
```
### 预览邮件通知
设计邮件通知模板时,像普通 Blade 模板一样在浏览器中快速预览渲染后的邮件会很方便。因此,Laravel 允许你直接从路由闭包或控制器返回邮件通知生成的任意邮件消息。返回的 `MailMessage` 会被渲染并显示在浏览器中,让你无需发送到真实邮箱就能快速预览其设计:
```php
use App\Models\Invoice;
use App\Notifications\InvoicePaid;
Route::get('/notification', function () {
$invoice = Invoice::find(1);
return (new InvoicePaid($invoice))
->toMail($invoice->user);
});
```
## Markdown 邮件通知
Markdown 邮件通知让你既能利用邮件通知预先构建的模板,又能更自由地编写较长的自定义消息。由于消息使用 Markdown 编写,Laravel 能够将其渲染为美观、响应式的 HTML 模板,同时自动生成对应的纯文本版本。
### 生成消息
要生成带有对应 Markdown 模板的通知,可以使用 `make:notification` Artisan 命令的 `--markdown` 选项:
```shell
php artisan make:notification InvoicePaid --markdown=mail.invoice.paid
```
与其他邮件通知一样,使用 Markdown 模板的通知应在通知类中定义 `toMail` 方法。不过,应使用 `markdown` 方法指定 Markdown 模板名称,而不是用 `line` 和 `action` 方法构建通知。要提供给模板的数据数组,可以作为该方法的第二个参数传入:
```php
/**
* 获取通知的邮件表示。
*/
public function toMail(object $notifiable): MailMessage
{
$url = url('/invoice/'.$this->invoice->id);
return (new MailMessage)
->subject('Invoice Paid')
->markdown('mail.invoice.paid', ['url' => $url]);
}
```
### 编写消息
Markdown 邮件通知结合了 Blade 组件和 Markdown 语法,让你可以轻松构建通知,同时使用 Laravel 预先构建的通知组件:
```blade
# Invoice Paid
Your invoice has been paid!
View Invoice
Thanks,
{{ config('app.name') }}
```
> [!NOTE]
> 编写 Markdown 邮件时,不要使用多余的缩进。根据 Markdown 标准,解析器会将缩进内容渲染为代码块。
#### 按钮组件
按钮组件会渲染一个居中的按钮链接。该组件接受两个参数:`url` 和可选的 `color`。支持的颜色有 `primary`、`green` 和 `red`。你可以在通知中添加任意数量的按钮组件:
```blade
View Invoice
```
#### 面板组件
面板组件将指定文本块渲染在一个面板中,其背景颜色与通知的其余部分略有不同,以便突出显示这段文本:
```blade
This is the panel content.
```
#### 表格组件
表格组件可以将 Markdown 表格转换为 HTML 表格。该组件接受 Markdown 表格作为内容,并支持使用默认的 Markdown 表格对齐语法设置列对齐方式:
```blade
| Laravel | Table | Example |
| ------------- | :-----------: | ------------: |
| Col 2 is | Centered | $10 |
| Col 3 is | Right-Aligned | $20 |
```
### 自定义组件
你可以将所有 Markdown 通知组件导出到自己的应用中进行自定义。要导出组件,请使用 `vendor:publish` Artisan 命令发布 `laravel-mail` 资源标签:
```shell
php artisan vendor:publish --tag=laravel-mail
```
该命令会将 Markdown 邮件组件发布到 `resources/views/vendor/mail` 目录。`mail` 目录中包含 `html` 和 `text` 两个目录,分别存放每个可用组件的 HTML 和纯文本版本。你可以自由地自定义这些组件。
#### 自定义 CSS
导出组件后,`resources/views/vendor/mail/html/themes` 目录中会包含一个 `default.css` 文件。你可以修改该文件中的 CSS,这些样式会自动内联到 Markdown 通知的 HTML 版本中。
如果想为 Laravel 的 Markdown 组件构建全新的主题,可以在 `html/themes` 目录中放置一个 CSS 文件。命名并保存文件后,将 `mail` 配置文件中的 `theme` 选项更新为新主题的名称。
要为单个通知自定义主题,可以在构建通知的邮件消息时调用 `theme` 方法。该方法接受发送通知时使用的主题名称:
```php
/**
* 获取通知的邮件表示。
*/
public function toMail(object $notifiable): MailMessage
{
return (new MailMessage)
->theme('invoice')
->subject('Invoice Paid')
->markdown('mail.invoice.paid', ['url' => $url]);
}
```
## 数据库通知
### 前提条件
`database` 通知渠道将通知信息存储在数据库表中。该表包含通知类型等信息,以及描述通知的 JSON 数据结构。
你可以查询该表,在应用的用户界面中显示通知。不过,在此之前需要先创建数据库表来存储通知。可以使用 `make:notifications-table` 命令生成包含适当表结构的 [迁移](/docs/laravel/13.x/migrations):
```shell
php artisan make:notifications-table
php artisan migrate
```
> [!NOTE]
> 如果可通知模型使用 [UUID 或 ULID 主键](/docs/laravel/13.x/eloquent#uuid-and-ulid-keys),应在通知表迁移中将 `morphs` 方法替换为 [uuidMorphs](/docs/laravel/13.x/migrations#column-method-uuidMorphs) 或 [ulidMorphs](/docs/laravel/13.x/migrations#column-method-ulidMorphs)。
### 格式化数据库通知
如果通知支持存储在数据库表中,应在通知类中定义 `toDatabase` 或 `toArray` 方法。该方法接收一个 `$notifiable` 实体,并应返回普通的 PHP 数组。返回的数组会被编码为 JSON,存储在 `notifications` 表的 `data` 列中。下面是一个 `toArray` 方法的示例:
```php
/**
* 获取通知的数组表示。
*
* @return array
*/
public function toArray(object $notifiable): array
{
return [
'invoice_id' => $this->invoice->id,
'amount' => $this->invoice->amount,
];
}
```
通知存储到应用数据库时,`type` 列默认设为通知的类名,`read_at` 列则为 `null`。不过,你可以在通知类中定义 `databaseType` 和 `initialDatabaseReadAtValue` 方法来自定义此行为:
```php
use Illuminate\Support\Carbon;
/**
* 获取通知的数据库类型。
*/
public function databaseType(object $notifiable): string
{
return 'invoice-paid';
}
/**
* 获取「read_at」列的初始值。
*/
public function initialDatabaseReadAtValue(): ?Carbon
{
return null;
}
```
#### `toDatabase` 与 `toArray`
`broadcast` 渠道也会使用 `toArray` 方法,确定要广播到 JavaScript 前端的数据。如果想让 `database` 和 `broadcast` 渠道使用不同的数组表示,应定义 `toDatabase` 方法,而不是仅使用 `toArray` 方法。
### 访问通知
通知存储到数据库后,你需要方便地从可通知实体访问它们。Laravel 默认的 `App\Models\User` 模型包含 `Illuminate\Notifications\Notifiable` trait,该 trait 提供了 `notifications` [Eloquent 关系](/docs/laravel/13.x/eloquent-relationships),用于返回该实体的通知。你可以像访问其他 Eloquent 关系一样访问它来获取通知。默认情况下,通知按 `created_at` 时间戳排序,最新的通知位于集合开头:
```php
$user = App\Models\User::find(1);
foreach ($user->notifications as $notification) {
echo $notification->type;
}
```
如果只想获取「未读」通知,可以使用 `unreadNotifications` 关系。同样,这些通知按 `created_at` 时间戳排序,最新的通知位于集合开头:
```php
$user = App\Models\User::find(1);
foreach ($user->unreadNotifications as $notification) {
echo $notification->type;
}
```
如果只想获取「已读」通知,可以使用 `readNotifications` 关系:
```php
$user = App\Models\User::find(1);
foreach ($user->readNotifications as $notification) {
echo $notification->type;
}
```
> [!NOTE]
> 要从 JavaScript 客户端访问通知,应为应用定义一个通知控制器,返回可通知实体(如当前用户)的通知。然后,就可以从 JavaScript 客户端向该控制器的 URL 发起 HTTP 请求。
### 标记通知为已读
通常,用户查看通知后,你会希望将其标记为「已读」。`Illuminate\Notifications\Notifiable` trait 提供了 `markAsRead` 方法,用于更新通知数据库记录的 `read_at` 列:
```php
$user = App\Models\User::find(1);
foreach ($user->unreadNotifications as $notification) {
$notification->markAsRead();
}
```
你也可以直接对通知集合调用 `markAsRead` 方法,而不必逐个遍历通知:
```php
$user->unreadNotifications->markAsRead();
```
还可以使用批量更新查询,将所有通知标记为已读,而无需先从数据库中获取它们:
```php
$user = App\Models\User::find(1);
$user->unreadNotifications()->update(['read_at' => now()]);
```
你可以使用 `delete` 删除通知,将其从表中完全移除:
```php
$user->notifications()->delete();
```
## 广播通知
### 前提条件
广播通知之前,应先配置并熟悉 Laravel 的 [事件广播](/docs/laravel/13.x/broadcasting) 服务。事件广播让 JavaScript 前端能够响应服务器端的 Laravel 事件。
### 格式化广播通知
`broadcast` 渠道通过 Laravel 的 [事件广播](/docs/laravel/13.x/broadcasting) 服务广播通知,让 JavaScript 前端能够实时接收通知。如果通知支持广播,可以在通知类中定义 `toBroadcast` 方法。该方法接收一个 `$notifiable` 实体,并应返回 `BroadcastMessage` 实例。如果未定义 `toBroadcast` 方法,则会使用 `toArray` 方法获取要广播的数据。返回的数据会被编码为 JSON 并广播到 JavaScript 前端。下面是一个 `toBroadcast` 方法的示例:
```php
use Illuminate\Notifications\Messages\BroadcastMessage;
/**
* 获取通知的广播表示。
*/
public function toBroadcast(object $notifiable): BroadcastMessage
{
return new BroadcastMessage([
'invoice_id' => $this->invoice->id,
'amount' => $this->invoice->amount,
]);
}
```
#### 广播队列配置
所有广播通知都会加入队列进行广播。如果想配置广播操作使用的队列连接或队列名称,可以使用 `BroadcastMessage` 的 `onConnection` 和 `onQueue` 方法:
```php
return (new BroadcastMessage($data))
->onConnection('sqs')
->onQueue('broadcasts');
```
#### 自定义通知类型
除了指定的数据,所有广播通知还包含一个 `type` 字段,记录通知的完整类名。如果想自定义通知的 `type`,可以在通知类中定义 `broadcastType` 方法:
```php
/**
* 获取广播通知的类型。
*/
public function broadcastType(): string
{
return 'broadcast.message';
}
```
### 监听通知
通知会在按 `{notifiable}.{id}` 约定命名的私有频道上广播。例如,向 ID 为 `1` 的 `App\Models\User` 实例发送通知时,通知会在 `App.Models.User.1` 私有频道上广播。使用 [Laravel Echo](/docs/laravel/13.x/broadcasting#client-side-installation) 时,可以通过 `notification` 方法轻松监听频道上的通知:
```js
Echo.private('App.Models.User.' + userId)
.notification((notification) => {
console.log(notification.type);
});
```
#### 使用 React、Vue 或 Svelte
Laravel Echo 提供了 React、Vue 和 Svelte 钩子,让监听通知变得简单。首先,调用用于监听通知的 `useEchoNotification` 钩子。当使用该钩子的组件卸载时,它会自动离开频道:
```js tab=React
import { useEchoNotification } from "@laravel/echo-react";
useEchoNotification(
`App.Models.User.${userId}`,
(notification) => {
console.log(notification.type);
},
);
```
```vue tab=Vue
```
```svelte tab=Svelte
```
默认情况下,该钩子监听所有通知。要指定需要监听的通知类型,可以向 `useEchoNotification` 传入类型字符串或类型数组:
```js tab=React
import { useEchoNotification } from "@laravel/echo-react";
useEchoNotification(
`App.Models.User.${userId}`,
(notification) => {
console.log(notification.type);
},
'App.Notifications.InvoicePaid',
);
```
```vue tab=Vue
```
```svelte tab=Svelte
```
你还可以指定通知负载的数据结构,以提高类型安全性并方便编辑:
```ts
type InvoicePaidNotification = {
invoice_id: number;
created_at: string;
};
useEchoNotification(
`App.Models.User.${userId}`,
(notification) => {
console.log(notification.invoice_id);
console.log(notification.created_at);
console.log(notification.type);
},
'App.Notifications.InvoicePaid',
);
```
#### 自定义通知频道
如果想自定义某个实体接收广播通知的频道,可以在可通知实体上定义 `receivesBroadcastNotificationsOn` 方法:
```php
id;
}
}
```
## 短信通知
### 前提条件
Laravel 的短信通知由 [Vonage](https://www.vonage.com/)(原 Nexmo)提供支持。通过 Vonage 发送通知之前,需要安装 `laravel/vonage-notification-channel` 和 `guzzlehttp/guzzle` 包:
```shell
composer require laravel/vonage-notification-channel guzzlehttp/guzzle
```
该包包含一个 [配置文件](https://github.com/laravel/vonage-notification-channel/blob/3.x/config/vonage.php),但你不必将其导出到应用中。直接使用 `VONAGE_KEY` 和 `VONAGE_SECRET` 环境变量定义 Vonage 的公钥和密钥即可。
定义密钥后,应设置 `VONAGE_SMS_FROM` 环境变量,指定发送短信时默认使用的电话号码。你可以在 Vonage 控制面板中生成这个号码:
```ini
VONAGE_SMS_FROM=15556666666
```
### 格式化短信通知
如果通知支持通过短信发送,应在通知类中定义 `toVonage` 方法。该方法接收一个 `$notifiable` 实体,并应返回 `Illuminate\Notifications\Messages\VonageMessage` 实例:
```php
use Illuminate\Notifications\Messages\VonageMessage;
/**
* 获取通知的 Vonage / 短信表示。
*/
public function toVonage(object $notifiable): VonageMessage
{
return (new VonageMessage)
->content('Your SMS message content');
}
```
#### Unicode 内容
如果短信包含 Unicode 字符,应在构建 `VonageMessage` 实例时调用 `unicode` 方法:
```php
use Illuminate\Notifications\Messages\VonageMessage;
/**
* 获取通知的 Vonage / 短信表示。
*/
public function toVonage(object $notifiable): VonageMessage
{
return (new VonageMessage)
->content('Your unicode message')
->unicode();
}
```
### 自定义发送号码
如果想让某些通知使用不同于 `VONAGE_SMS_FROM` 环境变量所指定的号码发送,可以在 `VonageMessage` 实例上调用 `from` 方法:
```php
use Illuminate\Notifications\Messages\VonageMessage;
/**
* 获取通知的 Vonage / 短信表示。
*/
public function toVonage(object $notifiable): VonageMessage
{
return (new VonageMessage)
->content('Your SMS message content')
->from('15554443333');
}
```
### 添加客户端引用
如果想按用户、团队或客户追踪费用,可以为通知添加「客户端引用」。Vonage 允许使用该引用生成报告,帮助你了解特定客户的短信使用情况。客户端引用可以是任意不超过 40 个字符的字符串:
```php
use Illuminate\Notifications\Messages\VonageMessage;
/**
* 获取通知的 Vonage / 短信表示。
*/
public function toVonage(object $notifiable): VonageMessage
{
return (new VonageMessage)
->clientReference((string) $notifiable->id)
->content('Your SMS message content');
}
```
### 路由短信通知
要将 Vonage 通知发送到正确的电话号码,请在可通知实体上定义 `routeNotificationForVonage` 方法:
```php
phone_number;
}
}
```
## Slack 通知
### 前提条件
发送 Slack 通知之前,应先通过 Composer 安装 Slack 通知渠道:
```shell
composer require laravel/slack-notification-channel
```
此外,还必须为 Slack 工作区创建一个 [Slack 应用](https://api.slack.com/apps?new_app=1)。
如果只需向创建该应用的 Slack 工作区发送通知,应确保应用拥有 `chat:write`、`chat:write.public` 和 `chat:write.customize` 权限范围。这些权限可以在 Slack 应用管理界面的「OAuth & Permissions」选项卡中添加。
接下来,复制 Slack 应用的「Bot User OAuth Token」,将其放入应用的 `services.php` 配置文件中的 `slack` 配置数组。该令牌可在 Slack 的「OAuth & Permissions」选项卡中找到:
```php
'slack' => [
'notifications' => [
'bot_user_oauth_token' => env('SLACK_BOT_USER_OAUTH_TOKEN'),
'channel' => env('SLACK_BOT_USER_DEFAULT_CHANNEL'),
],
],
```
#### 应用分发
如果应用需要向用户拥有的外部 Slack 工作区发送通知,就需要通过 Slack「分发」你的 Slack 应用。分发设置可在该应用的「Manage Distribution」选项卡中管理。完成分发后,可以使用 [Socialite](/docs/laravel/13.x/socialite) 代表应用用户 [获取 Slack Bot 令牌](/docs/laravel/13.x/socialite#slack-bot-scopes)。
### 格式化 Slack 通知
如果通知支持通过 Slack 消息发送,应在通知类中定义 `toSlack` 方法。该方法接收一个 `$notifiable` 实体,并应返回 `Illuminate\Notifications\Slack\SlackMessage` 实例。你可以使用 [Slack 的 Block Kit API](https://api.slack.com/block-kit) 构建内容丰富的通知。下面的示例可以在 [Slack 的 Block Kit Builder](https://app.slack.com/block-kit-builder/T01KWS6K23Z#%7B%22blocks%22:%5B%7B%22type%22:%22header%22,%22text%22:%7B%22type%22:%22plain_text%22,%22text%22:%22Invoice%20Paid%22%7D%7D,%7B%22type%22:%22context%22,%22elements%22:%5B%7B%22type%22:%22plain_text%22,%22text%22:%22Customer%20%231234%22%7D%5D%7D,%7B%22type%22:%22section%22,%22text%22:%7B%22type%22:%22plain_text%22,%22text%22:%22An%20invoice%20has%20been%20paid.%22%7D,%22fields%22:%5B%7B%22type%22:%22mrkdwn%22,%22text%22:%22*Invoice%20No:*%5Cn1000%22%7D,%7B%22type%22:%22mrkdwn%22,%22text%22:%22*Invoice%20Recipient:*%5Cntaylor@laravel.com%22%7D%5D%7D,%7B%22type%22:%22divider%22%7D,%7B%22type%22:%22section%22,%22text%22:%7B%22type%22:%22plain_text%22,%22text%22:%22Congratulations!%22%7D%7D%5D%7D) 中预览:
```php
use Illuminate\Notifications\Slack\BlockKit\Blocks\ContextBlock;
use Illuminate\Notifications\Slack\BlockKit\Blocks\SectionBlock;
use Illuminate\Notifications\Slack\SlackMessage;
/**
* 获取通知的 Slack 表示。
*/
public function toSlack(object $notifiable): SlackMessage
{
return (new SlackMessage)
->text('One of your invoices has been paid!')
->headerBlock('Invoice Paid')
->contextBlock(function (ContextBlock $block) {
$block->text('Customer #1234');
})
->sectionBlock(function (SectionBlock $block) {
$block->text('An invoice has been paid.');
$block->field("*Invoice No:*\n1000")->markdown();
$block->field("*Invoice Recipient:*\ntaylor@laravel.com")->markdown();
})
->dividerBlock()
->sectionBlock(function (SectionBlock $block) {
$block->text('Congratulations!');
});
}
```
#### 使用 Slack 的 Block Kit Builder 模板
你可以不使用链式消息构建方法来构造 Block Kit 消息,而是将 Slack Block Kit Builder 生成的原始 JSON 负载传给 `usingBlockKitTemplate` 方法:
```php
use Illuminate\Notifications\Slack\SlackMessage;
use Illuminate\Support\Str;
/**
* 获取通知的 Slack 表示。
*/
public function toSlack(object $notifiable): SlackMessage
{
$template = <<usingBlockKitTemplate($template);
}
```
### Slack 交互功能
Slack 的 Block Kit 通知系统提供了强大的 [用户交互处理](https://api.slack.com/interactivity/handling) 功能。要使用这些功能,应为 Slack 应用启用「Interactivity」,并配置「Request URL」,指向你的应用提供的 URL。这些设置可在 Slack 应用管理界面的「Interactivity & Shortcuts」选项卡中管理。
下面的示例使用了 `actionsBlock` 方法。Slack 会向你的「Request URL」发送 `POST` 请求,其负载包含点击按钮的 Slack 用户、按钮 ID 等信息。应用可以根据该负载决定要执行的操作。你还应 [验证请求](https://api.slack.com/authentication/verifying-requests-from-slack) 确实来自 Slack:
```php
use Illuminate\Notifications\Slack\BlockKit\Blocks\ActionsBlock;
use Illuminate\Notifications\Slack\BlockKit\Blocks\ContextBlock;
use Illuminate\Notifications\Slack\BlockKit\Blocks\SectionBlock;
use Illuminate\Notifications\Slack\SlackMessage;
/**
* 获取通知的 Slack 表示。
*/
public function toSlack(object $notifiable): SlackMessage
{
return (new SlackMessage)
->text('One of your invoices has been paid!')
->headerBlock('Invoice Paid')
->contextBlock(function (ContextBlock $block) {
$block->text('Customer #1234');
})
->sectionBlock(function (SectionBlock $block) {
$block->text('An invoice has been paid.');
})
->actionsBlock(function (ActionsBlock $block) {
// ID 默认为「button_acknowledge_invoice」……
$block->button('Acknowledge Invoice')->primary();
// 手动配置 ID……
$block->button('Deny')->danger()->id('deny_invoice');
});
}
```
#### 确认模态框
如果希望用户在执行操作前必须确认,可以在定义按钮时调用 `confirm` 方法。该方法接受一条消息和一个闭包,闭包会接收 `ConfirmObject` 实例:
```php
use Illuminate\Notifications\Slack\BlockKit\Blocks\ActionsBlock;
use Illuminate\Notifications\Slack\BlockKit\Blocks\ContextBlock;
use Illuminate\Notifications\Slack\BlockKit\Blocks\SectionBlock;
use Illuminate\Notifications\Slack\BlockKit\Composites\ConfirmObject;
use Illuminate\Notifications\Slack\SlackMessage;
/**
* 获取通知的 Slack 表示。
*/
public function toSlack(object $notifiable): SlackMessage
{
return (new SlackMessage)
->text('One of your invoices has been paid!')
->headerBlock('Invoice Paid')
->contextBlock(function (ContextBlock $block) {
$block->text('Customer #1234');
})
->sectionBlock(function (SectionBlock $block) {
$block->text('An invoice has been paid.');
})
->actionsBlock(function (ActionsBlock $block) {
$block->button('Acknowledge Invoice')
->primary()
->confirm(
'Acknowledge the payment and send a thank you email?',
function (ConfirmObject $dialog) {
$dialog->confirm('Yes');
$dialog->deny('No');
}
);
});
}
```
#### 检查 Slack 区块
如果想快速检查构建的区块,可以对 `SlackMessage` 实例调用 `dd` 方法。该方法会生成并输出一个 Slack [Block Kit Builder](https://app.slack.com/block-kit-builder/) URL,在浏览器中展示负载和通知的预览。你可以向 `dd` 方法传入 `true`,以输出原始负载:
```php
return (new SlackMessage)
->text('One of your invoices has been paid!')
->headerBlock('Invoice Paid')
->dd();
```
### 路由 Slack 通知
要将 Slack 通知发送到正确的团队和频道,请在可通知模型上定义 `routeNotificationForSlack` 方法。该方法可以返回以下三种值之一:
- `null`:使用通知自身配置的频道。构建 `SlackMessage` 时,可以通过 `to` 方法在通知中配置频道。
- 指定目标 Slack 频道的字符串,例如 `#support-channel`。
- `SlackRoute` 实例:可以指定 OAuth 令牌和频道名称,例如 `SlackRoute::make($this->slack_channel, $this->slack_token)`。向外部工作区发送通知时应使用这种方式。
例如,`routeNotificationForSlack` 方法返回 `#support-channel` 时,通知会发送到该频道,其所属工作区由应用的 `services.php` 配置文件中的 Bot User OAuth 令牌决定:
```php
### 通知外部 Slack 工作区
> [!NOTE]
> 向外部 Slack 工作区发送通知之前,必须先 [分发](#slack-app-distribution) 你的 Slack 应用。
你可能经常需要向应用用户拥有的 Slack 工作区发送通知。为此,首先需要获取该用户的 Slack OAuth 令牌。[Laravel Socialite](/docs/laravel/13.x/socialite) 提供了 Slack 驱动,让你可以轻松地通过 Slack 对应用用户进行认证,并 [获取 Bot 令牌](/docs/laravel/13.x/socialite#slack-bot-scopes)。
获取 Bot 令牌并存入应用数据库后,就可以使用 `SlackRoute::make` 方法将通知路由到用户的工作区。此外,应用通常还需要让用户指定接收通知的频道:
```php
slack_channel, $this->slack_token);
}
}
```
## 本地化通知
Laravel 允许使用不同于 HTTP 请求当前语言环境的语言发送通知,即使通知被加入队列,也会记住该语言环境。
为此,`Illuminate\Notifications\Notification` 类提供了 `locale` 方法来设置所需的语言。应用会在处理通知时切换到该语言环境,处理完成后再恢复之前的语言环境:
```php
$user->notify((new InvoicePaid($invoice))->locale('es'));
```
也可以通过 `Notification` 门面对多个可通知实体进行本地化:
```php
Notification::locale('es')->send(
$users, new InvoicePaid($invoice)
);
```
#### 用户首选语言
有时,应用会存储每个用户的首选语言。通过在可通知模型上实现 `HasLocalePreference` 契约,可以让 Laravel 在发送通知时使用所存储的语言环境:
```php
use Illuminate\Contracts\Translation\HasLocalePreference;
class User extends Model implements HasLocalePreference
{
/**
* 获取用户的首选语言。
*/
public function preferredLocale(): string
{
return $this->locale;
}
}
```
实现该接口后,Laravel 会在向模型发送通知和邮件时自动使用其首选语言。因此,使用该接口时不必再调用 `locale` 方法:
```php
$user->notify(new InvoicePaid($invoice));
```
## 测试
你可以使用 `Notification` 门面的 `fake` 方法阻止通知实际发送。通常,发送通知与你正在测试的代码无关,只需断言代码已指示 Laravel 发送指定通知即可。
调用 `Notification` 门面的 `fake` 方法后,可以断言程序已指示向用户发送通知,甚至检查通知接收到的数据:
```php tab=Pest
order->id === $order->id;
}
);
```
也可以将预期属性值的数组作为第三个参数传给 `assertSentTo` 或 `assertNotSentTo`:
```php
Notification::assertSentTo($user, OrderShipped::class, ['order' => $order]);
```
所有指定的属性都必须匹配。值使用严格相等进行比较,Eloquent 模型则使用其 `is` 方法比较。你也可以将预期属性值的数组作为第二个参数传给 `assertSentOnDemand`。
#### 按需发送通知
如果正在测试的代码发送了 [按需通知](#on-demand-notifications),可以通过 `assertSentOnDemand` 方法测试该通知是否已发送:
```php
Notification::assertSentOnDemand(OrderShipped::class);
Notification::assertSentOnDemandOnce(OrderShipped::class);
```
将闭包作为第二个参数传给 `assertSentOnDemand` 方法,可以判断按需通知是否发送到了正确的「路由」地址:
```php
Notification::assertSentOnDemand(
OrderShipped::class,
function (OrderShipped $notification, array $channels, object $notifiable) use ($user) {
return $notifiable->routes['mail'] === $user->email;
}
);
```
## 通知事件
#### 通知发送中事件
通知正在发送时,通知系统会派发 `Illuminate\Notifications\Events\NotificationSending` 事件。该事件包含可通知实体和通知实例。你可以在应用中为该事件创建 [事件监听器](/docs/laravel/13.x/events):
```php
use Illuminate\Notifications\Events\NotificationSending;
class CheckNotificationStatus
{
/**
* 处理事件。
*/
public function handle(NotificationSending $event): void
{
// ...
}
}
```
如果 `NotificationSending` 事件的某个监听器在 `handle` 方法中返回 `false`,通知就不会发送:
```php
/**
* 处理事件。
*/
public function handle(NotificationSending $event): bool
{
return false;
}
```
在事件监听器中,可以访问事件的 `notifiable`、`notification` 和 `channel` 属性,获取有关通知收件人或通知本身的更多信息:
```php
/**
* 处理事件。
*/
public function handle(NotificationSending $event): void
{
// $event->channel
// $event->notifiable
// $event->notification
}
```
#### 通知已发送事件
通知发送后,通知系统会派发 `Illuminate\Notifications\Events\NotificationSent` [事件](/docs/laravel/13.x/events)。该事件包含可通知实体和通知实例。你可以在应用中为该事件创建 [事件监听器](/docs/laravel/13.x/events):
```php
use Illuminate\Notifications\Events\NotificationSent;
class LogNotification
{
/**
* 处理事件。
*/
public function handle(NotificationSent $event): void
{
// ...
}
}
```
在事件监听器中,可以访问事件的 `notifiable`、`notification`、`channel` 和 `response` 属性,获取有关通知收件人或通知本身的更多信息:
```php
/**
* 处理事件。
*/
public function handle(NotificationSent $event): void
{
// $event->channel
// $event->notifiable
// $event->notification
// $event->response
}
```
## 自定义渠道
Laravel 内置了几种通知渠道,但你可能希望编写自己的驱动,通过其他渠道发送通知。Laravel 让这变得很简单。首先,定义一个包含 `send` 方法的类。该方法应接收两个参数:`$notifiable` 和 `$notification`。
在 `send` 方法中,可以调用通知的方法,获取你的渠道能够处理的消息对象,然后按需要将通知发送给 `$notifiable` 实例:
```php
toVoice($notifiable);
// 将通知发送给 $notifiable 实例……
}
}
```
定义通知渠道类后,就可以在任何通知的 `via` 方法中返回该类名。在本示例中,通知的 `toVoice` 方法可以返回你选择的任意对象来表示语音消息。例如,你可以定义自己的 `VoiceMessage` 类来表示这些消息:
```php