
 Laravel 5.6 中文文档
消息通知
消息通知
简介
除了 发送邮件 Laravel 还支持通过多种频道发送通知,包括邮件、短信 (通过 Nexmo), 以及 Slack。通知还能存到数据库,这样就能在网页界面上显示了。
通常情况下,通知应该是简短、有信息量的消息来通知用户你的应用发生了什么。举例来说,如果你在编写一个在线交易应用,你应该会通过邮件和短信频道来给用户发送一条 「账单已付」 的通知。
创建通知
Laravel 中一条通知就是一个类(通常存在 app/Notifications 文件夹里)。看不到的话不要担心,运行一下 make:notification 命令就能创建了:
php artisan make:notification InvoicePaid这个命令会在 app/Notifications 目录下生成一个新的通知类。这个类包含 via 方法和几个消息构建方法(比如 toMail 或 toDatabase),它们会针对指定的渠道把通知转换过为对应的消息。
发送通知
使用 Notifiable Trait
通知可以通过两种方法发送: Notifiable trait 的notify 方法或 Notification facade。首先,让我们探索使用 trait :
<?php

namespace App;

use Illuminate\Notifications\Notifiable;
use Illuminate\Foundation\Auth\User as Authenticatable;

class User extends Authenticatable
{
    use Notifiable;
}
默认的 App\User 模型中使用了这个 trait,它包含着一个可以用来发通知的方法:notify 。 notify 方法需要一个通知实例做参数:
use App\Notifications\InvoicePaid;

$user->notify(new InvoicePaid($invoice));
{tip} 记住,你可以在任意模型中使用
Illuminate\Notifications\Notifiabletrait,而不仅仅是在User模型中。
使用 Notification Facade
另外,你可以通过 Notification facade 来发送通知。它主要用在当你给多个可接收通知的实体发送通知的时候,比如给用户集合发通知。要用 facade 发送通知的话,要把可接收通知的实体和通知的实例传递给 send 方法:
Notification::send($users, new InvoicePaid($invoice));指定发送频道
每个通知类都有个 via 方法,它决定了通知在哪个频道上发送。开箱即用的通知频道有 mail, database, broadcast, nexmo, 和 slack 。
{tip} 如果你想用其它的频道比如 Telegram 或者 Pusher ,可以去看下社区驱动的 Laravel 通知频道网站。
via 方法接收一个 $notifiable 实例,这个实例将是通知实际发送到的类的实例。你可以用 $notifiable 来决定通知用哪些频道来发送:
/**
 * 获取通知发送频道。
 *
 * @param  mixed  $notifiable
 * @return array
 */
public function via($notifiable)
{
    return $notifiable->prefers_sms ? ['nexmo'] : ['mail', 'database'];
}
队列化通知
{note} 在队列化通知之前你应该配置你的队列并且 启动队列处理器.
发送通知可能很耗时,尤其是是当频道需要一个额外的 API 来发送通知。要加速你的应用响应时间,让你的通知继承 ShouldQueue 接口 并且在你的类中添加 Queueable trait。这些接口和 trait 已经被使用 make:notification 生成的所有通知引入了,所以你可以直接将他们添加到你的通知类:
<?php

namespace App\Notifications;

use Illuminate\Bus\Queueable;
use Illuminate\Notifications\Notification;
use Illuminate\Contracts\Queue\ShouldQueue;

class InvoicePaid extends Notification implements ShouldQueue
{
    use Queueable;

    // ...
}
一旦 ShouldQueue 接口被添加到通知,你就可以和平常一样发送通知了。 Laravel 将会找到类中的 ShouldQueue 接口并且自动发送通知:
$user->notify(new InvoicePaid($invoice));如果你想延迟发送通知,你可以链式调用 delay 方法到你的通知实例:
$when = now()->addMinutes(10);

$user->notify((new InvoicePaid($invoice))->delay($when));
按需通知
有时你可能需要发送通知给一个非应用中的用户。使用 Notification::route 方法,你在发送通知之前可以指定点对点的通知信息:
Notification::route('mail', 'taylor@laravel.com')
            ->route('nexmo', '5555555555')
            ->notify(new InvoicePaid($invoice));
邮件通知
格式化邮件信息
如果一个通知支持邮件发送,你应该定义一个 toMail 方法到你的类中。这个方法接收 $notifiable 实体并且返回一个 Illuminate\Notifications\Messages\MailMessage 实例。邮件信息可能包含多行文本或「链接」。让我们看一下示例 toMail 方法:
/**
* 获取通知中的邮件展示方式。
*
* @param mixed $notifiable
* @return \Illuminate\Notifications\Messages\MailMessage
*/
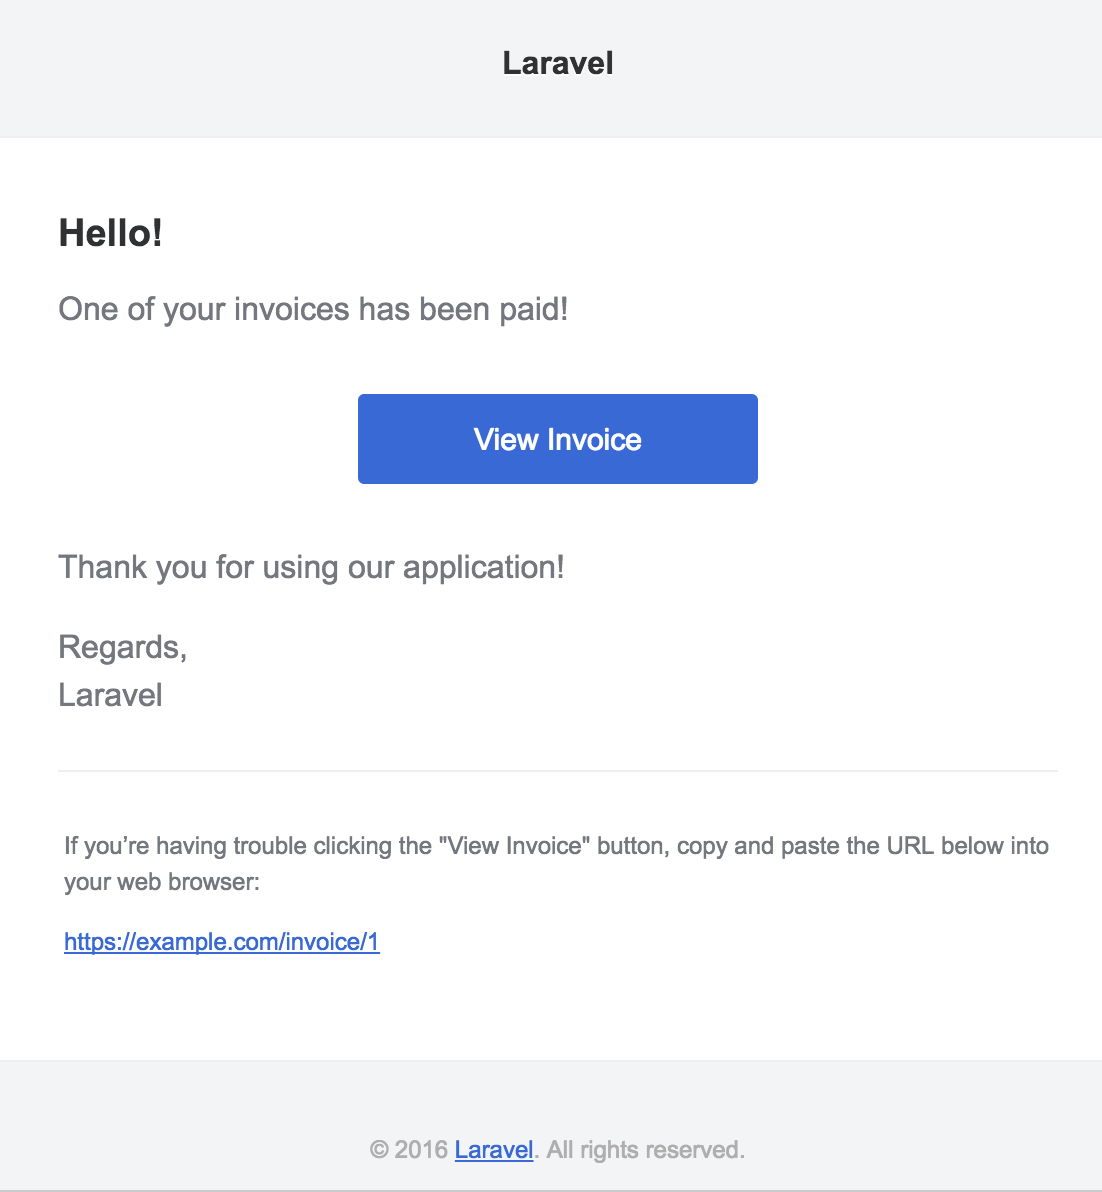
public function toMail($notifiable)
{
$url = url('/invoice/'.$this->invoice->id);
return (new MailMessage)
->greeting('Hello!')
->line('One of your invoices has been paid!')
->action('View Invoice', $url)
->line('Thank you for using our application!');
}{tip} 注意我们在
toMail方法中使用了$this->invoice->id。你可以在通知生成它的消息时传递给通知的构造函数任意数据。
在这个例子里,我们注册了一个问候,一行文本,一个链接和另一行文本。这些方法由 MailMessage 对象提供,这使格式化简单的事务性的邮件变得简单。然后,邮件频道将把文本转换成一个带有文字的漂亮的响应式 HTML 邮件模板。这是一个由「邮件」频道生成的 email 的样例:
{tip} 在发送邮件通知时,请确定在你的
config/app.php配置文件中设置了name的值。这个值会在你邮件通知消息的头部和尾部使用。
其它通知格式选项
你可以使用 view 方法来指定一个应用于渲染通知电子邮件的自定义模板,而不是在通知类中定义文本的「模板」:
/**
 *  获取通知的邮件展示方式。
 *
 * @param  mixed  $notifiable
 * @return \Illuminate\Notifications\Messages\MailMessage
 */
public function toMail($notifiable)
{
    return (new MailMessage)->view(
        'emails.name', ['invoice' => $this->invoice]
    );
}
另外,你可以从 toMail 方法中返回一个 mailable 对象。
use App\Mail\InvoicePaid as Mailable;

/**
 * 获取通知的邮件展示方式。
 *
 * @param  mixed  $notifiable
 * @return Mailable
 */
public function toMail($notifiable)
{
    return (new Mailable($this->invoice))->to($this->user->email);
}
错误消息
有些通知是给用户提示错误,比如账单支付失败的提示。你可以通过调用 error 方法来指定这条邮件消息被当做一个错误提示。当邮件消息使用了 error 方法后,引导链接按钮会变成红色而非蓝色:
/**
 * 获取通知的邮件展示方式。
 *
 * @param  mixed  $notifiable
 * @return \Illuminate\Notifications\Message
 */
public function toMail($notifiable)
{
    return (new MailMessage)
                ->error()
                ->subject('Notification Subject')
                ->line('...');
}
自定义接收者
当通过 mail 频道来发送通知的时候,通知系统将会自动寻找你的 notifiable 实体中的 email 属性。你可以通过在实体中定义 routeNotificationForMail 方法来自定义邮件地址。
<?php

namespace App;

use Illuminate\Notifications\Notifiable;
use Illuminate\Foundation\Auth\User as Authenticatable;

class User extends Authenticatable
{
    use Notifiable;

    /**
     * 邮件频道的路由。
     *
     * @param  \Illuminate\Notifications\Notification  $notification
     * @return string
     */
    public function routeNotificationForMail($notification)
    {
        return $this->email_address;
    }
}
自定义主题
默认情况下,邮件主题是格式化成了标题格式的通知类的类名。所以如果你对通知类名为 InvoicePaid ,邮件主题将会是 Invoice Paid 。如果你想显式指定消息的主题,你可以在构建消息时调用 subject 方法:
/**
 *获取通知的邮件展示方式。
 *
 * @param  mixed  $notifiable
 * @return \Illuminate\Notifications\Messages\MailMessage
 */
public function toMail($notifiable)
{
    return (new MailMessage)
                ->subject('Notification Subject')
                ->line('...');
}
自定义模板
你可以通过发布通知包的资源来修改 HTML 模板和纯文本模板。运行这个命令后,邮件通知模板就被放在了 resources/views/vendor/notifications 文件夹下:
php artisan vendor:publish --tag=laravel-notificationsMarkdown 邮件通知
Markdown 邮件通知可让您利用邮件通知的预先构建的模板,同时给予您更多自由地撰写更长的自定义邮件。 由于消息是用 Markdown 编写的, Laravel 能够为消息呈现漂亮,响应的 HTML 模板,同时还自动生成纯文本对应。
生成消息
要使用相应的 Markdown 模板生成通知,您可以使用 make:notification Artisan命令的 --markdown 选项:
php artisan make:notification InvoicePaid --markdown=mail.invoice.paid与所有其他邮件通知一样,使用 Markdown 模板的通知应在其通知类上定义一个 toMail 方法。 但是,不使用 line 和 action 方法来构造通知,而是使用 markdown 方法来指定应该使用的 Markdown 模板的名称:
/**
 * 获取通知的邮件展示方式。
 *
 * @param  mixed  $notifiable
 * @return \Illuminate\Notifications\Messages\MailMessage
 */
public function toMail($notifiable)
{
    $url = url('/invoice/'.$this->invoice->id);

    return (new MailMessage)
                ->subject('Invoice Paid')
                ->markdown('mail.invoice.paid', ['url' => $url]);
}
编写消息
Markdown 邮件通知使用 Blade 组件和 Markdown 语法的组合,允许你轻松构建通知,同时利用 Laravel 的预制通知组件:
@component('mail::message')
# Invoice Paid

Your invoice has been paid!

@component('mail::button', ['url' => $url])
View Invoice
@endcomponent

Thanks,<br>
{{ config('app.name') }}
@endcomponent
按钮组件
按钮组件渲染了一个居中的按钮链接。这条组件接受两个参数,一个 url 和一个可选的 color 。支持的颜色有 blue ,green,以及 red 。你可以根据需要想通知中添加任意数量的按钮:
@component('mail::button', ['url' => $url, 'color' => 'green'])
View Invoice
@endcomponent
面板组件
面板组件在面板中渲染指定的文本块,该面板具有与通知其它部分稍微不同的背景色,使你的文本块更容易吸引注意力:
@component('mail::panel')
This is the panel content.
@endcomponent
表格组件
表格组件帮助你将一个 Markdown 表格转换为 HTML 表格。该组件接受 Markdown 表格作为内容。表格的列对齐遵循默认的 Markdown 对齐语法:
@component('mail::table')
| Laravel       | Table         | Example  |
| ------------- |:-------------:| --------:|
| Col 2 is      | Centered      | $10      |
| Col 3 is      | Right-Aligned | $20      |
@endcomponent
自定义组件
你可以将所有的 Markdown 通知组件导出到你的应用中,以进行自定义。要导出组件,请使用 vendor:publish Artisan 命令来发布 laravel-mail 标签:
php artisan vendor:publish --tag=laravel-mail这个命令会发布 Markdown 邮件组件到 resources/views/vendor/mail 目录中。 mail 目录将会包含一个 html 和一个 markdown 目录,每个目录都包含它们各自可用组件的展示。你可以随意的自定义这些组件。
自定义 CSS
导出组件之后,resources/views/vendor/mail/html/themes 将会包含一个 default.css 文件。你可以修改文件中的 CSS ,你的样式将自动的内嵌在你的 Markdown 通知的 HTML 展示之中。
{tip} 如果你喜欢为 Markdown 组件创建一整个新主题,只需要在
html/themes目录中编写一个新的 CSS 文件,并修改theme选项。
数据库通知
先决条件
database 通知渠道在一张数据库表里存储通知信息。该表以自定义的 JSON 格式,存储如通知类型等描述通知的信息。
你可以为你的应用提供查询这些表,以显示通知的用户接口。不过,在此之前,你需要先创建一个数据库表来存放这些通知。你可以使用命令 notifications:table 生成包含特定表结构的迁移文件:
php artisan notifications:table

php artisan migrate
格式化数据库通知
要让一个通知支持被存储到数据库表中,你需要为通知类定义方法 toDatabase 或者 toArray。这个方法应当接受一个 $notifiable 的实体作为参数,并且可以返回一个普通的 PHP 数组。被返回的数组将被编码为 JSON 并存储在你的 notifications 表的 data 数据列。让我们看一个 toArray 方法的例子:
/**
 * Get the array representation of the notification.
 *
 * @param  mixed  $notifiable
 * @return array
 */
public function toArray($notifiable)
{
    return [
        'invoice_id' => $this->invoice->id,
        'amount' => $this->invoice->amount,
    ];
}
比较 toDatabase 和 toArray
toArray 方法也会被 broadcast 渠道用来判断哪些数据会被广播给你的 JavaScript 客户端。如果你希望 database 和 broacast 两个渠道有不同的数组展现方式,你需要定义 toDatabase 以取代定义 toArray 方法。
存取通知
一旦通知被存储到数据库之中,你需要一种方便的方式从通知实体中获取它们。Laravel 的默认模型 App\User 已经引入了 Trait Illuminate\Notifications\Notifiable ,它包含了一个 Eloquet 关系 notifications ,可以为实体返回通知。你可以像访问所有其他 Eloquent 关系一样访问这个方法,以获取通知。默认情况下,通知会被以 created_at 时间戳进行排序:
$user = App\User::find(1);

foreach ($user->notifications as $notification) {
    echo $notification->type;
}
如果你仅仅想检索所有「未读」通知,你需要使用 unreadNotifications 关系。这些通知也是以 created_at 时间戳进行排序的:
$user = App\User::find(1);

foreach ($user->unreadNotifications as $notification) {
    echo $notification->type;
}
{tip} 为了可以在你的 JavaScript 客户端访问到通知,你需要为你的应用定义一个通知控制器,它可以为诸如当前用户等可以被通知的实体,返回通知。然后你就可以在 JavaScript 客户端中,像控制器的 URI 构造一个 HTTP 请求。
通知标记已读
通常,你希望一个通知在用户浏览之后就标记为「已读」。Trait Illuminate\Notifications\Notifiable 提供一个 markAsRead 方法,它可以在通知对应的数据库记录中更新 read_at 列:
$user = App\User::find(1);

foreach ($user->unreadNotifications as $notification) {
    $notification->markAsRead();
}
你可以直接使用 markAsRead 方法操作一个通知集合,而不是遍历处理每个通知:
$user->unreadNotifications->markAsRead();你还可以使用批量更新的查询来标记所有通知为已读,而不用先从数据库中检索到它们:
$user = App\User::find(1);

$user->unreadNotifications()->update(['read_at' => now()]);
当然,你可以使用 delete 从数据表中完全删除掉通知:
$user->notifications()->delete();广播通知
先决条件
在广播通知之前,你需要配置并熟悉 Laravel 的 事件广播 服务。事件广播提供一种途径,让 JavaScript 客户端可以响应服务端触发的 Laravel 事件端。
格式化广播通知
broadcast 渠道使用 Laravel 的 事件广播 广播通知,允许你的 JavaScript 客户端实时抓取通知。你需要为通知类定义 toBroadcast 方法,以使该通知支持广播。这个方法获取一个 $notifiable 的实体,并需要返回一个 BroadcastMessage 实例。返回的数据会被编码为 JSON,并且广播给你的 JavaScript 客户端。让我们看一个 toBroadcast 方法的示例:
use Illuminate\Notifications\Messages\BroadcastMessage;

/**
 * Get the broadcastable representation of the notification.
 *
 * @param  mixed  $notifiable
 * @return BroadcastMessage
 */
public function toBroadcast($notifiable)
{
    return new BroadcastMessage([
        'invoice_id' => $this->invoice->id,
        'amount' => $this->invoice->amount,
    ]);
}
广播队列配置
所以的广播通知都排队等待广播。如果需要配置用于广播队列操作的队列链接或队列名称,你可以使用 BroadcastMessage 的 onConnection 和 onQueue 方法:
return (new BroadcastMessage($data))
                ->onConnection('sqs')
                ->onQueue('broadcasts');
{tip} 除了你指定的数据外,广播通知还包含一个
type字段,这个字段包含了通知类的类名。
监听通知
通知将会在一个私有频道里进行广播,频道格式为 {notifiable}.{id} 。所以,如果你给 ID 为 1 的 App\User 示例发送通知,这个通知就在 App.User.1 私有通道里被发送。当你使用 Laravel Echo 的时候,你可以很简单的使用 notification 辅助函数来监听一个频道的通知:
Echo.private('App.User.' + userId)
    .notification((notification) => {
        console.log(notification.type);
    });
自定义通知通道
如果你想自定义通知实体接受其广播台通知的频道,你可以在通知实体上定义一个 receivesBroadcastNotificationsOn 方法:
<?php

namespace App;

use Illuminate\Notifications\Notifiable;
use Illuminate\Broadcasting\PrivateChannel;
use Illuminate\Foundation\Auth\User as Authenticatable;

class User extends Authenticatable
{
    use Notifiable;

    /**
     * 接收用户的频道广播通知.
     *
     * @return string
     */
    public function receivesBroadcastNotificationsOn()
    {
        return 'users.'.$this->id;
    }
}
短信通知
实现前提
Laravel 的短信通知基于 Nexmo。使用 Nexmo 发送通知前,需要安装 nexmo/client 的 Composer 包并且配置好 config/services.php 文件。可以直接复制以下配置示例:
'nexmo' => [
    'key' => env('NEXMO_KEY'),
    'secret' => env('NEXMO_SECRET'),
    'sms_from' => '15556666666',
],
sms_from 选项代表短信发送者的号码,可以在 Nexmo 控制面板里生成。
格式化短信通知
要实现短信通知,需要在通知类里定义 toNexmo 方法。这个方法接受一个 $notifiable 实例,必须返回 Illuminate\Notifications\Messages\NexmoMessage 实例:
/**
 * 获取 Nexmo / 短信通知
 *
 * @param  mixed  $notifiable
 * @return NexmoMessage
 */
public function toNexmo($notifiable)
{
    return (new NexmoMessage)
                ->content('Your SMS message content');
}
Unicode 内容
如果短信包含 unicode 字符,就应在 NexmoMessage 实例上调用 unicode 方法:
/**
 * 获取 Nexmo / 短信通知
 *
 * @param  mixed  $notifiable
 * @return NexmoMessage
 */
public function toNexmo($notifiable)
{
    return (new NexmoMessage)
                ->content('Your unicode message')
                ->unicode();
}
自定义发送者号码
config/services.php 中的发送者号码与欲使用的发送者号码不一致时,就可以使用 NexmoMessage 实例上的 from 方法:
/**
 * 获取 Nexmo / 短信通知
 *
 * @param  mixed  $notifiable
 * @return NexmoMessage
 */
public function toNexmo($notifiable)
{
    return (new NexmoMessage)
                ->content('Your SMS message content')
                ->from('15554443333');
}
路由短信通知
当通过 mexmo 渠道发送通知是,通知系统会自动在通知实体中寻找 phone_number 属性。如果你希望自定义通知送达的手机号码,在实体中定义一个 routeNotificationForNexmo 方法:
<?php

namespace App;

use Illuminate\Notifications\Notifiable;
use Illuminate\Foundation\Auth\User as Authenticatable;

class User extends Authenticatable
{
    use Notifiable;

    /**
     * Route notifications for the Nexmo channel.
     *
     * @param  \Illuminate\Notifications\Notification  $notification
     * @return string
     */
    public function routeNotificationForNexmo($notification)
    {
        return $this->phone;
    }
}
Slack 通知
先决条件
在你通过 Slack 发送通知之前,你必须通过 Composer 安装 Guzzle HTTP 库:
composer require guzzlehttp/guzzle你需要为你的 Slack 组配置 "Incoming Webhook" 集成,它将为你提供 路由 Slack 通知 时所需要的 URL。
格式化 Slack 通知
要使一个通知支持被发送为一个 Slack 消息,你需要为通知类定义一个 toSlack 方法。该方法应接受一个 $notifiable 实体为参数,并可以返回一个 Illuminate\Notifications\Messages\SlackMessage 实例。 Slack 消息需要包含文本内容,以及一个「attachement」 用来附加额外的文本或者数组字段。让我来看一个基本的 toSlack 示例:
/**
 * Get the Slack representation of the notification.
 *
 * @param  mixed  $notifiable
 * @return SlackMessage
 */
public function toSlack($notifiable)
{
    return (new SlackMessage)
                ->content('One of your invoices has been paid!');
}
在这个示例中,我们仅仅发送了一行文本给 Slack,它将创建类似如下的一个消息:

自定义发送人和收件人
你可以使用 from 和 to 方法来自定义发送人和收件人。form 方法接受一个用户名和 emoji 标识符,而 to 方法接受一个渠道或者用户名:
/**
 * Get the Slack representation of the notification.
 *
 * @param  mixed  $notifiable
 * @return SlackMessage
 */
public function toSlack($notifiable)
{
    return (new SlackMessage)
                ->from('Ghost', ':ghost:')
                ->to('#other')
                ->content('This will be sent to #other');
}
你也可以使用图片来代替 emoji:
/**
 * Get the Slack representation of the notification.
 *
 * @param  mixed  $notifiable
 * @return SlackMessage
 */
public function toSlack($notifiable)
{
    return (new SlackMessage)
                ->from('Laravel')
                ->image('https://laravel.com/favicon.png')
                ->content('This will display the Laravel logo next to the message');
}
Slack 附件
你也可以为 Slack 消息添加「附件」。附件提供比简单的文本消息更丰富的格式化选项。在如下例子中,你会发送一个有关应用异常的报错通知,它包含一个查看异常详情的链接:
/**
 * Get the Slack representation of the notification.
 *
 * @param  mixed  $notifiable
 * @return SlackMessage
 */
public function toSlack($notifiable)
{
    $url = url('/exceptions/'.$this->exception->id);

    return (new SlackMessage)
                ->error()
                ->content('Whoops! Something went wrong.')
                ->attachment(function ($attachment) use ($url) {
                    $attachment->title('Exception: File Not Found', $url)
                               ->content('File [background.jpg] was not found.');
                });
}
该示例将会产生一个类似如下显示的 Slack 消息:

附件也允许你指定一个展现给用户的数组数据,给定的数据会被格式化为表格样式,以方便阅读:
/**
* Get the Slack representation of the notification.
*
* @param mixed $notifiable
* @return SlackMessage
*/
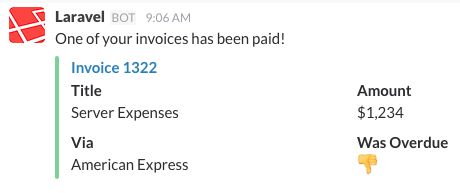
public function toSlack($notifiable)
{
$url = url('/invoices/'.$this->invoice->id);
return (new SlackMessage)
->success()
->content('One of your invoices has been paid!')
->attachment(function ($attachment) use ($url) {
$attachment->title('Invoice 1322', $url)
->fields([
'Title' => 'Server Expenses',
'Amount' => '$1,234',
'Via' => 'American Express',
'Was Overdue' => ':-1:',
]);
});
}该示例会创建一个类似如下显示的 Slack 消息:
Markdown 附件内容
如果一些附件字段包含 Markdown,你可以使用 markdown 方法通知 Slack 解析并显示给定的附件字段为 Markdown 格式化文本。该方法可以接受的值为: pretext,text,以及或者 fields 。如需获取 Slack 附件格式化的更多信息,请点击 Slack API 文档:
/**
 * Get the Slack representation of the notification.
 *
 * @param  mixed  $notifiable
 * @return SlackMessage
 */
public function toSlack($notifiable)
{
    $url = url('/exceptions/'.$this->exception->id);

    return (new SlackMessage)
                ->error()
                ->content('Whoops! Something went wrong.')
                ->attachment(function ($attachment) use ($url) {
                    $attachment->title('Exception: File Not Found', $url)
                               ->content('File [background.jpg] was *not found*.')
                               ->markdown(['text']);
                });
}
路由 Slack 通知
要把 Slack 通知路由到正确的位置,需要为你的可通知实体定义一个 routeNotificationForSlack 方法。它返回通知将被发送到的 URL 回调地址。回调地址可以在 Slack 组中通过附加「Incoming Webhook」服务来生成:
<?php

namespace App;

use Illuminate\Notifications\Notifiable;
use Illuminate\Foundation\Auth\User as Authenticatable;

class User extends Authenticatable
{
    use Notifiable;

    /**
     * Route notifications for the Slack channel.
     *
     * @param  \Illuminate\Notifications\Notification  $notification
     * @return string
     */
    public function routeNotificationForSlack($notification)
    {
        return $this->slack_webhook_url;
    }
}
通知事件
发送通知之后,通知系统就会触发 Illuminate\Notifications\Events\NotificationSent 事件。它包含「notifiable」实体,和通知实例本身。你可以在 EventServiceProvider 中为该事件注册监听器:
/**
 * The event listener mappings for the application.
 *
 * @var array
 */
protected $listen = [
    'Illuminate\Notifications\Events\NotificationSent' => [
        'App\Listeners\LogNotification',
    ],
];
{tip} 别忘记在
EventServiceProvider中注册监听器之后,使用event:generateArtisan 命令快速生成监听器类。
在一个事件监听器中,你可以访问事件的 notifiable,notification,和 channel 属性,来了解通知接受者和通知本身:
/**
 * Handle the event.
 *
 * @param  NotificationSent  $event
 * @return void
 */
public function handle(NotificationSent $event)
{
    // $event->channel
    // $event->notifiable
    // $event->notification
}
自定义频道
Laravel 附带少数的通知频道,但你可能需要编写自己的驱动以便通过其它频道发送通知。 Laravel 使得这一步很简单。要开始,需要定义一个包含 send 方法的类。这个方法接收两个参数: $notifiable 和 $notification :
<?php

namespace App\Channels;

use Illuminate\Notifications\Notification;

class VoiceChannel
{
    /**
     * 发送给定的通知
     *
     * @param  mixed  $notifiable
     * @param  \Illuminate\Notifications\Notification  $notification
     * @return void
     */
    public function send($notifiable, Notification $notification)
    {
        $message = $notification->toVoice($notifiable);

        // 将通知发送到 $notifiable 实例...
    }
}
一旦定义了通知频道类,你可以从任何通知类的 via 方法得到类名:
<?php

namespace App\Notifications;

use Illuminate\Bus\Queueable;
use App\Channels\VoiceChannel;
use App\Channels\Messages\VoiceMessage;
use Illuminate\Notifications\Notification;
use Illuminate\Contracts\Queue\ShouldQueue;

class InvoicePaid extends Notification
{
    use Queueable;

    /**
     * 获取通知频道
     *
     * @param  mixed  $notifiable
     * @return array|string
     */
    public function via($notifiable)
    {
        return [VoiceChannel::class];
    }

    /**
     * 获取通知的语音
     *
     * @param  mixed  $notifiable
     * @return VoiceMessage
     */
    public function toVoice($notifiable)
    {
        // ...
    }
}本译文仅用于学习和交流目的,转载请务必注明文章译者、出处、和本文链接
我们的翻译工作遵照 CC 协议,如果我们的工作有侵犯到您的权益,请及时联系我们。


 关于 LearnKu


推荐文章: