
[Go 开源推荐] webp_server_go —— 可自动将 jpg, jpeg, PNG 图片进行压缩的 WebP 服务
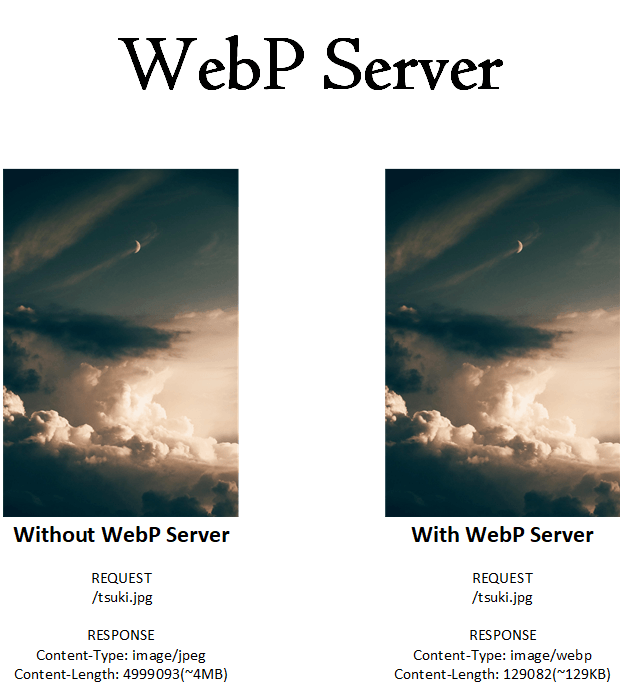
这是基于 Golang 的服务器, 允许你动态提供 WebP 图像。它将默认转换 jpg,jpeg,png 文件,可以通过编辑 config.json 进行自定义。
- 目前支持的图像格式:JPEG,PNG,BMP,GIF(目前为静态图像)
例如,当你访问
https://a.com/1.jpg时,它将作为image/webp,而不会更改 URL。对于 Safari 和 Opera 用户,将使用原始图像。
基本使用步骤
关于 config.json 中的 IMG_PATH 部分。如果你在 https://example.com/pics/tsuki.jpg 上提供图像,而文件在 /var/www/image/pics/tsuki.jpg 上,则 IMG_PATH 应为 /var/www/image。EXHAUST_PATH 是用于输出 webp 图像的缓存文件夹,在上述示例中,EXHAUST_PATH 设置为 /var/cache/webp 图像将保存在 /var/cache/webp/pics/tsuki.jpg.1582558990.webp 中。
1. 下载或构建二进制文件
从 release 页面下载 webp-server。
想要构建自己的二进制文件?查看 build 部分
2. 配置文件
创建如下 config.json 文件以满足你的需要, 默认的转换质量为 80%.
{
    "HOST": "127.0.0.1",
    "PORT": "3333",
    "QUALITY": "80",
    "IMG_PATH": "/path/to/pics",
    "EXHAUST_PATH": "/path/to/exhaust",
    "ALLOWED_TYPES": ["jpg","png","jpeg"]
}
3. 运行
./webp-server --help
Usage of ./webp-server:
  -child
        is child process
  -config string
        /path/to/config.json. (Default: ./config.json) (default "config.json")
  -dump-config
        Print sample config.json
  -dump-systemd
        Print sample systemd service file.
  -jobs int
        Prefetch thread, default is all. (default 8)
  -prefetch
        Prefetch and convert image to webp
  -prefork
        use prefork
预读
预读会将你的所有图像转换为 webp. 不要担心, WebP 服务器将启动, 你不必等到预读完成.
./webp-server -prefetch
如果要控制预取时使用的线程, 请添加 -jobs=4. 默认情况下, 它将利用您的所有 CPU 内核.
# use 4 cores
./webp-server -prefetch -jobs=4
转储配置文件 config.json
标准的 config.json 将显示在屏幕上. 你可以使用 > 重定向到一个文件.
./webp-server -dump-config > config.json
转储 systemd 服务文件
标准的 systemd 服务文件讲显示在屏幕上. 你可以使用 > 重定向到一个文件.
./webp-server -dump-systemd
screen 或 tmux
使用 screen 或 tmux 避免程序被终止. 我们以 screen 为例
screen -S webp
./webp-server --config /path/to/config.json
(在 webp-server 运行的情况下可以使用快捷键 Ctrl-A-D 分离 screen.)
systemd
Don't worry, we've got you covered!
不用担心, 我们会覆盖你的内容!
将 webp-server 下载到 /opt/webps/webp-server, 并创建一个配置文件到 /opt/webps/config.json, 然后,
./webp-server -dump-systemd > /lib/systemd/system/webp-server.service
systemctl daemon-reload
systemctl enable webps.service
systemctl start webps.service
4. Nginx proxy_pass
让 Nginx 代理 proxy_pass http://localhost:3333/;, 然后你的 webp-server 就运行在其中
WordPress 示例
location ^~ /wp-content/uploads/ {
        proxy_pass http://127.0.0.1:3333;
}
本文中的所有译文仅用于学习和交流目的,转载请务必注明文章译者、出处、和本文链接
我们的翻译工作遵照 CC 协议,如果我们的工作有侵犯到您的权益,请及时联系我们。


 关于 LearnKu


推荐文章: