
[转]Vue3 + Electron 开发图片压缩桌面应用
Electron 对于了解 NodeJS 的童鞋来说用起来并不复杂,需要着重理解下渲染进程和主进程的区别和通信即可,这篇文章是网上的一个实践,流程图画的挺清楚的。
简单理解就是 electron 为 NodeJS 提供了系统相关的 API,还提供了渲染进程(可想为浏览器)和主进程(Nodejs)的通信封装,然后写的页面就负责 UI 渲染和交互,NodeJS 就用来实现原生应用才有的能力。
原文:juejin.cn/post/6924521091914776584
作者:Iris_Mei
Vue3 + Electron 开发图片压缩桌面应用
前言
图片压缩是前端开发中很常见的操作,一般常见的有三种方式:
- UI 小姐姐压缩好提供给前端(这么贴心的UI小姐姐哪里找~)
- PS 等图片处理软件压缩
- 线上网站图片压缩(tinypng 等)
但是,今天我们要用js自己写一个桌面应用,用来压缩图片,软件截图如下: 
应用特点:
- 批量压缩:可以自己配置批量压缩的张数,我们这次定的是100张(tinypng在线一次最多压缩20张)
- 压缩速度快
- 压缩质量和tinypng差不多
聊聊技术选型: Electron + Vue3 + Element plus
Electron:
是目前比较火的js构建跨平台应用的框架,之前也使用electron 开发过小型的应用,我个人喜欢electron 的原因基于三点:
- 跨平台,一次开发,多平台适用;
- 学习成本和开发时间成本低, 尤其对于前端开发人员来说;
- 内置常用的功能模块,比如我们这次的图片压缩就是用到了electron 内置的 nativeImage 模块
electron的优点还有很多,大家可以移步至electron官网了解,很多我们常用的软件都是使用electron开发的,比如我们前端工程师的饭碗软件之一:vs code
当然,缺点也是有的,应用打包后略大,比如我们这次的图片压缩应用,打包后50多M,即便做了打包优化,包体积也不会很小,这个是electron 本身的底层实现决定的,期待官方可以优化下这个点~
Vue3:
个人比较喜欢3.0 版本的 Composition API,但是公司现在都是Vue2.x版本,打算拿这个应用练练手~
Element Plus:
这个主要是懒(捂脸),现成的组件用起来真香~
功能思考
electron 核心分为 主进程和渲染进程:
- 渲染进程是我们的前端环境,这个项目中就是vue 构建的单页面应用;
- 主进程管理渲染进程,并且负责和系统的交互,是渲染进程与系统之间的桥梁;
对于图片压缩功能的实现,用户在页面批量选择图片,发送图片路径给主进程,主进程压缩图片并将图片保存在指定目录,将压缩成功或者失败的状态返回给渲染进程,页面提示成功或失败: 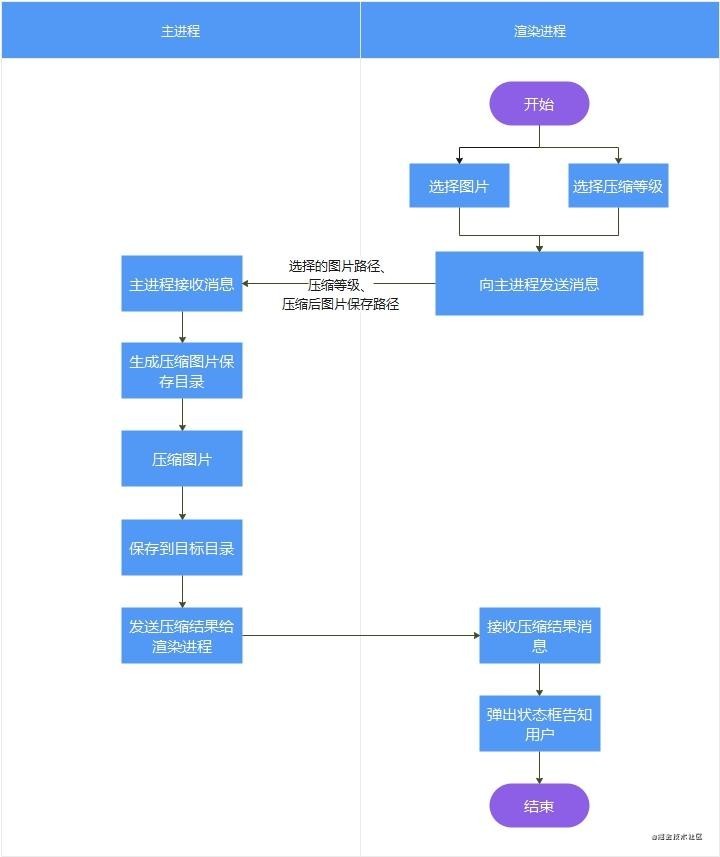
项目构建
首先你需要已经安装:
- node
- npm
- vue-cli
下面我们创建项目:
vue create <项目名称>然后录入项目的信息:
? Please pick a preset: Manually select features
? Check the features needed for your project: Choose Vue version, Babel, Router, CSS Pre-processors
? Choose a version of Vue.js that you want to start the project with 3.x (Preview)
? Use history mode for router? (Requires proper server setup for index fallback in production) No
? Pick a CSS pre-processor (PostCSS, Autoprefixer and CSS Modules are supported by default): Sass/SCSS (with node-sass)
? Where do you prefer placing config for Babel, ESLint, etc.? In package.json
? Save this as a preset for future projects? No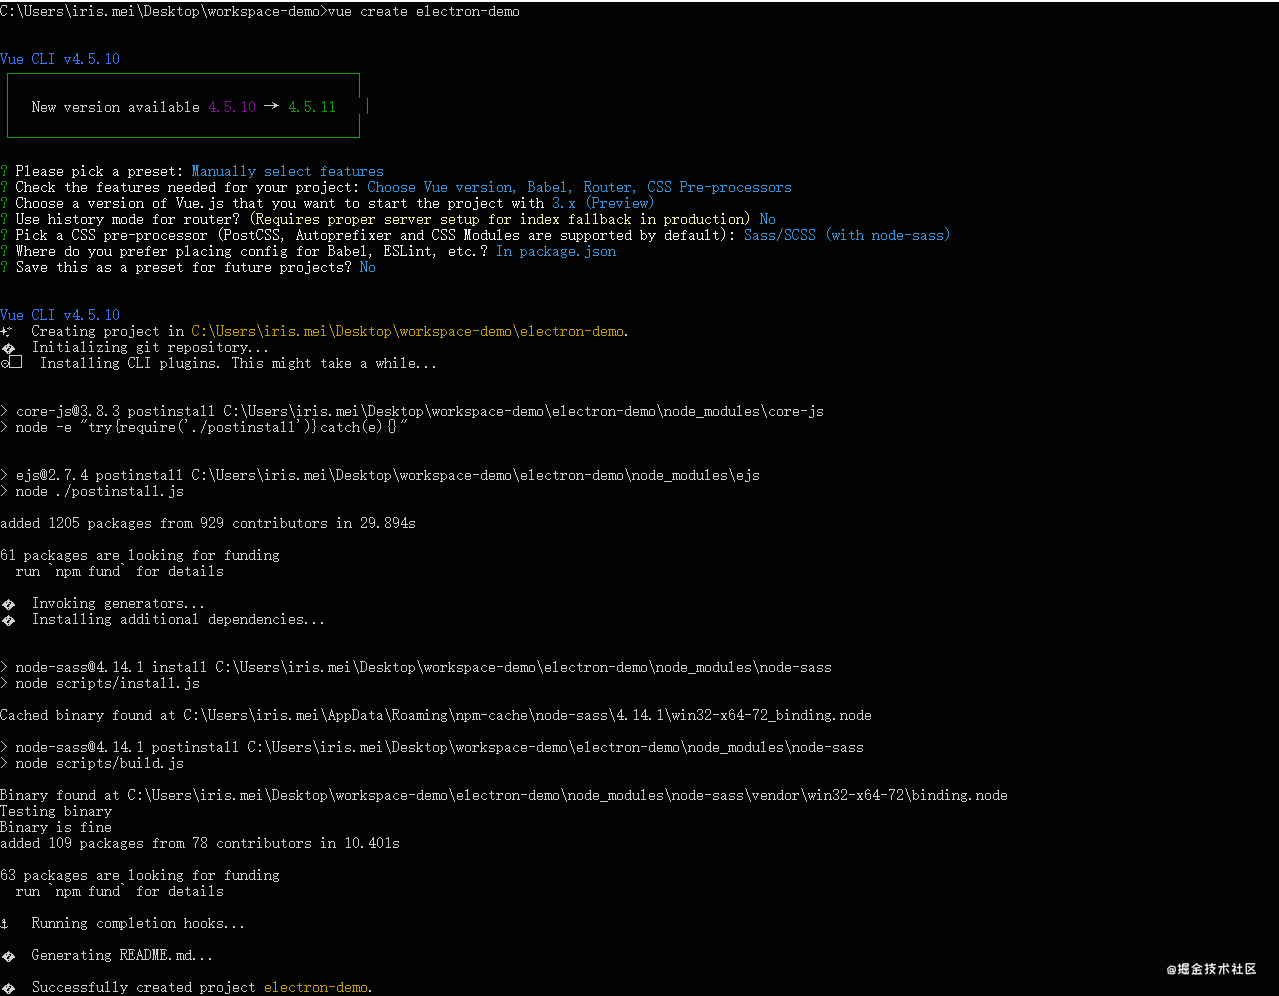
安装 vue-cli-plugin-electron-builder,electron版本选择^9.0.0:
cd <项目目录>
vue add electron-builder
启动项目:
npm run electron:serve
项目目录
初始化的项目中已经有一些页面了,但是我们并不需要,下面我们精简下项目目录:
- dist_electron
- node_modules
- public
- index.html
- src
- router
- index.js
- styles
- base.scss
- utils
- utils.js
- compress-electron.js
- views
- ImageCompress.vue
- App.vue
- background.js
- main.js
- router
- babel.config.js
- package.json
- README.md
开始coding
首先我们安装element-plus
npm install element-plus --save在main.js 中引入element-plus 和base.scss(base.scss是一些基础样式和公共样式)
// main.js

import { createApp } from 'vue'
import App from './App.vue'
import router from './router'
import ElementPlus from 'element-plus';
import 'element-plus/lib/theme-chalk/index.css';
import './styles/base.scss'

createApp(App).use(router).use(ElementPlus).mount('#app')
编写路由:router/index.js
// router/index.js
import { createRouter, createWebHashHistory } from 'vue-router'
import ImageCompress from '../views/ImageCompress.vue'
const routes = [{
    path: '/',
    name: 'ImageCompress',
    component: ImageCompress,
  }]
const router = createRouter({
  history: createWebHashHistory(),
  routes
})
export default router
复制代码
electron 中ipcmian(主进程)、ipcrenderer(渲染进程)负责主进程和渲染进程之间的通信,这需要在vue页面中引入 electron.ipcrenderer,进行引入之前,我们需要在electron的background.js中配置,允许页面集成node 模块
// background.js

const win = new BrowserWindow({
    width: 800, // 应用界面宽度
    height: 600, // 应用界面高度
    webPreferences: {
      nodeIntegration: true, //允许页面集成node模块
      webSecurity: false,// 取消跨域限制
    }
})
现在我们就可以在页面引入electron、path等node模块了,使用 window.require(“electron”)引入。
现在我们来写应用界面和逻辑,界面组件使用element-plus: 压缩质量选择用滑块组件el-slider,图片选择用el-upload组件,页面结构如下:
<!-- 页面结构-->
<template>
  <div class="tinypng-wrapper">
    <div class="tips">
      <p>1\. 只能压缩 <span class="highlight">jpg/png</span> 格式图片;</p>
      <p>2\. 一次最多压缩<span class="highlight">100张</span>;</p>
      <p>
        3\. 压缩后的文件会保存在<span class="highlight"
          >最后一张图片路径下的image-compress文件夹</span
        >中, 请留意成功后的提示;
      </p>
      <p>
        4\. image-compress文件夹中如果有同名文件,将被<span class="highlight"
          >覆盖</span
        >;
      </p>
      <p>5\. 图片处理需要时间,点击压缩后请耐心等待片刻。</p>
    </div>
    <div class="header">
      <span class="label">压缩质量</span>
      <el-slider
        class="slider"
        v-model="quality"
        :step="10"
        :min="10"
        :marks="marks"
        show-stops
      >
      </el-slider>
    </div>
    <div class="header">
      <el-input placeholder="保存文件目录" v-model="targetDir" disabled>
        <template #prepend>图片保存目录</template>
      </el-input>
      <el-button style="margin-left: 24px" type="success" @click="handleSubmit">开始压缩</el-button>
    </div>

    <div class="tinypng-content">
      <el-upload
        class="upload-demo"
        ref="upload"
        accept=".jpg,.png"
        multiple
        :auto-upload="false"
        :limit="maxFileNum"
        :file-list="fileList"
        :before-upload="beforeUpload"
        :on-exceed="handleExceed"
        :on-change="handleChangeFile"
        action=""
        list-type="picture-card"
      >
        <i class="el-icon-plus"></i>
      </el-upload>
    </div>
  </div>
</template>
下面是页面逻辑的编写,用户选择文件、压缩质量后,生成一个文件保存目录,并将文件的系统路径保存在数组中,通过ipcRenderer 传递给主进程,交由主进程中去进行图片处理,主进程处理完成(或失败)后,并且在页面响应由主进程返回的处理状态:
- ipcRenderer.send(): 向主进程(ipcMain)发送消息
- ipcRenderer.on(): 响应主进程(ipcMain)推送过来的消息
// 页面逻辑
<script>
// electron ipcRenderer -- 与electron主进程通信
const { ipcRenderer } = window.require("electron")
// path模块,处理文件路径
const PATH = window.require("path");

import { onMounted, ref, onBeforeUnmount } from "vue";
import { ElMessage, ElNotification, ElLoading } from "element-plus";
// loading 实例
 let loadingInstance = null;

export default {
  setup() {
    // 文件列表
    const fileList = ref([]);
    // 批量处理文件数量限制
    const maxFileNum = ref(100);
    // 图片选择组件
    const upload = ref(null);
    // 图片保存的目标目录
    const targetDir = ref(null);
    // 图片压缩质量
    const quality = ref(50);
    // 图片压缩质量选项
    const marks = ref({
      10: "10",
      20: "20",
      30: "30",
      40: "40",
      50: "50",
      60: "60",
      70: "70",
      80: "80",
      90: "90",
      100: "100"
    });

    // 文件选择数量超出设定值时,弹出警告框
    const handleExceed = (files, fileList) => {
        ElMessage.warning({
            message: `最多只能选择 ${ maxFileNum.value }个文件哦,当前选择了 ${files.length + fileList.length} 个文件`,
            type: "warning"
        });

    };

    // 文件改变事件,设置文件保存目录为当前目录下的image-compress文件夹,没有会创建,有同名文件会覆盖
    const handleChangeFile = file => {
        const parseUrl = PATH.parse(file.raw.path);
        targetDir.value = parseUrl.dir + `${PATH.sep}image-compress`;
    };

    // 确认按钮,开始压缩
    const handleSubmit = () => {
      const uploadFiles = upload.value.uploadFiles;
      // 验证是否选择了图片,没有选择弹出警告信息
       if (!uploadFiles.length) {
        ElNotification({
          title: "警告",
          message: "请先选择文件!",
          type: "warning"
        });
        return false;
      }

      const dir = PATH.normalize(targetDir.value);

      // 遍历出图片文件的路径
      const fileList = [];
      uploadFiles.map(item => item?.raw?.path && fileList.push(item.raw.path));

        // 消息参数
      const data = {
        fileList,
        quality: quality.value,
        targetDir: dir
      };

      // 显示loading
       loadingInstance = ElLoading.service({
            background: "rgba(255,255,255,0.5)"
          });

     // 向主进程发送消息,消息中有:压缩质量、压缩保存目录、压缩文件的地址(数组)
     ipcRenderer.send("compress-image", data);
    };

    onBeforeUnmount(() => {
      loadingInstance = null;
    });

    // mounted 生命周期
    onMounted(() => {
    // 响应主进程推送的图片压缩状态,并弹框显示
          ipcRenderer.on("compress-status", (event, arg) => {
        ElNotification({
            title: arg.success ? "成功" : "失败",
            message: arg.success ? arg.msg : arg.reason,
            type: arg.success ? "success" : "error"
        });
        loadingInstance.close();
        if (arg.success) {
          fileList.value = [];
          quality.value = 50;
          targetDir.value = null;
        }

    });
    });

    return {
      targetDir,
      upload,
      quality,
      marks,
      fileList,
      maxFileNum,
      handleExceed,
      handleChangeFile,
      handleSubmit
    };
  }
};
</script>
样式略…
现在需要在主进程中响应页面发送过来的消息,主进程的通信使用ipcMain: ipcMain.on(): 接受页面发送的消息
// background.js

// 图片压缩:接收 页面发来的消息,arg 为消息参数
ipcMain.on('compress-image', async (event, arg) => {
    // 图片压缩
  const status = await imageCompress(arg)
  // 发送结果给页面
  BrowerWindow.webContents.send('compress-status', status)
})
下面,开始压缩图片的逻辑,utils/utils.js 是一些常用方法的封装,utils/compress-electron.js 是图片压缩的逻辑:
// utils.js

import fs from 'fs'

// 创建目录,返回创建目录的结果
const mkdir = (path) => {
    return new Promise((resolve, reject) => {
        if (fs.existsSync( path )) {
            resolve(true)
            return
        }
        fs.mkdir(path, (error) => {
            if (error) {
                reject(false)
            } else {
                resolve(true)
            }
        })
    })
}
export {
    mkdir,
}
// compress-electron.js
import { nativeImage } from 'electron'
import path from 'path'
import fs from 'fs'
import { mkdir } from './utils'
const imageCompress = (input, quality) => {
quality = quality || 50
const image = nativeImage.createFromPath(input);
const res = image.resize({
// 图片压缩质量,可选值:better || good || best
quality: 'best'
})
console.log(res)
// const imageData = res.toPNG()
// jpg 压缩 图片质量设置
const imageData = res.toJPEG(quality)
return imageData;
}
export default async (options) => {
// 创建保存图片目录,失败的话退出
const createDir = await mkdir(options.targetDir)
if (!createDir) return {
success: false,
msg: '创建图片保存目录失败!'
}
try {
options.fileList.map((item) => {
const dirParse = path.parse(item)
const data = imageCompress(item, options.quality)
const targetDir = `${options.targetDir}${path.sep}${dirParse.name}${dirParse.ext}`
fs.writeFileSync(targetDir,data)
})
return {
success: true,
msg: `图片压缩成功,保存在 ${options.targetDir} 目录中`
}
} catch (err) {
console.log(err, 'err')
return {
success: false,
msg: `图片压缩失败!`,
reason: err
}
}
}最后,在electron 入口文件background.js 中引入compress-electron.js,并且隐藏顶部的菜单,background.js的完整代码:
'use strict'

import { app, protocol, BrowserWindow, ipcMain, Menu } from 'electron'
import { createProtocol } from 'vue-cli-plugin-electron-builder/lib'
import installExtension, { VUEJS_DEVTOOLS } from 'electron-devtools-installer'
import imageCompress from './utils/compress-electron.js'
const isDevelopment = process.env.NODE_ENV !== 'production'

// Scheme must be registered before the app is ready
protocol.registerSchemesAsPrivileged([
  { scheme: 'app', privileges: { secure: true, standard: true } }
])

let BrowerWindow = null

async function createWindow() {
  // Create the browser window.
  BrowerWindow = new BrowserWindow({
    width: 800,
    height: 600,
    webPreferences: {
      nodeIntegration: true,
      webSecurity: false,// 取消跨域限制
    }
  })

  if (process.env.WEBPACK_DEV_SERVER_URL) {
    // Load the url of the dev server if in development mode
    await BrowerWindow.loadURL(process.env.WEBPACK_DEV_SERVER_URL)
    if (!process.env.IS_TEST) BrowerWindow.webContents.openDevTools()
  } else {
    createProtocol('app')
    // Load the index.html when not in development
    BrowerWindow.loadURL('app://./index.html')
  }
}

// Quit when all windows are closed.
app.on('window-all-closed', () => {
  // On macOS it is common for applications and their menu bar
  // to stay active until the user quits explicitly with Cmd + Q
  if (process.platform !== 'darwin') {
    app.quit()
  }
})

app.on('activate', () => {
  // On macOS it's common to re-create a window in the app when the
  // dock icon is clicked and there are no other windows open.
  if (BrowserWindow.getAllWindows().length === 0) createWindow()
})

// This method will be called when Electron has finished
// initialization and is ready to create browser windows.
// Some APIs can only be used after this event occurs.
app.on('ready', async () => {
  if (isDevelopment && !process.env.IS_TEST) {
    // Install Vue Devtools
    try {
      await installExtension(VUEJS_DEVTOOLS)
    } catch (e) {
      console.error('Vue Devtools failed to install:', e.toString())
    }
  }
  createWindow()
})

// Exit cleanly on request from parent process in development mode.
if (isDevelopment) {
  if (process.platform === 'win32') {
    process.on('message', (data) => {
      if (data === 'graceful-exit') {
        app.quit()
      }
    })
  } else {
    process.on('SIGTERM', () => {
      app.quit()
    })
  }
}

// 图片压缩:接收 页面发来的消息,arg 为消息参数
ipcMain.on('compress-image', async (event, arg) => {
  const status = await imageCompress(arg)
  console.log('compress-status')
  BrowerWindow.webContents.send('compress-status', status)
})
效果图: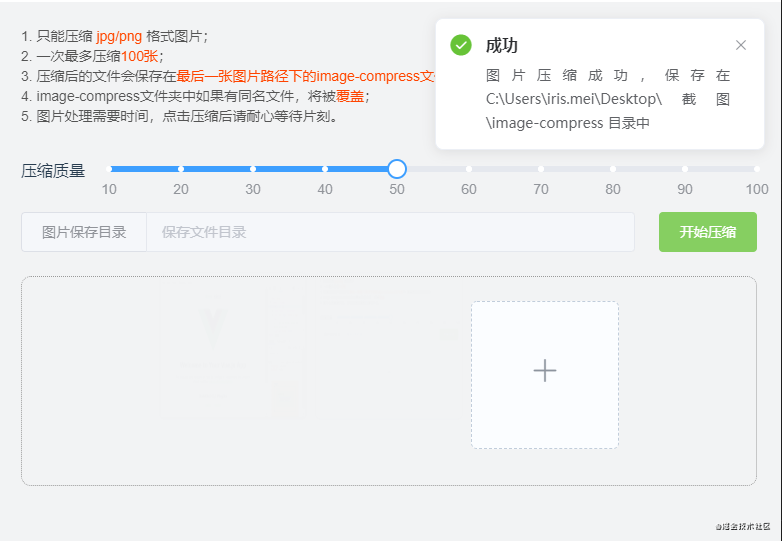
打包
执行命令
npm run electron:build不同的电脑,打包速度时间不同,稍等几分钟以后,就可以在项目目录下的dist_electron 文件夹中看到.exe的文件了,这就是我们打包出来的包(mac系统也是这样打包,只是生成的文件后缀不一样),双击运行.exe文件就行了,下面是效果演示: 
更多功能
electron的nativeImage还可以实现是图片的转格式(png转jpg,jpg转png),图片缩放、裁剪,可以在官方文档查看api,将公用的方法封装,我写的效果图如下: 
最后
文中如有任何错误,欢迎指正~~
最后感谢全大佬的帮助指导~~


 关于 LearnKu


推荐文章: