
编写具有描述性的 RESTful API (二): 推荐与 Observer
11 / 0 / 创建于 7年前 /
 weiwenhao 的个人博客
推荐阅读
建表
接上一篇提到的,通过专题( collection ), 来实现推荐阅读的编写.
按照惯例,先来看看 专题的设计稿 ,然后设计出表结构.
 Schema::create('collections', function (Blueprint $table) {
     $table->increments('id');
     $table->string('name');
     $table->string('avatar');
     $table->string('description');

     $table->unsignedInteger('post_count')->default(0);
     $table->unsignedInteger('fans_count')->default(0);

     $table->unsignedInteger('user_id')->comment('创建者');

     $table->timestamps();
 });
专题存在管理员( collection_admin )/投稿作者( collection_author )/关注者( collection_follower ) /帖子( collection_post ) 此处以 collection_post 为例看一下中间表的设计,其是 collection 和 post 中间表.
Schema::create('collection_post', function (Blueprint $table) {
    $table->unsignedInteger('post_id');
    $table->unsignedInteger('collection_id');

    $table->timestamp('passed_at')->nullable()->comment('审核通过时间');

    $table->timestamps();

    $table->index('post_id');
    $table->index('collection_id');

    $table->unique(['post_id', 'collection_id']);
});
建好表之后记得填充 seeder 哦.
建模
# Collection.php

<?php

namespace App\Models;

class Collection extends Model
{
    public function posts()
    {
        return $this->belongsToMany(Post::class, 'collection_post');
    }
}
# Post.php
<?php
namespace App\Models;
class Post extends Model
{
// ...
public function collections()
{
return $this->belongsToMany(Collection::class, 'collection_post');
}
}有了 Collection ,接下来就能够实现帖子详情页设计稿的最后一部分啦
专题收入

首先是专题收录部分, 按照 RESTful 的规范,我们可以设计出这样一条 API
test.com/api/posts/{post}/collections , 此处编码较为简单,参考源码即可
推荐阅读
首先还是按照 RESTful 规范 来设计 API
test.com/api/posts/{post}/recommend-posts?include=user
相应的控制器代码
# PostController.php

public function indexOfRecommend($post)
{
    $collectionIds = $post->collections()->pluck('id');

    $query = Post::whereHas('collections', function ($query) use ($collectionIds) {
        $query->whereIn('collection_id', $collectionIds);
    });

    // 排序问题
    $posts = $query->columns()->paginate();

    return PostResource::make($posts);
}
这里需要说明一下, laravel 提供的 whereHas 会生成一个效率不高的 SQL 语句,需要加载全表.但是系列的目的是编写具有描述性的 RESTful API ,所以此处不做进一步优化.
Observer
Observer 既 观察者,可以用于代码解耦,保持控制器简洁. 接下来的两个逻辑会涉及 Observer 的使用场景.
热度
$posts = $query->columns()->paginate(); 这行语句在没有指定 orderBy 时, MySQL 会按照 id , asc 的顺序取出帖子,但是在一般的社区网站中,通常会有一个热度,然后按照热度将帖子取出来.
这部分的排序算法又很多,按照产品给定的公式计算即可
下文假定热度计算公式为 heat = a (timestamp - 1546300800) + b read_count + c * like_count
a/b/c 代表每一个特征所占的权重,可根据运营需求随时调整, 由于时间戳过大,所以通过 减去 2019-01-01的时间戳 1546300800 ,来缩小时间戳数字, 当然即使如此依旧会得到一个很大的数字,所以 a 的值会很小
Schema::create('posts', function (Blueprint $table) {
    // ...

    $table->integer('heat')->index()->comment('热度');

    // ...
});
由于项目在开发阶段,所以直接修改原有的 migration , 添加 heat 字段.然后执行
> php artisan migrate:refresh --seed
heat 字段的维护原则是,检测到 read_count 或者 like_count 发生变化时,则更新相关的热度.因此此处会用 observe来实现相关的功能.
按照文档创建观察者并注册后,可以编写相关的代码
> php artisan make:observer PostObserver --model=Models/Post
class PostObserver
{
    /**
     * @param Post $post
     */
    public function saving(Post $post)
    {
        if ($post->isDirty(['like_count', 'read_count'])) {
            $heat = 0.001 * ($post->created_at->timestamp - 1546300800)
                + 10 * $post->read_count
                + 1000 * $post->like_count;

            $post->heat = (integer)$heat;
        }
    }
}
调用 $model->save/update/create 都会在持久化到数据库之前触发 saving 方法.
创建评论
基础编码
<?php

namespace App\Http\Controllers\Api;

use App\Http\Controllers\Controller;
use App\Models\Comment;
use App\Resources\CommentResource;
use Illuminate\Http\Request;
use Illuminate\Http\Response;

class CommentController extends Controller
{
    /**
     * @param  \Illuminate\Http\Request $request
     * @return \Illuminate\Contracts\Routing\ResponseFactory|Response
     */
    public function store(Request $request)
    {
        $data = $request->all();

        $data['user_id'] = \Auth::id();
        $data['floor'] = Comment::where('post_id', $request->input('post_id'))->max('floor') + 1;
        $comment = Comment::create($data);

        // RESTful 规范中,创建成功应该返回201状态码
        return \response(CommentResource::make($comment), 201);
    }
}
Model
<?php

namespace App\Models;

use Staudenmeir\EloquentEagerLimit\HasEagerLimit;

class Comment extends Model
{
    use HasEagerLimit;

    protected $fillable = ['content', 'user_id', 'post_id', 'floor', 'selected'];

    public function getLikeCountAttribute()
    {
        return $this->attributes['like_count'] ?? 0;
    }

    public function getReplyCountAttribute()
    {
        return $this->attributes['reply_count'] ?? 0;
    }
由于使用了create 方法进行创建,因此需要在模型中声明 $fillable
由于建表的时候为 like_count 和 reply_count 设定了默认值为 0 , 所以 在 create 时没有设定 like_count , reply_count .但是这样会造成控制器中的 store 方法中的 $comment 不存在 like_count , 和 reply_count 这两个 key , 这对前端是非常不友好的. 例如在 vue 中此处通常的做法是 this.comments.push(comment) .有两个办法解决这个问题
-
create 时添加
$data['like_count'] = 0和$data['reply_count'] = 0 -
使用模型修改器设置这两个 key 的默认值(上面的 Comment 模型中演示了该方法)
使用上述任意一种方法都能够保证查询与创建时的数据一致性.
API 展示, 相应的 Postman 文档附加在文末
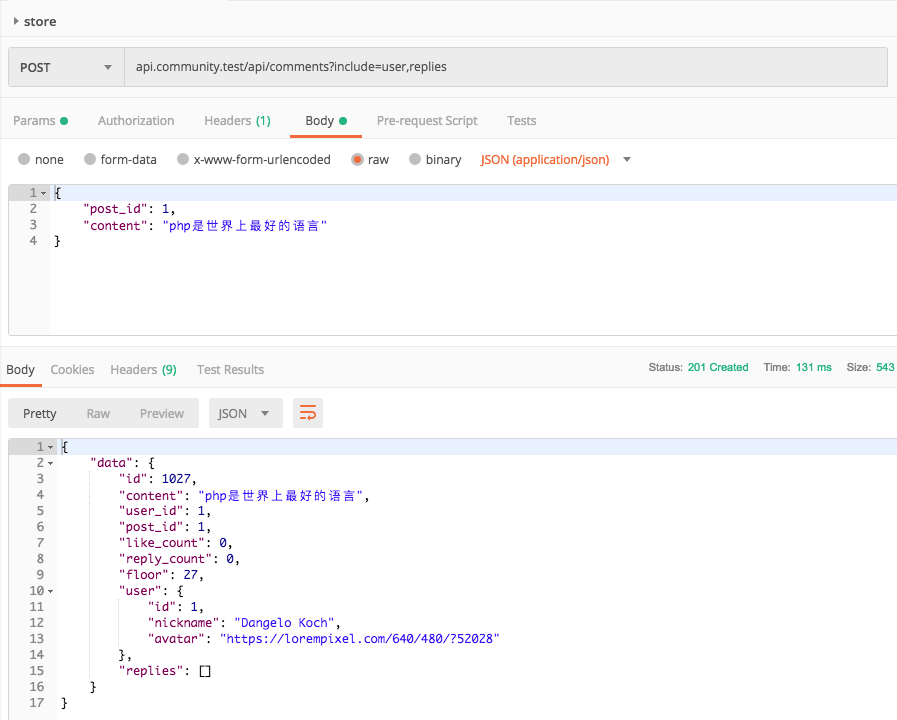
在控制器代码中, 将相应的 Model 交给了 tree-ql 处理, 所以这里依旧可以使用 include , 从而保证相应数据一致性.
posts 表中冗余了 comment_count ,因此当创建一条评论时,还需要相应的 post.comment_count + 1 . 创建并注册 CommentObserver. 然后完成相应的编码
# CommentObserver.php

<?php

namespace App\Observers;

use App\Models\Comment;

class CommentObserver
{
    public function created(Comment $comment)
    {
        $comment->post()->increment('comment_count');
    }
}
补充
帖子的发布流程
一个可能存在的问题是,一篇已经发布的帖子当用户想去再次修改它,此时如果修改到一半的帖子触发了自动保存机制,则会出现修改了一半的帖子被展示在首页等.
因此一张 posts 表并不能满足实际的需求,还需要增加一张 drafts 表来作为草稿箱, 用户的创建与修改操作都是在该表下进行的,只有用户点击发布时, 将相应的 drafts 同步到 posts 表即可. 相关流程参考简书即可.
发布流程编码示例
# DraftController.php

public function published(Draft $draft)
{
    Validator::make($draft->getAttributes(), [
        'title' => 'required|max:255',
        'content' => 'required'
    ])->validate();

    $draft->published();

    return response(null, 201);
}
public function published()
{
if (!$this->post_id) {
$post = Post::create([
'user_id' => $this->user_id,
'title' => $this->title,
'content' => $this->content,
'published_at' => $this->freshTimestampString(),
]);
$this->post_id = $post->id;
$this->save();
} else {
$post = Post::findOrFail($this->post_id);
$post->title = $this->title;
$post->content = $this->content;
$post->save();
}
}其余部分参考源码,相关 API 参考 Postman 文档.
相关
- Api Document https://documenter.getpostman.com/view/150...
- 线上调试工具 telescope
- 本节源码 weiwenhao/community-api
- Api Tool weiwenhao/tree-ql
- 上一节 编写具有描述性的 RESTful API (一): Workflow
本作品采用《CC 协议》,转载必须注明作者和本文链接


 关于 LearnKu


推荐文章: