
Go 实现雪花算法
6 / 0 / 创建于 7年前 /
 JaguarJack 的个人博客
雪花算法
Twitter 的
SnowFlake是一种经典分布式 ID 生成算法。ID 是一个 64 位的长整型。
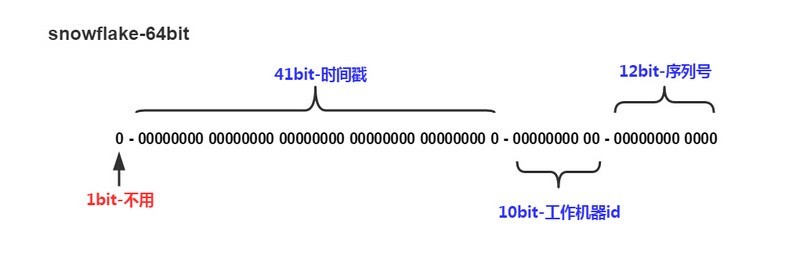
1位,不用。二进制中最高位为1的都是负数,但是我们生成的id一般都使用整数,所以这个最高位固定是041位,用来记录时间戳(毫秒)。
41位可以表示2^{41}−1个数字,
如果只用来表示正整数(计算机中正数包含0),可以表示的数值范围是:0 至 2^{41}−1,减1是因为可表示的数值范围是从0开始算的,而不是1。
也就是说41位可以表示241−1个毫秒的值,转化成单位年则是(2^{41}−1)/(1000∗60∗60∗24∗365)=69年
10位,用来记录工作机器id。
可以部署在2^{10}=1024个节点,包括5位datacenterId和5位workerId
5位(bit)可以表示的最大正整数是2^5−1=31,即可以用0、1、2、3、….31这32个数字,来表示不同的datecenterId或workerId
12位,序列号,用来记录同毫秒内产生的不同id。
12位(bit)可以表示的最大正整数是 2^{12}−1=4095,即可以用0、1、2、3、….4094这4095个数字,来表示同一机器同一时间截(毫秒)内产生的4095个ID序号
// Fetch prints the content found at a URL.
package main

import (
    "fmt"
    "log"
    "sync"
    "time"
)
const (
    workerIdBits int64  = 5
    datacenterIdBits int64 = 5
    sequenceBits int64 = 12

    maxWorkerId int64 = -1 ^ (-1 << uint64(workerIdBits))
    maxDatacenterId int64 = -1 ^ (-1 << uint64(datacenterIdBits))
    maxSequence int64 = -1 ^ (-1 << uint64(sequenceBits))

    timeLeft uint8 = 22
    dataLeft uint8 = 17
    workLeft uint8 = 12

    twepoch int64 = 1525705533000
)

type  worker struct {
    mu           sync.Mutex
    laststamp    int64
    workerid     int64
    datacenterid int64
    sequence     int64
}

func(w *worker) getCurrentTime() int64 {
    return time.Now().UnixNano() / 1e6
}
//var i int = 1
func(w *worker) nextId() int64 {
    w.mu.Lock()
    defer w.mu.Unlock()
    timestamp := w.getCurrentTime()
    if timestamp < w.laststamp {
        log.Fatal("can not generate id")
    }
    if w.laststamp == timestamp {
    // 这其实和 <==>
        // w.sequence++
        // if w.sequence++ > maxSequence  等价
        w.sequence = (w.sequence + 1) & maxSequence
        if w.sequence == 0 {
        // 之前使用 if, 只是没想到 GO 可以在一毫秒以内能生成到最大的 Sequence, 那样就会导致很多重复的
            // 这个地方使用 for 来等待下一毫秒
            for timestamp <= w.laststamp {
                //i++
                //fmt.Println(i)
                timestamp = w.getCurrentTime()
            }
        }
    } else {
        w.sequence = 0
    }
    w.laststamp = timestamp

    return ((timestamp - twepoch) << timeLeft) | (w.datacenterid << dataLeft)  | (w.workerid << workLeft) | w.sequence
}
func (w *worker) tilNextMillis() int64 {
    timestamp := w.getCurrentTime()
    if (timestamp <= w.laststamp) {
        timestamp = w.getCurrentTime()
    }
    return timestamp
}

func main() {
    w := new(worker)
    // 上一次时间
    w.laststamp = -1
    w.workerid  = 10
    w.datacenterid = 12
    w.sequence = 14

    i := 0
    r := make([]int64, 0)
    for {
        id := w.nextId()
        r = append(r, id)
        i++
        if  i > 10000000 {
            break
        }
    }
    j := 0
    for _,v := range r {
        if v > 1 {}
        j++
    }
    fmt.Println(j)
    fmt.Println(len(unique(r)))
    fmt.Println(w)

}
func unique(m[]int64) []int64 {
    s := make([]int64, 0)
    smap := make(map[int64]int64)
    for _, value := range m {
        //计算map长度
        length := len(smap)
        smap[value] = 1
        //比较map长度, 如果map长度不相等, 说明key不存在
        if len(smap) != length {
            s = append(s, value)
        }
    }

    return  s

}
代码解释
maxSequence int64 = -1 ^ (-1 << uint64(sequenceBits))
负数的二进制
这设计两个名词,反码和补码。来看一下整型 1 的二进制原码。
00000000 00000000 00000000 00000001
反码 (二进制取反)
11111111 11111111 11111111 11111110
补码 (反码 + 1)
11111111 11111111 11111111 11111111
再看这段代码,转成二进制:
11111111 11111111 11111111 11111111 ^ (11111111 11111111 11111111 11111111 << 12)
11111111 11111111 11111111 11111111 ^ 11111111 11111111 11110000 00000000
00000000 00000000 00001111 11111111 => 4095
整个过程大概就是这样的
还有就是 按位或 (|) 和 按位异或(^)的区别
0011 | 1011 => 1011 (按照征程 || 来想就可以了,1 true 0 false)
0011 ^ 1011 => 1000 (位相同为零, 位不同为一)
最后从结果来看,生成 1000W,也没有重复的。 而且速度也很快,个人感知大概在两秒左右。
本作品采用《CC 协议》,转载必须注明作者和本文链接


 关于 LearnKu


推荐文章: