
Memcached 编译安装部署、LRU 算法、分布式算法剖析
0 / 0 / 创建于 7年前 /
 Packie 的个人博客
MemCached 编译安装部署、LRU算法、分布式算法剖析
每次面试都问 memcached ,我说”没用过,但是了解,我一般使用 redis 多一点”。
面试官就瞧不起人了,然后今天看了看了书籍,阅读了下源码,除了一些巧妙的做法,也没有什么太多说不理解的难点,可能我看得还不够深入,但是这些巧妙的做法值得学习的。
1. 编译安装 Memcached 服务端
[vagrant@centos7 ~]$ wget https://github.com/libevent/libevent/releases/download/release-2.1.10-stable/libevent-2.1.10-stable.tar.gz

[vagrant@centos7 ~]$ tar -zxvf libevent-2.1.10-stable.tar.gz
[vagrant@centos7 ~]$ cd libevent-2.1.10-stable
[vagrant@centos7 libevent-2.1.10-stable]$ ./configure --prefix=/usr/local
[vagrant@centos7 libevent-2.1.10-stable]$ make
[vagrant@centos7 libevent-2.1.10-stable]$ sudo make install

[vagrant@centos7 ~]$ wget https://memcached.org/files/memcached-1.5.16.tar.gz
[vagrant@centos7 ~]$ tar -zxvf memcached-1.5.16.tar.gz
[vagrant@centos7 ~]$ cd memcached-1.5.16/
[vagrant@centos7 memcached-1.5.16]$ ./configure --prefix=/usr/local/memcached
[vagrant@centos7 memcached-1.5.16]$ make
[vagrant@centos7 memcached-1.5.16]$ sudo make install
[vagrant@centos7 memcached-1.5.16]$ ln -s /usr/local/lib/libevent-2.1.so.6 /usr/lib64/libevent-2.1.so.6

[vagrant@centos7 bin]$ /usr/local/memcached/bin/memcached -d -m 128 -u root -p 11211
2. PHP 安装拓展 memcache
详细教程可看 https://www.php.net/manual/en/memcache.ins...
可以使用 pecl 安装或者编译安装,pecl 的源只支持 php5
Github-PHP7-memcache
[vagrant@lnmp-new ~]$ git clone https://github.com/websupport-sk/pecl-memcache
[vagrant@lnmp-new ~]$ cd pecl-memcache/
[vagrant@lnmp-new pecl-memcache]$ /usr/local/php7/bin/phpize
[vagrant@lnmp-new pecl-memcache]$ ./configure --enable-memcache --with-php-config=/usr/local/php7/bin/php-config
[vagrant@lnmp-new pecl-memcache]$ sudo make && make install

[vagrant@lnmp-new pecl-memcache] sudo cp memcache.so /usr/local/php7/lib/php/extensions/no-debug-non-zts-20180731/

[vagrant@lnmp-new pecl-memcache] vi /usr/local/php7/lib/php.ini

#增加以下两句
extension_dir = "/usr/local/php7/lib/php/extensions/no-debug-non-zts-20180731"
extension = "memcache.so"

#查看是否启用
[vagrant@lnmp-new] systemctl php-fpm restart
[vagrant@lnmp-new] php -m | grep memcache
3. memcached 如何支持高并发
memcache 支持多路复用 I/O 模型(如 epoll,select 等)。传统阻塞 I/O 中,系统可能会因为某个用户连接还没做好 I/O 准备而一直等待,知道这个连接做好 I/O 准备,如果这时有其他用户连接到服务器,很可能会因为系统阻塞而得不到响应。
而多路复用 I/O 是一种消息通知模式,用户连接做好 I/O 准备后,系统会通知我们这个连接可以进行,这样就不会阻塞在某个用户连接。因此,Memcached 才能支持高并发。
4. memcached 使用 LRU 算法淘汰数据
LRU (Least Recently Used)
it = slabs_alloc(ntotal,id);

// 申请内存失败,就开始淘汰数据
if (it == 0){
    int tries = 50;
    ...
    //从尾部开始遍历
    for (search = tails[id];tries > 0 && search != NULL;tries--,search = search->prev){
        // 如果引用次数为 0,就释放掉
        if(search ->refcount == 0){
            ...
            do_item_unlink(search);
            break;
        }
    }

    // 再次申请内存,可能都有引用了
    it = slabs_alloc(ntotal,id);
    if (it == 0){
        tries = 50;
        for(search = tails[id];tries > 0 && search != NULL; tries--,search = search ->prev){
        //查找三小时没有访问过的数据,然后将它引用设置为零,再释放掉
            if (search ->refcont != 0 && search->time + 10800 < current_time){
                search->refcount =0;
                do_item_unlink(search);
                break;
            }
        }

        //如果还是申请不到内存,那么久返回 NULL
        it = slabs_alloc(ntotal,id);
        if(it == 0){
            return NULL;
        }
    }
}
5. memcached 多线程模型
主线程:接受客户端连接,并把连接分配给工作线程处理
工作线程:处理客户端连接的请求
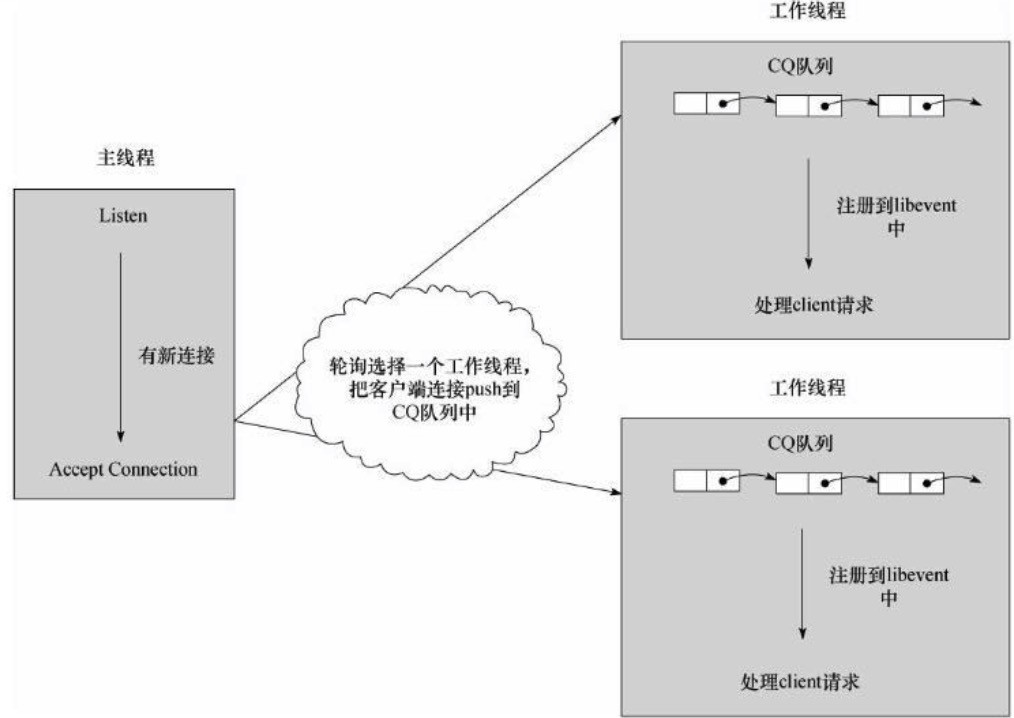
主线程监听客户端,客户端连接 memcached 时,memcached调用 accept 函数接收到来的连接,然后 push 到工作线程的 CQ 队列,并给工作线程发一个信号,通知工作线程有新的客户端连接需要处理
当工作线程收到主线程的信号,便会把 CQ 队列的客户端链接注册到 libevent 进行监听,libevent 就会侦听客户端连接的读写事件,并调用相关的回调函数。
6. memcached 分布式布置方案
如果要布置多台 memcached 服务器,怎样确定一个数据应该保存到哪台服务器上面?
有两种方案:第一种是普通的 Hash 分布,第二种是一致性的 Hash 分布。
a) 普通的 Hash 分布
function mHash($key) {
    $md5 = substr(md5($key),0,8);
    $seed = 31;
    $hash = 0;

    for ($i=0;$i<8;$i++){
        $hash = $hash * $seed + ord($md5($i));
        $i ++;
    }

    return $hash ;
}

$sercers = array(
    array(
        "host"=>'192.168.1.12',"port"=>6397
    )
    array(
        "host"=>'192.168.1.14',"port"=>6397
    )
);

$key = "name";
$value = 'biyongyao';

$sc = $server[mHash($key)%2];
$memcached = new Memcached($sc);
$memcached->set($key,$value);
如果服务器不发生改变,这种方法很好地运行
如果增加一台服务器,那么 key 经过 hash 之后和之前的服务器对不上了,这就导致了市局丢失,那么就需要使用一致性 Hash 分布
b)一致性 Hash 分布
$key1 = mHash('key1');
$key2 = mHash('key2');
$key3 = mHash('key3');
$key4 = mHash('key4');

$server1 = mHash('192.168.1.1');
$server2 = mHash('192.168.1.2');
$server3 = mHash('192.168.1.3');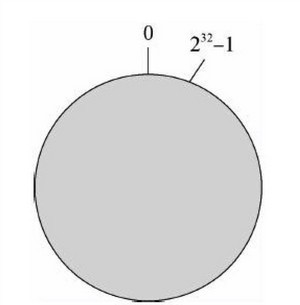
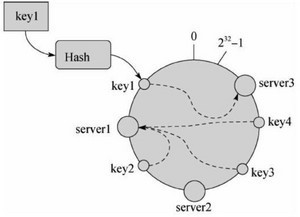
将 32 位的整数(0 到 2^31 -1)想象成一个圆环,0 是开头,2^31 -1 是尾
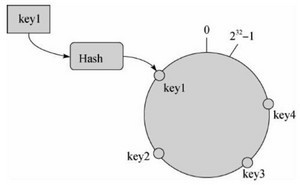
把四个 key 经过 mhash 整成整数,然后在圆环给它一个位置
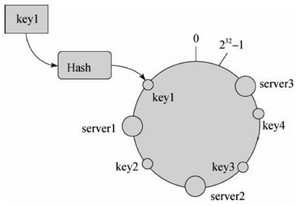
把三台服务器放到环中

以逆时针开始划分,把相应的 key 保存到服务器上
key4,key3 属于 server2,key2 属于 server1,key1 属于 server3
如果 server2 发生故障,那么开始属于 server2 的 key3 和 key4 就归属 server1 管
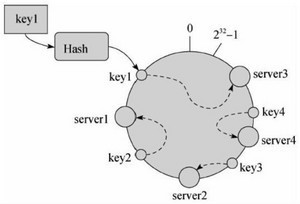
如果新增一台服务器放在 key3 和 key4 之间,那么原来属于 server2 的 key4 就归属 server4 管
c) 一致性 Hash 分布算法的实例
/**
 * memcache 分布式算法,一致性 hash
 * Class FlexiHash
 */
class FlexiHash
{
    use hashTools;

    private $serverList = array();

    private $isSorted = false;

    public function addServer($server)
    {
        $hash = $this->mHash1($server);

        if ( !isset($this->serverList[$hash])) {
            $this->serverList[$hash] = $server;
        }

        $this->isSorted = false;

        return true;
    }

    public function removeServer($service)
    {
        $hash = $this->mHash1($service);

        if (isset($this->serverList[$hash])) {
            unset($this->serverList[$hash]);
        }

        $this->isSorted = false;

        return true;
    }

    public function lookup($key)
    {
        $hash = $this->mHash1($key);

        if ( !$this->isSorted) {
            krsort($this->serverList, SORT_NUMERIC);
            $this->isSorted = true;
        }

        foreach ($this->serverList as $pos => $server) {
            if ($hash >= $pos) {
                return $server;
            }
        }

        return end($this->serverList);
    }
}
d) 测试一致性算法
$hashServer = new FlexiHash();

$hashServer->addServer('192.168.1.1');
$hashServer->addServer('192.168.1.2');
$hashServer->addServer('192.168.1.3');
$hashServer->addServer('192.168.1.4');

echo 'save key1 in server:',$hashServer->lookup('key1').PHP_EOL;
echo 'save key2 in server:',$hashServer->lookup('key2').PHP_EOL;

echo '####################'.PHP_EOL;

$hashServer->removeServer('192.168.1.2');
echo 'save key3 in server:',$hashServer->lookup('key3').PHP_EOL;
echo 'save key4 in server:',$hashServer->lookup('key4').PHP_EOL;

echo '####################'.PHP_EOL;

$hashServer->addServer('192.168.1.6');
echo 'save name in server:',$hashServer->lookup('name').PHP_EOL;
echo 'save girl in server:',$hashServer->lookup('girl').PHP_EOL;
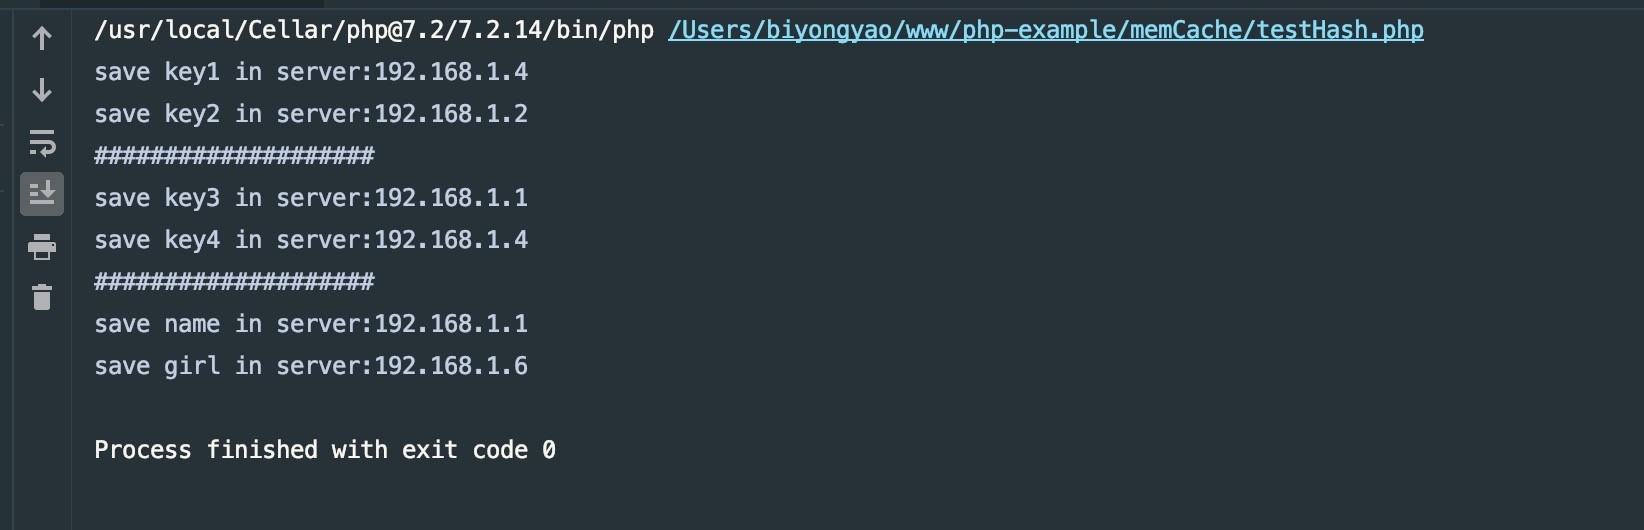
结果可看,一致性 hash 算法只会改变很少一部分的数据,从而减少了数据丢失的情况
刚进入这个社区,只发布了少量文章,更多请关注我的 blog :https://blog.biyongyao.com
本作品采用《CC 协议》,转载必须注明作者和本文链接


 关于 LearnKu


推荐文章: