
Laradock 下使用 Tideways_xhprof+Xhgui 进行性能分析 —— 安装篇
2 / 2 / 创建于 6年前
 lishen 的个人博客
之前看很多人有怎么使用xhprof做性能分析的,于是就自己就在laradock下安装tideways_xhprof进行尝试。中间还是有部分问题的,在此特意记录一下。
一. 准备
一开始查资料很多人说laradock中没有xhprof,但自己看了下laradock的.env文件,发现在php-fpm的配置项中存在。所以就直接基于laradock安装,而不重新以扩展的方式安装了。
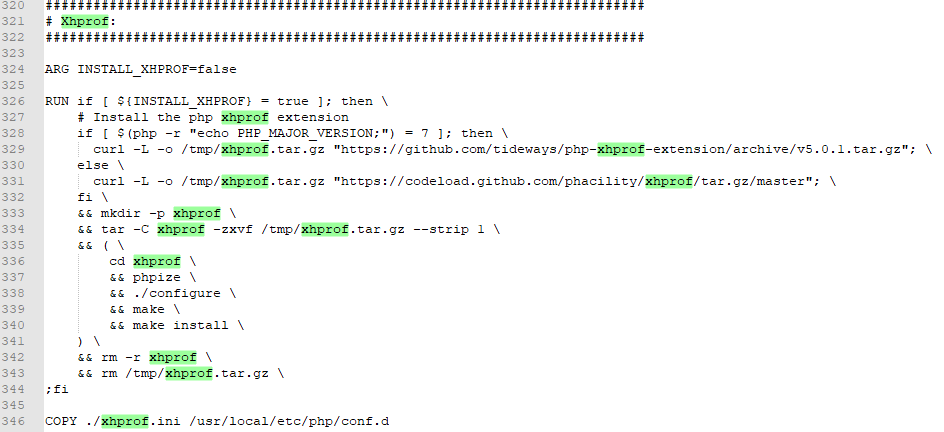
xhprof原项目已经很久没更新并且不支持PHP7,所以这里查看了laradock下php-fpm下的dockerfile文件,这里使用的是tideways的扩展。因为tideways的ui不是免费的,所以这里使用Xhgui进行图形化操作。Xhgui需要使用MongoDB,所以我们总共需要安装的有 tideways、MongoDB、xhgui。
二,正式安装
1,安装XHPROF与Mongo扩展
在laradock目录下,打开.env文件,进行如下配置。
[WORKSPACE]
WORKSPACE_INSTALL_MONGO=true
[PHP_FPM]
PHP_FPM_INSTALL_XHPROF=true
PHP_FPM_INSTALL_MONGO=true
然后重新编译php-fpm和workspace
docker-compose build php-fpm workspace重新编译因为网络的问题有时会出错,这个请自行想办法。或者,当你在安装某项扩展的时候遇到了404错误,尝试在对应的dockerfile文件中相应位置做如下改动。
例如,我在重新编译的时候遇到了 IMAGEMAGICK 404 的问题(报错信息会告诉你在编译的时候是谁遇到了什么问题)。那么,我在php-fpm下的dockerfile文件中做了如下修改,问题得到解决(每个人遇到的问题不同,请具体问题具体分析)。
RUN if [ ${INSTALL_IMAGEMAGICK} = true ]; then
apt-get install -y libmagickwand-dev imagemagick &&
pecl install imagick &&
docker-php-ext-enable imagick
;fi
(上面是原来的文件,下面才是修改后的。也就是添加了apt-get update)
RUN if [ ${INSTALL_IMAGEMAGICK} = true ]; then
apt-get update && apt-get install -y libmagickwand-dev imagemagick &&
pecl install imagick &&
docker-php-ext-enable imagick
;fi
2,安装MongoDB
此处参照laradock文档(使用Mongo),这里就不赘述了。
3,安装Xhgui
我这里安装的是xhgui的汉化版,在你的项目目录下,安装。
$ git clone https://github.com/laynefyc/xhgui-branch.git
$ cd xhgui-branch
$ php install.php
进入到mongo容器,执行以下命令
$ mongo
> use xhprof
> db.results.ensureIndex( { 'meta.SERVER.REQUEST_TIME' : -1 } )
> db.results.ensureIndex( { 'profile.main().wt' : -1 } )
> db.results.ensureIndex( { 'profile.main().mu' : -1 } )
> db.results.ensureIndex( { 'profile.main().cpu' : -1 } )
> db.results.ensureIndex( { 'meta.url' : 1 } )
4,修改 xhgui-branch 的配置文件
<?php
return array(
     ...
    'extension' => 'tideways_xhprof',
     ...
    'save.handler' => 'mongodb',
    'db.host' => 'mongodb://mongo:27017',
    'db.db' => 'xhprof',
     ...
);
5,配置 Xhgui 虚拟主机
server {
        listen        80;
        server_name  xhgui.test;
        root   /var/www/xhgui-branch/webroot;
        location / {
            try_files $uri $uri/ /index.php?$query_string;
            index  index.php index.html index.htm;
        }

    location ~ \.php$ {
        try_files $uri /index.php =404;
        fastcgi_pass php-upstream;
        fastcgi_index index.php;
        fastcgi_buffers 16 16k;
        fastcgi_buffer_size 32k;
        fastcgi_param SCRIPT_FILENAME $document_root$fastcgi_script_name;
        #fixes timeouts
        fastcgi_read_timeout 600;
        include fastcgi_params;
    }


    charset utf-8;

    location = /favicon.ico { access_log off; log_not_found off; }
    location = /robots.txt  { access_log off; log_not_found off; }
    location ~ /\.ht {
        deny all;
    }
}
6,增加监控
在需要分析的站点的nginx配置文件中,添加如下项即可。
fastcgi_param PHP_VALUE "auto_prepend_file=/path/xhgui-branch/external/header.php";参考配置
server {
    listen       80;
    server_name  laravel.test;
    root         /var/www/laravel/public;

    # access_log  /usr/local/var/log/nginx/access.log;
    error_log  /usr/local/var/log/nginx/error.log;

    location / {
        try_files $uri $uri/ /index.php?$query_string;
        index  index.php index.html index.htm;
    }
     # 添加 PHP_VALUE,告诉 PHP 程序在执行前要调用的服务
    fastcgi_param PHP_VALUE "auto_prepend_file=/path/wwwroot/xhgui-branch/external/header.php";
}
至此,安装部分已经结束了。可以去访问项目,尝试去使用了。
参考文献
《Tideways、xhprof 和 xhgui 打造 PHP 非侵入式监控平台》
本作品采用《CC 协议》,转载必须注明作者和本文链接


 关于 LearnKu


推荐文章: