
orientDB学习笔记(二)MATCH
0 / 0 / 创建于 4年前 /
 程序员的猫 的个人博客
简 介
MATCH是orientdb 2.2版本引入的以声明方式的模式匹配语言,主要用于查询图。是OrientDB最灵活最有效的查询图的SQL。它和Neo4j的cypher语言有点像,但目前MATCH仅支持用于查询。
MATCH语法格式介绍
根据官方文档,MATCH的语法格式如下:
MATCH
  {
    [class: <class>],
    [as: <alias>],
    [where: (<whereCondition>)]
  }
  .<functionName>(){
    [class: <className>],
    [as: <alias>],
    [where: (<whereCondition>)],
    [while: (<whileCondition>)],
    [maxDepth: <number>],
    [depthAlias: <identifier> ],
    [pathAlias: <identifier> ],
    [optional: (true | false)]
  }*
  [,
    [NOT]
    {
      [as: <alias>],
      [class: <class>],
      [where: (<whereCondition>)]
    }
    .<functionName>(){
      [class: <className>],
      [as: <alias>],
      [where: (<whereCondition>)],
      [while: (<whileCondition>)],
      [maxDepth: <number>],
      [depthAlias: <identifier> ],
      [pathAlias: <identifier> ],
      [optional: (true | false)]
    }*
  ]*
RETURN [DISTINCT] <expression> [ AS <alias> ] [, <expression> [ AS <alias> ]]*
GROUP BY <expression> [, <expression>]*
ORDER BY <expression> [, <expression>]*
SKIP <number>
LIMIT <number>
下面我们对主要的语法点作下简要的介绍。
必须以MATCH关键字开头,大小写不敏感。
{}用于对一个node进行定义及条件过滤,这个node可以是点也可以是边。
[]表示可选项。{}内所有的定义都是可选的,也就是说可以直接写成{}。
<>表示具体的值。
定义一个有效的class,可以是一个点也可以是一个边。
为node定义一个别名,在整个模式中可以根据这个别名来访问这个node,类似于SQL中table的别名。
定义匹配当前node的过滤条件,它支持大部分SQL中的where语法。同时也可以使用两个上下文变量$currentMatch和$matched,具体如何使用这两个变量,后续会有例子详细解释。
定义一个用于表示连接两个node的图函数。它支持的函数有:out()、in()、both()、outE()、inE()、bothE()、outV()、inV()、bothV()。对于out()、in()和both()也可以用更形象化的箭头表示法。下面我们着重对这9个函数作下详细的介绍,注意右边的node不是必须存在的。
函数 示例 箭头表示法 左边 右边 方向 out() {…}.out(){…} {…}–>{…} 点 点 左指向右 {…}.out(“EdgeClass”){…} {…}-EdgeClass->{…} 点 点 左指向右 in() {…}.in(){…} {…}<–{…} 点 点 右指向左 {…}.in(“EdgeClass”){…} {…}<-EdgeClass-{…} 点 点 右指向左 both() {…}.both(){…} {…}–{…} 点 点 任意 {…}.both(“EdgeClass”){…} {…}-EdgeClass-{…} 点 点 任意 outE() {…}.outE(){…} 无 点 边 左指向右 {…}.outE(“EdgeClass”){…} 无 点 边 左指向右 inE() {…}.inE(){…} 无 点 边 右指向左 {…}.inE(“EdgeClass”){…} 无 点 边 右指向左 bothE() {…}.bothE() {…} 无 点 边 任意 {…}.bothE(“EdgeClass”){…} 无 点 边 任意 outV() {…}.outV() {…} 无 边 点 左指向右 {…}.outV(“EdgeClass”){…} 无 边 点 左指向右 inV() {…}.inV() {…} 无 边 点 右指向左 {…}.inV(“EdgeClass”){…} 无 边 点 右指向左 bothV() {…}.bothV() {…} 无 边 点 任意 {…}.bothV(“EdgeClass”){…} 无 边 点 任意 定义深度遍历路径上满足的条件,它支持大部分SQL中的where语法,同时也可以使用上下文变量$currentMatch、$matched、$depth,具体如何使用这些变量,后续会有例子详细解释。
定义深度遍历的最大深度,后续会有例子详细解释。
orientdb3.X新增加的特性,必须和while或者maxDepth一起使用,该值用于存储遍历的深度,在return中可以通过该值获取每次遍历深度的值。
orientdb3.X新增加的特性,必须和while或者maxDepth一起使用,该值用于存储遍历的路径,在return中可以通过该值获取每次遍历路径下的点。
optional 是orientdb2.2.4版本添加的特性。在默认情况下该选项的值为false,它的意思是所声明的结点必须存在,否则不会匹配该条路径上的数据。如果设置为true,那么即使这个节点没有匹配到,也不会影响整条路径的匹配,但这个选项只能出现在路径上最右边的节点。类似于SQL中的left join。
RETURN [ AS ] 定义返回的数据结构。返回值包括如下三种:{…}中定义的别名、别名.字段以及上下文变量。RETURN可使用的上下文变量详细解释:
变量名称 解释 备注 $matches 包括所有在{…}定义了别名的node。 $paths 包括所有遍历路径上node。包括没有定义别名的node。 $elements 包括$matches返回的node展开的数据。 可以在graph控制台上以图的形式展示 $pathElements 包括$paths返回的node展开的数据。 可以在graph控制台上以图的形式展示 DISTINCT 3.X版本支持对RETURN的结果进行去重。注意3.X之前是不支持这个特性,需要通过在外层套一层SELECT然后DISTINCT去重。
GROUP BY 分组。3.X引入的特性。
ORDER BY 排序。3.X引入的特性。
SKIP 和LIMIT一起可进行分页。3.X引入的特性。
MATCH的使用
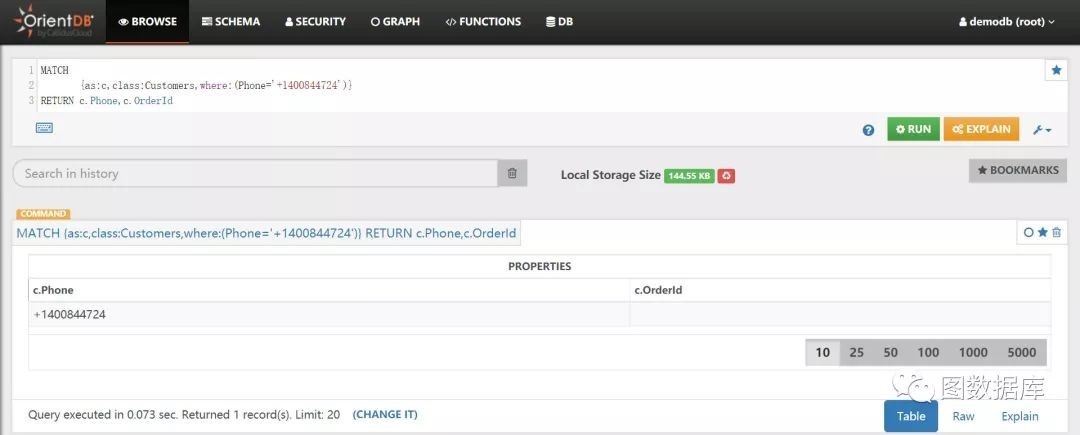
3.1.在browse控制台中使用
MATCH{as:c,class:Customers,where:(Phone='+1400844724')}RETURN c.Phone,c.OrderId
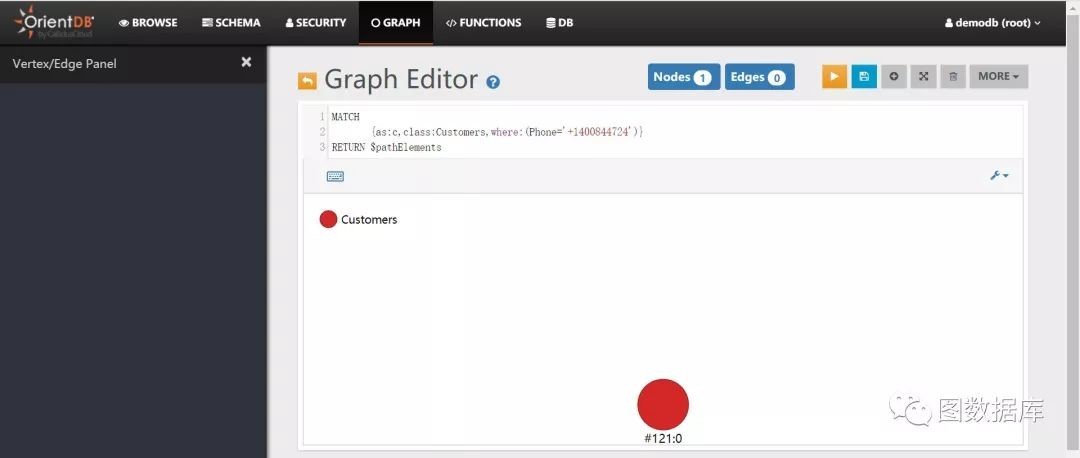
3.2.在graph控制台中使用
在graph中以图的形式显示数据,需要借助$pathElements或者$elements变量。
MATCH{as:c,class:Customers,where:(Phone='+1400844724')}RETURN $pathElements
3.3.使用API
maven依赖如下:
<dependency><groupId>com.orientechnologies</groupId><artifactId>OrientDB-graphdb</artifactId><version>3.0.4</version></dependency><dependency><groupId>com.orientechnologies</groupId><artifactId>OrientDB-core</artifactId><version>3.0.4</version></dependency><dependency><groupId>com.orientechnologies</groupId><artifactId>OrientDB-client</artifactId><version>3.0.4</version></dependency>
测试代码如下:
public class MatchTest {public static void main(String[] args) {// 用户名和密码,请根据配置修改OrientGraphFactory factory = new OrientGraphFactory("remote:localhost/demodb", "root", "root");OrientGraphNoTx graphNoTx = factory.getNoTx();// 执行MATCH语句Iterable<Element> iterable = graphNoTx.command(new OCommandSQL("MATCH {as:c,class:Customers,where:(Phone='+1400844724')} RETURN c.Phone as phone,c.OrderedId as orderedId")).execute();// 遍历MATCH返回的结果集Iterator<Element> it = iterable.iterator();while (it.hasNext()) {Element ele = it.next();System.out.println("Phone=>" + ele.getProperty("phone") + ",OrderedId=>" + ele.getProperty("orderedId"));}graphNoTx.shutdown();factory.close();}}
编写MATCH语句的规则
4.1.确定查询的起始点
图查询要从一个或者多个node开始,否则会引起某个class的全表扫描,甚至会引导整个图的遍历,这个开始的node就是查询的起始点。全表扫描时的性能可能不如RDBMS的性能。
起始点要根据查询需求来判断及确定。一般可根据已知的查询条件能够最快确定的点就认为是起始点。如根据用户的手机号”+1400844724”查询获取用户的朋友,那么根据用户的手机号找到用户的记录,然后根据已经找到用户的点再去遍历获取用户的朋友,而不能根据朋友找用户。
确定了查询的起始点后,我们就可以编写match语句了,但要让查询引擎按照我们的想法执行,需要注意一些编写注意事项。
4.2.MATCH中必须要有一个class显示的声明的node
如下SQL语句没有显示的声明class,执行后报” java.lang.UnsupportedOperationException”。
MATCH{as:customer,where:(Phone='+1400844724')}-HasProfile->{as:profile}-HasFriend-{as:friend}RETURN distinct customer,profile,friend

4.3.如果只有一个node声明了class,那么这个node就是起始点,无论这个node有没有过滤条件
MATCH{as:customer,where:(Phone='+1400844724')}-HasProfile->{as:profile}-HasFriend-{as:friend,class:Profiles}RETURN distinct customer,profile,friend
explain结果如下:
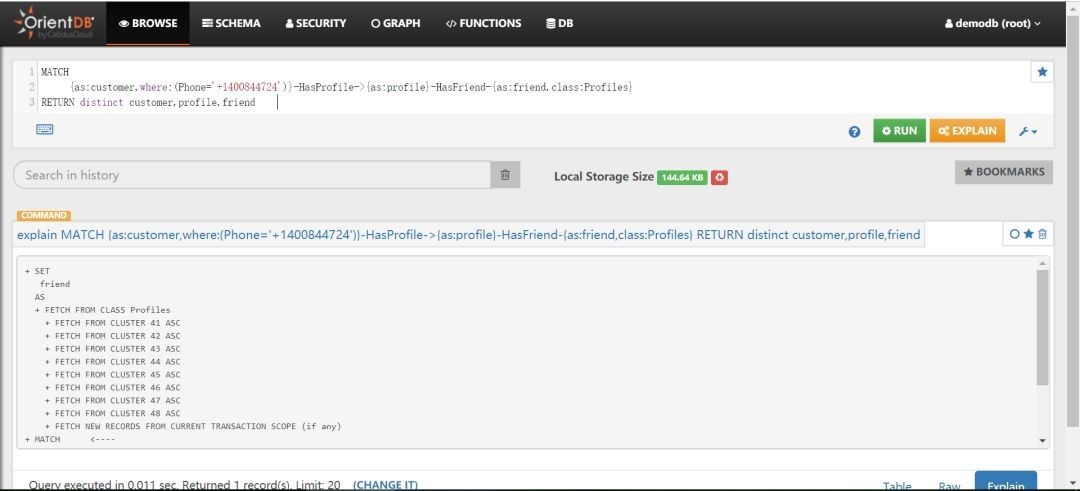
分析:根据explain的结果可以知道起始点是Profiles,虽然Profiles没有设置过滤条件,但只有它指定了class。
4.4.起始点必须要显示声明class
只有声明了class才有可能作为起始点。
4.5.起始点的过滤条件尽量加索引
MATCH{as:customer,class:Customers,where:(Phone='+1400844724')}-HasProfile->{as:profile,class:Profiles,where:(Id=2)}-HasFriend-{as:friend,class:Profiles,where:(Id=1)}RETURN distinct customer,profile,friend
explain结果如下:

分析:根据上图explain的结果可知道起始点是Profiles,且命中了索引Id=1和Id=9。Customers虽然声明了class且添加了过滤条件,但并没有把Customers作为起始点,因为Customers的Phone属性上没有索引。
请再explain如下SQL,观察下explain的结果。
MATCH{as:customer,class:Customers,where:(Phone='+1400844724')}-HasProfile->{as:profile,where:(Id=9)}-HasFriend-{as:friend,where:(Id=1)}RETURN distinct customer,profile,friend
4.6.非起始点尽量不要声明class,避免执行引擎把它识别成起始结点
4.7.尽量声明边的名称和方向
在已知边和边的方向的情况下,明确声明边和边的方向,这样可以减少图的遍历路径的数量。
MATCH实战
5.1.MATCH返回的结果的去重处理
创建两个点,并且在两个点之间创建三条边,创建语句如下:
insert into V set name = 'v1'insert into V set name = 'v2'create edge E from (select from V where name= 'v1') to (select from V where name= 'v2')create edge E from (select from V where name= 'v1') to (select from V where name= 'v2')create edge E from (select from V where name= 'v1') to (select from V where name= 'v2')
执行如下SQL语句:
MATCH{as:v1,class:V,where:(name = 'v1')}--{as:v2}RETURN v1,v2
在orientdb3.0.x的执行结果如下。
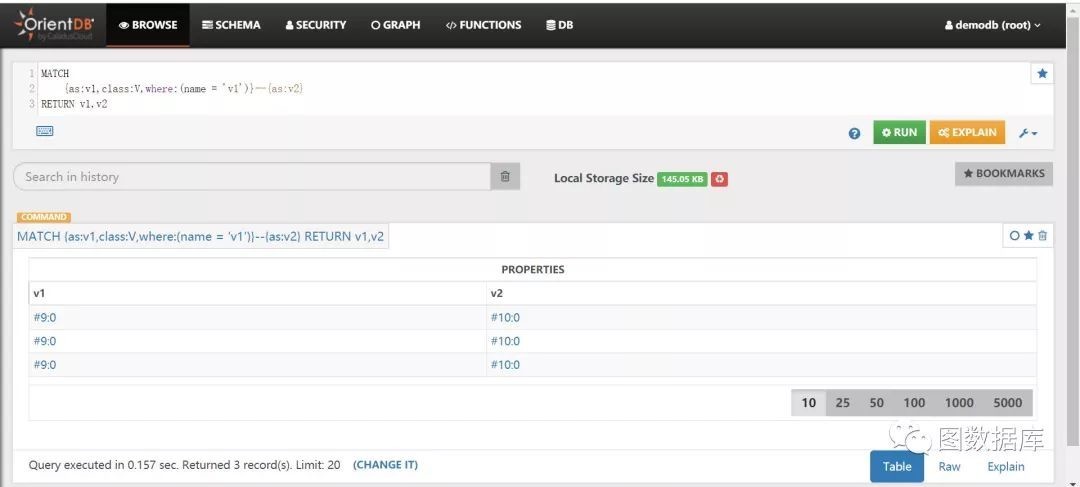
分析:返回了3条记录,说明没有去重。但是orientdb3.x支持distinct关键字,可通过如下语句去重。
MATCH{as:v1,class:V,where:(name = 'v1')}--{as:v2}RETURN distinct v1,v2
orientdb3.x这种设计更加合理,由使用者来自主选择结果是否需要去重,而在orientdb2.x版本只返回了1条记录,说明是自动去重的。在使用时需要注意,请自行验证。
5.2.MATCH返回的结果的数量
MATCH返回的结果的数量是所有查询路径的数量。也可理解为根据所有起始结点查询的笛卡儿积之和。
MATCH{as:customer,class:Customers,where:(Phone in ['+1400844724','+1548604972'])}-HasProfile->{as:profile}-HasFriend->{as:friend1}RETURN customer,profile,friend1
执行结果如下:

分析:起始结点为Customers,根据查询条件最多可查询到两个Customers记录。
根据’+1400844724’查询路径的数量为:1(customer的数量) * 1(HasProfile的数量) * 1 * 1(profile的数量) * 1(边HasFriend的数量) * 2(friend1的数量) = 2
根据’+1548604972’查询路径的数量为:1(customer的数量) * 1(HasProfile的数量) * 1 * 1(profile的数量) * 1(边HasFriend的数量) * 2(friend1的数量) = 2
所以所有路径的数量4 = 2 + 2
5.3.深度遍历查询
基于MATCH的深度遍历查询有两个办法:第一个使用maxDepth,第二个是while和$depth变量。示例获取Id为9的Profiles的深度为2的朋友关系。
5.3.1.使用maxDepth进行深度遍历
MATCH{as:profile,class:Profiles,where:(Id = 9)}-HasFriend->{as:friend,maxDepth:2,depthAlias:da}RETURN friend.Id,da
执行结果如下:
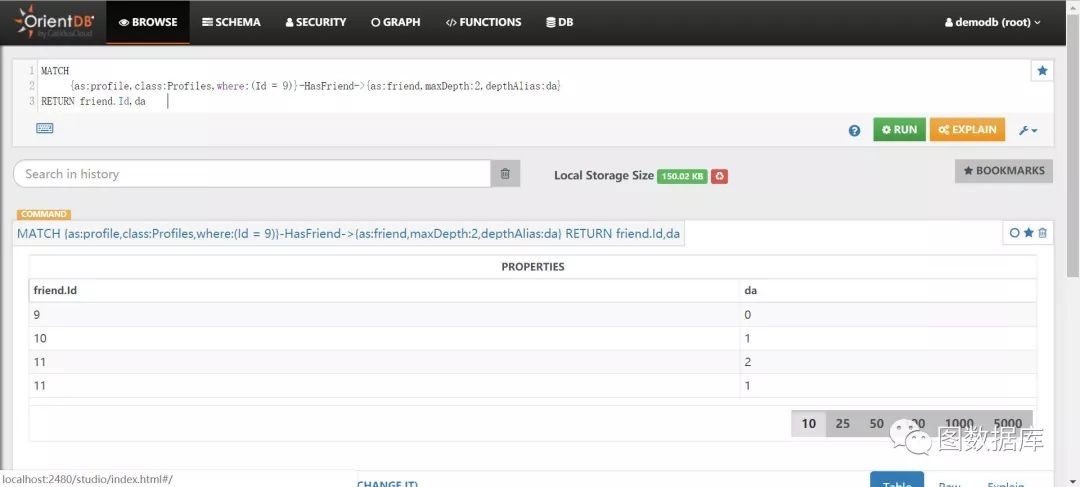
分析:我们借助orientdb3.x版本提供的depthAlilas特性获取到friend的深度,方便我们理解。根据上图的执行结果当maxDepth为2时,获取的数据包括深度为0(查询起始点)、1、2的数据。
深度为0是查询起始结点,如何剔除深度为0的数据呢?有两个办法:
1)、使用MATCH和SELECT的组合
select*from (MATCH{as:profile,class:Profiles,where:(Id = 9)}-HasFriend->{as:friend,maxDepth:2,depthAlias:da}RETURNfriend.Id,da)where da > 0
2)、使用$depth进行过滤
MATCH{as:profile,class:Profiles,where:(Id = 9)}-HasFriend->{as:friend,maxDepth:2,where:($depth > 0),depthAlias:da}RETURN friend.Id,da
限于篇幅请自行验证结果。
5.3.2.使用while和$depth进行深度遍历
MATCH{as:profile,class:Profiles,where:(Id = 9)}-HasFriend->{as:friend,while:($depth < 2),depthAlias:da}RETURN friend.Id,da
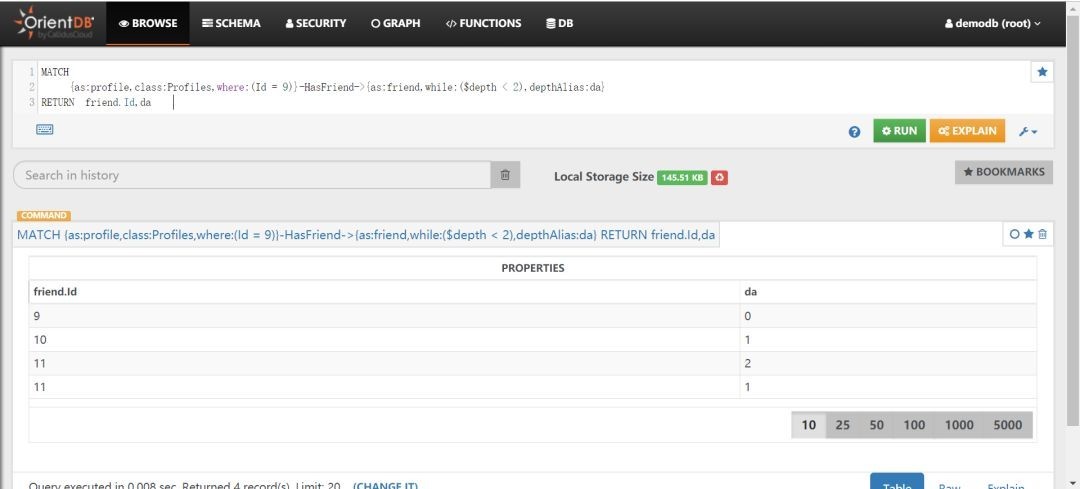
分析:根据上图的执行结果当$depth<2时,获取的数据包括深度为0(查询起始点)、1、2的数据,注意这里包括深度为2的数据。
深度为0是查询起始结点,如何剔除深度为0的数据呢?
有两个办法:
1)、使用MATCH和SELECT的组合
select*from (MATCH{as:profile,class:Profiles,where:(Id = 9)}-HasFriend->{as:friend,while:($depth < 2),depthAlias:da}RETURNfriend.Id,da)where da > 0
2)、使用$depth进行过滤
MATCH{as:profile,class:Profiles,where:(Id = 9)}-HasFriend->{as:friend,while:(depth < 2),where:(depth > 0),depthAlias:da}RETURN friend.Id,da
限于篇幅大家自行验证结果。
5.4.RETURN上下文变量的使用
请执行如下SQL结合MATCH语法描述部分理解下这几个变量不同。限于篇幅,请自行验证结果。
MATCH{as:customer,class:Customers,where:(Phone = '+1400844724')}.outE(){}RETURN $matchesMATCH{as:customer,class:Customers,where:(Phone = '+1400844724')}.outE(){}RETURN $pathsMATCH{as:customer,class:Customers,where:(Phone = '+1400844724')}.outE(){}RETURN $elementsMATCH{as:customer,class:Customers,where:(Phone = '+1400844724')}.outE(){}RETURN $pathElements
5.5.使用count(*)而不是count(1)
在关系型数据库中我们建议使用count(1)统计数量,但在orientdb中我们建议使用count(*)而不是count(1)。具体原因,我们通过explain如下SQL来分析下。
select count(*) from Profiles
explain结果如下: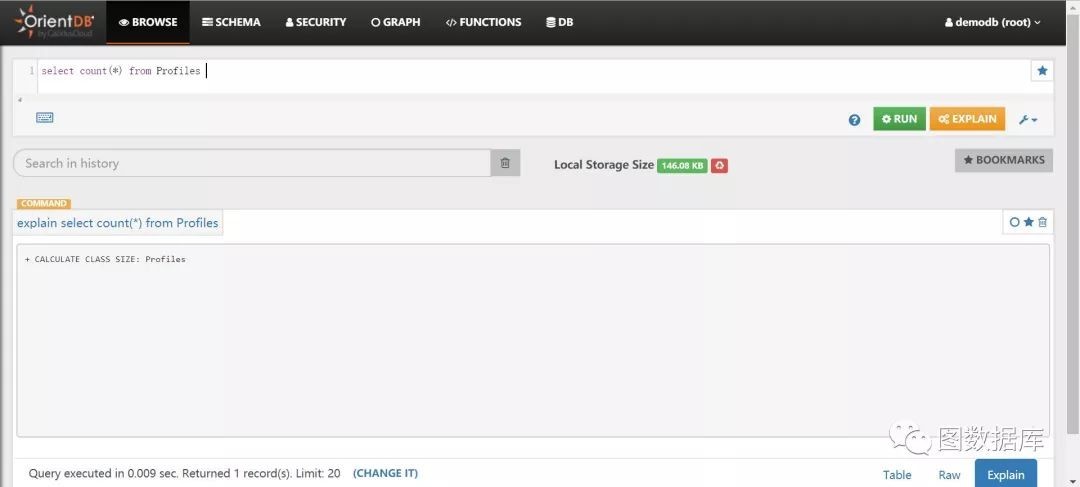
select count(1) from Profiles
explain结果如下:
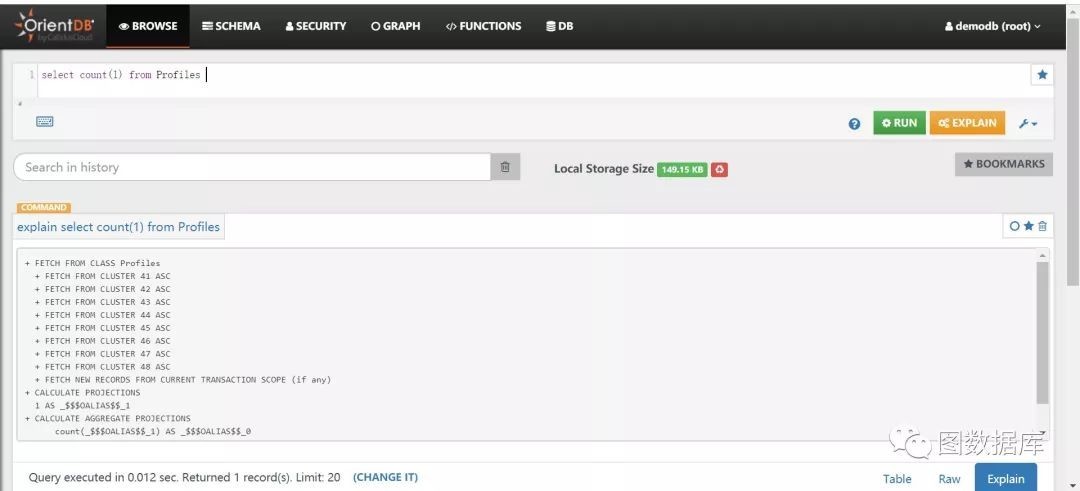
分析:根据explain的结果:count()是直接取class的记录大小,而count(1)会取出所有class下cluster的记录,然后计算大小,所以count()的性能肯定比count(1)快很多。但由于本例中Profiles的数量比较小,性能上看不出大的差别,倘若数量大,性能会有明显的差别。可自行验证数据量比较大的点。
5.6.分组查询
统计Id为9的朋友一度和二度朋友的数量。
MATCH{as:profile,class:Profiles,where:(Id = 9)}-HasFriend->{as:friend,while:($depth < 2),where:($depth > 0),depthAlias:da}RETURN da,count(*)GROUP BY daORDER BY da desc
使用了orientdb3.x提供的group by和order by功能。
5.7.分页查询
分页查询friend,获取第9页,每页10条记录。
MATCH{as:profile,class:Profiles}RETURN profileSKIP 90LIMIT 100
explain结果如下:
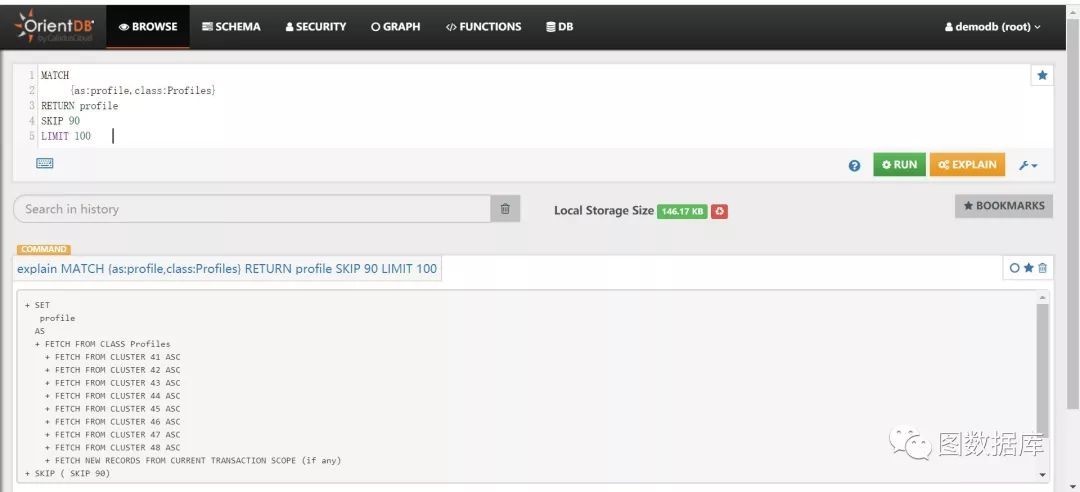
分析:分页查询需要skip和limit一起使用,其思路和mysql的limit分页是一致的。需要查询出前limit条,然后通过skip跳过来分页,当数据量大且查询页数越大时查询性能越慢。使用时请慎重使用,可考虑基于索引限制条件来分页。
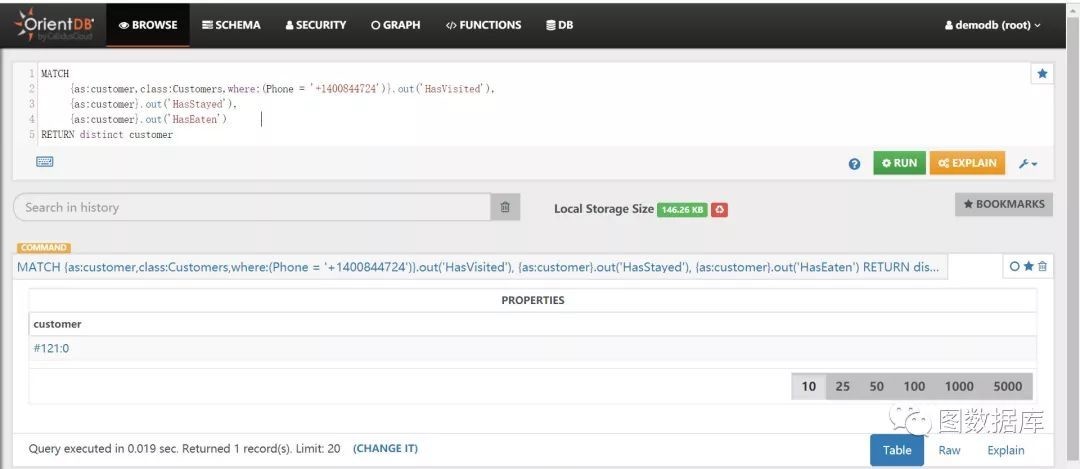
5.8.拆分SQL语句
假如有些场景的查询需要一个点与三条以及上的边关联,那么如何写这个SQL呢?按照我们目前理解的MATCH写法一个node只能左边关联一个node,右边关联一个node。这个地方就需要拆分 SQL语句。
找一个客户,这个客户既有吃过某个酒店,也居住过某个酒店,也访问过某些旅游景点。SQL如下:
MATCH{as:customer,class:Customers,where:(Phone = '+1400844724')}.out('HasVisited'), {as:customer}.out('HasStayed'),{as:customer}.out('HasEaten')RETURN distinct customer
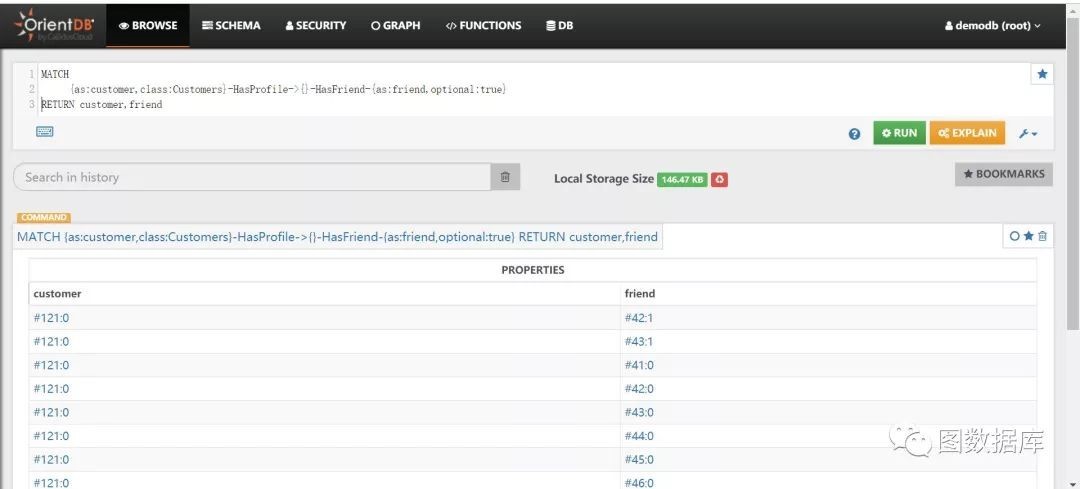
5.9.实现LEFT JOIN的功能
查询出所有Customers,要求Customers必须要有Friend,SQL如下:
MATCH{as:customer,class:Customers}-HasProfile->{}-HasFriend-{as:friend}RETURN customer,friend
那么如果查询出所有Customers同时带出它们的Friend,即使没有Friend的Customers也要查询出来。那么该如何写呢?
MATCH{as:customer,class:Customers}-HasProfile->{}-HasFriend-{as:friend,optional:true} RETURN customer,friend
5.10.实现INNER JOIN的功能
查询出所有Customers,要求它的Name和它的朋友的Name相同。
MATCH{as:customer,class:Customers}-HasProfile->{as:profile}-HasFriend-{as:friend,where:($matched.profile.Name = Name)}RETURN distinct customer,profile,friend
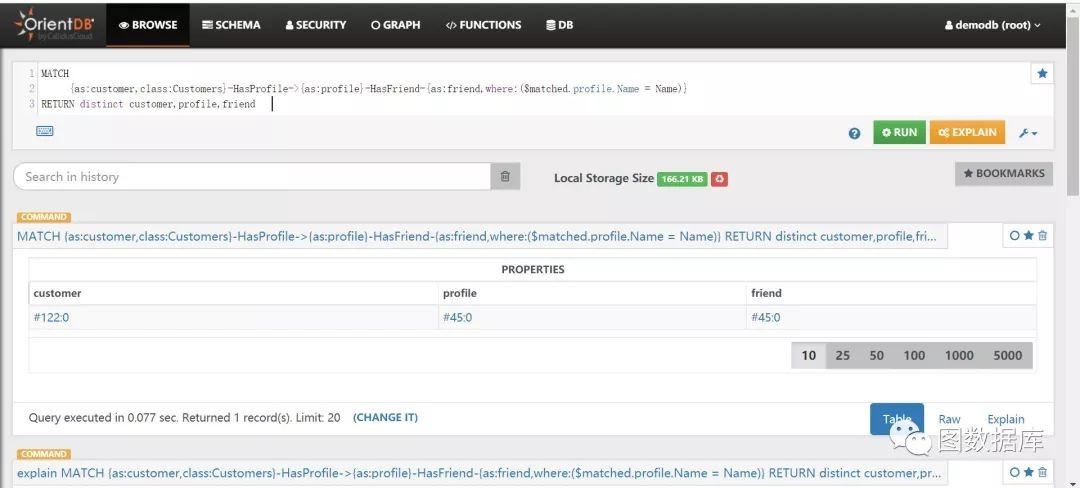
分析:借助$matched变量引用另外一个点的别名,然后通过别名访问相关属性。这个示例中的数据显示它自己是自己的朋友,这个仅说明如何使用,不用太关心具体的业务数据。
5.11.已知RID查询
已知Customers的rid为#121:0,查询出它的朋友。
MATCH{as:customer,rid:#121:0}-HasProfile->{as:profile}-HasFriend-{as:friend}RETURN distinct customer,profile,friend
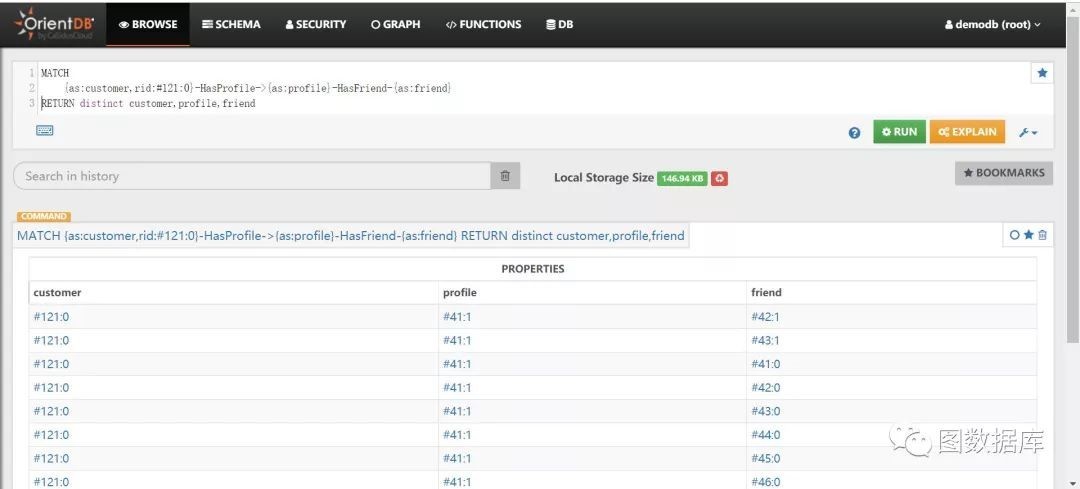
分析:这个特性orientdb官方并没有暴露出来,虽然目前试验下来orientdb2.x和orientdb3.x都支持,但请慎重使用,说不定下个版本应当不支持了。
5.12.基于边上的条件查询
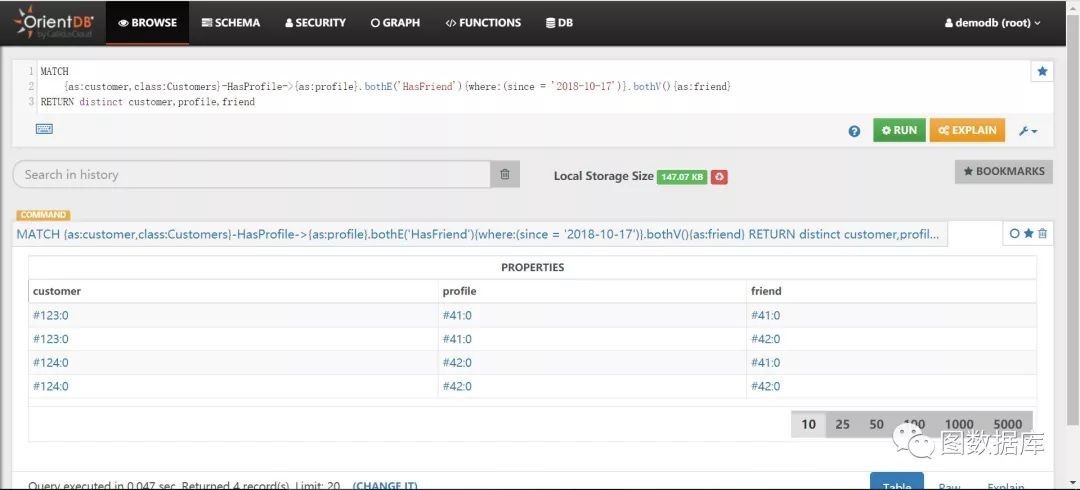
查询在2018-10-17这个日期成为朋友的用户和朋友。
由于边HasFriend上的属性From和SQL关键字冲突,无法根据此属性查询,所以我们需要新建个属性,执行SQL:
update edge HasFriend set since = '2018-10-17' limit 1
然后执行如下SQL:
MATCH{as:customer,class:Customers}-HasProfile->{as:profile}.bothE('HasFriend'){where:(since = '2018-10-17')}.bothV(){as:friend}RETURN distinct customer,profile,friend
5.13.如何避免查询环
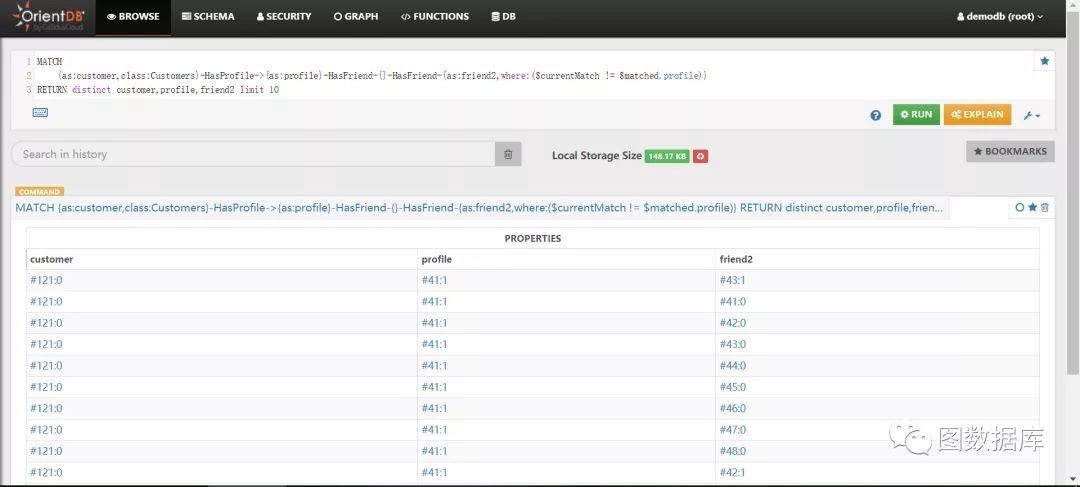
查询所有Customers的朋友的朋友。
MATCH{as:customer,class:Customers}-HasProfile->{as:profile}-HasFriend-{}-HasFriend-{as:friend2}RETURN distinct customer,profile,friend2 limit 10

通过上图查询结果高亮部分我们可以知道用的朋友的朋友是它自己,形成了一个查询环,这样的数据应该剔除,那么如何剔除呢?需要借助两个变量$matched和$currentMatch,$matched前边例子已经介绍过,要想在{}点内访问另外一个{}点,必须借助$matched。不过访问当前{}点也是不能直接使用当前{}点定义的别名的,需要借助$currentMatch。
MATCH{as:customer,class:Customers}-HasProfile->{as:profile}-HasFriend-{}-HasFriend-{as:friend2,where:($currentMatch != $matched.profile)}RETURN distinct customer,profile,friend2 limit 10
本作品采用《CC 协议》,转载必须注明作者和本文链接


 关于 LearnKu


