
新手使用 Laravel 开发 API 时的前置准备
117 / 73 / 创建于 3年前 /
 巴啦啦臭魔仙 的个人博客
前言
使用 Laravel 有一段时间了,虽然公司项目使用的都是 Thinkphp 框架,但我个人还是比较偏好 Laravel,今天来总结我平时进行开发前的一些准备工作,如果有不合理的地方或者有更好的建议欢迎各位大佬指出纠正!
环境
PHP8 + MySQL5.7 + Nginx1.20
IDE:PhpStorm
搭建
安装
推荐使用 composer 安装 或者 Laravel 安装器安装:
Composer 安装
composer create-project laravel/laravel example-appLaravel 安装器安装
composer global require laravel/installer

laravel new example-app具体详见文档
配置
1、数据库
配置根目录下 .env 文件
DB_CONNECTION=mysql
// host地址
DB_HOST=127.0.0.1
// 端口号
DB_PORT=3306
// 数据库名
DB_DATABASE=laravel9
// 用户名
DB_USERNAME=root
// 密码
DB_PASSWORD=
2、时区
配置 config/app.php 文件
// 时区修改,感觉两者皆可,自己根据实际情况定义
'timezone' => 'PRC', // 大陆时间
或
'timezone' => 'Asia/Shanghai' // 上海时间
3、设置 Accept 头中间件
(1)生成中间件
php artisan make:middleware AcceptHeader(2)修改为以下内容
<?php
namespace App\Http\Middleware;
use Closure;
class AcceptHeader
{
    public function handle($request, Closure $next)
    {
        $request->headers->set('Accept', 'application/json');
        return $next($request);
    }
}
(3)添加中间件
protected $middlewareGroups = [
    'web' => [
        ...
    ],
    'api' => [
        \App\Http\Middleware\AcceptHeader::class,
        ...
    ],
];
(4)效果
设置前:
会返回 HTML ,且响应时间和样式很糟糕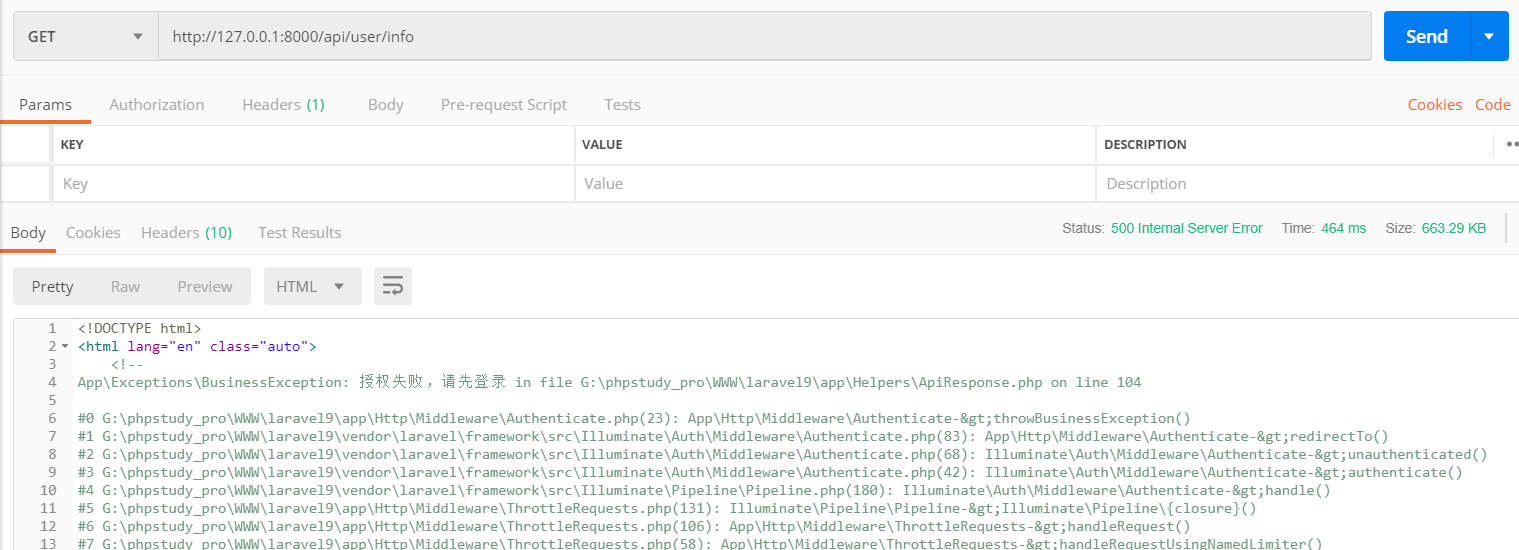
设置后:
返回 JSON 类型,响应时间很快和格式一目了然
扩展包
只列出项目必备的几个,如果有需要可以从下面链接里看一下
下载量最高的 100 个 Laravel 扩展包推荐
1、代码提示工具
composer require barryvdh/laravel-ide-helper --dev2、语言包
composer require caouecs/laravel-lang使用:将 vendor/caouecs/laravel-lang/src/zh-CN 文件放到 resources/lang 目录下,如果是 laravel9 则直接放到根目录 lang 目录下
修改 config/app中:
'locale' => 'zh_CN',3、开发调试利器(debugbar 在 dev 环境安装)
composer require barryvdh/laravel-debugbar --devResponse 响应
这里不使用 dingo 进行开发,个人感觉不怎好用,我们下面自己定义
首先,我们需要在 app 目录下创建一个 Helpers 目录

一、封装统一状态码(ResponseEnum)
在 app/Helpers 目录下创建 ResponseEnum.php 文件
<?php

namespace App\Helpers;

class ResponseEnum
{
    // 001 ~ 099 表示系统状态;100 ~ 199 表示授权业务;200 ~ 299 表示用户业务

    /*-------------------------------------------------------------------------------------------*/
    // 100开头的表示 信息提示,这类状态表示临时的响应
    // 100 - 继续
    // 101 - 切换协议


    /*-------------------------------------------------------------------------------------------*/
    // 200表示服务器成功地接受了客户端请求
    const HTTP_OK = [200001, '操作成功'];
    const HTTP_ERROR = [200002, '操作失败'];
    const HTTP_ACTION_COUNT_ERROR = [200302, '操作频繁'];
    const USER_SERVICE_LOGIN_SUCCESS = [200200, '登录成功'];
    const USER_SERVICE_LOGIN_ERROR = [200201, '登录失败'];
    const USER_SERVICE_LOGOUT_SUCCESS = [200202, '退出登录成功'];
    const USER_SERVICE_LOGOUT_ERROR = [200203, '退出登录失败'];
    const USER_SERVICE_REGISTER_SUCCESS = [200104, '注册成功'];
    const USER_SERVICE_REGISTER_ERROR = [200105, '注册失败'];
    const USER_ACCOUNT_REGISTERED = [23001, '账号已注册'];


    /*-------------------------------------------------------------------------------------------*/
    // 300开头的表示服务器重定向,指向的别的地方,客户端浏览器必须采取更多操作来实现请求
    // 302 - 对象已移动。
    // 304 - 未修改。
    // 307 - 临时重定向。


    /*-------------------------------------------------------------------------------------------*/
    // 400开头的表示客户端错误请求错误,请求不到数据,或者找不到等等
    // 400 - 错误的请求
    const CLIENT_NOT_FOUND_HTTP_ERROR = [400001, '请求失败'];
    const CLIENT_PARAMETER_ERROR = [400200, '参数错误'];
    const CLIENT_CREATED_ERROR = [400201, '数据已存在'];
    const CLIENT_DELETED_ERROR = [400202, '数据不存在'];
    // 401 - 访问被拒绝
    const CLIENT_HTTP_UNAUTHORIZED = [401001, '授权失败,请先登录'];
    const CLIENT_HTTP_UNAUTHORIZED_EXPIRED = [401200, '账号信息已过期,请重新登录'];
    const CLIENT_HTTP_UNAUTHORIZED_BLACKLISTED = [401201, '账号在其他设备登录,请重新登录'];
    // 403 - 禁止访问
    // 404 - 没有找到文件或目录
    const CLIENT_NOT_FOUND_ERROR = [404001, '没有找到该页面'];
    // 405 - 用来访问本页面的 HTTP 谓词不被允许(方法不被允许)
    const CLIENT_METHOD_HTTP_TYPE_ERROR = [405001, 'HTTP请求类型错误'];
    // 406 - 客户端浏览器不接受所请求页面的 MIME 类型
    // 407 - 要求进行代理身份验证
    // 412 - 前提条件失败
    // 413 – 请求实体太大
    // 414 - 请求 URI 太长
    // 415 – 不支持的媒体类型
    // 416 – 所请求的范围无法满足
    // 417 – 执行失败
    // 423 – 锁定的错误


    /*-------------------------------------------------------------------------------------------*/
    // 500开头的表示服务器错误,服务器因为代码,或者什么原因终止运行
    // 服务端操作错误码:500 ~ 599 开头,后拼接 3 位
    // 500 - 内部服务器错误
    const SYSTEM_ERROR = [500001, '服务器错误'];
    const SYSTEM_UNAVAILABLE = [500002, '服务器正在维护,暂不可用'];
    const SYSTEM_CACHE_CONFIG_ERROR = [500003, '缓存配置错误'];
    const SYSTEM_CACHE_MISSED_ERROR = [500004, '缓存未命中'];
    const SYSTEM_CONFIG_ERROR = [500005, '系统配置错误'];

    // 业务操作错误码(外部服务或内部服务调用)
    const SERVICE_REGISTER_ERROR = [500101, '注册失败'];
    const SERVICE_LOGIN_ERROR = [500102, '登录失败'];
    const SERVICE_LOGIN_ACCOUNT_ERROR = [500103, '账号或密码错误'];
    const SERVICE_USER_INTEGRAL_ERROR = [500200, '积分不足'];

    //501 - 页眉值指定了未实现的配置
    //502 - Web 服务器用作网关或代理服务器时收到了无效响应
    //503 - 服务不可用。这个错误代码为 IIS 6.0 所专用
    //504 - 网关超时
    //505 - HTTP 版本不受支持
    /*-------------------------------------------------------------------------------------------*/
}
二、创建业务异常捕获 Exception 文件
在 app/Exceptions 目录下创建 BusinessException.php 文件用于业务异常的抛出
<?php

namespace App\Exceptions;

use Exception;

class BusinessException extends Exception
{
    /**
     * 业务异常构造函数
     * @param array $codeResponse 状态码
     * @param string $info 自定义返回信息,不为空时会替换掉codeResponse 里面的message文字信息
     */
    public function __construct(array $codeResponse, $info = '')
    {
        [$code, $message] = $codeResponse;
        parent::__construct($info ?: $message, $code);
    }
}
三、自定义返回异常
修改 app/Exceptions 目录下的 Handler.php 文件
<?php

namespace App\Exceptions;

use App\Helpers\ApiResponse;
use App\Helpers\ResponseEnum;
use Illuminate\Foundation\Exceptions\Handler as ExceptionHandler;
use Illuminate\Validation\ValidationException;
use Symfony\Component\HttpKernel\Exception\MethodNotAllowedHttpException;
use Symfony\Component\HttpKernel\Exception\NotFoundHttpException;
use Throwable;

class Handler extends ExceptionHandler
{
    use ApiResponse;

    /**
     * A list of the exception types that are not reported.
     *
     * @var array<int, class-string<Throwable>>
     */
    protected $dontReport = [
        //
    ];

    /**
     * A list of the inputs that are never flashed for validation exceptions.
     *
     * @var array<int, string>
     */
    protected $dontFlash = [
        'current_password',
        'password',
        'password_confirmation',
    ];

    /**
     * Register the exception handling callbacks for the application.
     *
     * @return void
     */
    public function register()
    {
        $this->reportable(function (Throwable $e) {
            //
        });
    }

    public function render($request, Throwable $exception)
    {
        // 如果是生产环境则返回500
        if (!config('app.debug')) {
            $this->throwBusinessException(ResponseEnum::SYSTEM_ERROR);
        }
        // 请求类型错误异常抛出
        if ($exception instanceof MethodNotAllowedHttpException) {
            $this->throwBusinessException(ResponseEnum::CLIENT_METHOD_HTTP_TYPE_ERROR);
        }
        // 参数校验错误异常抛出
        if ($exception instanceof ValidationException) {
            $this->throwBusinessException(ResponseEnum::CLIENT_PARAMETER_ERROR);
        }
        // 路由不存在异常抛出
        if ($exception instanceof NotFoundHttpException) {
            $this->throwBusinessException(ResponseEnum::CLIENT_NOT_FOUND_ERROR);
        }
        // 自定义错误异常抛出
        if ($exception instanceof BusinessException) {
            return response()->json([
                'status'  => 'fail',
                'code'    => $exception->getCode(),
                'message' => $exception->getMessage(),
                'data'    => null,
                'error'  => null,
            ]);
        }
        return parent::render($request, $exception);
    }
}
四、封装 API 返回的统一消息(ApiResponse)
在 app/Helpers 目录下创建 ApiResponse.php 文件
<?php


namespace App\Helpers;

use App\Helpers\ResponseEnum;
use App\Exceptions\BusinessException;
use Illuminate\Http\JsonResponse;
use Illuminate\Pagination\LengthAwarePaginator;
use Illuminate\Support\Collection;


trait ApiResponse
{
    /**
     * 成功
     * @param null $data
     * @param array $codeResponse
     * @return JsonResponse
     */
    public function success($data = null, $codeResponse=ResponseEnum::HTTP_OK): JsonResponse
    {
        return $this->jsonResponse('success', $codeResponse, $data, null);
    }

    /**
     * 失败
     * @param array $codeResponse
     * @param null $data
     * @param null $error
     * @return JsonResponse
     */
    public function fail($codeResponse=ResponseEnum::HTTP_ERROR, $data = null, $error=null): JsonResponse
    {
        return $this->jsonResponse('fail', $codeResponse, $data, $error);
    }

    /**
     * json响应
     * @param $status
     * @param $codeResponse
     * @param $data
     * @param $error
     * @return JsonResponse
     */
    private function jsonResponse($status, $codeResponse, $data, $error): JsonResponse
    {
        list($code, $message) = $codeResponse;
        return response()->json([
            'status'  => $status,
            'code'    => $code,
            'message' => $message,
            'data'    => $data ?? null,
            'error'  => $error,
        ]);
    }


    /**
     * 成功分页返回
     * @param $page
     * @return JsonResponse
     */
    protected function successPaginate($page): JsonResponse
    {
        return $this->success($this->paginate($page));
    }

    private function paginate($page)
    {
        if ($page instanceof LengthAwarePaginator){
            return [
                'total'  => $page->total(),
                'page'   => $page->currentPage(),
                'limit'  => $page->perPage(),
                'pages'  => $page->lastPage(),
                'list'   => $page->items()
            ];
        }
        if ($page instanceof Collection){
            $page = $page->toArray();
        }
        if (!is_array($page)){
            return $page;
        }
        $total = count($page);
        return [
            'total'  => $total, //数据总数
            'page'   => 1, // 当前页码
            'limit'  => $total, // 每页的数据条数
            'pages'  => 1, // 最后一页的页码
            'list'   => $page // 数据
        ];
    }

    /**
     * 业务异常返回
     * @param array $codeResponse
     * @param string $info
     * @throws BusinessException
     */
    public function throwBusinessException(array $codeResponse=ResponseEnum::HTTP_ERROR, string $info = '')
    {
        throw new BusinessException($codeResponse, $info);
    }
}
五、创建控制器基类
1、在 app/Http/controller 目录下创建一个 BaseController.php 作为 Api 的基类,然后在 BaseController.php 这个基类中继承 Controller,并引入封装 API 返回的统一消息(ApiResponse)
<?php

namespace App\Http\Controllers;

use App\Helpers\ApiResponse;

class BaseController extends Controller
{
    // API接口响应
    use ApiResponse;
}
六、使用
1、返回成功信息
return $this->success($data);2、返回失败信息
return $this->fail($codeResponse);3、抛出异常
$this->throwBusinessException($codeResponse);4、分页
return $this->successPaginate($data);参数输入校验
一、创建
在 App\Helpers 目录下创建 VerifyRequestInput.php 文件,并引入 ApiResponse ,这样可以更便捷地校验表单参数,其中 verifyData 方法可以自定义校验字段及规则
<?php


namespace App\Helpers;


use App\Helpers\ResponseEnum;
use App\Exceptions\BusinessException;
use Illuminate\Validation\Rule;

trait VerifyRequestInput
{
    use ApiResponse;

    /**
     * 验证ID
     * @param $key
     * @param null $default
     * @return mixed|null
     * @throws BusinessException
     */
    public function verifyId($key, $default=null)
    {
        return $this->verifyData($key, $default, 'integer|digits_between:1,20');
    }

    /**
     * 验证是否为整数
     * @param $key
     * @param null $default
     * @return mixed|null
     * @throws BusinessException
     */
    public function verifyInteger($key, $default=null)
    {
        return $this->verifyData($key, $default, 'integer');
    }

    /**
     * 验证是否为数字
     * @param $key
     * @param null $default
     * @return mixed|null
     * @throws BusinessException
     */
    public function verifyNumeric($key, $default=null)
    {
        return $this->verifyData($key, $default, 'numeric');
    }

    /**
     * 验证是否为字符串
     * @param $key
     * @param null $default
     * @return mixed|null
     * @throws BusinessException
     */
    public function verifyString($key, $default=null)
    {
        return $this->verifyData($key, $default, 'string');
    }

    /**
     * 验证是否为布尔值
     * @param $key
     * @param null $default
     * @return mixed|null
     * @throws BusinessException
     */
    public function verifyBoolean($key, $default=null)
    {
        return $this->verifyData($key, $default, 'boolean');
    }

    /**
     * 验证是否为枚举
     * @param $key
     * @param null $default
     * @param array $enum
     * @return mixed|null
     * @throws BusinessException
     */
    public function verifyEnum($key, $default=null, array $enum=[])
    {
        return $this->verifyData($key, $default, Rule::in($enum));
    }

    /**
     * 自定义校验参数
     * @param $key string 字段
     * @param $default string 默认值
     * @param $rule string 验证规则
     * @return mixed|null
     * @throws BusinessException
     */
    public function verifyData($key, $default, $rule)
    {
        $value = request()->input($key, $default);
        $validator = \Validator::make([$key => $value], [$key => $rule]);
        if (is_null($value)){
            $this->throwBusinessException(ResponseEnum::CLIENT_PARAMETER_ERROR);
        }
        if ($validator->fails()){
            $this->throwBusinessException(ResponseEnum::CLIENT_PARAMETER_ERROR, $validator->errors()->first());
        }
        return $value;
    }

}
2、使用
需要在 App\Http\Controllers\BaseController 这个控制器基类中引入 VerifyRequestInput
use App\Helpers\VerifyRequestInput;

// 验证表单参数输入请求
use VerifyRequestInput;
3、案例:
有一个 index 方法,我们在获取参数时使用 verifyId 来校验请求的参数
public function index()
{
$id = $this->verifyId('id', null);
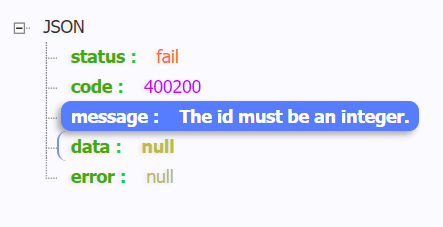
}当我们请求时,因为传入的参数是字符串
http://127.0.0.1:8000/api/user/index?id=xddd所以返回 The id must be an integer ,提示id必须为整数
创建服务层 Service
如果项目比较小,接口较少,业务逻辑放在 controller 和 model 层就可以。否则就需要创建一个 Service 层来存放一些较复杂些的业务逻辑。
一、在 app 目录下,创建名叫 Services 的文件夹

二、在新创建的 Services 目录下创建基类 BaseService.php ,采用单例模式避免对内存造成浪费,也方便调用
<?php

namespace App\Services;

use App\Helpers\ApiResponse;

class BaseService
{
    // 引入api统一返回消息
    use ApiResponse;

    protected static $instance;

    public static function getInstance()
    {
        if (static::$instance instanceof static){
            return self::$instance;
        }
        static::$instance = new static();
        return self::$instance;
    }

    protected function __construct(){}

    protected function __clone(){}

}
三、使用
例如要实现一个获取用户信息的功能
1、在 Service 层创建一个 UserService.php 的文件
<?php

namespace App\Services;

use App\Services\BaseService;

class UserService extends BaseService
{
    // 获取用户信息
    public function getUserInfo()
    {
        return ['id' => 1, 'nickname' => '张三', 'age' => 18];
    }

}
2、在控制器 UserController 中增加一个 info 方法,并调用服务层中的 getUserInfo() 方法
use App\Services\UserService;
public function info()
{
$user = UserService::getInstance()->getUserInfo();
return $this->success($user);
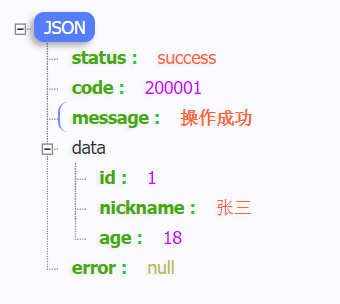
}3、返回
监听sql语句
1、创建监听器
php artisan make:listener QueryListener修改 handle 方法
public function handle(QueryExecuted $event)
{
    // 只在测试环境下输出 log 日志
    if (!app()->environment(['testing', 'local'])) {
        return;
    }
    $sql = $event->sql;
    $bindings = $event->bindings;
    $time = $event->time; // 毫秒
    $bindings = array_map(function ($binding) {
        if (is_string($binding)) {
            return (string)$binding;
        }
        if ($binding instanceof \DateTime) {
            return $binding->format("'Y-m-d H:i:s'");
        }
        return $binding;
    }, $bindings);
    $sql = str_replace('?', '%s', $sql);
    $sql = sprintf($sql, ...$bindings);
    Log::info('sql_log', ['sql' => $sql, 'time' => $time . 'ms']);
}
2、注册监听事件
在系统的服务提供者 App\Providers\EventServiceProvider 中注册监听事件
protected $listen = [
    ...
    QueryExecuted::class => [
        QueryListener::class,
    ],
];
3、执行 sql 查看日志
可以在日志文件中看到 sql 的执行时间、sql语句、毫秒数
[2022-05-08 22:45:04] local.INFO: sql_log {"sql":"select * from `user` where `user`.`id` = 3 limit 1","time":"51.59ms"} 项目地址
不喜勿喷,如有错误或建议欢迎指出提出,持续更新中…
本作品采用《CC 协议》,转载必须注明作者和本文链接


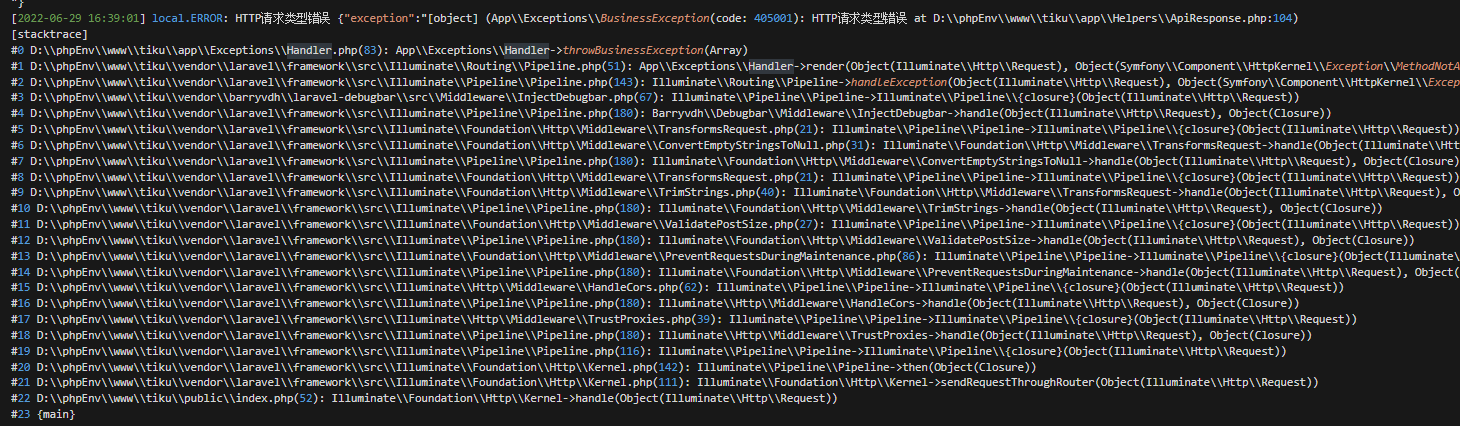
 DEBUG 模式关闭后 直接就是500啦
开启 DEBUG 模式能返回 响应,但是日志里面还是会打印错误信息
DEBUG 模式关闭后 直接就是500啦
开启 DEBUG 模式能返回 响应,但是日志里面还是会打印错误信息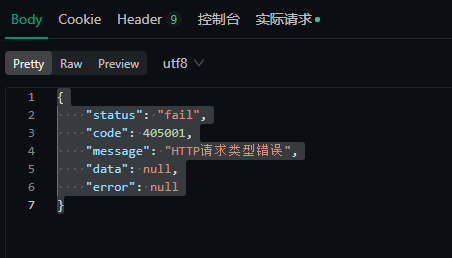


 关于 LearnKu


推荐文章: