
Hyperf 异步队列及源码分析
70 / 1 / 创建于 4年前 /
 善良的死神 的个人博客
Hyperf 异步队列使用
Hyperf 进行安装
composer require hyperf/async-queue 安装扩展
php bin/hyperf.php vendor:publish hyperf/async-queue 发布配置文件
工作原理
配置 config 配置
<?php

declare(strict_types=1);
/**
 * This file is part of Hyperf.
 *
 * @link     https://www.hyperf.io
 * @document https://hyperf.wiki
 * @contact  group@hyperf.io
 * @license  https://github.com/hyperf/hyperf/blob/master/LICENSE
 */
return [
    'default' => [
        'driver' => \Hyperf\AsyncQueue\Driver\RedisDriver::class, //目前框架支持的就一种
        'redis' => [
            'pool' => 'default', //redis 连接池
        ],
        'channel' => '{queue}', //队列前缀
        'timeout' => 2, //pop 消息的超时时间
        'retry_seconds' => 5, //失败后重新尝试间隔
        'handle_timeout' => 10, //消息处理超时时间
        'processes' => 1, //消费进程数
        'concurrent' => [
            'limit' => 10, //同时处理消息数
        ],
        'max_messages' => 10 //进程重启所需最大处理的消息数 默认不重启
    ],
    'user' => [
        'driver' => \Hyperf\AsyncQueue\Driver\RedisDriver::class,
        'redis' => [
            'pool' => 'kuke',
        ],
        'channel' => '{user_queue}',
        'timeout' => 2,
        'retry_seconds' => 5,
        'handle_timeout' => 10,
        'processes' => 10,
        'concurrent' => [
            'limit' => 10,
        ],
        'max_messages' => 10 //进程重启所需最大处理的消息数 默认不重启
    ],
];
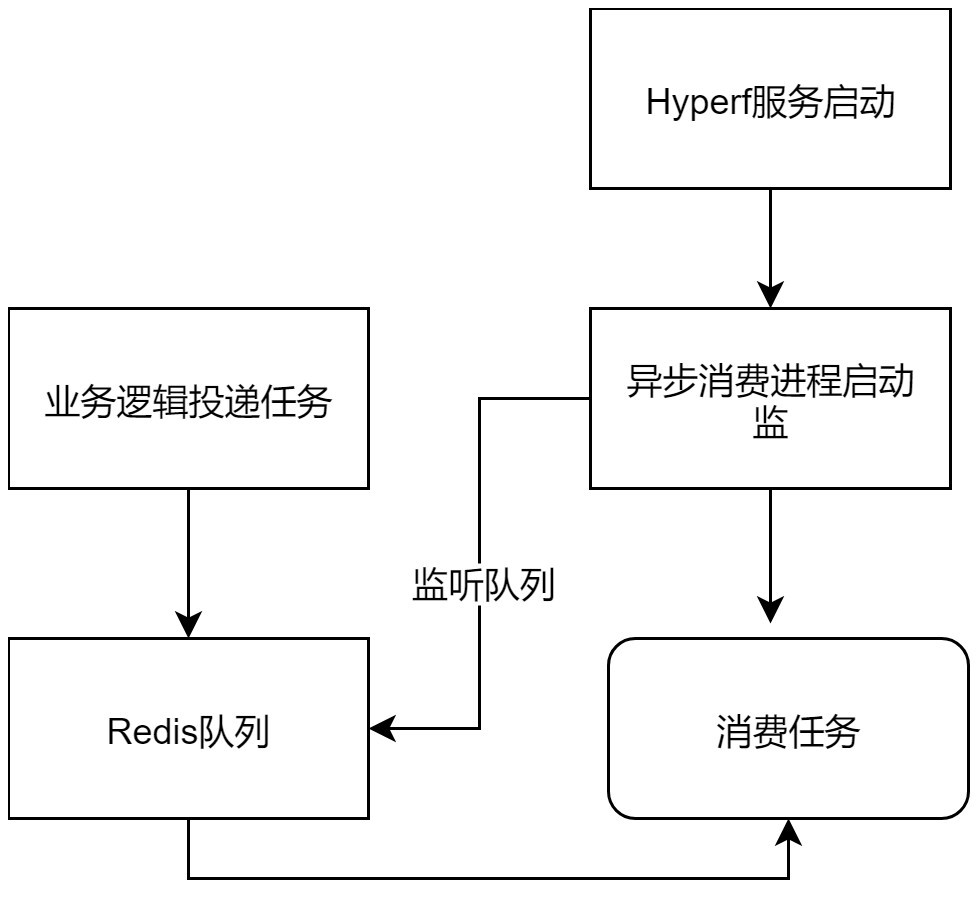
Process进程监听队列
异步消费进程会随着 Hyperf 框架的启动而启动,同时会根据进程内配置的 redis 配置(queue属性控制),进行队列监听
想要进程随着框架启动,需要添加配置,如下两种:
通过 config/autoload/processes.php 配置文件
通过注入 @Process(name=”async-queue”)
业务异步逻辑
创建 Job类 并继承 Hyperf\AsyncQueue\Job 类
<?php

declare(strict_types=1);

namespace App\Job;

use Hyperf\AsyncQueue\Job;

class ExampleJob extends Job
{
    public $params;

    /**
     * 任务执行失败后的重试次数,即最大执行次数为 $maxAttempts+1 次
     *
     * @var int
     */
    protected $maxAttempts = 2;

    public function __construct($params)
    {
        // 这里最好是普通数据,不要使用携带 IO 的对象,比如 PDO 对象
        $this->params = $params;
    }

    public function handle()
    {
        // 根据参数处理具体逻辑
        // 通过具体参数获取模型等
        // 这里的逻辑会在 ConsumerProcess 进程中执行
        var_dump($this->params);
    }
}
投递 job 类到redis
//创建 DriverFactory 工厂(目前只支持redisDriver)
$factory = \Hyperf\Utils\ApplicationContext::getContainer()->get(DriverFactory::class);
//通过工厂获取相应redis连接池的driver (配置文件的 redis.pool)
$driver = $factory->get('default');
//通过redisDriver 投递消息,第二个参数是延迟队列 (zset 通过时间进行有序排序)
$driver->push(new TestJob(['user_id' => 110]), 10);
注意点
此异步驱动会将整个 JOB 进行序列化,当投递即时队列后,会 lpush 到 list 结构中,投递延时队列,会 zadd 到 zset 结构中。 所以,如果 Job 的参数完全一致的情况,在延时队列中就会出现后投递的消息 覆盖 前面投递的消息的问题。 如果不想出现延时消息覆盖的情况,只需要在 Job 里增加一个唯一的 uniqid,或者在使用 注解 的方法上增加一个 uniqid 的入参即可。
原理
Hyperf 中关于这块的源码不难理解,建议阅读一下
事件
| 事件名称 | 触发时机 | 备注 |
|---|---|---|
| BeforeHandle | 处理消息前触发 | |
| AfterHandle | 处理消息后触发 | |
| FailedHandle | 处理消息失败后触发 | |
| RetryHandle | 重试处理消息前触发 | |
| QueueLength | 每处理 500 个消息后触发 | 用户可以监听此事件,判断失败或超时队列是否有消息积压 |
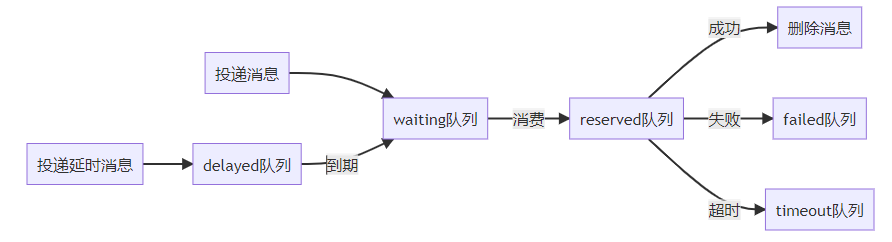
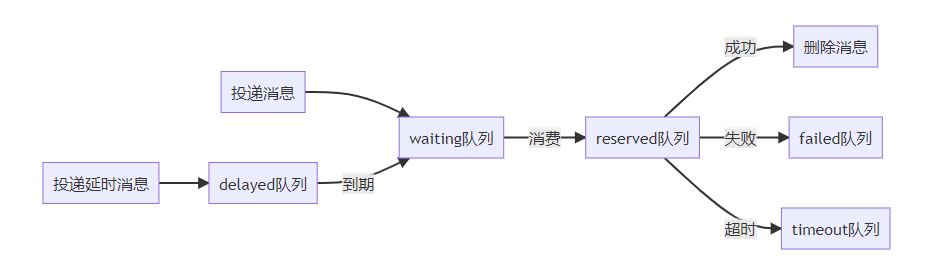
redis 队列
| 队列名 | 备注 |
|---|---|
| waiting | 等待消费的队列 (list) |
| reserved | 正在消费的队列 (zset) |
| delayed | 延迟消费的队列 (zset) |
| failed | 消费失败的队列 (list) |
| timeout | 消费超时的队列 (虽然超时,但可能执行成功) (list) |
异步消费进程代码分析
hyperf/async-queue 提供的 Hyperf\AsyncQueue\Process\ConsumerProcess 进程默认对应的配置文件的 redis default 实例
ConsumerProcess 消费队列的 进程,此进程会在 Server 启动时会自动创建,并执行指定的子进程函数,进程意外退出时,Server 会重新拉起进程。
Hyperf\AsyncQueue\Process\ConsumerProcess 定义的类属性
    /**
     * @var string
     * async_queue 配置文件的连接名称
     */
    protected $queue = 'default';

    /**
     * @var DriverInterface
     * 处理消息的驱动(redis,mysql) 目前只提供了 redis 驱动
     */
    protected $driver;

    /**
     * @var array
     * async_queue.default 对应的配置信息
     */
    protected $config;
在 Server 启动的时候 ConsumerProcess 初始化的内容
初始化驱动工厂对象 Hyperf\AsyncQueue\Driver\DriverFactory
通过工厂对象获取到驱动对象 Hyperf\AsyncQueue\Driver\Driver
通过工厂对象获取到连接的配置信息
创建驱动工厂的时候,初始化的内容
配置文件如下
<?php

declare(strict_types=1);
/**
 * This file is part of Hyperf.
 *
 * @link     https://www.hyperf.io
 * @document https://hyperf.wiki
 * @contact  group@hyperf.io
 * @license  https://github.com/hyperf/hyperf/blob/master/LICENSE
 */
return [
    'default' => [
        'driver' => \Hyperf\AsyncQueue\Driver\RedisDriver::class,
        'redis' => [
            'pool' => 'default', //redis 连接池
        ],
        'channel' => '{queue}', //队列前缀
        'timeout' => 2, //pop 消息的超时时间
        'retry_seconds' => 5, //失败后重新尝试间隔
        'handle_timeout' => 10, //消息处理超时时间
        'processes' => 1, //消费进程数
        'concurrent' => [
            'limit' => 10, //同时处理消息数
        ],
        'max_messages' => 10 //进程重启所需最大处理的消息数 默认不重启
    ],
    'user' => [
        'driver' => \Hyperf\AsyncQueue\Driver\RedisDriver::class,
        'redis' => [
            'pool' => 'kuke',
        ],
        'channel' => '{user_queue}',
        'timeout' => 2,
        'retry_seconds' => 5,
        'handle_timeout' => 10,
        'processes' => 10,
        'concurrent' => [
            'limit' => 10,
        ],
        'max_messages' => 10 //进程重启所需最大处理的消息数 默认不重启
    ],
];
                //获取配置文件的全部内容
        $this->configs = $config->get('async_queue', []);
        foreach ($this->configs as $key => $item) {
            //取驱动类定义
            $driverClass = $item['driver'];

            if (! class_exists($driverClass)) {
                throw new InvalidDriverException(sprintf('[Error] class %s is invalid.', $driverClass));
            }
            //创建驱动对象
            $driver = make($driverClass, ['config' => $item]);
            if (! $driver instanceof DriverInterface) {
                throw new InvalidDriverException(sprintf('[Error] class %s is not instanceof %s.', $driverClass, DriverInterface::class));
            }
            //保存驱动对象到 drivers 属性上
            // ["default" => RedisDriver.class对象, "user" => RedisDriver.class 对象]
            $this->drivers[$key] = $driver;
        }
获取 async_queue 配置文件的所有配置信息
循环配置信息
获取每个连接的驱动类
创建驱动对象
保存驱动对象到工厂的 drivers 属性
创建驱动对象,初始化内容
根据 async_queue 的连接配置信息初始化属性信息
创建表示 redis 队列名称的 ChannelConfig 对象
waiting 等待消费的队列
reserved 正在消费的队列
delayed 延迟消费的队列
failed 消费失败的队列
timeout 消费超时的队列 (虽然超时,但可能执行成功)
初始化 ConsumerProcess 进程对象,Hyperf 框架会调用 handler 方法,所以 handler 方法里面就是我们具体的监听redis异步队列的逻辑
public function handle(): void
    {
        if (! $this->driver instanceof DriverInterface) {
            $logger = $this->container->get(StdoutLoggerInterface::class);
            $logger->critical(sprintf('[CRITICAL] process %s is not work as expected, please check the config in [%s]', ConsumerProcess::class, 'config/autoload/queue.php'));
            return;
        }

        $this->driver->consume();
    }
然后来看 driver 的 consume 方法 \Hyperf\AsyncQueue\Driver\Driver::consume
public function consume(): void
    {
        $messageCount = 0;
        $maxMessages = Arr::get($this->config, 'max_messages', 0);

        while (ProcessManager::isRunning()) {
            try {
                [$data, $message] = $this->pop();

                if ($data === false) {
                    continue;
                }

                $callback = $this->getCallback($data, $message);

                if ($this->concurrent instanceof Concurrent) {
                    $this->concurrent->create($callback);
                } else {
                    parallel([$callback]);
                }

                if ($messageCount % $this->lengthCheckCount === 0) {
                    $this->checkQueueLength();
                }

                if ($maxMessages > 0 && $messageCount >= $maxMessages) {
                    break;
                }
            } catch (\Throwable $exception) {
                $logger = $this->container->get(StdoutLoggerInterface::class);
                $logger->error((string) $exception);
            } finally {
                ++$messageCount;
            }
        }
    }
通过 while 死循环不间断监听 redis 队列
$this->pop() 从具体的驱动对象中取出要消费的数据(目前来说是 redis )
针对 redis 驱动,来看下取出一个消费对象需要经过哪些流程
public function pop(): array
{
  $this->move($this->channel->getDelayed(), $this->channel->getWaiting());
  $this->move($this->channel->getReserved(), $this->channel->getTimeout());

  $res = $this->redis->brPop($this->channel->getWaiting(), $this->timeout);
  if (! isset($res[1])) {
    return [false, null];
  }

  $data = $res[1];
  $message = $this->packer->unpack($data);
  if (! $message) {
    return [false, null];
  }

  $this->redis->zadd($this->channel->getReserved(), time() + $this->handleTimeout, $data);

  return [$data, $message];
}
先从延迟队列中取出值小于当前时间的数据到等待队列
从消费队列查询小于当前时间的数据到超时队列
从等待队列中取出数据
反序列化
把取出的消息体添加到消费队列中
返回原消息体(操作 redis 使用)和反序列化的消息体
通过消息体封装回调方法
protected function getCallback($data, $message): callable
    {
        return function () use ($data, $message) {
            try {
                /**
                 * 反序列化的消息对象应该是 Hyperf\AsyncQueue\Message 对象
                 * 此对象会在业务代码中推送 Job 对象时进行封装
                 */
                if ($message instanceof MessageInterface) {
                    //触发事件
                    $this->event && $this->event->dispatch(new BeforeHandle($message));
                    //执行业务代码逻辑
                    $message->job()->handle();
                    //触发执行成功事件
                    $this->event && $this->event->dispatch(new AfterHandle($message));
                }
                //成功消费消息,把消息从消费队列删除
                $this->ack($data);
            } catch (\Throwable $ex) {
                if (isset($message, $data)) {
                    //有异常发生,未超过 job 里面最大的重试次数,把消息从消费队列删除
                    if ($message->attempts() && $this->remove($data)) {
                        //触发重试事件
                        $this->event && $this->event->dispatch(new RetryHandle($message, $ex));
                        //把消息重新推送到延迟队列中
                        $this->retry($message);
                    } else {
                        //超过最大重试次数,触发失败事件
                        $this->event && $this->event->dispatch(new FailedHandle($message, $ex));
                        //把消息从消费队列删除,并把消息推送到失败队列
                        $this->fail($data);
                    }
                }
            }
        };
    }
根据配置触发队列长度事件
判断是否需要重新启动进程

Job投递消息代码分析
投递消息
$factory = \Hyperf\Utils\ApplicationContext::getContainer()->get(DriverFactory::class);
$driver = $factory->get('default');
$driver->push(new TestJob(['user_id' => 110]), 10);
获取驱动工厂
获取要操作的驱动对象 Job
push
主要看 push 方法的代码
public function push(JobInterface $job, int $delay = 0): bool
{
        $message = make(Message::class, [$job]);
        $data = $this->packer->pack($message);

        if ($delay === 0) {
            return (bool) $this->redis->lPush($this->channel->getWaiting(), $data);
        }

        return $this->redis->zAdd($this->channel->getDelayed(), time() + $delay, $data) > 0;
}
从代码中可以看到,存储到 redis 的不是 Job 的序列化数据,而是封装了一层 Message 对象
如果没有设置延迟时间直接推送到等待消费队里
设置延迟时间推送到延迟队列
基于 mysql 实现异步队列
既然 Hyperf 把架子搭起来了,那么使用 mysql 也是可以实现异步队列的
CREATE TABLE `async_queue`  (
  `id` bigint(20) UNSIGNED NOT NULL AUTO_INCREMENT,
  `queue` varchar(20) CHARACTER SET utf8mb4 COLLATE utf8mb4_general_ci NOT NULL DEFAULT '',
  `message` text CHARACTER SET utf8mb4 COLLATE utf8mb4_general_ci NULL,
  `md5_message` char(32) CHARACTER SET utf8mb4 COLLATE utf8mb4_general_ci NOT NULL DEFAULT '',
  `add_time` bigint(20) NOT NULL DEFAULT 0,
  `delayed_time` bigint(20) NOT NULL DEFAULT 0,
  PRIMARY KEY (`id`) USING BTREE
) ENGINE = InnoDB AUTO_INCREMENT = 1 CHARACTER SET = utf8mb4 COLLATE = utf8mb4_general_ci ROW_FORMAT = Compact;
message 就相当于 new Message(new Job()) 序列化后的内容,可能比较大,所以添加一个md5 字段,以便创建索引查询删除使用
MysqlDriver.php 代码片段
创建 MysqlDriver.php 继承 Hyperf\AsyncQueue\Driver\Driver 类
并在构造函数中对操作的表进行初始化
public function __construct(ContainerInterface $container, $config)
    {
        parent::__construct($container, $config);
        $channel = $config['channel'] ?? 'queue';
              //初始化表
        $this->async_queue = AsyncQueue::class;
        $this->timeout = $config['timeout'] ?? 5;
        $this->retrySeconds = $config['retry_seconds'] ?? 10;
        $this->handleTimeout = $config['handle_timeout'] ?? 10;

        $this->channel = make(ChannelConfig::class, ['channel' => $channel]);
}- push 方法
$message = make(Message::class, [$job]);
        $data = $this->packer->pack($message);
        return $this->async_queue->save(
            [
                'queue' => $delay == 0 ? $this->channel->getWaiting() : $this->channel->getDelayed(),
                'message' => $data,
                'md5_message' => md5($data),
                'add_time' => time(),
                'delayed_time' => $delay == 0 ? 0 : time() + $delay,
            ]
);- pop 方法
public function pop(): array
    {
        //从延迟队列移动消息到等待队列中
        $this->move($this->channel->getDelayed(), $this->channel->getWaiting());
        $this->move($this->channel->getReserved(), $this->channel->getTimeout());

        $res = $this->async_queue->where(['queue' => $this->channel->getWaiting()])->orderBy('add_time', 'asc')->first();
        if ($res->message) {
            return [false, null];
        }

        $data = $res->message;
        $message = $this->packer->unpack($data);
        if (! $message) {
            return [false, null];
        }
        $this->async_queue->save([
            'queue' => $this->channel->getReserved(),
            'message' => $data,
            'md5_message' => md5($data),
            'add_time' => time(),
            'delayed_time' => time() + $this->handleTimeout,
        ]);
        return [$data, $message];
}- delete 方法
    public function delete(JobInterface $job): bool
    {
        $message = make(Message::class, [$job]);
        $data = $this->packer->pack($message);
        return $this->async_queue->delete(['md5_message' => md5($data), 'queue' => $this->channel->getDelayed()]);
}- fail 方法
public function fail($data): bool
    {
        if ($this->remove($data)) {
            return $this->async_queue->save([
                'queue' => $this->channel->getFailed(),
                'message' => $data,
                'md5_message' => md5($data),
                'add_time' => time(),
                'delayed_time' => 0,
            ]);
        }
        return false;
}- move 方法,队列消息转移方法
protected function move(string $from, string $to): void
    {
        $data = $this->async_queue->where('delayed_time', '<=', time())
            ->where('queue', $from)
            ->orderBy('delayed_time')
            ->limit(100)
            ->get();
        $now = time();
        foreach ($data as $info) {
            if ($this->async_queue->delete($info->id)) {
                $this->async_queue->save([
                    'queue' => $to,
                    'message' => $info->message,
                    'md5_message' => $info->md5_message,
                    'add_time' => time(),
                    'delayed_time' => 0,
                ]);
            }

        }
}本作品采用《CC 协议》,转载必须注明作者和本文链接


 关于 LearnKu


推荐文章: