
web项目部署总结
503 / 1 / 创建于 1年前 /
 ice_moss 的个人博客
[toc]
环境搭建
部署的第一步就是需要将服务所需要的环境搭建好
golang的安装
方法一
下载压缩包:将要下载在golang版本和对应操作系统在golang中文网或者在golang官方下载到本地。
将下载后的压缩包上传服务器
在终端使用 (以Ubuntu为例):
scp -r /本地路径/go压缩包 ssh ubuntu@IP:/服务器下的文件路径/目录解压到/usr/local下:
tar -C /usr/local -xzf gox.x.x.linux-amd64.tar.gz添加环境变量:
编辑/etc/profile文件
vim /etc/profile添加到末尾:
export PATH=$PATH:/usr/local/go/bin保存退出,使用命令source etc/profile 生效。
source etc/profile配置完成后,输入go -version可以查看安装的版本。
$ go  version
go version gox.x.x linux/amd64
方法二
以 root 或者其他 sudo 用户身份运行下面的命令,下载并且解压 Go 二进制文件到
/usr/local目录:wget -c https://dl.google.com/go/go1.x.x.linux-amd64.tar.gz -O - | sudo tar -xz -C /usr/local配置环境变量(和方法一一致)
安装数据库(mysql)
准备工作
远程连接需要部署LNMP环境的ECS实例。
具体操作,请参见连接方式概述。
关闭系统内部防火墙。
运行以下命令,检查防火墙当前状态。
sudo ufw status- 如果防火墙状态为Status: inactive,则表示防火墙为关闭状态。
- 如果防火墙状态为Status: active,则表示防火墙为开启状态。
可选:
关闭防火墙。
如果您的防火墙为开启状态,需要运行以下命令,关闭防火墙并关闭开机自启动防火墙。
sudo ufw disable
安装并配置MySQL
方法一:
安装MySQL。
运行以下命令,安装MySQL。
sudo apt -y install mysql-server运行以下命令,查看MySQL版本。
sudo mysql -V返回结果如下所示,表示MySQL已成功安装,MySQL的版本为8.0.27。
mysql Ver 8.0.27-0ubuntu0.20.04.1 for Linux on x86_64 ((Ubuntu))
配置MySQL。
运行以下命令,进入MySQL。
sudo mysql运行以下命令,设置root用户密码。
ALTER USER 'root'@'localhost' IDENTIFIED WITH mysql_native_password by 'mynewpassword';本示例中密码以
Mysql@1234为例,示例命令:ALTER USER 'root'@'localhost' IDENTIFIED WITH mysql_native_password by 'Mysql@1234';运行以下命令,退出MySQL数据库。
exit;运行以下命令,对MySQL进行安全性配置。
sudo mysql_secure_installation根据命令行提示,依次完成以下配置项。
输入root用户的密码。本示例中输入
Mysql@1234root@iZbp19jsi7s0g7m4zgc****:~# sudo mysql_secure_installation Securing the MySQL server deployment. Enter password for user root:说明 在输入密码时,系统为了最大限度的保证数据安全,命令行将不做任何回显。您只需要输入正确的密码信息,然后按Enter键即可。
输入Y,更改root用户密码。
Change the password for root ? ((Press y|Y for Yes, any other key for No) : Y输入root用户密码。
New password:

Re-enter new password:

Estimated strength of the password: 100
输入Y,确认使用已设置的密码。
Do you wish to continue with the password provided?(Press y|Y for Yes, any other key for No) : Y输入Y,删除MySQL自带的匿名用户。
By default, a MySQL installation has an anonymous user,
allowing anyone to log into MySQL without having to have
a user account created for them. This is intended only for
testing, and to make the installation go a bit smoother.
You should remove them before moving into a production
environment.

Remove anonymous users? (Press y|Y for Yes, any other key for No) : Y
输入Y,禁止MySQL的root用户的远程登录权限,如果需要远程登录,可以不用禁止
Normally, root should only be allowed to connect from
'localhost'. This ensures that someone cannot guess at
the root password from the network.

Disallow root login remotely? (Press y|Y for Yes, any other key for No) : Y
输入Y,移除test数据库。
By default, MySQL comes with a database named 'test' that
anyone can access. This is also intended only for testing,
and should be removed before moving into a production
environment.
     Remove test database and access to it? (Press y|Y for Yes, any other key for No) :
     ```

  8. 输入Y,重新加载授权表。

     ```yaml
     Reloading the privilege tables will ensure that all changes
     made so far will take effect immediately.

     Reload privilege tables now? (Press y|Y for Yes, any other key for No) : Y
     ```

     当命令行回显

     All done!

     时,表示配置完成。
测试登录MySQL数据库。
运行以下命令,登录MySQL数据库。
sudo mysql -u root -p在命令行回显的Enter password:后输入已设置的数据库密码。
说明 在输入密码时,系统为了最大限度的保证数据安全,命令行将不做任何回显。您只需要输入正确的密码信息,然后按Enter键即可。
成功登录MySQL数据库后,命令行信息如下所示。
root@iZbp19jsi7s0g7m4zgc****:~# sudo mysql -uroot -p
Enter password:
Welcome to the MySQL monitor.  Commands end with ; or \g.
Your MySQL connection id is 15
Server version: 8.0.29-0ubuntu0.20.04.3 (Ubuntu)

Copyright (c) 2000, 2022, Oracle and/or its affiliates.

Oracle is a registered trademark of Oracle Corporation and/or its
affiliates. Other names may be trademarks of their respective
owners.

Type 'help;' or '\h' for help. Type '\c' to clear the current input statement.

mysql>
运行以下命令,退出MySQL数据库。
exit;配置远程访问,进入mysql配置文件($为命令提示符)
cd /etc/mysql/mysql.conf.d有两个文件:
root@VM-0-6-ubuntu:/etc/mysql/mysql.conf.d# ls
mysqld.cnf  mysqld_safe_syslog.cnf
编辑mysqld.cnf:
vim mysqld.cnf# * Basic Settings # user = mysql pid-file = /var/run/mysqld/mysqld.pid socket = /var/run/mysqld/mysqld.sock port = 3306 basedir = /usr datadir = /var/lib/mysql tmpdir = /tmp lc-messages-dir = /usr/share/mysql skip-external-locking # # Instead of skip-networking the default is now to listen only on # localhost which is more compatible and is not less secure. bind-address = localhost #将
bind-address的localhost改为0.0.0.0即可远程访问如果端口冲突,也可以更改端口即:3306。保存即可。
方法二:使用docker安装
下载镜像
docker pull mysql:5.7通过镜像启动
docker run -p 3306:3306 --name mymysql -v $PWD/conf:/etc/mysql/conf.d -v $PWD/logs:/logs -v $PWD/data:/var/lib/mysql -e MYSQL_ROOT_PASSWORD=123456 -d mysql:5.7

-p 3306:3306:将容器的 3306 端口映射到主机的 3306 端口。

-v -v $PWD/conf:/etc/mysql/conf.d:将主机当前目录下的 conf/my.cnf 挂载到容器的 /etc/mysql/my.cnf。

-v $PWD/logs:/logs:将主机当前目录下的 logs 目录挂载到容器的 /logs。

-v $PWD/data:/var/lib/mysql :将主机当前目录下的data目录挂载到容器的 /var/lib/mysql 。

-e MYSQL_ROOT_PASSWORD=123456:初始化 root 用户的密码。
进入容器配置
由于mysql的安全策略,现在还不能使用root/123456来访问数据库
进入容器
通过docker ps -a来查看mysql的容器id然后使用:
docker exec -it 62349aa31687 /bin/bash进入mysql
mysql -u root -p 123456建立用户并授权
GRANT ALL PRIVILEGES ON *.* TO 'root'@'%' IDENTIFIED BY 'root' WITH GRANT OPTION; GRANT ALL PRIVILEGES ON *.* TO 'root'@'127.0.0.1' IDENTIFIED BY 'root' WITH GRANT OPTION; GRANT ALL PRIVILEGES ON *.* TO 'root'@'localhost' IDENTIFIED BY 'root' WITH GRANT OPTION; FLUSH PRIVILEGES;注:如果不能远程访问依然需要像方法一一样更改配置文件
缓存Redis的安装(docker安装)
docker run -p 6379:6379 -d redis:latest redis-server

docker container update --restart=always 容器名字
中间件RocketMQ的安装(docker安装)
配置文件
├── conf
│   └── broker.conf
└── docker-compose.yml
新建一个目录:
~ mkdir install
~ cd install
新建docker-compose.yml:
vim docker-compose.yml写入配置:
version: '3.5'
services:
  rmqnamesrv:
    image: foxiswho/rocketmq:server
    container_name: rmqnamesrv
    ports:
      - 9876:9876
    volumes:
      - ./logs:/opt/logs
      - ./store:/opt/store
    networks:
        rmq:
          aliases:
            - rmqnamesrv

  rmqbroker:
    image: foxiswho/rocketmq:broker
    container_name: rmqbroker
    ports:
      - 10909:10909
      - 10911:10911
    volumes:
      - ./logs:/opt/logs
      - ./store:/opt/store
      - ./conf/broker.conf:/etc/rocketmq/broker.conf
    environment:
        NAMESRV_ADDR: "rmqnamesrv:9876"
        JAVA_OPTS: " -Duser.home=/opt"
        JAVA_OPT_EXT: "-server -Xms256m -Xmx256m -Xmn256m"
    command: mqbroker -c /etc/rocketmq/broker.conf
    depends_on:
      - rmqnamesrv
    networks:
      rmq:
        aliases:
          - rmqbroker

  rmqconsole:
    image: styletang/rocketmq-console-ng
    container_name: rmqconsole
    ports:
      - 8080:8080
    environment:
        JAVA_OPTS: "-Drocketmq.namesrv.addr=rmqnamesrv:9876 -Dcom.rocketmq.sendMessageWithVIPChannel=false"
    depends_on:
      - rmqnamesrv
    networks:
      rmq:
        aliases:
          - rmqconsole

networks:
  rmq:
    name: rmq
    driver: bridge
新建目录:conf
~ mkdir conf
~ cd conf
新建配置文件:
vim broker.conf写入配置:
# Licensed to the Apache Software Foundation (ASF) under one or more
# contributor license agreements.  See the NOTICE file distributed with
# this work for additional information regarding copyright ownership.
# The ASF licenses this file to You under the Apache License, Version 2.0
# (the "License"); you may not use this file except in compliance with
# the License.  You may obtain a copy of the License at
#
#     http://www.apache.org/licenses/LICENSE-2.0
#
#  Unless required by applicable law or agreed to in writing, software
#  distributed under the License is distributed on an "AS IS" BASIS,
#  WITHOUT WARRANTIES OR CONDITIONS OF ANY KIND, either express or implied.
#  See the License for the specific language governing permissions and
#  limitations under the License.


# 所属集群名字
brokerClusterName=DefaultCluster

# broker 名字,注意此处不同的配置文件填写的不一样,如果在 broker-a.properties 使用: broker-a,
# 在 broker-b.properties 使用: broker-b
brokerName=broker-a

# 0 表示 Master,> 0 表示 Slave
brokerId=0

# nameServer地址,分号分割
# namesrvAddr=rocketmq-nameserver1:9876;rocketmq-nameserver2:9876

# 启动IP,如果 docker 报 com.alibaba.rocketmq.remoting.exception.RemotingConnectException: connect to <192.168.0.120:10909> failed
# 解决方式1 加上一句 producer.setVipChannelEnabled(false);,解决方式2 brokerIP1 设置宿主机IP,不要使用docker 内部IP
brokerIP1=127.0.0.1

# 在发送消息时,自动创建服务器不存在的topic,默认创建的队列数
defaultTopicQueueNums=4

# 是否允许 Broker 自动创建 Topic,建议线下开启,线上关闭 !!!这里仔细看是 false,false,false
autoCreateTopicEnable=true

# 是否允许 Broker 自动创建订阅组,建议线下开启,线上关闭
autoCreateSubscriptionGroup=true

# Broker 对外服务的监听端口
listenPort=10911

# 删除文件时间点,默认凌晨4点
deleteWhen=04

# 文件保留时间,默认48小时
fileReservedTime=120

# commitLog 每个文件的大小默认1G
mapedFileSizeCommitLog=1073741824

# ConsumeQueue 每个文件默认存 30W 条,根据业务情况调整
mapedFileSizeConsumeQueue=300000

# destroyMapedFileIntervalForcibly=120000
# redeleteHangedFileInterval=120000
# 检测物理文件磁盘空间
diskMaxUsedSpaceRatio=88
# 存储路径
# storePathRootDir=/home/ztztdata/rocketmq-all-4.1.0-incubating/store
# commitLog 存储路径
# storePathCommitLog=/home/ztztdata/rocketmq-all-4.1.0-incubating/store/commitlog
# 消费队列存储
# storePathConsumeQueue=/home/ztztdata/rocketmq-all-4.1.0-incubating/store/consumequeue
# 消息索引存储路径
# storePathIndex=/home/ztztdata/rocketmq-all-4.1.0-incubating/store/index
# checkpoint 文件存储路径
# storeCheckpoint=/home/ztztdata/rocketmq-all-4.1.0-incubating/store/checkpoint
# abort 文件存储路径
# abortFile=/home/ztztdata/rocketmq-all-4.1.0-incubating/store/abort
# 限制的消息大小
maxMessageSize=65536

# flushCommitLogLeastPages=4
# flushConsumeQueueLeastPages=2
# flushCommitLogThoroughInterval=10000
# flushConsumeQueueThoroughInterval=60000

# Broker 的角色
# - ASYNC_MASTER 异步复制Master
# - SYNC_MASTER 同步双写Master
# - SLAVE
brokerRole=ASYNC_MASTER

# 刷盘方式
# - ASYNC_FLUSH 异步刷盘
# - SYNC_FLUSH 同步刷盘
flushDiskType=ASYNC_FLUSH

# 发消息线程池数量
# sendMessageThreadPoolNums=128
# 拉消息线程池数量
# pullMessageThreadPoolNums=128
注意:需要将brokerIP1=127.0.0.1ip改为公网ip。
安装并启动
#cd到目录之下
docker-compose up
安装配置完成。
参考
当然也可以参考更简单的安装方式:rocketMQ的安装
代理服务器Nginx的安装
运行以下命令,更新Ubuntu系统内的软件包。
sudo apt update运行以下命令,安装Nginx。
sudo apt -y install nginx运行以下命令,查看Nginx版本。
sudo nginx -v返回结果如下所示,查看到Nginx的版本信息为1.18.0。同时也表示Nginx已成功安装。
nginx version: nginx/1.18.0 (Ubuntu)
更多安装配置参考:
部署
初始化数据库
- 数据库建立
- 表建立
- 导入数据
上传代码
环境搭建完成后我们就应该将前后端代码上传了
方法一:命令上传
将本地代码上传到服务器可以使用命令
scp -r /本地路径/项目目录 ssh ubuntu@IP:/服务器下的文件路径/目录方法二:通过git拉取
我们可以将测试好的代码(项目)上传至github或者gitee然后使用git clone拉取
后端项目部署
部署并启动服务
如果条件允许,我们最好有两天服务器:测试服务器和线上服务器。
条件有限,这里我就以一台服务器介绍。
进入项目目录:
root@VM-0-6-ubuntu:/home/ubuntu/project/mxshop/mxshop_srvs/user_srv# ls
config  config-debug.yaml  config-pro.yaml  global  handler  initialize  main.go  model  proto  test  tmp  utils
我们直接使用命令:
go run main.go #当然也可以在后台运行:go run main.go &他会自动去拉取项目所有的依赖,然后运行,测试无误后,使用命令:kill -9 pid退出测试服务进行,将main.go编译成可执行文件:
go build main.go 或者
go build main.go user_main #user_main 为可执行文件名root@VM-0-6-ubuntu:/home/ubuntu/project/mxshop/mxshop_srvs/user_srv# ls
config config-debug.yaml config-pro.yaml global handler initialize main main.go model proto test tmp utils可以看到多了一个可执行文件main
然后运行可执行文件:& 后台运行
../user_srv/main & 如果还有一台服务器的情况,这里我们就完成了,测试服务器的测试,然后将可执行文件上传线上服务器运行即可。
当然这是最简单的部署模式,我们也可以将服务制作成一个docker镜像,将服务容器化。
这样我们的后端项目就成功部署到服务器了。
前端项目部署
方法一:使用Ngin部署
怎么只需要将本地打包好的静态文件上传服务器,然后使用Nginx即可,具体如下:
我们准备我们的前端项目不管你是vue项目还是普通的jquery写的项目都是一样的,本文的前端项目是vue。
通过git把他克隆到我们的服务器下面,我的前端项目就放在/home/ubuntu/web/下
下面是我前端项目的目录和内容,我们主要是用到打包后的dist文件夹。
root@VM-0-6-ubuntu:/home/ubuntu/web/dist# ls
index.entry.js  index.html  static
root@VM-0-6-ubuntu:/home/ubuntu/web/dist# pwd
/home/ubuntu/web/dist
root@VM-0-6-ubuntu:/home/ubuntu/web/dist#
进入:/etc/nginx/sites-enabled/
root@VM-0-6-ubuntu:/home/ubuntu/web/dist# cd /etc/nginx/sites-enabled/
root@VM-0-6-ubuntu:/etc/nginx/sites-enabled# ls
default
下面有一个默认的配置,我们将其复制一份:
cp /etc/nginx/sites-enabled/default /etc/nginx/sites-enabled/myproject然后进入配置:
vim myproject可以看到
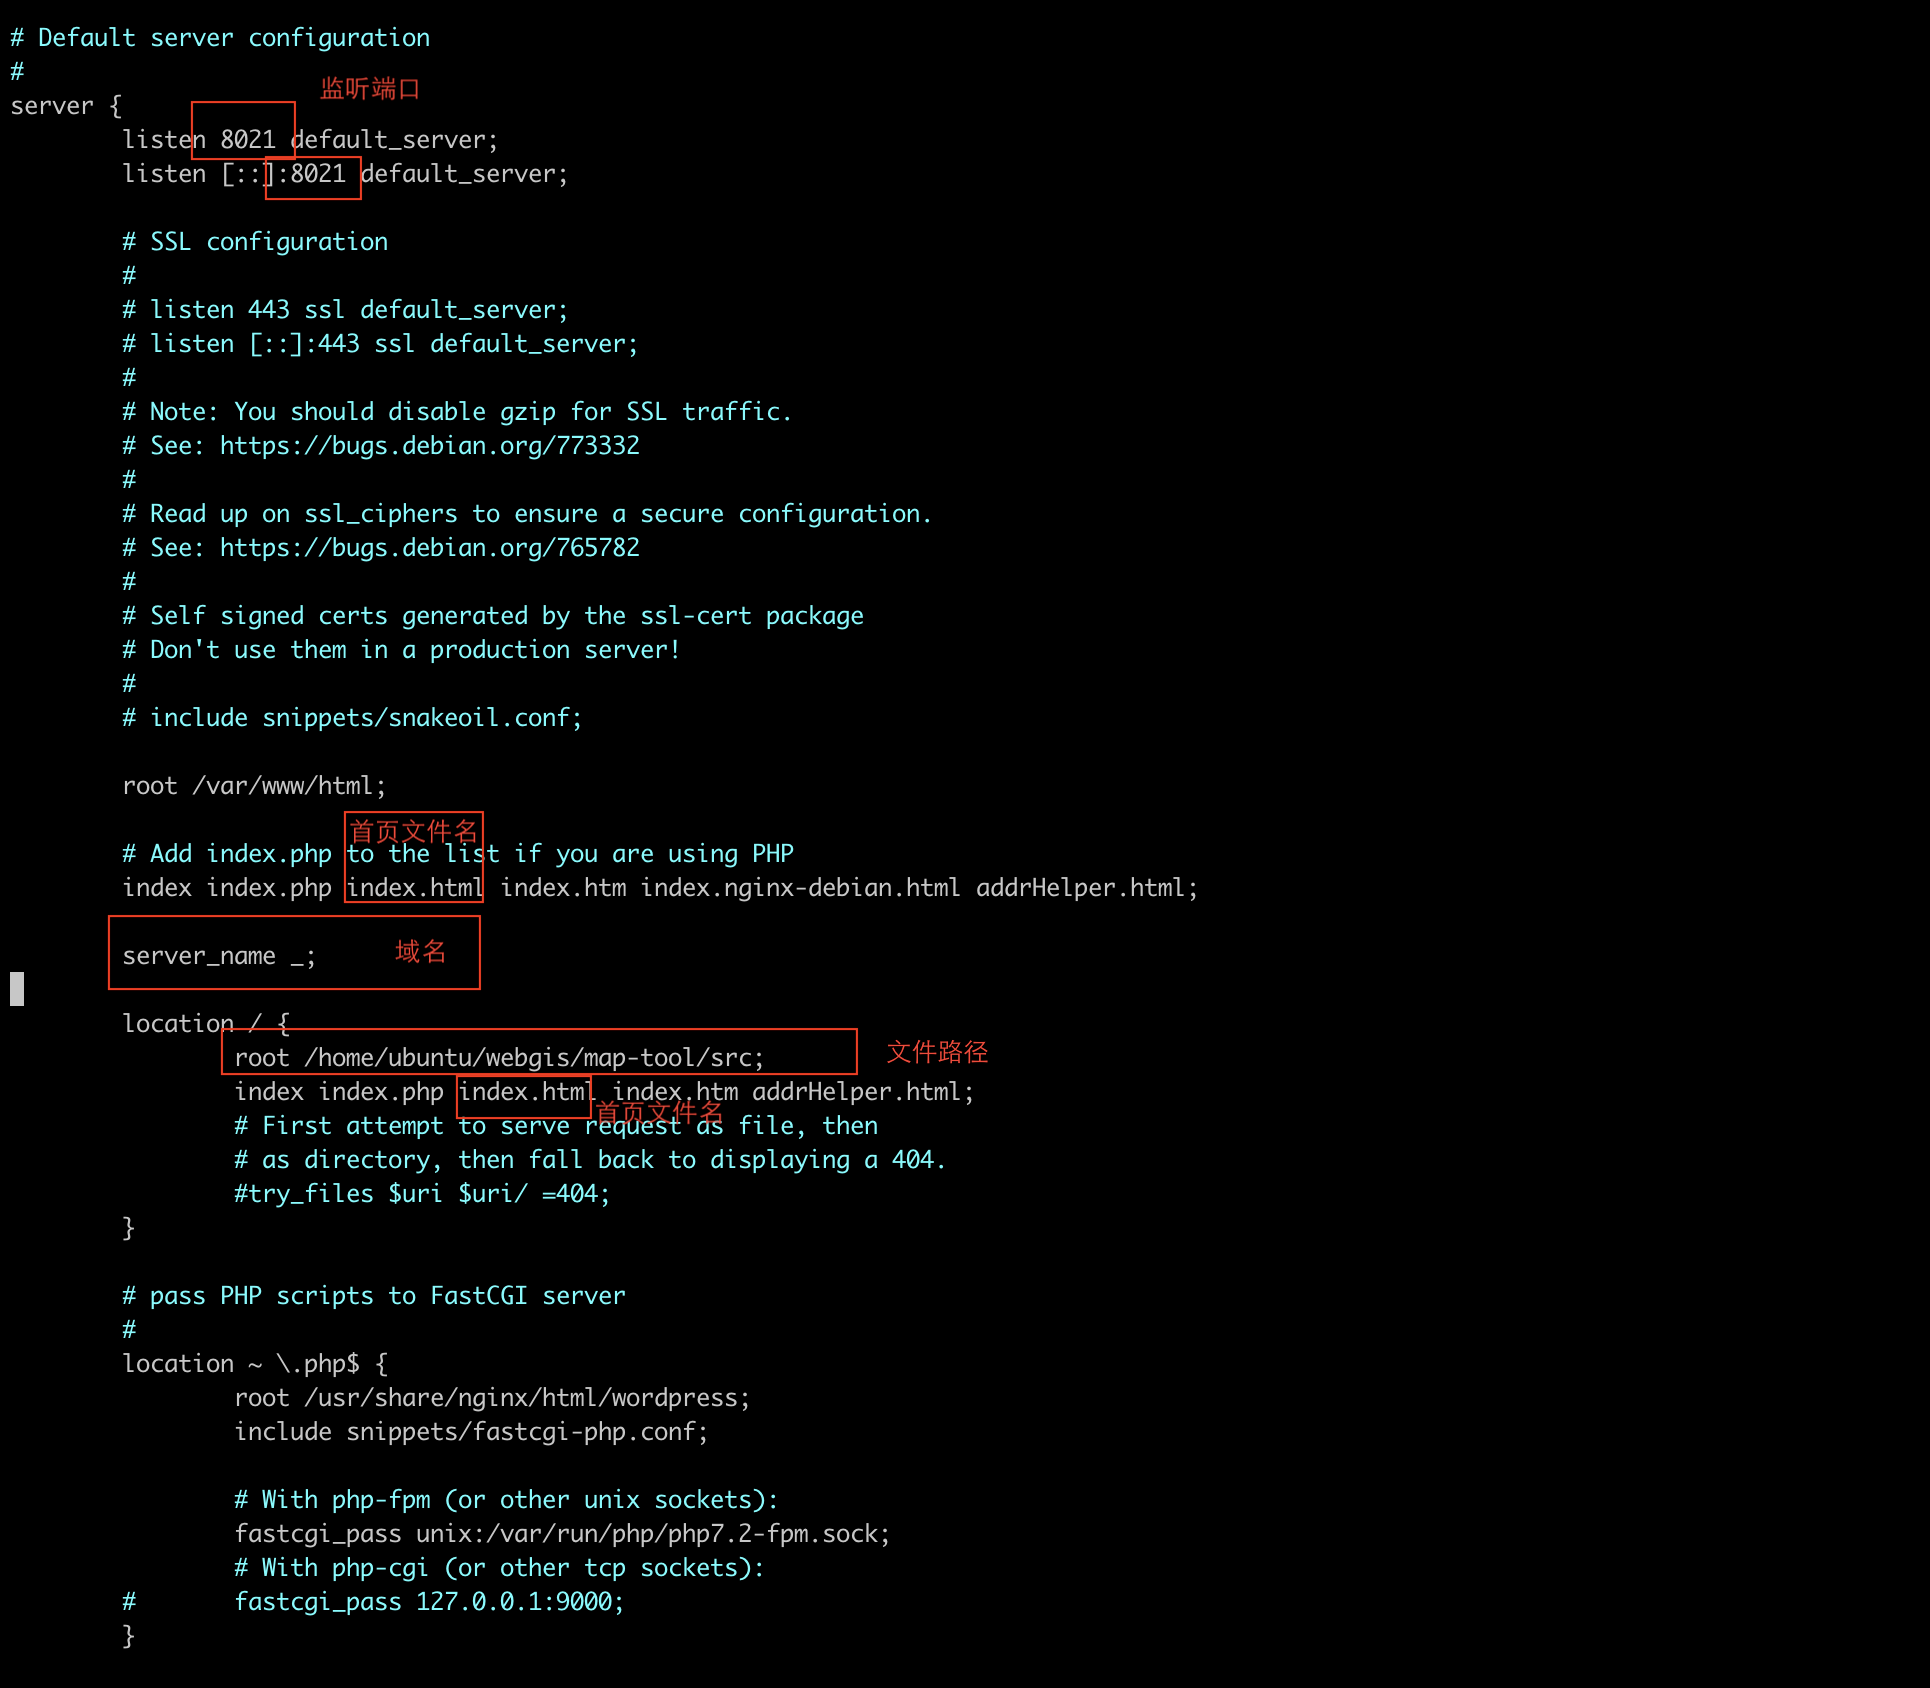
只需要修改图中对应的内容即可。
然后重新加载Nginx
nginx -s reload前端项目就部署完成。
方法二:使用node和npm部署
可以直接在服务器上将
将前端项目clone到服务器,使用命令npm install拉取依赖
npm install然后使用npm run dev 运行
npm run dev同样这里测试完成后,也可以使用命令 npm run build 将文件打包为静态文件
npm run build然后静态文件会在项目中的dist文件夹中。
依然可以使用nginx来部署。
方法三:使用其他服务代理
可以使用kong等服务代理。
本作品采用《CC 协议》,转载必须注明作者和本文链接


 关于 LearnKu


推荐文章: