
LatticePHP-使用PHP生成点阵图
0 / 3 / 创建于 3年前 /
 zmxyzmxy1234 的个人博客
入门
这是什么
LatticePHP是一个点阵图生成软件包,用于PHP生成点阵图。由于点阵图生成一般是嵌入式语言所需要的,而PHP几乎不使用,于是我开发了这一款冷门的软件包,希望能帮助你。
项目已经开源:Github地址
环境
- PHP >= 7.1
安装
使用composer安装
composer require zmxy/lattice或者前往GitHub仓库下载源文件,自行手动导入
使用
先创建一个画布
use Lattice\LatticePck\Lattice;
$width = 296;
$height = 128;
$lattice = new Lattice();
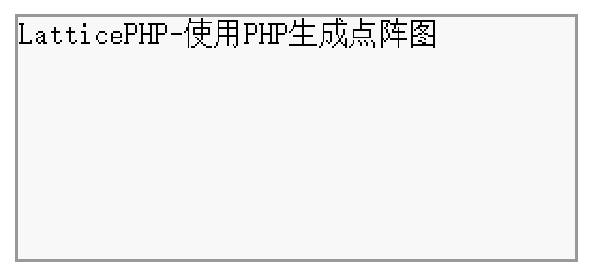
$lattice->createBlankImage($width, $height);这样子我们就创建了一个296X128的一个画布
接下来往上写字
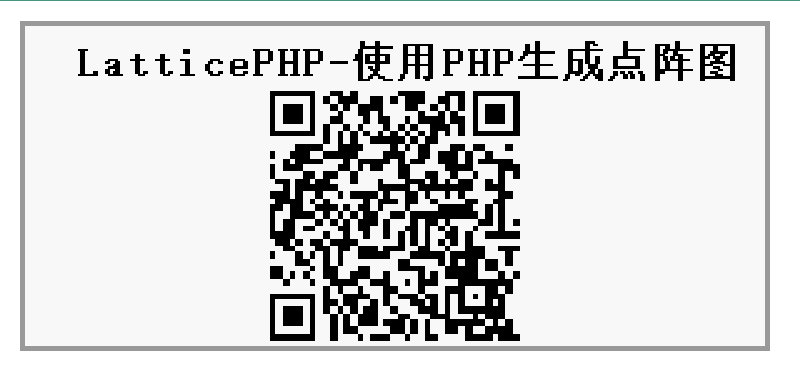
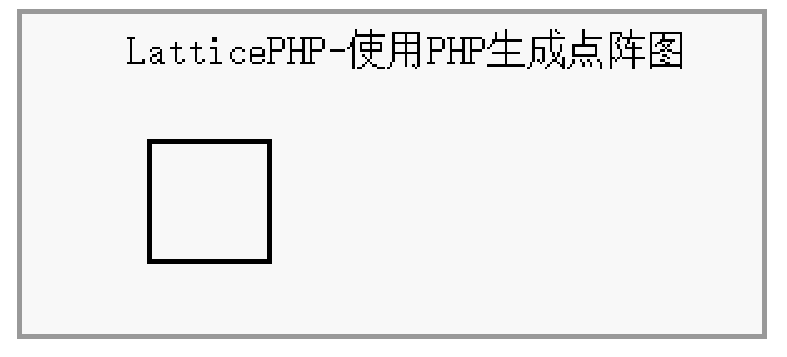
$lattice->text('LatticePHP-使用PHP生成点阵图', [0, 0]);效果如下
画一个矩形
use Lattice\LatticePck\LatticeImg;

LatticeImg::Rectangle($lattice, 50, 50, [50, 50], 0, 1);
效果如下
画二维码
use Lattice\LatticePck\LatticeImg;

$order = "http://weixin.qq.com/r/BRy0rI7EoNPfrcrP90kX";
LatticeImg::QrCode($lattice, $order, [0, 12, 'center'], "public/", 0);
输出HTML来看看效果
use Lattice\LatticePck\LatticeOutput;

$latticeOutput = (new LatticeOutput($lattice));
echo $latticeOutput->getHTML();
完整Demo
require 'vendor/autoload.php';

use Lattice\LatticePck\Lattice;
use Lattice\LatticePck\LatticeImg;
use Lattice\LatticePck\LatticeOutput;

$width = 296;
$height = 128;
$lattice = new Lattice();
$latticeOutput = (new LatticeOutput($lattice));
$lattice->createBlankImage($width, $height);

// 坐标
$x = 6;
$y = 6;
$lattice->text('LatticePHP-使用PHP生成点阵图', [$x, $y, 'top-center']);
// LatticeImg::Rectangle($lattice, 50, 50, [50, 50], 0, 1);

$order = "http://weixin.qq.com/r/BRy0rI7EoNPfrcrP90kX";
LatticeImg::QrCode($lattice, $order, [0, 12, 'center'], "public/", 0);

echo $latticeOutput->getHTML();
代码文档
画布
您在做任何操作之前起码得先创建一个画布。
use Lattice\LatticePck\Lattice;

$width = 296;
$height = 128;
$lattice = new Lattice();
$lattice->createBlankImage($width, $height);
/**
* 创建空白图片
* @param int $width
* @param int $height
* @param int $color 填充颜色 0.白 1.黑
*/字体
获取点阵字体
普通的字体因为加了锐角、美化是不能直接用来生成点阵图的,必须使用点阵字体。但是这方面的市场非常小,所以做的人很少,仅有的几个还会收取高昂费用。
这里提供一个工具用来生成点阵字体。
需要注意的是,如果源字体不可商用,您也无法将这个点阵字体商用,请尊重版权。本文会用免费的宋体来演示。
这里面主要是设置字号和字体宽高度,宽高要保持8的倍数,比如12号字体宽高填16。
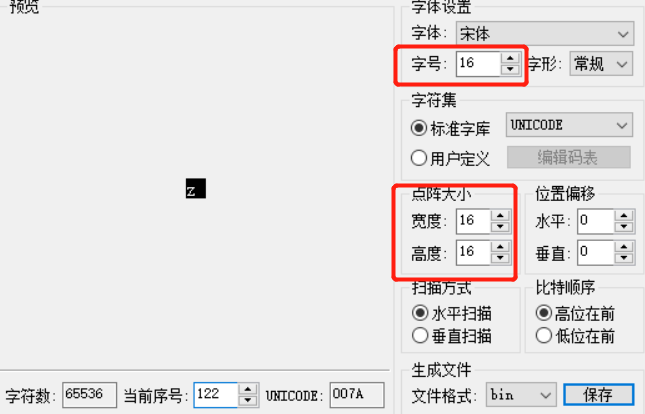
格式 bin 然后保存即可。
代码里使用
use Lattice\LatticePck\Lattice;

$fontDraw = Lattice::getFontDraw();
$fontDraw->setFont('./font/st16_16', 16, 8);
这里第一个参数是字体路径,第二个是中文宽度,第三个是英文宽度,因为英文比中文短一半,所以设置为8。(设置英文宽度主要是去除多余空白,不然影响美观)
    /**
     * 设置字体大小
     * @param stirng $fontFileName 字体文件路径
     * @param int $font_v 中文宽度
     * @param int $font_e 英文宽度
     * @return void
     */
颜色
LatticePHP是用 1 表示黑色 0 表示白色 (后期可以考虑加入其他颜色)。本质上点阵图就是一串01010101.
颜色反转
$lattice->colorReflection($textArr); /**
* 颜色反转
* @param array $textArr 点阵数组
* @return void
*/您可以传入$lattice->image,因为这个是整张画布,如这么做将会把整张画布颜色反转。
坐标偏移
所有绘制的图像需要设置X、Y坐标与偏移指令,例如:
[$x, $y, 'top-center']除了top-center,还有top-right、top-left、bottom-center、bottom-left、bottom-right、center-right、center、center-left
意思应该懂吧,top-center就是Y轴靠上,X轴居中,以此类推。
文本
use Lattice\LatticePck\Lattice;

$lattice = new Lattice();
$lattice->text('LatticePHP-使用PHP生成点阵图', [$x, $y, 'top-center']);
/**
* 写入文字
* @param string $text 文字
* @param array $xy xy坐标与偏移指令
* @param int $color 字体颜色 1.黑色 0.白色
* @param int $spacing 字间距
* @param int $font_bold 1 加粗 0 不加粗
* @param int $heightSpacing 1 去除上下空白 0 不去除
* @param int $getType 1 获取点阵数组
* @return array
*/参数$getType的意思是返回一个由01构成的数组。
例如:
图形
点
use Lattice\LatticePck\LatticeImg;

LatticeImg::point($lattice, [0, 12]);
/**
* 创建点
* @param Lattice $lattice Lattice对象
* @param array $xy XY坐标偏移指令
* @param int $color 点颜色 1.黑 0.白 默认为1
* @return void
*/直线
use Lattice\LatticePck\LatticeImg;

LatticeImg::Line($lattice, [[1, 1],  [8, 8]]);
/**
* 创建线
* @param Lattice $lattice Lattice对象
* @param array $xy XY坐标[[1, 1], [8, 8]] 不支持偏移指令
* @param int $color 线条颜色 1.黑 0.白 默认为1
* @return void
*/矩形
use Lattice\LatticePck\LatticeImg;

LatticeImg::Rectangle($lattice, $width, $height, [$x, $y]);
/**
* 创建矩形
* @param Lattice $lattice Lattice对象
* @param int $width 宽度
* @param int $height 高度
* @param array $xy XY坐标偏移
* @param int $fillColor 填充颜色 0.白 1.黑
* @param int $borderSize 边框大小
* @param int $borderColor 边框颜色
* @return void
*/插入自定义图片
use Lattice\LatticePck\LatticeImg;

$lattice->insertImg($lattice, $filePath, [$x, $y]);
/**
* 插入图片(只能是黑白)
* @param Lattice $lattice 点阵类
* @param string $filePath 图片的文件路径
* @param array $xy 坐标偏移
* @param int $mode 模式 0.只读白色,其余为黑 1. 只读黑色,其余为白 2. 黑白都读,其余为灰(用2表示),默认模式为1
* @return void
* @throws Exception
*/条码
因为条码种类繁多,所以LatticePHP内置了CodeItNow来生成条码,先生成图片,然后再插入。
一维码
use Lattice\LatticePck\LatticeImg;

$order = "112233";
LatticeImg::BarCode($lattice, $order, [$x, $y, 'top-center']);
/**
* Barcode生成条纹码
* @param Lattice $lattice 点阵类
* @param string $text 内容字符串
* @param array $xy xy坐标
* @param string $barcodeType 条码格式 默认 BarcodeType::Code128
* @param int $thickness 高度厚度 默认18
* @param int $thick 厚度比例 默认1
* @param int $fillColor 条纹码颜色 默认1
* @param bool $delete 是否自动将生成的图片删除 默认true
* @param string $filePath 文件路径 默认 public/images/ (结尾记得带/)
* @param string $fileName 文件名 默认时间戳+随机数
* @return void
*/二维码
use Lattice\LatticePck\LatticeImg;

$order = "http://weixin.qq.com/r/BRy0rI7EoNPfrcrP90kX";
LatticeImg::QrCode($lattice, $order, [$x, $y, 'center']);
/**
* Barcode生成二维码
* @param Lattice $lattice 点阵类
* @param string $text 字符串
* @param array $xy xy坐标
* @param int $size 尺寸 默认100
* @param bool $delete 是否自动将生成的图片删除 默认true
* @param string $filePath 生成二维码的文件路径 默认 public/images/ (结尾记得带/)
* @param string $fileName 生成二维码的文件名 默认时间戳+随机数
* @return void
* @throws Exception
*/输出画布
我们有时候需要预览画布,您可以通过LatticeOutput这个工具类进行输出
use Lattice\LatticePck\Lattice;
use Lattice\LatticePck\LatticeOutput;

$width = 296;
$height = 128;
$lattice = new Lattice();
$latticeOutput = (new LatticeOutput($lattice));
$lattice->createBlankImage($width, $height);

$order = "http://weixin.qq.com/r/BRy0rI7EoNPfrcrP90kX";
LatticeImg::QrCode($lattice, $order, [0, 12, 'center']);
输出HTML
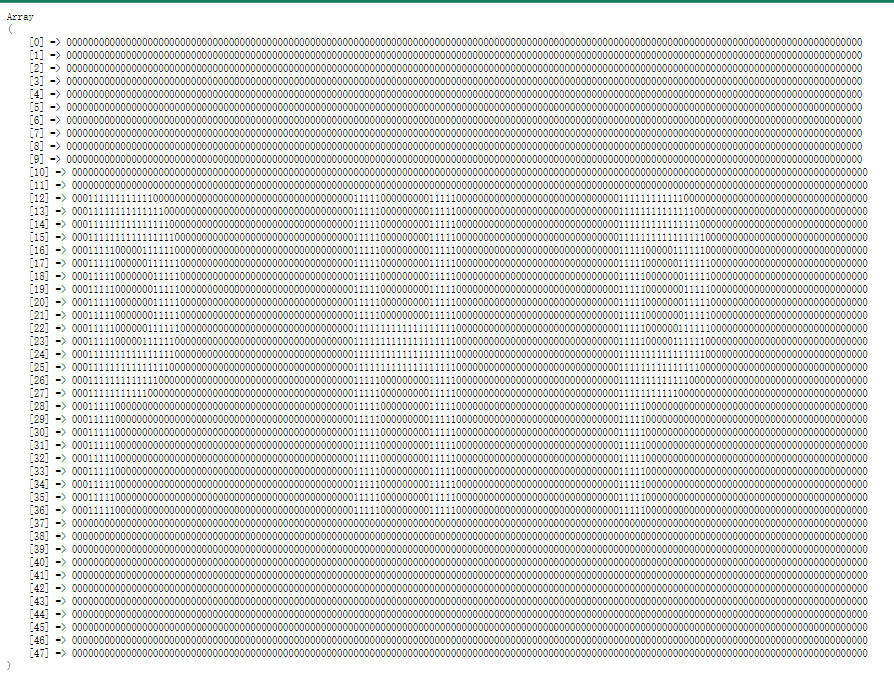
echo $latticeOutput->getHTML();输出数组
通过<pre>这个标签可以格式化输出
echo '<pre>';
print_r($latticeOutput->getImageArray());
输出16进制
将图片的01当做二进制转换为16进制
echo $latticeOutput->toHexa(); /**
* 将二进制数据转换16进制数串的函数(并反转)
* @param array $olbImage 点阵数组 默认整张画布
* @param bool $strrev 是否反转图片(将图片倒置并且竖直)
* @return string $_32hexa
*/其他
截取
有时候您插入了一个超过了整张画布的图片,它不会报错,但肯定会影响您的程序。您需要使用这个方法进行画布截取。
$lattice->interception();这将会把超出画布的元素截取掉。
字符串换行
默认情况下一个字符串超出时不会换行,您可以通过这个函数进行换行
$address = "我是一个很长的地址,要被换行哦噢噢噢噢噢噢噢噢哦哦哦哦哦哦哦哦哦哦哦哦";
$addressArray = LatticeFont::strWrap($address, 48, 2);
/**
* 字符串换行分割
* @param string $str 要被换行分割的字符串
* @param int $length 一行的长度, 英文长度 默认12
* @param int $hans_length 一个汉字等于多少个英文的宽度(GBK编码是2,UTF-8编码是3) 默认2
* @param string $append 尾部追加的字符串 默认为空
* @return array 字符串分割后的数组
*/ABABAB合并字符串
use Lattice\Utils\CString;

CString::MergeBetween('AAAAA', 'BBBBB');
/**
* 以类似ABABAB模式的方式合并两个字符串结果。
* @param string $str1 String A
* @param string $str2 String B
* @return string Merged string
*/本作品采用《CC 协议》,转载必须注明作者和本文链接


 关于 LearnKu


推荐文章: