
 AdonisJS 中文文档
数据关联
Lucid 数据模型对处理关系具有开箱即用的支持。你必须在模型上定义关系,而 Lucid 将完成构建底层 SQL 查询的所有繁重工作。
HasOne
HasOne 在两个模型之间创建一对一关系。例如,用户有个人资料。有一个关系需要相关表中的外键。
以下是具有一个关系的示例表结构。profiles.user_id是外键,与users.id列形成关系。

以下是users和profiles表的示例迁移。
// title: users
import BaseSchema from '@ioc:Adonis/Lucid/Schema'

export default class Users extends BaseSchema {
  protected tableName = 'users'

  public async up () {
    this.schema.createTable(this.tableName, (table) => {
      // 高亮开始
      table.increments('id').primary()
      // 高亮结束
      table.timestamp('created_at', { useTz: true })
      table.timestamp('updated_at', { useTz: true })
    })
  }
}
// title: profiles
import BaseSchema from '@ioc:Adonis/Lucid/Schema'
export default class Profiles extends BaseSchema {
protected tableName = 'profiles'
public async up () {
this.schema.createTable(this.tableName, (table) => {
table.increments('id')
// 高亮开始
table
.integer('user_id')
.unsigned()
.references('users.id')
.onDelete('CASCADE') // 删除用户时删除配置文件
// 高亮结束
table.timestamp('created_at', { useTz: true })
table.timestamp('updated_at', { useTz: true })
})
}
}在模型上定义关系
一旦你创建了包含所需列的表,你还必须在 Lucid 模型上定义关系。
has one 关系是使用模型属性上的 @hasOne 装饰器定义的。
import Profile from 'App/Models/Profile'

import {
  column,
  BaseModel,
  // 高亮开始
  hasOne,
  HasOne
  // 高亮结束
} from '@ioc:Adonis/Lucid/Orm'

export default class User extends BaseModel {
  // 高亮开始
  @hasOne(() => Profile)
  public profile: HasOne<typeof Profile>
  // 高亮结束
}
自定义关系键
默认情况下,foreignKey是 camelCase 表示的父模型名称及其主键。但是,你也可以定义自定义外键。
@hasOne(() => Profile, {
  foreignKey: 'profileUserId', // defaults to userId
})
public profile: HasOne<typeof Profile>本地键始终是父模型的主键,但也可以显式定义。
@hasOne(() => Profile, {
  localKey: 'uuid', // defaults to id
})
public profile: HasOne<typeof Profile>
HasMany
HasMany 在两个模型之间创建一对多关系。例如,一个用户有很多帖子。 hasMany 关系需要相关表中的外键。
以下是 hasMany 关系的示例表结构。posts.user_id是外键并与users.id列形成关系。

以下是users和posts表的示例迁移
// title: users
import BaseSchema from '@ioc:Adonis/Lucid/Schema'

export default class Users extends BaseSchema {
  protected tableName = 'users'

  public async up () {
    this.schema.createTable(this.tableName, (table) => {
      // 高亮开始
      table.increments('id').primary()
      // 高亮结束
      table.timestamp('created_at', { useTz: true })
      table.timestamp('updated_at', { useTz: true })
    })
  }
}
// title: posts
import BaseSchema from '@ioc:Adonis/Lucid/Schema'
export default class Posts extends BaseSchema {
protected tableName = 'posts'
public async up () {
this.schema.createTable(this.tableName, (table) => {
table.increments('id')
// 高亮开始
table
.integer('user_id')
.unsigned()
.references('users.id')
.onDelete('CASCADE') // 删除用户时删除帖子
// 高亮结束
table.timestamp('created_at', { useTz: true })
table.timestamp('updated_at', { useTz: true })
})
}
}在模型上定义关系
一旦创建了包含所需列的表,你还必须在 Lucid 模型上定义关系。
一对多关系是使用模型属性上的 @hasMany 装饰器定义的。
import Post from 'App/Models/Post'

import {
  column,
  BaseModel,
  hasMany,
  HasMany
} from '@ioc:Adonis/Lucid/Orm'

export default class User extends BaseModel {
  @hasMany(() => Post)
  public posts: HasMany<typeof Post>
}
自定义关系键
默认情况下,foreignKey 是 小驼峰表示的父模型名称及其主键。但是,你也可以定义自定义外键。
@hasMany(() => Post, {
  foreignKey: 'authorId', // 默认为 userId
})
public posts: HasMany<typeof Post>
local key 始终是父模型的主键,但也可以显式定义。
@hasMany(() => Post, {
  localKey: 'uuid', // 默认为 id
})
public posts: HasMany<typeof Post>
BelongsTo
BelongsTo 是 hasOne 和 hasMany 关系的逆。例如,个人资料属于用户,帖子属于用户。
你可以利用相同的表结构和相同的外键约定来定义 belongsTo 关系。
所属关系是使用模型属性上的 @belongsTo 装饰器定义的。
import User from 'App/Models/User'
import {
  column,
  BaseModel,
  belongsTo,
  BelongsTo
} from '@ioc:Adonis/Lucid/Orm'

export default class Profile extends BaseModel {
  // Foreign key 仍然在同一个模型上
  @column()
  public userId: number

  @belongsTo(() => User)
  public user: BelongsTo<typeof User>
}
ManyToMany
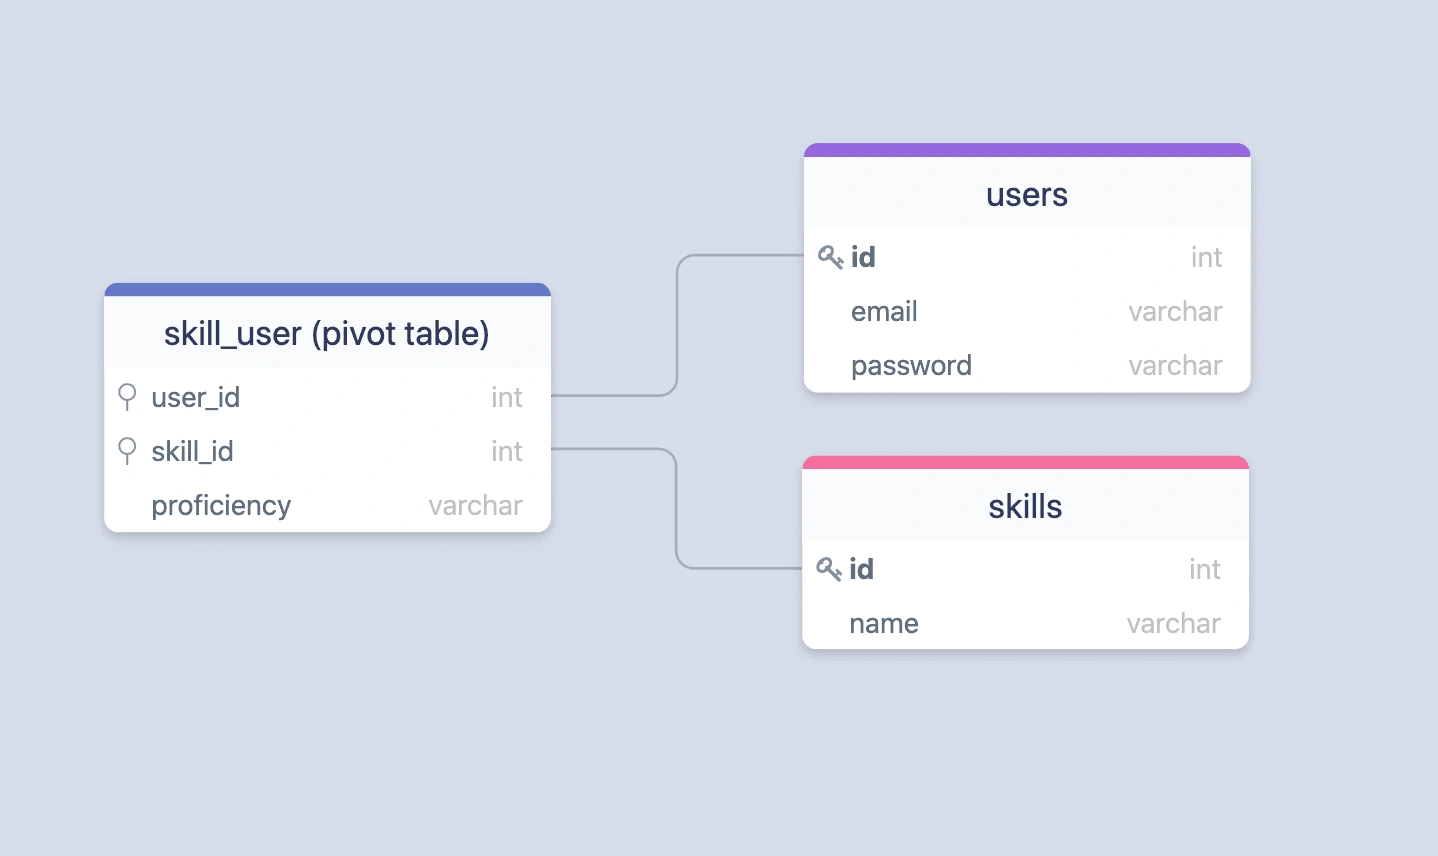
多对多的关系相对复杂,举个例子:一个用户可以拥有多个技能, 一个技能可以被多个用户共享。
为了表示这种多对多的关系,往往需要第三张表来描述这种对应关系。一般这种表被称为关联表,它保存着其它两个表的外键。
在以下示例中,skill_user表即为关联表,存放着users表和skills表的外键,通过多条数据来表示这两张表的对应关系。
以下是users、skills和skill_user表的示例迁移。
// title: users
import BaseSchema from '@ioc:Adonis/Lucid/Schema'

export default class Users extends BaseSchema {
  protected tableName = 'users'

  public async up () {
    this.schema.createTable(this.tableName, (table) => {
      // 高亮开始
      table.increments('id').primary()
      // 高亮结束
      table.timestamp('created_at', { useTz: true })
      table.timestamp('updated_at', { useTz: true })
    })
  }
}
// title: skills
import BaseSchema from '@ioc:Adonis/Lucid/Schema'
export default class Skills extends BaseSchema {
protected tableName = 'skills'
public async up () {
this.schema.createTable(this.tableName, (table) => {
// 高亮开始
table.increments('id').primary()
// 高亮结束
table.timestamp('created_at', { useTz: true })
table.timestamp('updated_at', { useTz: true })
})
}
}// title: skill_user
import BaseSchema from '@ioc:Adonis/Lucid/Schema'
export default class SkillUsers extends BaseSchema {
protected tableName = 'skill_user'
public async up () {
this.schema.createTable(this.tableName, (table) => {
table.increments('id').primary()
// 高亮开始
table.integer('user_id').unsigned().references('users.id')
table.integer('skill_id').unsigned().references('skills.id')
table.unique(['user_id', 'skill_id'])
// 高亮结束
table.timestamp('created_at', { useTz: true })
table.timestamp('updated_at', { useTz: true })
})
}
}在模型上定义关系
一旦创建了包含所需列的表,您还必须在 Lucid 模型上定义关系。
多对多关系是使用模型属性上的 @manyToMany 装饰器定义的。
注意:无需为数据透视表创建模型。
import Skill from 'App/Models/Skill'
import {
  column,
  BaseModel,
  manyToMany,
  ManyToMany,
} from '@ioc:Adonis/Lucid/Orm'

export default class User extends BaseModel {
  @column({ isPrimary: true })
  public id: number

  @manyToMany(() => Skill)
  public skills: ManyToMany<typeof Skill>
}
自定义关系键
多对多关系依赖于许多不同的键来正确设置关系,所有这些键都是使用标准约定计算的。但是,你可以进行覆盖。
localKey是父模型的主键(即 User)relatedKey是相关模型的主键(即 Skill)pivotForeignKey是与父模型建立关系的外键。默认值为父模型名称及其主键的snake_case版本。pivotRelatedForeignKey是与相关模型建立关系的外键。默认值为相关模型名称及其主键的snake_case版本。
@manyToMany(() => Skill, {
  localKey: 'id',
  pivotForeignKey: 'user_id',
  relatedKey: 'id',
  pivotRelatedForeignKey: 'skill_id',
})
public skills: ManyToMany<typeof Skill>
自定义数据透视表
数据透视表名称的默认值综合 父模型名称 和相关型号名称计算。但是,你也可以定义自定义数据透视表。
@manyToMany(() => Skill, {
  pivotTable: 'user_skills',
})
public skills: ManyToMany<typeof Skill>
额外的数据透视列
有时你的数据透视表会有额外的列。例如,将 proficiency 与用户技能一起存储。
您需要通知有关此额外列的 manyToMany 关系。否则,Lucid 不会在 fetch 查询期间选择它。
@manyToMany(() => Skill, {
  pivotColumns: ['proficiency'],
})
public skills: ManyToMany<typeof Skill>
数据透视表时间戳
你可以使用 pivotTimestamps 属性为数据透视表启用对 created at 和 updated at 时间戳的支持。
- 一旦定义,Lucid 将在插入和更新查询时自动设置/更新这些时间戳。
- 在获取期间将它们转换为 Luxon Datetime 类的实例。
@manyToMany(() => Skill, {
  pivotTimestamps: true
})
public skills: ManyToMany<typeof Skill>
设置 pivotTimestamps = true 假定列名定义为 created_at 和 updated_at。但是,你也可以自定义列名。
@manyToMany(() => Skill, {
  pivotTimestamps: {
    createdAt: 'creation_date',
    updatedAt: 'updation_date'
  }
})
public skills: ManyToMany<typeof Skill>
要禁用特定时间戳,可以将其值设置为 false。
@manyToMany(() => Skill, {
  pivotTimestamps: {
    createdAt: 'creation_date',
    updatedAt: false // 关闭时间戳字段更新
  }
})
public skills: ManyToMany<typeof Skill>
HasManyThrough
HasManyThrough 关系类似于 HasMany 关系,但通过中间模型创建关系。例如,一个国家/地区有很多用户发布的帖子。
- 这种关系需要贯穿模型(即 User )与当前模型(即国家)有一个外键引用。
相关模型(即 Post)具有与贯穿模型(即 User)的外键引用。
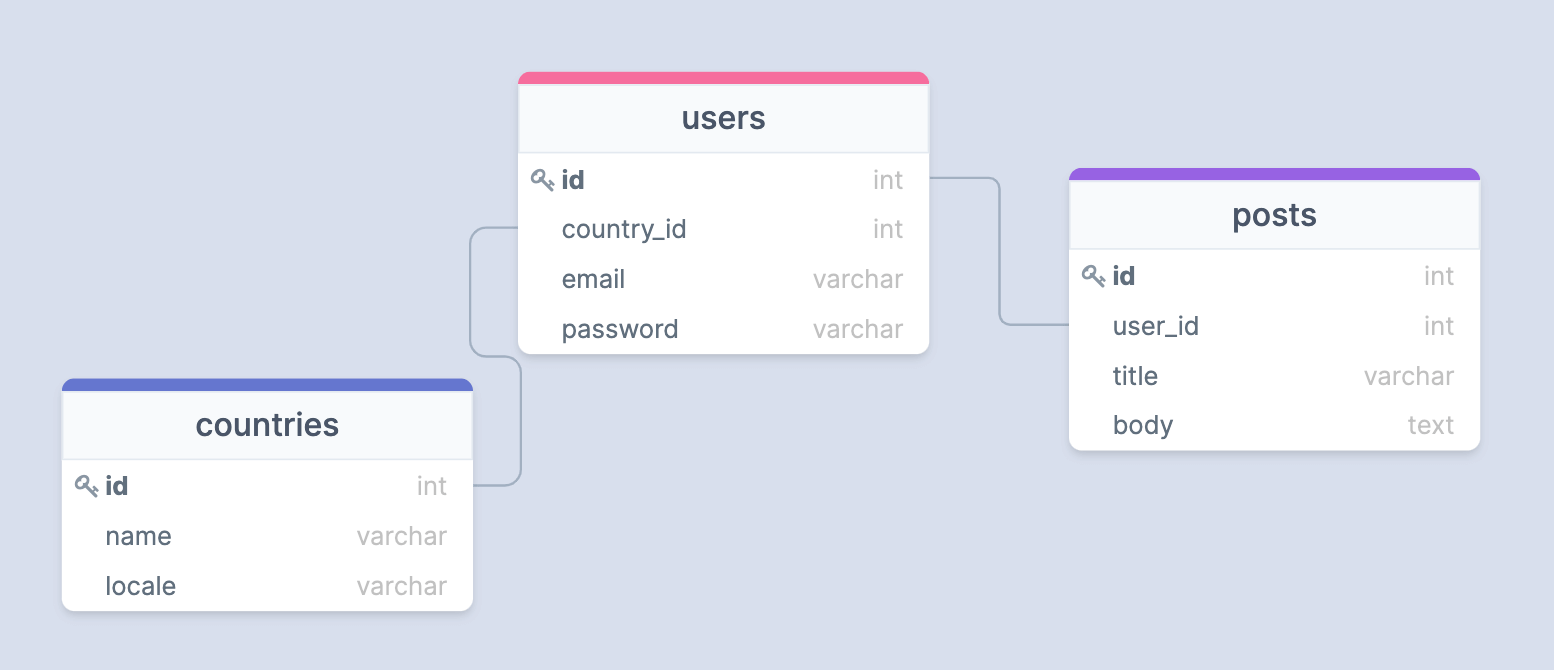
以下是 countries、users 和 posts 表的示例迁移。
// 主题: countries
import BaseSchema from '@ioc:Adonis/Lucid/Schema'

export default class Countries extends BaseSchema {
  protected tableName = 'countries'

  public async up () {
    this.schema.createTable(this.tableName, (table) => {
      table.increments('id').primary()
      table.timestamp('created_at', { useTz: true })
      table.timestamp('updated_at', { useTz: true })
    })
  }
}
// 主题: users
import BaseSchema from '@ioc:Adonis/Lucid/Schema'
export default class Users extends BaseSchema {
protected tableName = 'users'
public async up () {
this.schema.createTable(this.tableName, (table) => {
table.increments('id').primary()
table
.integer('country_id')
.unsigned()
.references('countries.id')
table.timestamp('created_at', { useTz: true })
table.timestamp('updated_at', { useTz: true })
})
}
}// 主题: posts
import BaseSchema from '@ioc:Adonis/Lucid/Schema'
export default class Posts extends BaseSchema {
protected tableName = 'posts'
public async up () {
this.schema.createTable(this.tableName, (table) => {
table.increments('id').primary()
table
.integer('user_id')
.unsigned()
.references('users.id')
table.timestamp('created_at', { useTz: true })
table.timestamp('updated_at', { useTz: true })
})
}
}在模型上定义关系
一旦创建了包含所需列的表,你还必须在 Lucid 模型上定义关系。
has many through 关系是使用模型属性上的 @hasManyThrough 装饰器定义的。
import Post from 'App/Models/Post'
import User from 'App/Models/User'
import {
  BaseModel,
  column,
  hasManyThrough,
  HasManyThrough
} from '@ioc:Adonis/Lucid/Orm'

export default class Country extends BaseModel {
  @column({ isPrimary: true })
  public id: number

  @hasManyThrough([
    () => Post,
    () => User,
  ])
  public posts: HasManyThrough<typeof Post>
}
预加载关系
预加载允许你伴随主查询获取关系数据。例如:同时选择所有用户和预加载(preload)他们的个人资料。
preload方法接受模型上定义的关系名称。hasOne和belongsTo关系的关系属性值要么设置为相关模型实例,要么在未找到记录时设置为null。
关系属性值是所有其他关系类型的相关模型实例的数组。
const users = await User
  .query()
  .preload('profile')

users.forEach((user) => {
  console.log(user.profile)
})
你可以通过将可选回调传递给 preload 方法来修改关系查询。
const users = await User
  .query()
  .preload('profile', (profileQuery) => {
    profileQuery.where('isActive', true)
  })
预加载多个关系
可以通过多次调用 preload 方法将多个关系一起预加载。例如:
const users = await User
  .query()
  .preload('profile')
  .preload('posts')
预加载嵌套关系
可以使用带可选回调的关系查询构建器预加载嵌套关系。
在下面的示例中,我们获取所有用户,预加载他们的帖子,然后获取每个帖子的所有评论以及评论用户。
const users = await User
  .query()
  .preload('posts', (postsQuery) => {
    postsQuery.preload('comments', (commentsQuery) => {
      commentsQuery.preload('user')
    })
  })
多对多数据透视列
预加载 manyToMany 关系时,数据透视表列将移动到关系实例上的 $extras 对象。
默认情况下,我们只从数据透视表中选择外键。但是,你可以在 额外透视列定义关系 或运行时定义要选择的其他数据透视列。
const users = await User
  .query()
  .preload('skills', (query) => {
    query.pivotColumns(['proficiency'])
  })

users.forEach((user) => {
  user.skills.forEach((skill) => {
    console.log(skill.$extras.pivot_proficiency)
    console.log(skill.$extras.pivot_user_id)
    console.log(skill.$extras.pivot_skill_id)
    console.log(skill.$extras.pivot_created_at)
  })
})
延迟加载关系
除了预加载,你还可以直接从模型实例加载关系。
const user = await User.find(1)

// 延迟加载配置文件
await user.load('profile')
console.log(user.profile) // 文件 | null

// 延迟加载帖
await user.load('posts')
console.log(user.posts) // Post[]
与 preload 方法一样,load 方法也接受一个可选的回调来修改关系查询。
await user.load('profile', (profileQuery) => {
  profileQuery.where('isActive', true)
})
你可以通过多次调用 load 方法或抓取底层关系加载器的实例来加载多个关系。
// 多次调用“load”方法
await user.load('profile')
await user.load('posts')
// 使用关系加载器
await user.load((loader) => {
loader.load('profile').load('posts')
})限制预加载的关系
假设你要加载所有帖子并获取每个帖子的最近三个评论。
使用查询构建器 limit 方法不会提供所需的输出,因为该限制适用于整个数据集,而不是单个帖子的评论。
因此,你必须使用使用 SQL 窗口函数 的 groupLimit 方法对每个父级应用限制分开记录。
const posts = await Post
  .query()
  .preload('comments', (query) => {
    query.groupLimit(3)
  })
关系查询生成器
注意:确保已经阅读 关系 API 文档 以查看查询构建器上所有可用的方法/属性。
你还可以使用 related 方法访问关系的查询构建器, 关系查询始终限定在给定的父模型实例范围内。
在以下示例中,Lucid 将自动添加 where 子句以将帖子限制为指定用户。
const user = await User.find(1)
const posts = await user.related('posts').query()
query 方法返回一个标准查询构建器实例,你可以将任何方法链接到它以添加额外的约束。
const posts = await user
  .related('posts')
  .query()
  .where('isPublished', true)
  .paginate(1)
你还可以使用关系查询构建器来 update 和 delete 相关行。但是,这样做 不会执行 任何模型钩子。
按关系过滤
你还可以通过检查是否存在关系来过滤主查询的记录。例如,选择所有收到一条或多条评论的帖子。
你可以使用 has 或 whereHas 方法按关系进行过滤。他们接受关系名称作为第一个参数,你还可以选择传递运算符和预期行数。
// 获取包含一条或多条评论的帖子
const posts = await Post
  .query()
  .has('comments')

// 获取超过 2 条评论的帖子
const posts = await Post
  .query()
  .has('comments', '>', 2)
你可以使用 whereHas 方法为关系查询添加额外的约束。在以下示例中,我们仅获取具有一个或多个赞评论的帖子。
const posts = await Post
  .query()
  .whereHas('comments', (query) => {
    query.where('isApproved', true)
  })
与 has 方法类似,whereHas 也接受可选运算符和预期行数。
const posts = await Post
  .query()
  .whereHas('comments', (query) => {
    query.where('isApproved', true)
  }, '>', 2)
以下是 has 和 whereHas 变体的列表。
orHas | orWhereHas为关系的存在添加了一个 OR 子句。doesntHave | whereDoesntHave检查是否存在关系。orDoesntHave | orWhereDoesntHave为关系缺失添加了一个 OR 子句。
关系聚合
Lucid 的关系 API 还允许加载关系的聚合。例如,可以获取帖子列表,其中包含每个帖子的评论数。
withAggregate
withAggregate 方法接受关系作为第一个参数和一个强制回调来定义值的聚合函数和属性名称。
注意:在以下示例中,
comments_count属性被移动到$extras对象,因为它没有被定义为模型上的属性。
const posts = await Post
  .query()
  .withAggregate('comments', (query) => {
    query.count('*').as('comments_count')
  })

posts.forEach((post) => {
  console.log(post.$extras.comments_count)
})
withCount
由于计算关系行数是一个非常常见的要求,因此可以改用 withCount 方法。
const posts = await Post.query().withCount('comments')

posts.forEach((post) => {
  console.log(post.$extras.comments_count)
})
You can also provide a custom name for the count property using the as method.
const posts = await Post
  .query()
  .withCount('comments', (query) => {
    query.as('commentsCount')
  })

posts.forEach((post) => {
  console.log(post.$extras.commentsCount)
})
你可以通过将可选回调传递给 withCount 方法来定义计数查询的约束。
const posts = await Post
  .query()
  .withCount('comments', (query) => {
    query.where('isApproved', true)
  })
延迟加载关系聚合
与 withCount 和 withAggregate 方法类似,你也可以使用 loadCount 和 loadAggregate 方法从模型实例中延迟加载聚合.
const post = await Post.findOrFail()
await post.loadCount('comments')

console.log(post.$extras.comments_count)
const post = await Post.findOrFail()
await post.loadAggregate('comments', (query) => {
query.count('*').as('commentsCount')
})
console.log(post.$extras.commentsCount)确保仅在使用单个模型实例时使用 loadCount 方法。如果有多个模型实例,最好使用查询构建器 withCount 方法。
关系查询钩子
你可以在定义关系时定义 onQuery 关系挂钩。然后,为关系查询构建器执行的所有 select、update 和 delete 查询执行查询钩子。
onQuery 方法通常在你始终将某些约束应用于关系查询时很有帮助。
import UserEmail from 'App/Models/UserEmail'
import {
  column,
  BaseModel,
  hasMany,
  HasMany
} from '@ioc:Adonis/Lucid/Orm'

export default class User extends BaseModel {
  @hasMany(() => UserEmail)
  public emails: HasMany<typeof UserEmail>

  @hasMany(() => UserEmail, {
    onQuery: (query) => {
      query.where('isActive', true)
    }
  })
  public activeEmails: HasMany<typeof UserEmail>
}
建立关系
你可以使用关系持久性 API 在两个模型之间创建关系。查看 API 文档 以查看所有可用的方法。
create
在下面的示例中,我们创建一个新评论并将其同时链接到帖子。 create 方法接受一个普通的 JavaScript 对象来持久化。外键值自动定义。
const post = await Post.findOrFail(1)
const comment = await post.related('comments').create({
  body: 'This is a great post'
})

console.log(comment.postId === post.id) // true
save
下面是使用save方法的示例。save方法需要相关模型的实例进行关联。外键的值是自动定义的。
const post = await Post.findOrFail(1)

const comment = new Comment()
comment.body = 'This is a great post'

await post.related('comments').save(comment)

console.log(comment.postId === post.id) // true
createMany
您还可以使用createMany方法关联创建多个数据。该方法仅适用于hasMany(一对多)和manyToMany(多对多)。
createMany方法会返回一个模型实例化后的数组。
const comments = await Post
  .related('comments')
  .createMany([
    {
      body: 'This is a great post.'
    },
    {
      body: 'Well written.'
    }
  ])
saveMany
类似于save方法。saveMany方法允许同时关联更新多条数据。
const comment1 = new Comment()
comment1.body = 'This is a great post'

const comment2 = new Comment()
comment2.body = 'Well written'

await Post
  .related('comments')
  .saveMany([comment1, comment2])
associate
associate方法是belongsTo独有的。它可以将两个模型相互关联。
const user = await User.findOrFail(1)

const profile = new Profile()
profile.avatarUrl = 'foo.jpg'
await profile.related('user').associate(user)
dissociate
dissociate通过将外键设置为null取消两个模型之间的belongsTo关联。因此该方法也是belongsTo独有的。
await profile = await Profile.findOrFail(1)
await profile.related('user').dissociate()
attach
attach方法专用于manyToMany(多对多)。它允许您在数据表内建立两个模型之间的关联。
attach方法只需要相关模型的id来生成数据表内部的关系。
const user = await User.find(1)
const skill = await Skill.find(1)

// 在数据表中执行插入
await user.related('skills').attach([skill.id])
你可以通过传递键值对对象来定义其他数据透视列。键是对应的模型id,值是附加列的对象。
await user.related('skills').attach({
  [skill.id]: {
    proficiency: 'Beginner'
  }
})
detach
detach 方法与 attach 方法相反,允许你从数据透视表中删除关系**。
它可以接受要删除的 ids 数组。不带任何参数调用该方法将从数据透视表中删除所有关系。
const user = await User.find(1)
const skill = await Skill.find(1)

await user.related('skills').detach([skill.id])

// 移除当前用户的所有 “skill”
await user.related('skills').detach()
sync
sync 方法允许你同步数据透视行。提供给 sync 方法的有效输入是唯一依赖,我们在内部计算一个比较来执行以下 SQL 查询。
- 插入数据透视表中缺少但存在于同步有效负载中的行。
- 更新数据透视表和同步有效负载中存在的行,但有一个或多个更改的参数。
- 删除数据透视表中存在但同步负载中缺失的行。
- 忽略数据透视表和同步负载中存在的行。
const user = await User.find(1)

// 只有 id 为 1、2、3 的技能会留在数据透视表中
await user.related('skills').sync([1, 2, 3])
你还可以将其他数据透视列定义为键值对的对象。
const user = await User.find(1)

await user.related('skills').sync({
  [1]: {
    proficiency: 'Beginner',
  },
  [2]: {
    proficiency: 'Master'
  },
  [3]: {
    proficiency: 'Master'
  }
})
你可以禁用 detach 选项来同步行,而无需从数据透视表中删除行。
await user
  .related('skills')
  // 添加 id 为 1,2,3 的 skill
  // 但不会删除数据透视表中的任何行
  .sync([1, 2, 3], false)
删除关系
在大多数情况下,你可以直接从其模型中删除相关行。例如:直接使用评论模型可以通过评论的id删除评论,不需要通过 post 触发评论删除。
- 对于
manyToMany关系,你可以使用detach方法从数据透视表中删除行。 - 使用
dissociate方法删除 belongsTo 关系,而不从数据库表中删除行。
使用 onDelete 操作
你还可以使用数据库 onDelete 操作从数据库中删除相关数据。例如:当用户本身被删除时,删除用户的帖子。
以下是设置 onDelete 操作的示例迁移。
this.schema.createTable(this.tableName, (table) => {
  table.increments('id')
  table
    .integer('user_id')
    .unsigned()
    .references('users.id')
    // highlight-start
    .onDelete('CASCADE')
    // highlight-end
})本译文仅用于学习和交流目的,转载请务必注明文章译者、出处、和本文链接
我们的翻译工作遵照 CC 协议,如果我们的工作有侵犯到您的权益,请及时联系我们。


 关于 LearnKu


