【2021-07-07】Java 中创建对象有哪几种方式?
请移步至:
每日一题 查看更多的题目 ~
答:
常见的创建对象的方式有4种:
- 使用 new 关键字
- 反射
- 使用 clone() 方法
- 序列化与反序列化
1.使用 new 关键字创建对象
public class Person {

    private String name;
    private int age;

    public Person() {
        this.name = "default";
        this.age = 0;
    }

    public Person(String name, int age) {
        this.name = name;
        this.age = age;
    }

    public void info() {
        System.out.println("My name is " + name + ", I'm " + age + "years old.");
    }

    public static void main(String[] args) {
        Person p1 = new Person("Jack",30);
        p1.info();
    }
}
程序输出结果:
My name is Jack, I'm 30 years old.2.使用反射创建对象
使用反射创建对象还可以具体划分为:
- 使用 Class 类的 newInstance 方法
- 使用 Constructor 类的 newInstance 方法
使用 Class 类的 newInstance 方法创建对象
该方式会调用无参构造器来创建对象
public class Person {
    private String name;
    private int age;

    public Person() {
        this.name = "default";
        this.age = 0;
    }

    public Person(String name, int age) {
        this.name = name;
        this.age = age;
    }

    public void info() {
        System.out.println("My name is " + name + ", I'm " + age + " years old.");
    }

    public static void main(String[] args) throws ClassNotFoundException, IllegalAccessException, InstantiationException {
        // copy reference
        Person p2 = (Person)Class.forName("test.Person").newInstance();
        Person p3 = Person.class.newInstance();

        p2.info();
        p3.info();
    }
}
程序输出结果:
My name is default, I'm 0 years old.
My name is default, I'm 0 years old.
使用 Constructor 类的 newInstance 方法创建对象
和 Class 类的 newInstance 方法很像,java.lang.reflect.Constructor类里也有一个 newInstance 方法可以创建对象。我们可以通过这个 newInstance 方法调用有参数的和私有的构造函数。
import java.lang.reflect.InvocationTargetException;

public class Person {
    private String name;
    private Integer age;

    public Person() {
        this.name = "default";
        this.age = 18;
    }

    public Person(String name){
        this(name,18);
    }
    // 私有构造器
    private Person(String name, Integer age) {
        this.name = name;
        this.age = age;
    }

    public void info() {
        System.out.println("My name is " + name + ", I'm " + age + " years old.");
    }

    public static void main(String[] args) throws ClassNotFoundException, NoSuchMethodException, IllegalAccessException, InvocationTargetException, InstantiationException {

        Person p4 = (Person) Class.forName("test.Person").getConstructor(String.class).newInstance("Tracy");
        p4.info();

        Person p5 = (Person) Class.forName("test.Person").getDeclaredConstructor(String.class,Integer.class).newInstance("James",25);
        p5.info();
    }
}
程序运行结果:
My name is Tracy, I'm 18 years old.
My name is James, I'm 25 years old.
3.使用 clone() 方法创建对象
关于 clone() 方法,有需要注意以下几点:
- 一个类,需要实现了 Cloneable 接口,才能调用 Object 的 clone() 方法,否则会报 CloneNotSupportedException
- clone() 方法并不会调用被复制实例的构造函数
- clone()方法实际上为浅拷贝,在《Core Java》中提到了这一点:应该完全避免使用 clone() 方法,而使用其他方法达到拷贝的目的,例如工厂模式,或者序列化等等。
我们来看程序:
public class Person implements Cloneable {
    private int age;
    private String name;

    public Person(int age,String name){
        this.age = age;
        this.name = name;
    }

    public int getAge(){
        return this.age;
    }
    public String getName(){
        return this.name;
    }

    @Override
    public Object clone(){
        Person p = null;
        try {
            p = (Person) super.clone();
        } catch (CloneNotSupportedException e) {
            e.printStackTrace();
        }
        return p;
    }

    public static void main(String[] args) {
        Person p1 = new Person(26,"kim");
        Person p2 = (Person)p1.clone();
        System.out.println(p1.getName() == p2.getName() ? "shallow  copy" : "deep copy");
    }
}
该程序运行的结果为:
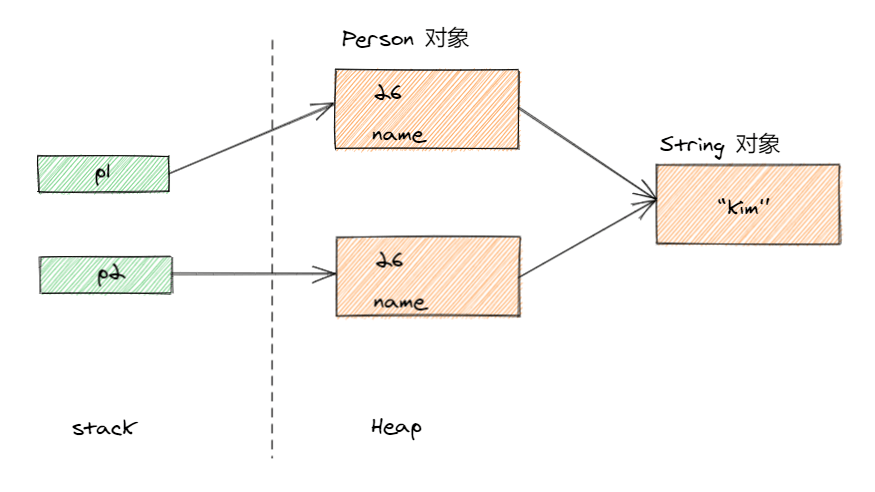
shallow copy我们来看下本程序中 p1 对象与 p2 对象的内存分配示意图:

从本图中就可以看出,clone() 方法只是 field-to-field-copy(浅拷贝),而真正的深拷贝应该是这样的:
public class Person implements Cloneable {
    private int age;
    private String name;

    public Person() {
    }

    public Person(int age, String name) {
        this.age = age;
        this.name = name;
    }

    public int getAge() {
        return this.age;
    }

    public void setAge(int age) {
        this.age = age;
    }

    public String getName() {
        return this.name;
    }

    public void setName(String name) {
        this.name = name;
    }


    @Override
    public Object clone() {
        Person p = null;
        try {
            p = (Person) super.clone();
        } catch (CloneNotSupportedException e) {
            e.printStackTrace();
        }
        return p;
    }

    public static void main(String[] args) {
        Person p1 = new Person(26, "kim");
        // shallow copy
        Person p2 = (Person) p1.clone();
        // deep copy
        Person p3 = new Person();
        String name = new String("kim");
        int age = 26;
        p3.setAge(age);
        p3.setName(name);
        System.out.println(p1.getName() == p2.getName() ? "shallow  copy" : "deep copy");
        System.out.println(p1.getName() == p3.getName() ? "shallow  copy" : "deep copy");
    }
}
程序输出结果:
shallow  copy
deep copy
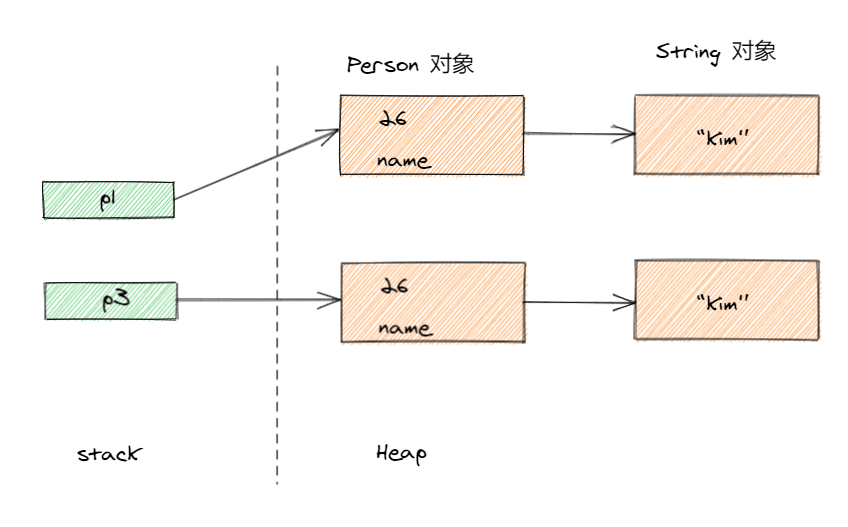
我们来看一下 p1 与 p3 的内存分配示意图:

从上面两张图的对比,我们也可以看出,浅拷贝和深拷贝最根本的区别就是,深拷贝拷贝出的东西是是一个对象的复制实体,而不是引用。
举个栗子:
假设 B 是 A 的一个拷贝
在我们修改 A 的时候,如果 B 也跟着发生了变化,那么就是浅拷贝,说明修改的是堆内存中的同一个值;
在我们修改 A 的时候,如果 B 没有发生改变,那么就是深拷贝,说明修改的是堆内存中不同的值
4.使用序列化与反序列化创建对象
所谓的序列化是指:将对象通过流的方式存储到磁盘中;
反序列化则是将磁盘上的对象信息转换到内存中
使用序列化,首先要实现 Serializable 接口,如果我们想要序列化的对象的类没有实现 Serializable 接口,那么就会抛出 NotSerializableException 异常;其次要求:
- 对象中的所有属性也都是可以序列化才能被序列化,static 变量无法序列化
- 如果某个属性不想序列化,可以在属性上加 transient 关键字
程序示例如下:
序列化
import java.io.*;

public class Person implements Serializable {
    private int age;
    private String name;

    public Person(int age, String name) {
        this.age = age;
        this.name = name;
    }

    public int getAge() {
        return age;
    }

    public void setAge(int age) {
        this.age = age;
    }

    public String getName() {
        return name;
    }

    public void setName(String name) {
        this.name = name;
    }

    public void info() {
        System.out.println("My name is " + name + ", I'm " + age + " years old.");
    }

    public static void main(String[] args) throws IOException {
        File file = new File("src\\test\\file.txt");
        ObjectOutputStream o = new ObjectOutputStream(new FileOutputStream(file));
        Person p = new Person(30,"Jack");
        o.writeObject(p);
    }
}
反序列化
import java.io.File;
import java.io.FileInputStream;
import java.io.IOException;
import java.io.ObjectInputStream;

public class Test {
    public static void main(String[] args) throws IOException, ClassNotFoundException {
        File file = new File("src\\test\\file.txt");
        ObjectInputStream o = new ObjectInputStream(new FileInputStream(file));
        Person p = (Person) o.readObject();
        p.info();
    }
}
程序输出结果:
My name is Jack, I'm 30 years old.序列化与反序列化的方式创建对象不会调用类的构造器,并且序列化反序列化方式创建对象的本质是深拷贝。

 每日一题
每日一题

 关于 LearnKu


