
 Laravel 13 中文文档
日志
日志
简介
为了帮助你更好地了解应用程序内部正在发生的事情,Laravel 提供了强大的日志服务,允许你将消息记录到文件、系统错误日志中,甚至发送到 Slack,以通知整个团队。
Laravel 日志基于“通道”。每个通道代表一种特定的日志信息写入方式。例如,single 通道会将日志写入单个日志文件,而 slack 通道会将日志消息发送到 Slack。根据日志的严重级别,日志消息可以被写入多个通道。
在底层,Laravel 使用 Monolog 库,它支持多种强大的日志处理器。Laravel 使这些处理器的配置变得非常简单,允许你对它们进行组合搭配,以自定义应用程序的日志处理方式。
配置
所有用于控制应用程序日志行为的配置选项都位于 config/logging.php 配置文件中。该文件允许你配置应用程序的日志通道,因此请务必查看每个可用通道及其选项。下面我们将介绍几个常见的选项。
默认情况下,Laravel 在记录日志消息时会使用 stack 通道。stack 通道用于将多个日志通道聚合为一个通道。有关构建日志栈的更多信息,请查看下面的文档。
可用的通道驱动
每个日志通道都由一个“驱动”提供支持。驱动决定日志消息实际如何以及在哪里被记录。以下日志通道驱动在每个 Laravel 应用程序中都可用。应用程序的 config/logging.php 配置文件中已经包含了这些驱动中的大多数条目,因此请务必查看该文件,以熟悉其中的内容:
| 名称 | 描述 | | ------------ | ------------------------------------------- | | `custom` | 调用指定工厂来创建通道的驱动。 | | `daily` | 基于 `RotatingFileHandler` 的 Monolog 驱动,每日轮换。 | | `errorlog` | 基于 `ErrorLogHandler` 的 Monolog 驱动。 | | `monolog` | 可以使用任何受支持 Monolog 处理器的 Monolog 工厂驱动。 | | `papertrail` | 基于 `SyslogUdpHandler` 的 Monolog 驱动。 | | `single` | 基于单个文件或路径的日志通道(`StreamHandler`)。 | | `slack` | 基于 `SlackWebhookHandler` 的 Monolog 驱动。 | | `stack` | 用于方便创建“多通道”通道的包装器。 | | `syslog` | 基于 `SyslogHandler` 的 Monolog 驱动。 |
[!注意]
请查看高级通道自定义文档,以了解有关monolog和custom驱动的更多信息。
配置通道名称
默认情况下,Monolog 在实例化时会使用与当前环境匹配的“通道名称”,例如 production 或 local。要更改此值,可以在通道配置中添加一个 name 选项:
'stack' => [
    'driver' => 'stack',
    'name' => 'channel-name',
    'channels' => ['single', 'slack'],
],
通道前置条件
配置 Single 和 Daily 通道
single 和 daily 通道有三个可选的配置选项:bubble、permission 和 locking。
| 名称 | 描述 | 默认值 | | --- | --- | --- | | `bubble` | 表示消息在被处理后是否应继续向上传递到其他通道。 | `true` | | `locking` | 在写入日志文件之前尝试锁定该文件。 | `false` | | `permission` | 日志文件的权限。 | `0644` |
此外,daily 通道的保留策略可以通过 LOG_DAILY_DAYS 环境变量进行配置,或者通过设置 days 配置选项进行配置。
| 名称 | 描述 | 默认值 | | --- | --- | --- | | `days` | 每日日志文件应保留的天数。 | `14` |
配置 Papertrail 通道
papertrail 通道需要 host 和 port 配置选项。这些选项可以通过 PAPERTRAIL_URL 和 PAPERTRAIL_PORT 环境变量进行定义。你可以从 Papertrail 获取这些值。
配置 Slack 通道
slack 通道需要一个 url 配置选项。该值可以通过 LOG_SLACK_WEBHOOK_URL 环境变量进行定义。这个 URL 应与为你的 Slack 团队配置的传入 Webhook URL 相匹配。
默认情况下,Slack 只会接收 critical 级别及以上的日志;不过,你可以通过 LOG_LEVEL 环境变量进行调整,或者修改 Slack 日志通道配置数组中的 level 配置选项。
记录弃用警告
PHP、Laravel 和其他库通常会通知用户,其某些功能已经被弃用,并将在未来版本中移除。如果你希望记录这些弃用警告,可以使用 LOG_DEPRECATIONS_CHANNEL 环境变量指定你首选的 deprecations 日志通道,或者在应用程序的 config/logging.php 配置文件中进行设置:
'deprecations' => [
    'channel' => env('LOG_DEPRECATIONS_CHANNEL', 'null'),
    'trace' => env('LOG_DEPRECATIONS_TRACE', false),
],

'channels' => [
    // ...
]
或者,你也可以定义一个名为 deprecations 的日志通道。如果存在同名日志通道,那么它将始终用于记录弃用信息:
'channels' => [
    'deprecations' => [
        'driver' => 'single',
        'path' => storage_path('logs/php-deprecation-warnings.log'),
    ],
],
构建日志栈
如前所述,stack 驱动允许你将多个通道组合成一个日志通道,以便于使用。为了说明如何使用日志栈,让我们来看一个你可能会在生产环境应用程序中看到的配置示例:
'channels' => [
    'stack' => [
        'driver' => 'stack',
        'channels' => ['syslog', 'slack'], // [tl! add]
        'ignore_exceptions' => false,
    ],

    'syslog' => [
        'driver' => 'syslog',
        'level' => env('LOG_LEVEL', 'debug'),
        'facility' => env('LOG_SYSLOG_FACILITY', LOG_USER),
        'replace_placeholders' => true,
    ],

    'slack' => [
        'driver' => 'slack',
        'url' => env('LOG_SLACK_WEBHOOK_URL'),
        'username' => env('LOG_SLACK_USERNAME', 'Laravel Log'),
        'emoji' => env('LOG_SLACK_EMOJI', ':boom:'),
        'level' => env('LOG_LEVEL', 'critical'),
        'replace_placeholders' => true,
    ],
],
让我们来拆解一下这个配置。首先,请注意,我们的 stack 通道通过其 channels 选项聚合了另外两个通道:syslog 和 slack。因此,在记录日志消息时,这两个通道都会有机会记录该消息。不过,正如我们将在下面看到的,这些通道是否真正记录该消息,可能取决于消息的严重程度 / “级别”。
日志级别
请注意上面示例中 syslog 和 slack 通道配置里的 level 配置选项。该选项决定了一条消息至少需要达到什么“级别”,才会被该通道记录。Laravel 的日志服务由 Monolog 提供支持,而 Monolog 提供了 RFC 5424 规范 中定义的所有日志级别。按照严重程度从高到低排列,这些日志级别分别是:emergency、alert、critical、error、warning、notice、info 和 debug。
因此,假设我们使用 debug 方法记录一条消息:
Log::debug('An informational message.');根据我们的配置,syslog 通道会将该消息写入系统日志;但是,由于该错误消息的级别不是 critical 或更高,因此它不会被发送到 Slack。不过,如果我们记录一条 emergency 级别的消息,那么它将同时被发送到系统日志和 Slack,因为 emergency 级别高于这两个通道设置的最低日志级别阈值:
Log::emergency('The system is down!');写入日志消息
你可以使用 Log Facade 将信息写入日志。如前所述,日志记录器提供了 RFC 5424 规范 中定义的八个日志级别:emergency、alert、critical、error、warning、notice、info 和 debug:
use Illuminate\Support\Facades\Log;

Log::emergency($message);
Log::alert($message);
Log::critical($message);
Log::error($message);
Log::warning($message);
Log::notice($message);
Log::info($message);
Log::debug($message);
你可以调用这些方法中的任意一个,以对应的日志级别记录消息。默认情况下,消息会被写入由你的 logging 配置文件所配置的默认日志通道:
<?php

namespace App\Http\Controllers;

use App\Models\User;
use Illuminate\Support\Facades\Log;
use Illuminate\View\View;

class UserController extends Controller
{
    /**
     * 显示指定用户的个人资料。
     */
    public function show(string $id): View
    {
        Log::info('Showing the user profile for user: {id}', ['id' => $id]);

        return view('user.profile', [
            'user' => User::findOrFail($id)
        ]);
    }
}
上下文信息
可以向日志方法传递一个包含上下文数据的数组。这些上下文数据会被格式化,并与日志消息一起显示:
use Illuminate\Support\Facades\Log;

Log::info('User {id} failed to login.', ['id' => $user->id]);
有时,你可能希望指定一些上下文信息,使其包含在某个特定通道后续的所有日志条目中。例如,你可能希望记录一个与应用程序接收到的每个请求相关联的请求 ID。为此,你可以调用 Log Facade 的 withContext 方法:
<?php

namespace App\Http\Middleware;

use Closure;
use Illuminate\Http\Request;
use Illuminate\Support\Facades\Log;
use Illuminate\Support\Str;
use Symfony\Component\HttpFoundation\Response;

class AssignRequestId
{
    /**
     * 处理传入的请求。
     *
     * @param  \Closure(\Illuminate\Http\Request): (\Symfony\Component\HttpFoundation\Response)  $next
     */
    public function handle(Request $request, Closure $next): Response
    {
        $requestId = (string) Str::uuid();

        Log::withContext([
            'request-id' => $requestId
        ]);

        $response = $next($request);

        $response->headers->set('Request-Id', $requestId);

        return $response;
    }
}
如果你希望在 所有 日志通道之间共享上下文信息,可以调用 Log::shareContext() 方法。该方法会将上下文信息提供给所有已经创建的通道,以及之后创建的任何通道:
<?php

namespace App\Http\Middleware;

use Closure;
use Illuminate\Http\Request;
use Illuminate\Support\Facades\Log;
use Illuminate\Support\Str;
use Symfony\Component\HttpFoundation\Response;

class AssignRequestId
{
    /**
     * 处理传入的请求。
     *
     * @param  \Closure(\Illuminate\Http\Request): (\Symfony\Component\HttpFoundation\Response)  $next
     */
    public function handle(Request $request, Closure $next): Response
    {
        $requestId = (string) Str::uuid();

        Log::shareContext([
            'request-id' => $requestId
        ]);

        // ...
    }
}
[!注意]
如果你需要在处理队列任务时共享日志上下文,可以使用 任务中间件。
写入指定通道
有时,你可能希望将消息记录到应用程序默认通道以外的其他通道。你可以使用 Log Facade 的 channel 方法来获取配置文件中定义的任意通道,并向该通道写入日志:
use Illuminate\Support\Facades\Log;

Log::channel('slack')->info('Something happened!');
如果你希望创建一个由多个通道组成的按需日志栈,可以使用 stack 方法:
Log::stack(['single', 'slack'])->info('Something happened!');按需通道
你也可以通过在运行时提供配置来创建按需通道,而无需事先在应用程序的 logging 配置文件中定义该配置。为此,你可以将配置数组传递给 Log Facade 的 build 方法:
use Illuminate\Support\Facades\Log;

Log::build([
  'driver' => 'single',
  'path' => storage_path('logs/custom.log'),
])->info('Something happened!');
你可能还希望在按需日志栈中包含一个按需通道。为此,可以将按需通道实例包含在传递给 stack 方法的数组中:
use Illuminate\Support\Facades\Log;

$channel = Log::build([
  'driver' => 'single',
  'path' => storage_path('logs/custom.log'),
]);

Log::stack(['slack', $channel])->info('Something happened!');
Monolog 通道自定义
为通道自定义 Monolog
有时,你可能需要完全控制现有通道中 Monolog 的配置方式。例如,你可能希望为 Laravel 内置的 single 通道配置一个自定义的 Monolog FormatterInterface 实现。
首先,在通道配置中定义一个 tap 数组。tap 数组应包含一个类列表,这些类将在 Monolog 实例创建之后有机会对其进行自定义(或“接入”该实例)。这些类没有约定俗成的存放位置,因此你可以自由地在应用程序中创建一个目录来存放这些类:
'single' => [
    'driver' => 'single',
    'tap' => [App\Logging\CustomizeFormatter::class],
    'path' => storage_path('logs/laravel.log'),
    'level' => env('LOG_LEVEL', 'debug'),
    'replace_placeholders' => true,
],
在为通道配置好 tap 选项之后,就可以定义用于自定义 Monolog 实例的类了。这个类只需要一个方法:__invoke,该方法接收一个 Illuminate\Log\Logger 实例。Illuminate\Log\Logger 实例会将所有方法调用代理到底层的 Monolog 实例:
<?php

namespace App\Logging;

use Illuminate\Log\Logger;
use Monolog\Formatter\LineFormatter;

class CustomizeFormatter
{
    /**
     * 自定义给定的日志记录器实例。
     */
    public function __invoke(Logger $logger): void
    {
        foreach ($logger->getHandlers() as $handler) {
            $handler->setFormatter(new LineFormatter(
                '[%datetime%] %channel%.%level_name%: %message% %context% %extra%'
            ));
        }
    }
}
[!笔记]
所有的tap类都会通过 服务容器 进行解析,因此它们构造函数中所需的任何依赖都会被自动注入。
创建 Monolog Handler 通道
Monolog 提供了多种可用的 Handler,而 Laravel 并没有为其中的每一种 Handler 都提供内置通道。在某些情况下,你可能希望创建一个自定义通道,该通道只是某个特定 Monolog Handler 的实例,而这个 Handler 并没有对应的 Laravel 日志驱动。你可以使用 monolog 驱动轻松创建此类通道。
使用 monolog 驱动时,可以通过 handler 配置选项指定要实例化的 Handler。你还可以通过 handler_with 配置选项指定该 Handler 构造函数所需的参数:
'logentries' => [
    'driver'  => 'monolog',
    'handler' => Monolog\Handler\SyslogUdpHandler::class,
    'handler_with' => [
        'host' => 'my.logentries.internal.datahubhost.company.com',
        'port' => '10000',
    ],
],
Monolog 格式化器
使用 monolog 驱动时,Monolog 的 LineFormatter 将作为默认格式化器。不过,你可以通过 formatter 和 formatter_with 配置选项来自定义传递给 Handler 的格式化器类型:
'browser' => [
    'driver' => 'monolog',
    'handler' => Monolog\Handler\BrowserConsoleHandler::class,
    'formatter' => Monolog\Formatter\HtmlFormatter::class,
    'formatter_with' => [
        'dateFormat' => 'Y-m-d',
    ],
],
如果你使用的 Monolog Handler 能够提供自己的格式化器,可以将 formatter 配置选项的值设置为 default:
'newrelic' => [
    'driver' => 'monolog',
    'handler' => Monolog\Handler\NewRelicHandler::class,
    'formatter' => 'default',
],
Monolog 处理器
Monolog 还可以在记录日志之前对消息进行处理。你可以创建自己的处理器,也可以使用 Monolog 提供的现有处理器。
如果你希望为 monolog 驱动自定义处理器,可以在通道配置中添加一个 processors 配置项:
'memory' => [
    'driver' => 'monolog',
    'handler' => Monolog\Handler\StreamHandler::class,
    'handler_with' => [
        'stream' => 'php://stderr',
    ],
    'processors' => [
        // Simple syntax...
        Monolog\Processor\MemoryUsageProcessor::class,

        // With options...
        [
            'processor' => Monolog\Processor\PsrLogMessageProcessor::class,
            'with' => ['removeUsedContextFields' => true],
        ],
    ],
],
通过工厂创建自定义通道
如果你希望定义一个完全自定义的通道,并完全控制 Monolog 的实例化和配置,可以在 config/logging.php 配置文件中指定 custom 驱动类型。你的配置中应包含一个 via 选项,其中包含将被调用以创建 Monolog 实例的工厂类名称:
'channels' => [
    'example-custom-channel' => [
        'driver' => 'custom',
        'via' => App\Logging\CreateCustomLogger::class,
    ],
],
配置好 custom 驱动通道后,就可以定义用于创建 Monolog 实例的类了。这个类只需要一个 __invoke 方法,并且该方法应返回 Monolog 日志记录器实例。该方法将接收通道配置数组作为其唯一参数:
<?php

namespace App\Logging;

use Monolog\Logger;

class CreateCustomLogger
{
    /**
     * 创建一个自定义的 Monolog 实例。
     */
    public function __invoke(array $config): Logger
    {
        return new Logger(/* ... */);
    }
}
使用 Pail 实时查看日志消息
通常,你可能需要实时查看应用程序的日志。例如,在调试问题时,或者在监控应用程序日志中的特定类型错误时。
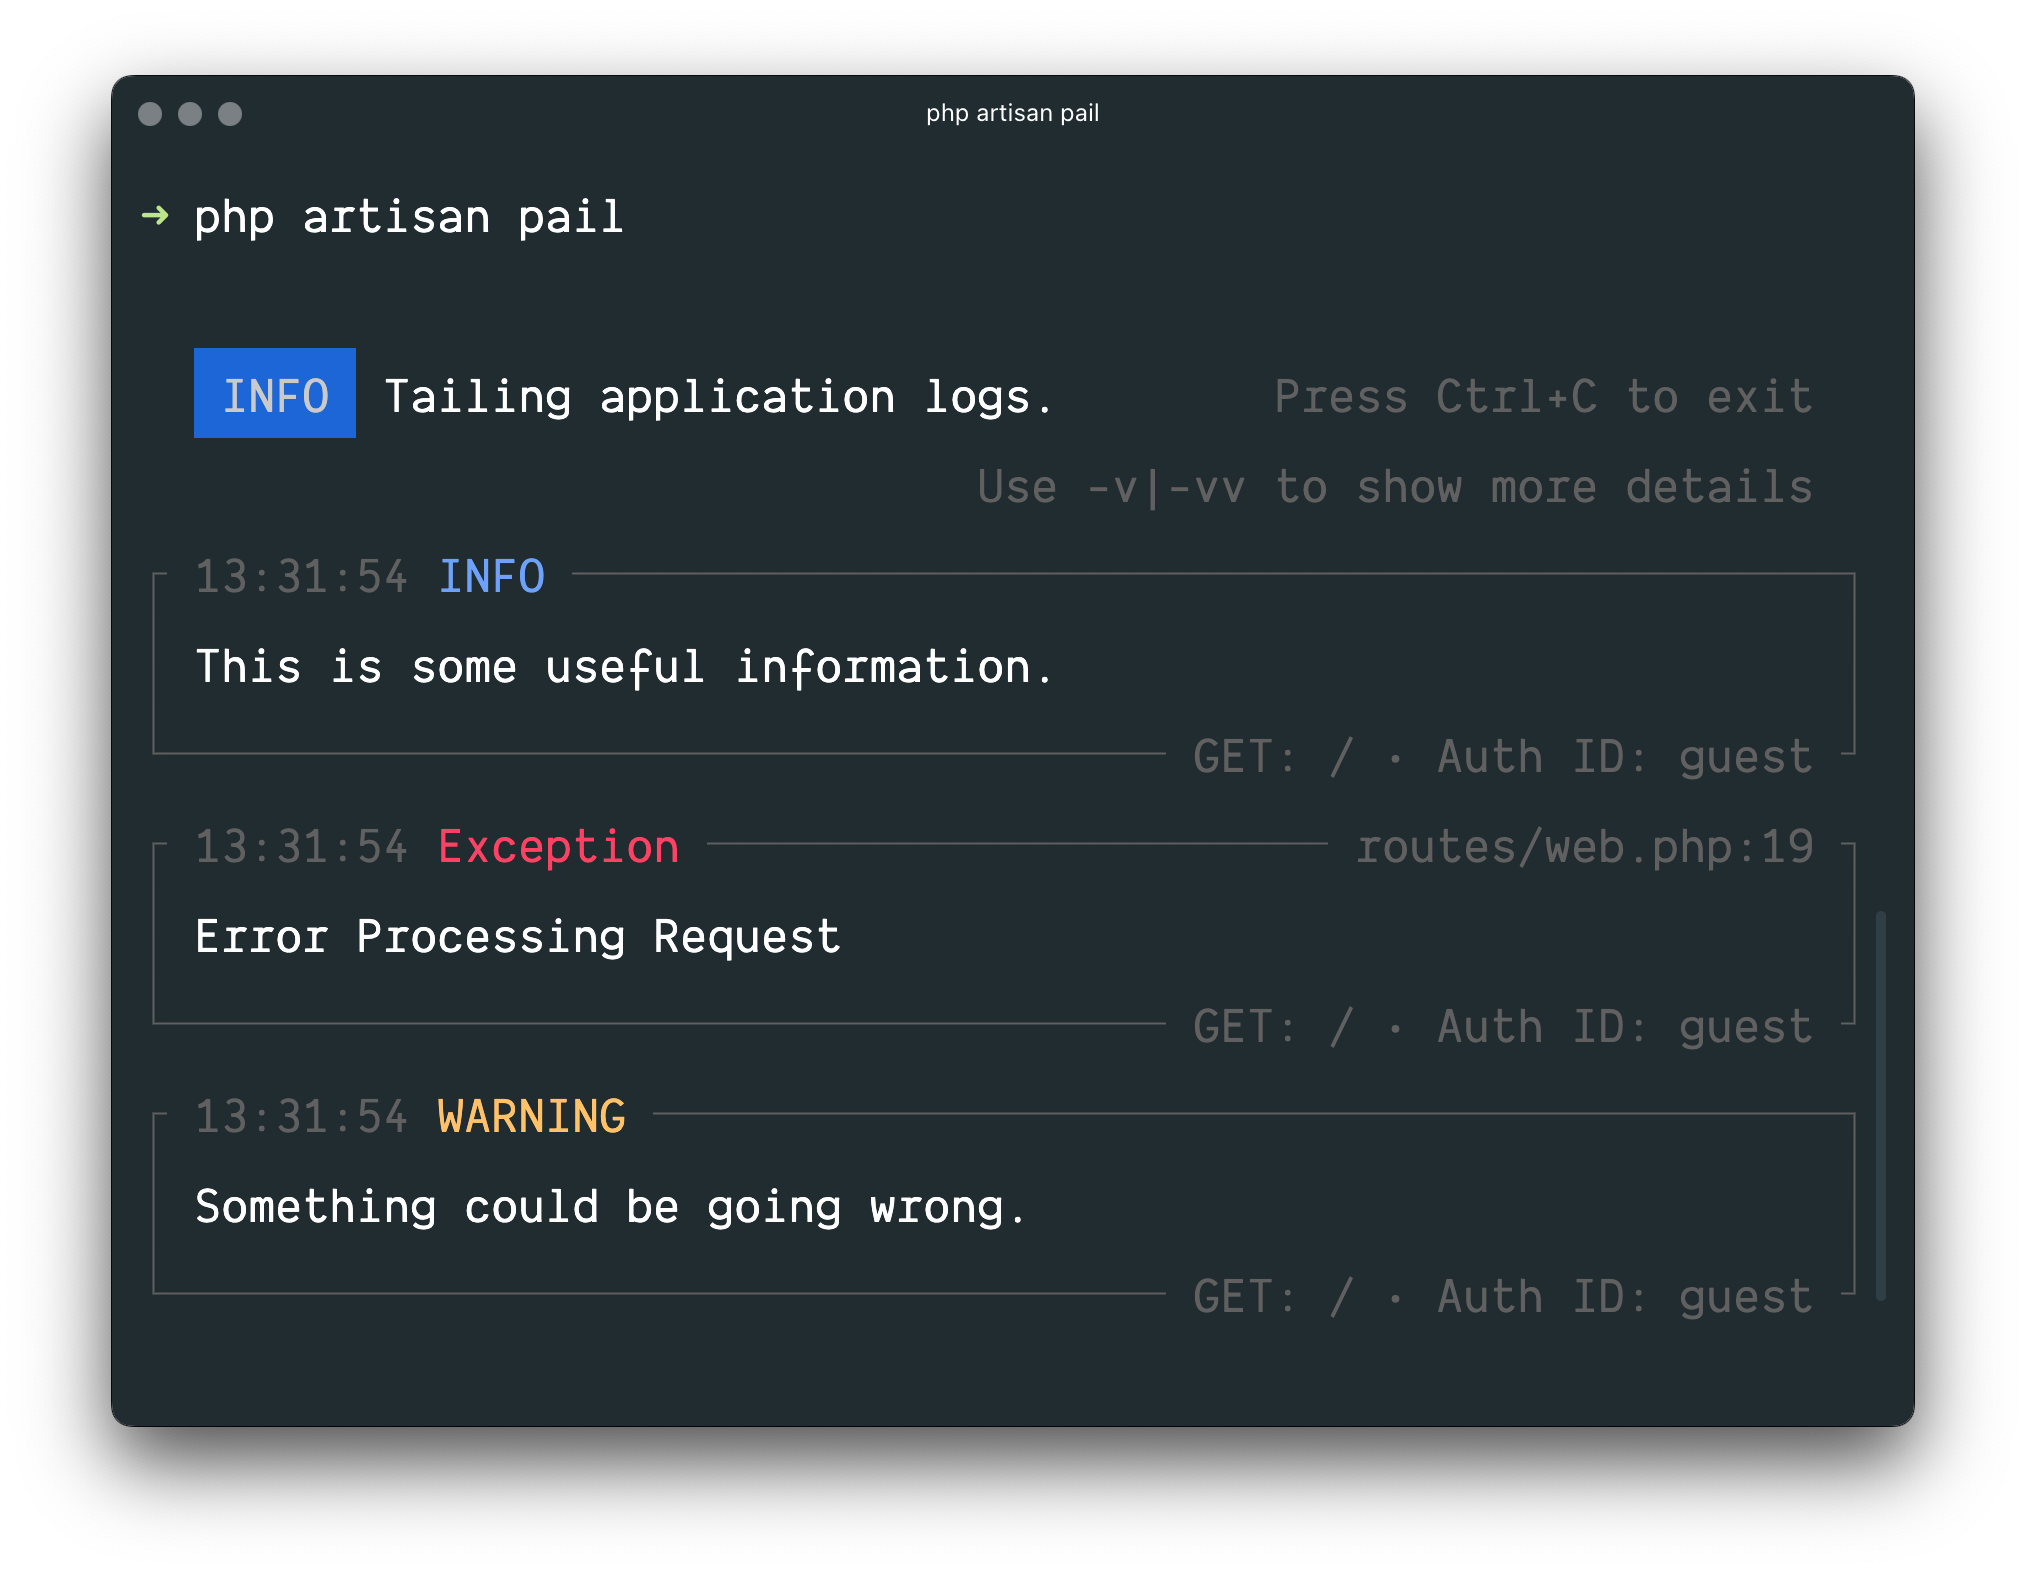
Laravel Pail 是一个软件包,它允许你直接从命令行轻松查看 Laravel 应用程序的日志文件。与标准的 tail 命令不同,Pail 被设计为可以与任何日志驱动配合使用,包括 Sentry 或 Flare。此外,Pail 还提供了一组实用的过滤器,帮助你快速找到所需内容。
安装
[!警告]
Laravel Pail 需要安装 PCNTL PHP 扩展。
首先,使用 Composer 包管理器将 Pail 安装到你的项目中:
composer require --dev laravel/pail使用
要开始实时查看日志,请运行 pail 命令:
php artisan pail如果希望增加输出的详细程度并避免内容被截断(…),可以使用 -v 选项:
php artisan pail -v如果希望获得最高详细程度并显示异常堆栈跟踪,可以使用 -vv 选项:
php artisan pail -vv要停止实时查看日志,可以随时按下 Ctrl+C。
过滤日志
--filter
你可以使用 --filter 选项,根据日志的类型、文件、消息以及堆栈跟踪内容进行过滤:
php artisan pail --filter="QueryException"--message
如果只希望根据日志消息进行过滤,可以使用 --message 选项:
php artisan pail --message="User created"--level
可以使用 --level 选项,根据日志的日志级别进行过滤:
php artisan pail --level=error--user
如果只希望显示某个指定用户通过身份验证期间写入的日志,可以将该用户的 ID 提供给 --user 选项:
php artisan pail --user=1本译文仅用于学习和交流目的,转载请务必注明文章译者、出处、和本文链接
我们的翻译工作遵照 CC 协议,如果我们的工作有侵犯到您的权益,请及时联系我们。



 关于 LearnKu



 粤公网安备 44030502004330号
推荐文章: