
 Masonite 中文文档
Masonite 通知
Masonite 消息通知
简介
Masonite 消息通知模块可以轻松地为您的 Masonite 项目添加新的语义通知。这些通知可能是电子邮件或松散消息。该软件包的设计极其简单并且模块化,因此允许通过第三方集成向其添加新的通知功能。
安装
若想使用 Masonite 消息通知,首先必须安装它:
$ pip install masonite-notifications然后将提其供者添加到我们的 PROVIDERS 列表中:
from notifications.providers import NotificationProvider
...

PROVIDERS = [
    ...
    NotificationProvider,
    ...
]
就是这样!让我们看看它是怎么工作的!
用法
我们需要介绍几个概念,以便您可以完全理解消息通知的工作原理。 首先,我们将介绍高级内容,然后慢慢深入到较低层的实现。 在本文档中,我们将逐步介绍如何设置欢迎通知,以便在用户注册时能发送电子邮件。
创建通知
若要使用它,我们需要创建一个消息通知类。我们可以通过一个简单的 craft 命令来完成:
$ craft notification WelcomeNotification这将在 app/notifications 目录中创建一个消息通知。
您可以随意将其移动到任何位置。
创建出的类如下:
''' A WelcomeNotification Notification '''
from notifications import Notifiable

class WelcomeNotification(Notifiable):

    def mail(self):
        pass
构建我们的邮件通知
现在,让我们逐步了解如何构建通知,以便我们将电子邮件发送给用户。
由于通知类继承自 Notifiable,所以我们可以访问一些用于构建通知的方法。因为它非常简单,我们就先来看一个完整的示例,稍后将会详细介绍它:
from notifications import Notifiable
import os

class WelcomeNotification(Notifiable):

    def mail(self):
        return self.subject('New account signup!') \
            .driver('smtp') \
            .panel('GBALeague.com') \
            .heading('You have created a new account!') \
            .line('We greatly value your service!') \
            .line('Attached is an invoice for your recent purchase') \
            .action('Sign Back In', href="http://gbaleague.com") \
            .line('See you soon! Game on!') \
            .view('/notifications/snippets/mail/heading',
                  {'message': 'Welcome To The GBA!'})
请注意,这里我们调用了一些方法,例如 driver,panel,line 等。如果我们发送此消息,它将看起来像:
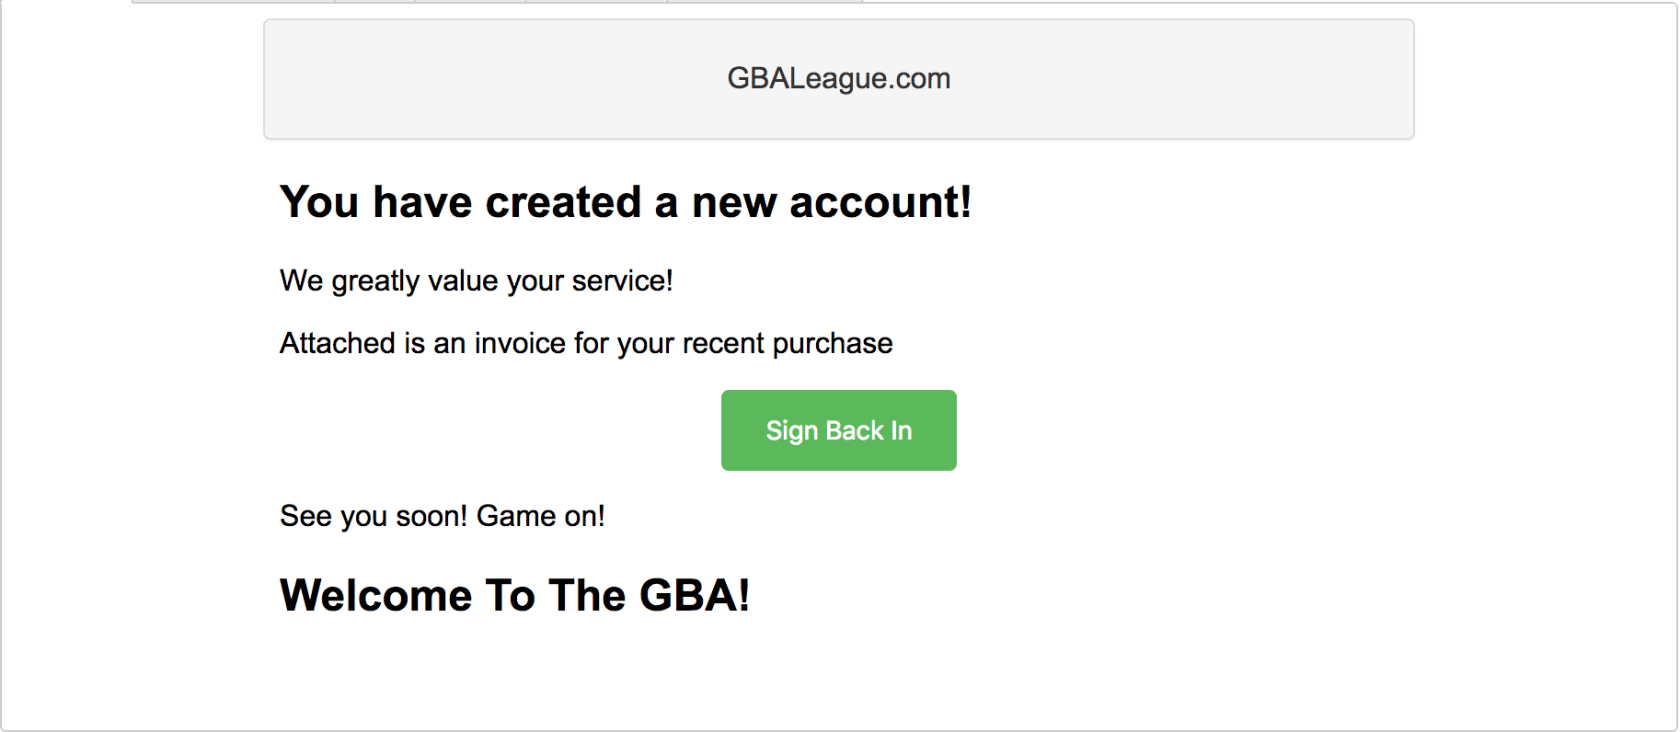
还不错。我们可以使用此逻辑轻松地就将电子邮件构建成一种不错的格式。
可选项
让我们来看看构建电子邮件通知的不同选项以及它们的作用。
| Method | Description | Example |
|---|---|---|
| .line() | 创建一行文本,就像在段落标记中看到的文本一样 | line('this is a line of text') |
| .action() | 这将创建一个可单击的按钮。包括 href 和 style。样式就是 bootstraps 的按钮样式,包括 default, success, danger, info 等。 |
action('Click Me', href="google.com", style="danger") |
| .view() | 这里是普通视图对象,因此您可以传入所需的任何模板和字典。 | .view('mail/header', {'key': 'value'}) |
| .panel() | 这将创建一个灰色背景标题面板。 | .panel('Some Header') |
| .heading() | 创建标题 | .heading('Welcome!') |
| .subject() | 电子邮件的主题 | .subject('New Account!') |
| .dry() | 设置所有必需字段,但不实际发送电子邮件。这对于测试来说非常有用。这不需要任何参数 | .dry() |
| .driver() | 您要用来发送电子邮件的驱动程序。 | .driver('mailgun') |
发送消息通知
现在我们已经构建了上面的通知,我们可以在控制器中(或任何其他我们喜欢的地方)发送通知:
from app.notifications.WelcomeNotification import WelcomeNotification
from notifications import Notify
...

def show(self, notify: Notify):
    notify.mail(WelcomeNotification, to='user@gmail.com')
请注意,这里我们只是在参数列表中指定了 Notify 类,我们可以将很棒的新 WelcomeNotification 传递到 mail 方法中。
注意:您要在 Notify 类上使用的方法应该与 notification 类上的方法相对应。例如,如果我们要执行 WelcomeNotification 的 slack 方法,我们将调用:
notify.slack(WelcomeNotification)您调用的方法应该与要在 notification 类上调用的方法相同。Notify 类实际上不包含任何方法,但是将在 notification 类上调用与在 Notify 类上调用的相同的方法。
通过 Via 发送
您还可以使用 via 和 send 方法发送多个消息通知以及通知类型,如下所示:
from app.notifications.WelcomeNotification import WelcomeNotification
from notifications import Notify
...

def show(self, notify: Notify):
    notify.via('mail', 'slack').send(WelcomeNotification, to='user@gmail.com')
这对于更动态化地发送邮件或仅在一行中发送多种类型的消息通知很有用。
将消息通知排队
如果要将消息通知排队,则只需继承 ShouldQueue 类,它会自动将消息通知发送到队列中以供稍后处理。这是加快应用程序速度的一种很好的方法:
from notifications import Notifiable
from masonite.queues import ShouldQueue
import os

class WelcomeNotification(Notifiable, ShouldQueue):

    def mail(self):
        return self.subject('New account signup!') \
            .driver('smtp') \
            .panel('GBALeague.com') \
            .heading('You have created a new account!') \
            .line('We greatly value your service!') \
            .line('Attached is an invoice for your recent purchase') \
            .action('Sign Back In', href="http://gbaleague.com") \
            .line('See you soon! Game on!') \
            .view('/notifications/snippets/mail/heading',
                  {'message': 'Welcome To The GBA!'})
构建松散的消息通知
开箱即用,Masonite 通知也带有 Slack 支持,以便于我们想要向特定的 Slack 组发送消息。
注意:为了充分利用此功能,您需要从 Slack 生成令牌。此令牌至少应具有
channels:read,chat:write:bot,chat:write:user和files:write:user权限范围。如果您的令牌没有这些范围,则此功能的某些部分将无法使用。
回到我们的 WelcomeNotification,我们可以简单地指定一个名为 slack 的方法。
class WelcomeNotification(Notifiable):

    def mail(self):
        return self.subject('New account signup!') \
            .driver('smtp') \
            .panel('GBALeague.com') \
            .heading('You have created a new account!') \
            .line('We greatly value your service!') \
            .line('Attached is an invoice for your recent purchase') \
            .action('Sign Back In', href="http://gbaleague.com") \
            .line('See you soon! Game on!') \
            .view('/notifications/snippets/mail/heading',
                  {'message': 'Welcome To The GBA!'})

      def slack(self):
          pass
注意底部的新 slack 方法。我们将使用此方法来构建 slack(松散)通知。我们将再次向您展示一个完整的示例,然后运行所有方法:
class WelcomeNotification(Notifiable):

    def mail(self):
        return self.subject('New account signup!') \
            .driver('smtp') \
            .panel('GBALeague.com') \
            .heading('You have created a new account!') \
            .line('We greatly value your service!') \
            .line('Attached is an invoice for your recent purchase') \
            .action('Sign Back In', href="http://gbaleague.com") \
            .line('See you soon! Game on!') \
            .view('/notifications/snippets/mail/heading',
                  {'message': 'Welcome To The GBA!'})

    def slack(self):
        return self.token(os.getenv('BOT')) \
            .text('Masonite Notification: Read The Docs!, https://docs.masoniteproject.com/') \
            .channel('#bot') \
            .as_user('Masonite Bot') \
            .icon(':fire:') \
            .button('Sure!', "https://docs.masoniteproject.com/")
选项
| Method | Description | Example |
|---|---|---|
| .token() | 这是您的Slack令牌,具有正确的权限范围。 | .token('xoxp-359926262626-35...') |
| .text() | 您想在消息中显示的文本 | .text('Welcome to Masonite!') |
| .channel() | 您要广播到的频道。如果您提供的值以 # 符号开头,则 Notifications 将使用令牌向 Slack 通道列表 API 发出 POST 请求,并获取通道 ID。如果您不希望出现这种情况,则可以直接指定通道 ID。 | .channel('#general') .channel('CHSUU862') |
| .as_user() | 要显示为消息的用户名 | .as_user('Masonite Bot') |
| .icon() | 您要显示的图标。这需要是Slack表情符号 | .icon(':fire:') |
| .as_current_user() | 这会将消息是否应显示为当前经过身份验证的用户,将布尔值设置为True。 | .as_current_user() |
| .without_markdown() | 这不会解析消息中的 markdown 。这是一个布尔值,不需要任何参数。 | .without_markdown() |
| .dont_unfurl() | 这会将邮件是否应显示任何附件的布尔值设置为 False。通常,发布链接时,Slack 会显示网站的图标。这将为当前消息禁用该功能。 | .dont_unfurl() |
| .as_snippet() | 用于将当前消息作为摘要而不是常规消息发布。此选项有 3 个关键字参数。file_type、name 和 title。这使用了不同的 API 终结点,因此可能无法使用某些先前的方法。 |
.as_snippet(file_type='python', name='snippet', title='Awesome Snippet') |
| .comment() | 仅在使用.as_snippet ()方法时使用。这将在代码段上设置注释。 | .comment('Great Snippet') |
| .button() | 用于在消息下创建操作按钮。这需要 text 和 url,但是还可以包含 style和 confirm |
.button('Sure!', 'google.com', style='primary', confirm='Are you sure?') |
| .dry() | 设置所有必填字段,但实际上不发送电子邮件。这非常适合测试。这不带参数 | .dry() |
发送 Slack (松散)通知
现在我们已经在上面构建了消息通知,我们可以将其发送到控制器 (或我们喜欢的其他任何位置)中:
from app.notifications.WelcomeNotification import WelcomeNotification
from notifications import Notify
...

def show(self, notify: Notify):
    notify.slack(WelcomeNotification)
请注意,这里我们只是在参数列表中指定了 Notify 类,并且我们能够将我们很棒的新WelcomeNotification 传递给 slack 方法。
构建集成
Notifiable 类是非常模块化的,如果您很喜欢,就可以构建自定义集成。在本节中,我们将逐步介绍如何创建所谓的 Components。
什么是组件?
组件是可以添加到 Notification 类的类,这些类扩展了通知的行为。实际上,Notifiable 类只是两个不同组件的简单抽象。让我们看一下我们继承自的类的签名。
from notifications.components import MailComponent, SlackComponent

class Notifiable(MailComponent, SlackComponent):
    pass
Component 类是具有我们一直在使用的方法的类。如果您想查看这些组件的源代码,可以在 GitHub 上查看它们,以对它们的工作原理有较低层的了解。
创建组件
让我们逐步介绍如何通过创建邮件组件的简化版本来创建它。首先让我们创建一个简单的类:
class MailComponent:
    pass
现在,我们向其添加一行和一个主题方法:
class MailComponent:

    def line(self, message):
        pass

    def subject(self, subject)
        pass
让我们使用这两种方法来构建模板属性
class MailComponent:

    template = ''

    def line(self, message):
        self.template += template
        return self

    def subject(self, subject)
        self._subject = subject
        return self
自从我们返回 self 以来,我们可以像往常一样继续追加到 notification 类上。
实际的 MailComponent 类比这要复杂一些,但为了说明起见,我们将使其保持简单。
Fire 方法
每当我们将通知插入到 Notify 类中时:
notify.mail(WelcomeNotification)这将在 notification 类 (或我们在 Notify 类上调用的任何其他方法) 上调用 mail 方法。
返回该值后,它将调用您在组件中指定的 fire_mail 方法。
如果创建了一个 discord 消息通知,则您的组件上应该有一个
fire_discord方法,您可以使用notify.discord(WelcomeNotification)对其进行调用。
由于我们要在其上调用 mail 方法,因此我们将创建一个 fire_mail 方法:
class MailComponent:

    template = ''

    def line(self, message):
        self.template += template
        return self

    def subject(self, subject)
        self._subject = subject
        return self

    def fire_mail(self):
        pass
与受保护成员传递数据
有时您会希望将数据传递到 fire_mail 方法中。为了保持这种简单和模块化,您传递给 Notify 类的任何关键字参数都将在 notification 类中设置为受保护成员。例如,假设我们有以下内容:
notify.mail(WelcomeNotification, to='admin@site.com')在进入 fire 方法之前,它将在通知类上设置一个 _to 属性。
因此,使用上面的示例,我们将能够做到:
def fire_mail(self):
    self._to # admin@site.com
我们可以使用此行为将信息传递到 fire_mail 方法中,同时保持所有内容的整洁。
一个实际的示例是将消息发送给特定用户:
notify.mail(WelcomeNotification, to='admin@site.com')class WelcomeNotification(Notifiable):
def mail(self):
return self.line('{0} We greatly value your service!'.format(self._to)) \
.action('Sign Back In', href="http://gbaleague.com")请注意,我们的类上现在有了一个 _to 成员可以使用,因为它是我们从 Notify 类传递过来的。
发送邮件
Ok,最后我们有了足够的信息,我们需要发送实际的电子邮件。 fire_method 由容器解析,因此我们只需指定发送电子邮件所需的内容即可。
我们的 notification 类如下所示:
from your.package import MailComponent

class WelcomeNotification(Notifiable, MailComponent):

    def mail(self):
        return self.subject('New account signup!') \
            .line('We greatly value your service!')
我们的 Notify 类如下所示:
notify.mail(WelcomeNotification, to='admin@site.com')我们的 fire 方法将如下所示:
from masonite import Mail

class MailComponent:

    template = ''

    def line(self, message):
        self.template += template
        return self

    def subject(self, subject)
        self._subject = subject
        return self

    def fire_mail(self, mail: Mail):
        mail.to(self._to) \
            .subject(self._subject) \
            .send(self.template)
请记住类属性 _to,它来自 Notify 类中的关键字参数。
本译文仅用于学习和交流目的,转载请务必注明文章译者、出处、和本文链接
我们的翻译工作遵照 CC 协议,如果我们的工作有侵犯到您的权益,请及时联系我们。


 关于 LearnKu


推荐文章: