
 PHP知识框架
1 Nginx负载均衡
1 Nginx安装
参考:
$ yum install -y pcre pcre-devel              # 安装 pcre 软件包,使 nginx 支持 http rewrite 模块
$ yum install -y openssl openssl-devel        # 安装 openssl-devel,使 nginx 支持 ssl
$ yum install -y zlib zlib-devel gd gd-devel  # 安装zlib

$ groupadd -r nginx                                                 # 创建用户组,-r表示创建一个系统用户组
$ useradd -r -g nginx -s /sbin/nologin -d /usr/local/nginx -M nginx # -r: 添加系统用户
                                                                    # -g: 指定要创建的用户所属组
                                                                    # -s: 不能新用户用来登录系统
                                                                    # -d: 新帐户的主目录
                                                                    # -M: 不要创建用户的家目录
# 下载源码
$ wget http://nginx.org/download/nginx-1.21.4.tar.gz
# 解压后进入目录编译
$ ./configure --prefix=/usr/local/nginx \
--user=nginx \
--group=nginx \
--with-pcre \
--with-http_ssl_module \
--with-http_v2_module \
--with-http_realip_module \
--with-http_addition_module \
--with-http_sub_module \
--with-http_dav_module \
--with-http_flv_module \
--with-http_mp4_module \
--with-http_gunzip_module \
--with-http_gzip_static_module \
--with-http_random_index_module \
--with-http_secure_link_module \
--with-http_stub_status_module \
--with-http_auth_request_module \
--with-http_image_filter_module \
--with-http_slice_module \
--with-mail \
--with-threads \
--with-file-aio \
--with-stream \
--with-mail_ssl_module \
--with-stream_ssl_module

$ make
$ make install
$ /usr/local/nginx/sbin/nginx -v # 验证安装结果
$ /usr/local/nginx/sbin/nginx -t # 检查配置文件
$ /usr/local/nginx/sbin/nginx -V # 查看安装配置
$ cat ./auto/options | grep YES  # 查看内置模块

$ /usr/local/nginx/sbin/nginx           # 启动
$ /usr/local/nginx/sbin/nginx -s reload # reload-重启,stop-停止
修改配置文件:启动用户和配置文件的目录,conf.d 目录不存在则创建。
# /usr/local/nginx/conf/nginx.conf
user nginx;
include /usr/local/nginx/conf/conf.d/*.conf;
2 Nginx的负载均衡策略
参考:
Nginx(开源版)官方文档
Nginx(开源版)中文文档
Nginx(开源版)负载均衡官方文档
Nginx(商业版)负载均衡官方文档
ngx_http_upstream_module 官方文档
相比 Nginx 开源版,商业版提供了更多负载均衡策略,例如“通用哈希”、“最小时间”,“随机”等等,这里不做介绍。
2.1 Round Robin
轮询——对应用服务器的请求以循环的方式分发。
http {
    upstream myapp1 {
        server srv1.example.com;
        server srv2.example.com;
        server srv3.example.com;
    }

    server {
        listen 80;
        location / {
            proxy_pass http://myapp1;
        }
    }
}
2.2 Least Connections
最少连接——请求被分配给具有最少活动连接数的服务器。
upstream myapp1 {
    least_conn;
    server srv1.example.com;
    server srv2.example.com;
    server srv3.example.com;
}
2.3 Hash
upstream myapp1 {
    hash $request_uri consistent;
    hash_method crc32;
    server 127.0.0.1:9001 ;
    server 127.0.0.1:9002 ;
}
如果指定了一致性参数 consistent,则将使用 ketama 一致哈希方法。该方法确保在将服务器添加到或从组中删除服务器时,只有少数密钥会重新映射到不同的服务器。这有助于提高缓存服务器的缓存命中率。
部分内置变量:
$args                      请求中的参数;
$binary_remote_addr        远程地址的二进制表示
$body_bytes_sent           已发送的消息体字节数
$content_length            HTTP请求信息里的"Content-Length"
$content_type              请求信息里的"Content-Type"
$document_root             针对当前请求的根路径设置值
$document_uri              与$uri相同
$host                      请求信息中的"Host",如果请求中没有Host行,则等于设置的服务器名;
$http_cookie               cookie 信息
$http_referer              来源地址
$http_user_agent           客户端代理信息
$http_via                  最后一个访问服务器的Ip地址
$http_x_forwarded_for      相当于网络访问路径。
$limit_rate                对连接速率的限制
$remote_addr               客户端地址
$remote_port               客户端端口号
$remote_user               客户端用户名,认证用
$request                   用户请求信息
$request_body              用户请求主体
$request_body_file         发往后端的本地文件名称
$request_filename          当前请求的文件路径名
$request_method            请求的方法,比如"GET"、"POST"等
$request_uri               请求的URI,带参数
$server_addr               服务器地址,如果没有用listen指明服务器地址,使用这个变量将发起一次系统调用以取得地址(造成资源浪费)
$server_name               请求到达的服务器名
$server_port               请求到达的服务器端口号
$server_protocol           请求的协议版本,"HTTP/1.0"或"HTTP/1.1"
$uri                       请求的URI,可能和最初的值有不同,比如经过重定向之类的
2.4 IP Hash
IP 哈希——对客户端 IP 地址进行哈希计算,确定分发请求的服务器。
该策略有个缺点,上游节点的变更(服务器的增加/减少/宕机)会导致之前所有的求模都需要重新计算,造成会话和缓存丢失。sticky 可以解决 IP Hash 的弊端。
upstream myapp1 {
    ip_hash;
    server srv1.example.com;
    server srv2.example.com;
    server srv3.example.com;
}
2.5 Weighted
权重——没有设置取默认值1。Nginx 会根据总权重设置虚拟节点的数量,虚拟节点数 = 总权重 * 160 。
以下配置表示负载均衡服务器会以3:1:1的比例将请求转发,主要用于服务器配置差异的场景。
upstream myapp1 {
    server srv1.example.com weight=3;
    server srv2.example.com;
    server srv3.example.com;
}
2.6 Backup
热机——将服务器标记为备份服务器。它将在主服务器不可用时传递请求。必须要注意的是,backup 不能和 ip_hash 关键字一起使用。
upstream myapp1 {
    server srv1.example.com backup;
    server srv2.example.com;
    server srv3.example.com;
}
2.7 Fair
公平——nginx-upstream-fair 模块增强了 Nginx 所提供的标准轮询负载均衡器,根据后端服务器响应时间来分配,响应时间越短越优先。它是第三方模块,需要通过 Nginx 的源码安装。
nginx-upstream-fair 下载地址
# 查看现有的编译配置
$ /usr/local/nginx/sbin/nginx -V

# 编译,--add-module 指定模块的路径
$ ./configure --with-http_ssl_module --add-module=/absolute/path/to/nginx-upstream-fair

$ make & make install
upstream mongrel {
fair;
server 127.0.0.1:5000;
server 127.0.0.1:5001;
server 127.0.0.1:5002;
}2.8 Sticky
Sticky 是基于 Cookie 的一种负载均衡解决方案,通过分发和识别 Cookie,使来自同一个客户端的请求落在同一台服务器上,默认 Cookie 标识名为 route,也可以自定义。
- 客户端首次发起访问请求,Nginx 接收后,发现请求头没有 Cookie,则以轮询方式将请求分发给后端服务器。
- 后端服务器处理完请求,将响应数据返回给 Nginx。
- 此时 Nginx 生成带 route 的 Cookie,返回给客户端。route 的值与后端服务器对应,可能是明文、Md5、Sha1 等 Hash 值。
- 客户端接收请求,并保存带 route 的 Cookie。
- 当客户端下一次发送请求时,会带上 route,Nginx 根据接收到的 Cookie 中的 route 值,转发给对应的后端服务器。
$ /usr/local/nginx/sbin/nginx -V

# 编译,--add-module 指定模块的路径
$ ./configure --add-module=/usr/local/src/nginx-sticky-module-ng-master

$ make & make install
upstream myapp1 {
sticky;
server 127.0.0.1:9000;
server 127.0.0.1:9001;
}注意点:
- 由于 Cookie 最初由服务器端下发,如果客户端禁用 Cookie,则 Cookie 不会生效。
- sticky 不能与 ip_hash 同时使用。
- Cookie 名称不要和业务使用的 Cookie 重名。
2.9 Consistent Hash
一致性哈希——ngx_http_upstream_consistent_hash 模块是使用上游一致哈希环来选择正确后端节点的负载均衡器。该模块可以根据配置的内置参数采取不同的方式将请求均匀映射到后端机器,常用的内置参数有:
- consistent_hash $remote_addr:可以根据客户端 IP 映射。
- consistent_hash $request_uri:根据客户端请求的uri映射。
- consistent_hash $args:根据客户端携带的参数进行映射。($args 请求地址 ? 后面的字符串,$arg_name 指定参数的值)
- consistent_hash $cookie_name:根据客户端携带的键名为 name 的 Cookie 参数进行映射。
它是第三方模块,需要通过 Nginx 的源码安装。
ngx_http_upstream_consistent_hash 下载地址。
$ /usr/local/nginx/sbin/nginx -V

# 编译,--add-module 指定模块的路径
$ ./configure --add-module=/usr/local/src/ngx_http_upstream_consistent_hash_module

$ make & make install
upstream somestream {
consistent_hash $request_uri;
server 10.50.1.3:11211;
server 10.50.1.4:11211;
server 10.50.1.5:11211;
}3 一致性哈希算法
在 2.4 IP Hash 中有提过,上游节点的变化会造成会话和缓存丢失。解决这个问题的方法有以下两种:
- 2.3 Hash:指定 consistent 参数。
- 2.8 Sticky:依靠第三方模块 nginx-sticky-module。
- 2.8 Consistent Hash:依靠第三方模块 ngx_http_upstream_consistent_hash。
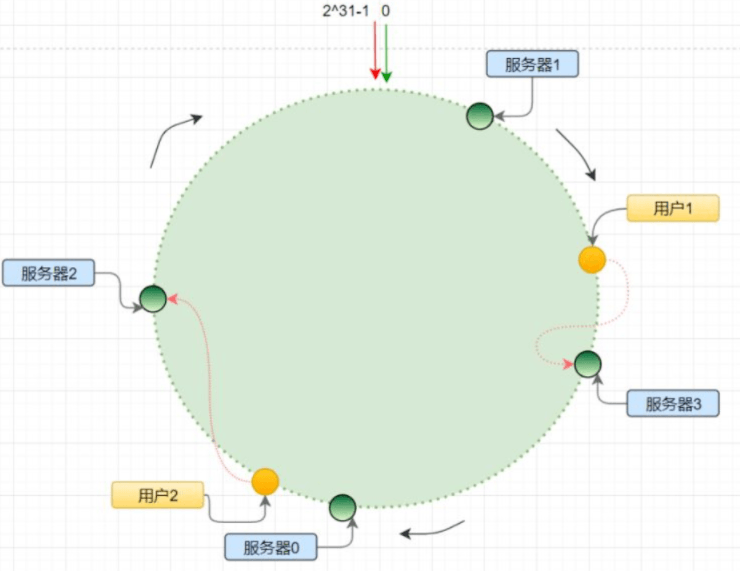
3.1 一致性哈希算法基本原理
首先要有一条直线,直线的开头和结尾分别定义为 0 和 2的31次方减1,将这样一条直线弯曲形成一个圆形的闭环,这个圆环称为 Hash 环。
针对服务器,对服务器的 IP 或主机名求 Hash 值,然后对应到 Hash 环上;针对客户端用户,也根据它的 IP 进行 Hash 求值,对应到环上某个位置。在 Hash 环上按照顺时针方向找最近的服务器节点,即可确定每个客户端请求路由到哪个服务器处理。
在一致性 Hash 算法实现过程中,每一台服务器负责一段,对于节点的增减都只需重定位环空间中的部分数据,具有较好的容错性和可扩展性。
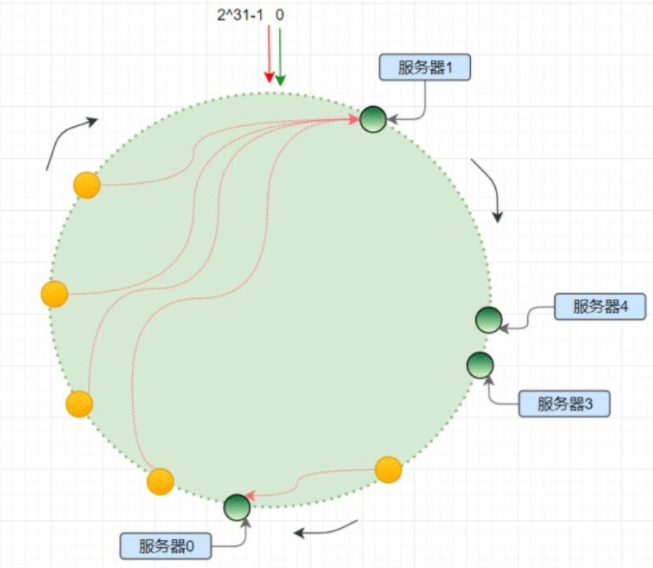
3.2 Hash环的数据倾斜问题
因为 Hash 取模算法得到的结果是随机的,故不能保证各个服务节点能均匀的分配到哈希环上。服务节点分布不均匀就会导致用户的请求访问不均匀,即服务节点承受的压力不均匀。这种问题现象我们称之为 Hash 环的数据倾斜问题。
如果想要将服务器尽量多的、均匀的出现在 Hash 环上,但又没有多余的真实物理服务器节点,我们就只能将现有的物理节点通过虚拟的方法复制出来。
这些由实际节点虚拟复制而来的节点被称为“虚拟节点”,即对每一个服务节点计算多个哈希,每个计算结果位置都放置一个此服务节点,称为虚拟节点。具体做法可以在服务器 IP 或主机名的后面增加编号来实现。
4 搭建Nginx负载均衡
1.1 流程图
在 Docker 下,通过 Nginx 负载均衡实现 Session 绑定,该方案的实现流程如图所示:
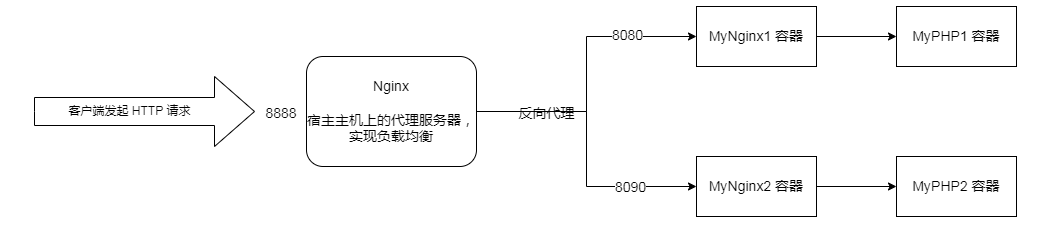
宿主主机上的 Nginx 将请求转发给两个 Nginx 容器处理,实现负载均衡。
1.2 Docker安装容器
创建桥接网络,实现容器间的通信(例如 MyNginx1 与 MyPHP1、MyNginx2 与 MyPHP2)。
$ docker network create -d bridge session-binding-net参考资料:docker网络模式和端口映射:
# 查看所有的网络 $ docker network ls # 查看创建的 Docker 桥接网络 $ ifconfig # 查看端口映射规则 $ iptables -t nat -vnL从镜像地址选择版本安装 PHP,并启动2个容器。
# 拉取镜像
$ docker pull php:7.4.28-fpm

# 启动2个容器
$ docker run --name MyPHP1 -v /usr/local/src/php1:/www --network session-binding-net -d php:7.4.28-fpm
$ docker run --name MyPHP2 -v /usr/local/src/php2:/www --network session-binding-net -d php:7.4.28-fpm
命令说明:
–name MyPHP1:指定容器名称为 MyPHP1。
-v /usr/local/src/php1:/www:将本地 /usr/local/src/php1 目录挂载到容器的 /www 目录,实现容器与宿主主机、容器与容器之间的数据共享。
–network session-binding-net:连接到新建的 session-binding-net 网络。
-d:设置容器在后台运行。
php:7.4.28-fpm:指定使用的镜像,格式为 REPOSITORY:TAG,TAG 为 latest 时可省略,可使用 docker images 查看。
准备2个 Nginx 容器的 Nginx 配置。
在 /usr/local/src/php1/conf/conf.d/ 目录下新建 Nginx 配置文件 session_binding.conf。
server {
    listen       80;
    server_name  localhost;

    location / {
        root   /usr/share/nginx/html;
        index  index.html index.htm index.php;
    }

    error_page   500 502 503 504  /50x.html;
    location = /50x.html {
        root   /usr/share/nginx/html;
    }

    location ~ \.php$ {
        fastcgi_pass   MyPHP1:9000;
        fastcgi_index  index.php;
        fastcgi_param  SCRIPT_FILENAME  /www/$fastcgi_script_name;
        include        fastcgi_params;
    }
}
在 /usr/local/src/php2/conf/conf.d/ 目录下新建 Nginx 配置文件 session_binding.conf。
server {
    listen       80;
    server_name  localhost;

    location / {
        root   /usr/share/nginx/html;
        index  index.html index.htm index.php;
    }

    error_page   500 502 503 504  /50x.html;
    location = /50x.html {
        root   /usr/share/nginx/html;
    }

    location ~ \.php$ {
        fastcgi_pass   MyPHP2:9000;
        fastcgi_index  index.php;
        fastcgi_param  SCRIPT_FILENAME  /www/$fastcgi_script_name;
        include        fastcgi_params;
    }
}
配置说明:
- MyPHP1:9000: 表示 php-fpm 服务的 URL。MyPHP1 是容器名。
- /www/:MyPHP1 容器中 php 文件的存储路径,映射到本地的 /usr/local/src/php1 目录。
拉取拉取 Nginx 镜像,并启动 2 个 Nginx 容器。
# 安装最新 Nginx
$ docker pull nginx:latest

$ docker run --name MyNginx1 -p 8080:80 -d \
  -v /usr/local/src/php1:/usr/share/nginx/html:ro \
  -v /usr/local/src/php1/conf/conf.d:/etc/nginx/conf.d:ro \
  --network session-binding-net \
  nginx

$ docker run --name MyNginx2 -p 8090:80 -d \
  -v /usr/local/src/php2:/usr/share/nginx/html:ro \
  -v /usr/local/src/php2/conf/conf.d:/etc/nginx/conf.d:ro \
  --network session-binding-net \
  nginx
命令说明:
- ro:只读
- -p 8080:80: 端口映射,将本地 8080 端口映射到容器内部的 80 端口。
1.3 宿主主机配置Nginx
在 /etc/nginx/conf.d 目录下新建配置文件 session.conf。
# 日志格式
log_format upstreamlog '[$time_local] $remote_addr - $remote_user - $server_name  to: $upstream_addr: $request upstream_response_time $upstream_response_time msec $msec request_time $request_time';

# 配置负载均衡日志,可以看到具体代理到了哪台机器
access_log /usr/local/nginx/logs/access.log upstreamlog;

# 转发到 Nginx 容器
upstream session.binding.test.com {
    server 172.16.60.2:8080;
    server 172.16.60.2:8090;
}
server {
    listen      8888;
    server_name localhost;
    location / {
        proxy_pass http://session.binding.test.com;
    }
}
配置完后,重启 Nginx。
阿里云服务器需要把搭载在宿主主机的 Ngnx 监听端口 8888,和2个 Nginx 容器监听端口 8080/8090 加到安全组。
5 Nginx负载均衡测试
新建 /usr/local/src/php1/index.php 文件。
<?php
  echo "MyPHP1";
?>
新建 /usr/local/src/php2/index.php 文件。
<?php
  echo "MyPHP2";
?>访问:http://172.16.60.2:8888,查看负载均衡日志:
$ tail -f /usr/local/nginx/logs/access.log5.1 测试IP Hash
upstream session.binding.test.com {
    ip_hash;
    server 172.16.60.2:8080;
    server 172.16.60.2:8090;
}
电脑端访问 http://172.16.60.2:8888,结果:
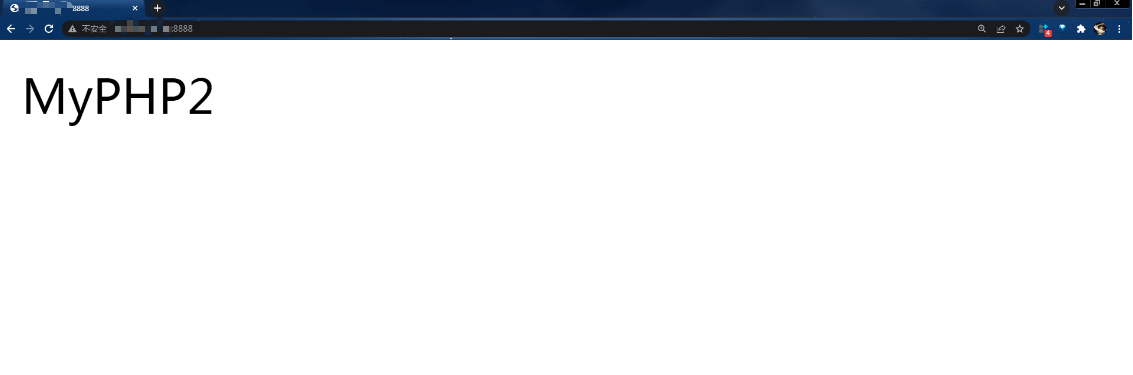
手机端访问 http://172.16.60.2:8888,结果:

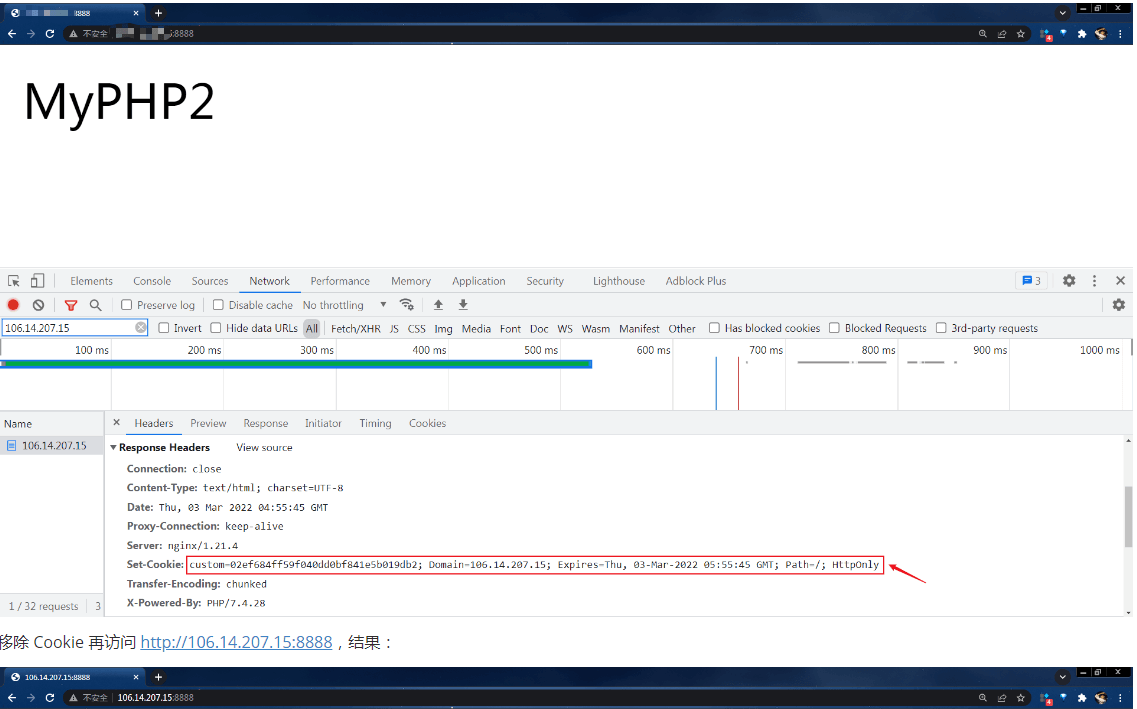
5.2 测试Sticky
upstream session.binding.test.com {
    sticky name=custom domain=172.16.60.2 expires=1h httponly;
    server 172.16.60.2:8080;
    server 172.16.60.2:8090;
}
访问 http://172.16.60.2:8888,结果:
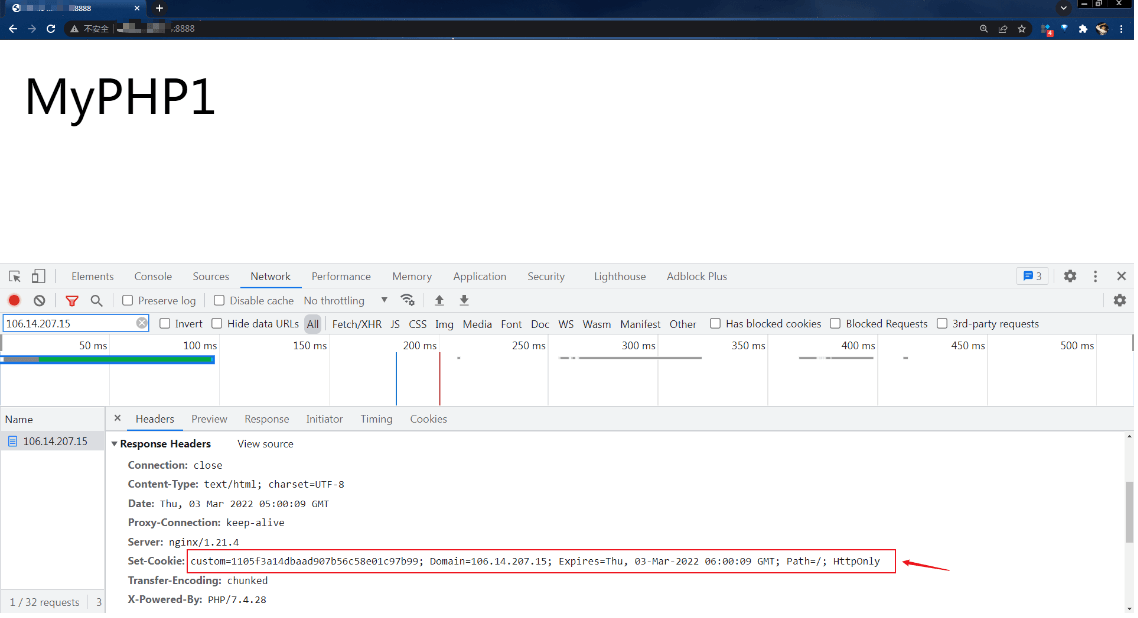
移除 Cookie 再访问 http://172.16.60.2:8888,结果:
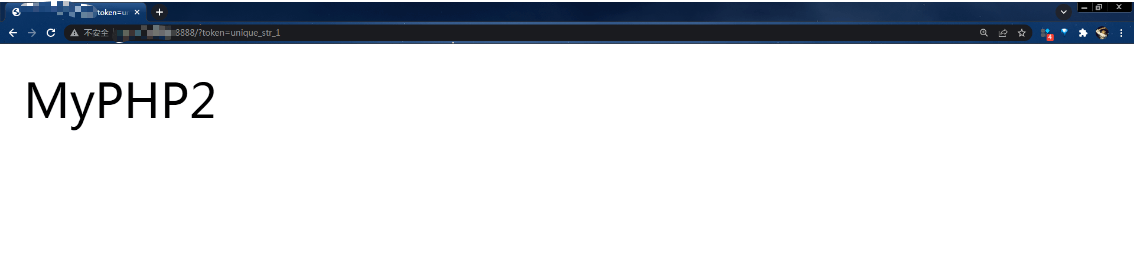
5.3 测试Consistent Hash
upstream session.binding.test.com {
    consistent_hash $arg_token;
    server 172.16.60.2:8080 weight=10;
    server 172.16.60.2:8090 weight=20;
}
访问 http://172.16.60.2:8888/?token=unique_str_1,结果:
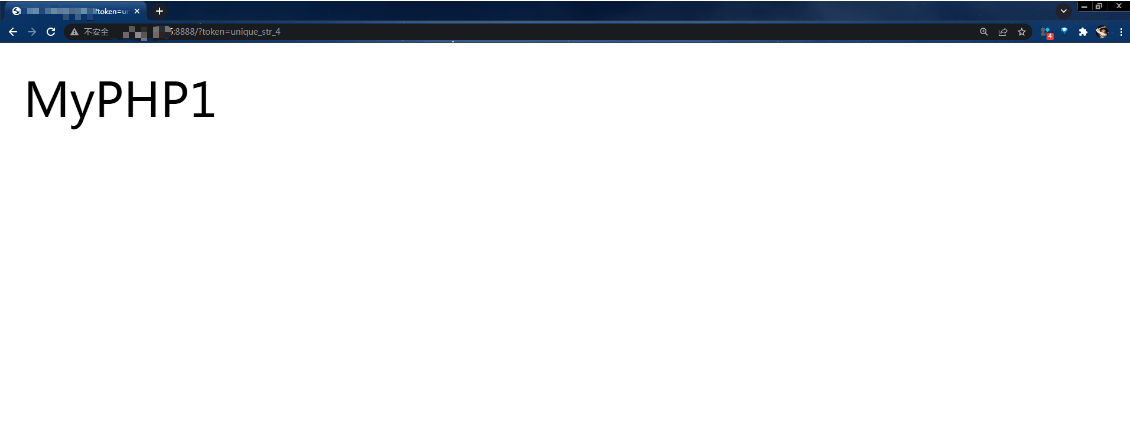
访问 http://172.16.60.2:8888/?token=unique_str_4,结果:
6 故障节点摘除与恢复
例子:当 Nginx 发现发送到这个节点上的请求失败了 3 次时,就会把这个节点摘除,摘除时间是 30s,30s 后才会再次发送请求到这个节点上。当主要节点都挂了的时候,会把请求分发到标注为 backup 的节点。
upstream server_group {
    server 127.0.0.1:9000;
    server 127.0.0.1:9001 max_fails=3 fail_timeout=30s;
    server 127.0.0.1:9002 backup;
}- max_fails=number:达到设置的最大请求失败次数后暂停节点,默认是 1,需配合 fail_timeout 使用。
- fail_timeout=time:当节点不可用时的暂停时间,默认是 10s。
- backup:当主要节点都挂了的时候,会把请求分发到这个 backup 节点。
如果文章有帮到你的话,别忘了点赞收藏噢:smile:


 关于 LearnKu


推荐文章: