
使用 Docker 来开发 PHP,Laradock 系列 3:Mailhog
当应用程序已经注册或订阅用户时,发送邮件可能是必不可少的功能之一。 在开发过程中,我们倾向于使用SMTP测试服务器,例如mailtrap.io。
Mailtrap为单个收件箱提供了一个免费计划以进行测试,我们可以将邮件发送到该收件箱,但收件箱中存储的邮件数量有限。当我们使用此免费计划时,我们还限制了在一秒钟内可以发送多少封电子邮件,因此我们不能同时发送多封电子邮件,所以必须延迟或睡眠每个邮件过程。
上述问题的最优解是mailhog。 Mailhog是在服务器/计算机本地运行的SMTP测试服务器,Laradock拥有此服务。 让我们尝试一下。
运行Mailhog服务器和web UI
我假设你已经知道并尝试过使用Laradock,如果没有,那么你可以试试使用Laradock此处。
要运行Mailhog服务器和web UI,只需运行这个docker compose命令:
docker-compose up -d mailhog
这下容器应该就会处于工作状态,并且当你使用docker-compose ps命令进行检查时,它的状态为up:
           Name                          Command               State                       Ports
---------------------------------------------------------------------------------------------------------------------
laradock_mailhog_1            MailHog Mailhog                  Up      0.0.0.0:1025->1025/tcp, 0.0.0.0:8025->8025/tcp
为 Laravel App 设置 Mailhog
在你的laravel app 的.env, 添加/更改这些参数:
MAIL_DRIVER=smtp
MAIL_HOST=mailhog
MAIL_PORT=1025
MAIL_USERNAME=null
MAIL_PASSWORD=null
MAIL_ENCRYPTION=null
MAIL_FROM_ADDRESS=from@example.com
MAIL_FROM_NAME=Example
在 Laravel 发送邮件的例子
我们可以创建一个简单的 artisan 命令发送邮件,以下是你需要添加到你的 laravel 项目:
app\Console\Commands\ExampleSendMailCommand.php:
<?php

namespace App\Console\Commands;

use Illuminate\Console\Command;

use App\Mail\ExampleMail;
use Illuminate\Support\Facades\Mail;

class ExampleSendMailCommand extends Command
{
    /**
     * The name and signature of the console command.
     *
     * @var string
     */
    protected $signature = 'example:send-mail';

    /**
     * The console command description.
     *
     * @var string
     */
    protected $description = 'Command for exemplify the mail sending in laravel';

    /**
     * Create a new command instance.
     *
     * @return void
     */
    public function __construct()
    {
        parent::__construct();
    }

    /**
     * Execute the console command.
     *
     * @return mixed
     */
    public function handle()
    {
        Mail::to('example@mailinator.net')->send(new ExampleMail());
    }
}
app\Mail\ExampleMail.php:
<?php

namespace App\Mail;

use Illuminate\Bus\Queueable;
use Illuminate\Contracts\Queue\ShouldQueue;
use Illuminate\Mail\Mailable;
use Illuminate\Queue\SerializesModels;

class ExampleMail extends Mailable implements ShouldQueue
{
    use Queueable, SerializesModels;

    /**
     * Create a new message instance.
     *
     * @return void
     */
    public function __construct()
    {
        //
    }

    /**
     * Build the message.
     *
     * @return $this
     */
    public function build()
    {
        return $this->view('mails.example');
    }
}
resources\views\mails\example.blade.php:
<!DOCTYPE html>
<html lang="en">
<head>
    <meta charset="UTF-8">
    <meta name="viewport" content="width=device-width, initial-scale=1.0">
    <meta http-equiv="X-UA-Compatible" content="ie=edge">
    <title>Example Mail Test</title>
</head>
<body>
    <h1>Hello from the other side!</h1>
</body>
</html>
添加/注册命令到app\Console\Kernel.php:
<?php

namespace App\Console;

use Illuminate\Console\Scheduling\Schedule;
use Illuminate\Foundation\Console\Kernel as ConsoleKernel;

use App\Console\Commands\ExampleSendMailCommand;

class Kernel extends ConsoleKernel
{
    /**
     * The Artisan commands provided by your application.
     *
     * @var array
     */
    protected $commands = [
        ExampleSendMailCommand::class,
    ];

    /**
     * Define the application's command schedule.
     *
     * @param  \Illuminate\Console\Scheduling\Schedule  $schedule
     * @return void
     */
    protected function schedule(Schedule $schedule)
    {
        // $schedule->command('inspire')
        //          ->hourly();
    }

    /**
     * Register the commands for the application.
     *
     * @return void
     */
    protected function commands()
    {
        $this->load(__DIR__.'/Commands');

        require base_path('routes/console.php');
    }
}
最后,现在进入 laradock workspace bash(如果你还没有)使用你最喜欢的 CLI来执行这个命令:
docker-compose exec --user=laradock workspace bash
进入你的 laravel app root 目录,执行 artisan 命令:
php artisan example:send-mail
如果在执行命令时没有错误,那么让我们看看我们的收件箱!
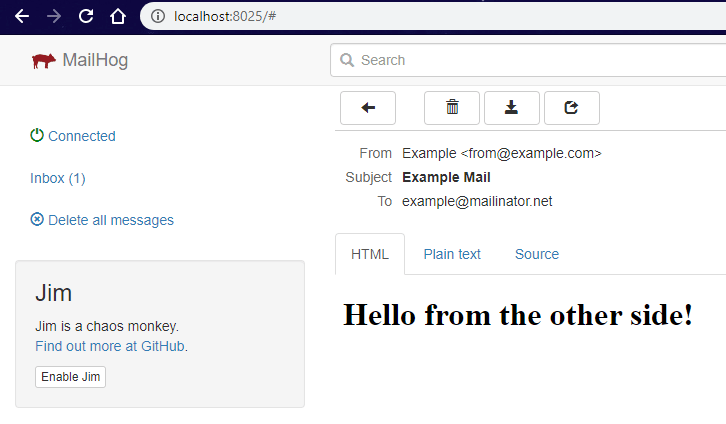
访问 Mailhog Web UI
mailhog web UI 应该可以通过 http://localhost:8025 访问。你的示例邮件应该在那里:)
使电子邮件消息持久
Mailhog将caught消息存储在内存中,这意味着当你停止容器并再次运行时,你所有的消息都将消失(永远)。因此,如果你想要保留它们,那么你必须通过配置laradock/docker- composition .yml来保持它们的持久性。在文件中找到 mailhog 配置,并将其更改为如下所示:
...

## Mailhog ################################################
    mailhog:
      build: ./mailhog
      volumes:
        - ${DATA_PATH_HOST}/mailhog/maildir:/maildir
      command: ["-storage=maildir", "-maildir-path=/maildir"]
      ports:
        - "1025:1025"
        - "8025:8025"
      networks:
        - frontend
        - backend

...
然后重新启动或停止运行容器。从这一点开始,你的所有消息都将被保存。
在 Laradock 探索 Mailhog 的乐趣。
laravel version used: 6.0 LTS本文中的所有译文仅用于学习和交流目的,转载请务必注明文章译者、出处、和本文链接
我们的翻译工作遵照 CC 协议,如果我们的工作有侵犯到您的权益,请及时联系我们。


 关于 LearnKu


推荐文章: