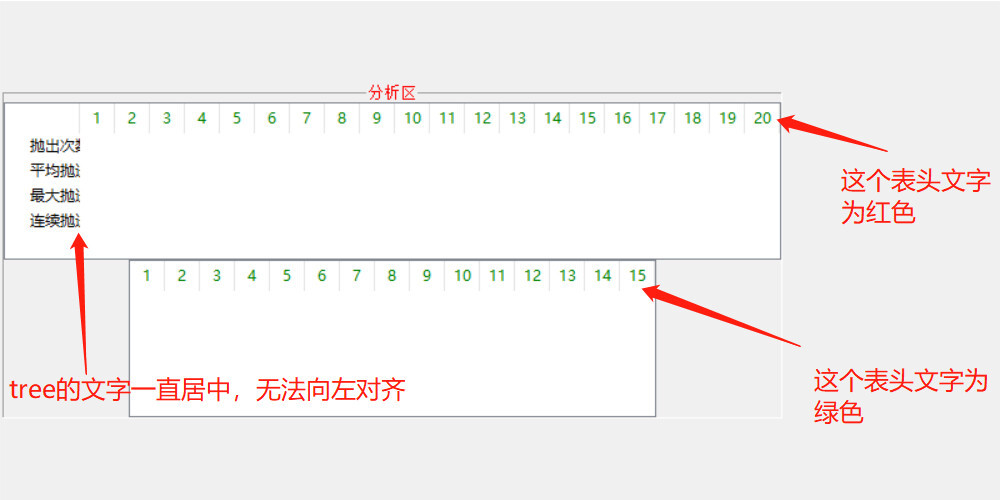
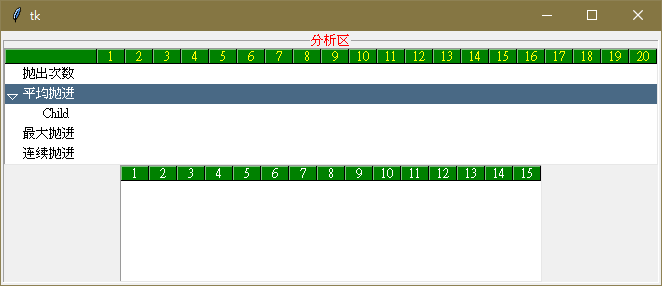
如何设置区分两个Treeview表头的颜色及tree的文字无法向左对齐


import tkinter as tk
import tkinter.ttk as ttk

root = tk.Tk()
root.title(“text”)
root.geometry(‘800x400’)
frame = tk.LabelFrame (root, text=’分析区’, font=(‘宋体’, 10), fg=’red’, labelanchor=’n’, bd=1, height=140,
relief=’groove’)
frame.pack(side=’left’, pady=2, padx=2)
style = ttk.Style()
style.configure(‘Heading’, foreground=’red’)
lable = [‘抛出次数’, ‘平均抛进’, ‘最大抛进’, ‘连续抛进’]

mark = [str(i) for i in range(1, 21)]
table = ttk.Treeview(frame, columns=mark, height=5, style=’Treeview’, show=’tree headings’)
for i in lable:
table.insert(‘’, ‘end’, text=i)
table.column(‘#0’, width=60, anchor=’w’, stretch=False)
for j in range(len(mark)):
table.heading(column=mark[j], text=mark[j], anchor=’center’)
table.column(j+1, width=28, anchor=’center’, stretch=tk.NO)
table.pack()

style.configure(‘Heading’, foreground=’green’)
mark1 = [str(i) for i in range(1, 16)]
table1 = ttk.Treeview(frame, columns=mark1, height=5, style=’Treeview’, show=’headings’)
for k in range(len(mark1)):
table1.heading(column=mark1[k], text=mark1[k], anchor=’center’)
table1.column(k+1, width=28, anchor=’center’, stretch=tk.NO)
table1.pack()

root.mainloop()

当设置style的颜色时,应用的是全部的Treeview表头,如何设置第一个Treeview的表头文字为红色,第二个Treeview的表头文字为蓝色;

Jason990420
最佳答案

tree的文字无法向左对齐 ?

有向左对齐, 左边还有一個位置是給展开/折叠按钮, 只是你設置的宽度不夠顯示其內容.

file

如何设置区分两个Treeview表头的颜色 ?

使用不同的樣式名, 由旧样式 (“Treeview”) 导出新样式的名称 ‘new_name.old_name’, 如 ‘Table1.Treeview’ 以及 ‘Table2.Treeview’

Demo Code

from tkinter import font as tkfont
import tkinter as tk
import tkinter.ttk as ttk

root = tk.Tk()

font = ('Courier New', 10)
frame = tk.LabelFrame (root, text='分析区', font=font, fg='red', labelanchor='n', bd=1, height=140, relief='groove')
frame.pack(side='left', pady=2, padx=2)

style = ttk.Style()
style.theme_use("default")

style.configure('Tree1.Treeview.Heading', foreground='yellow', background='green', font=font)
style.configure('Tree1.Treeview', font=font)
lable = ['抛出次数', '平均抛进', '最大抛进', '连续抛进']

mark = [str(i) for i in range(1, 21)]
table = ttk.Treeview(frame, columns=mark, height=5, style='Tree1.Treeview', show='tree headings')

for i in lable:
    table.insert('', 'end', text=i)
table.insert("I002", 'end', text="Child")

width = tkfont.Font(font=font).measure('抛出次数')
minwidth = table.column('#0', option='minwidth')
table.column('#0', width=width+2*minwidth, anchor='w', stretch=False)

for j in range(len(mark)):
    table.heading(column=mark[j], text=mark[j], anchor='center')
    table.column(j+1, width=28, anchor='center', stretch=tk.NO)
table.pack()

style.configure('Tree2.Treeview.Heading', foreground='white', background='green', font=font)
mark1 = [str(i) for i in range(1, 16)]
table1 = ttk.Treeview(frame, columns=mark1, height=5, style='Tree2.Treeview', show='headings')
for k in range(len(mark1)):
    table1.heading(column=mark1[k], text=mark1[k], anchor='center')
    table1.column(k+1, width=28, anchor='center', stretch=tk.NO)
table1.pack()

root.mainloop()

想把表头(Headings)的形状都改成圆形

最好是使用图形文字, 如❶❷❸❹❺❻❼❽❾❿⓫⓬⓭⓮⓯⓰⓱⓲⓳⓴

Python

如要用图形会很复杂, 比如以下的代码, 这里就不详细说明了

import tkinter as tk
from tkinter import font as tkfont
import tkinter.ttk as ttk
from PIL import Image, ImageTk, ImageDraw

root = tk.Tk()
root.title('Table')

columns = [str(i+1) for i in range(20)]
table = ttk.Treeview(root, columns=columns, show='headings')
table.pack()

font = ('Courier New', 20)
# extra one space reserved for each column
width = tkfont.Font(font=font).measure('00')
height= tkfont.Font(font=font).metrics('linespace')-2

circles = []
for i, column in enumerate(columns):

    # 数字画到圆形图片中
    im = Image.new("RGBA", (height, height), "#80800000")
    draw = ImageDraw.Draw(im)
    draw.ellipse((0, 0, height, height), fill = 'yellow', outline ='yellow')
    draw.text((height//2, height//2), f"{i+1}", fill="black", anchor="mm", align="center", font_size=20)
    circle = ImageTk.PhotoImage(im)
    circles.append(circle)

    table.heading(column=column, text="", image=circle)     # 无文字, 只有图片
    table.column(column, width=width, anchor='center', stretch=tk.NO)

# Set color of headings
white, blue, green = 'white', 'blue', 'green'
style = ttk.Style()
style.theme_use('winnative')
style_name = 'Treeview'
"""
print(style.layout(style_name + ".Heading"))
new_style = [('Treeheading.cell', {'sticky': 'nswe'}), ('Treeheading.border', {'sticky': 'nswe', 'children': [('Treeheading.padding', {'sticky': 'nswe', 'children': [('Treeheading.image', {'side': 'left', 'sticky': ''}), ('Treeheading.text', {'sticky': 'we'})]})]})]
style.layout(style_name + ".Heading", new_style)
"""
# Better with extra one space for each column when setting
# 'winnative', 'clam', 'alt', 'default', 'classic', 'vista', 'xpnative'

style.configure(
    style_name + '.Heading',
    foreground=white,
    background=blue,
    borderwidth=1,
    font=font,
)

root.mainloop()

Python

1年前 评论
Jason990420 (作者) 1年前
LiTtianS (楼主) 1年前
LiTtianS (楼主) 1年前
LiTtianS (楼主) 1年前
Jason990420 (作者) 1年前
讨论数量: 6
Jason990420

tree的文字无法向左对齐 ?

有向左对齐, 左边还有一個位置是給展开/折叠按钮, 只是你設置的宽度不夠顯示其內容.

file

如何设置区分两个Treeview表头的颜色 ?

使用不同的樣式名, 由旧样式 (“Treeview”) 导出新样式的名称 ‘new_name.old_name’, 如 ‘Table1.Treeview’ 以及 ‘Table2.Treeview’

Demo Code

from tkinter import font as tkfont
import tkinter as tk
import tkinter.ttk as ttk

root = tk.Tk()

font = ('Courier New', 10)
frame = tk.LabelFrame (root, text='分析区', font=font, fg='red', labelanchor='n', bd=1, height=140, relief='groove')
frame.pack(side='left', pady=2, padx=2)

style = ttk.Style()
style.theme_use("default")

style.configure('Tree1.Treeview.Heading', foreground='yellow', background='green', font=font)
style.configure('Tree1.Treeview', font=font)
lable = ['抛出次数', '平均抛进', '最大抛进', '连续抛进']

mark = [str(i) for i in range(1, 21)]
table = ttk.Treeview(frame, columns=mark, height=5, style='Tree1.Treeview', show='tree headings')

for i in lable:
    table.insert('', 'end', text=i)
table.insert("I002", 'end', text="Child")

width = tkfont.Font(font=font).measure('抛出次数')
minwidth = table.column('#0', option='minwidth')
table.column('#0', width=width+2*minwidth, anchor='w', stretch=False)

for j in range(len(mark)):
    table.heading(column=mark[j], text=mark[j], anchor='center')
    table.column(j+1, width=28, anchor='center', stretch=tk.NO)
table.pack()

style.configure('Tree2.Treeview.Heading', foreground='white', background='green', font=font)
mark1 = [str(i) for i in range(1, 16)]
table1 = ttk.Treeview(frame, columns=mark1, height=5, style='Tree2.Treeview', show='headings')
for k in range(len(mark1)):
    table1.heading(column=mark1[k], text=mark1[k], anchor='center')
    table1.column(k+1, width=28, anchor='center', stretch=tk.NO)
table1.pack()

root.mainloop()

想把表头(Headings)的形状都改成圆形

最好是使用图形文字, 如❶❷❸❹❺❻❼❽❾❿⓫⓬⓭⓮⓯⓰⓱⓲⓳⓴

Python

如要用图形会很复杂, 比如以下的代码, 这里就不详细说明了

import tkinter as tk
from tkinter import font as tkfont
import tkinter.ttk as ttk
from PIL import Image, ImageTk, ImageDraw

root = tk.Tk()
root.title('Table')

columns = [str(i+1) for i in range(20)]
table = ttk.Treeview(root, columns=columns, show='headings')
table.pack()

font = ('Courier New', 20)
# extra one space reserved for each column
width = tkfont.Font(font=font).measure('00')
height= tkfont.Font(font=font).metrics('linespace')-2

circles = []
for i, column in enumerate(columns):

    # 数字画到圆形图片中
    im = Image.new("RGBA", (height, height), "#80800000")
    draw = ImageDraw.Draw(im)
    draw.ellipse((0, 0, height, height), fill = 'yellow', outline ='yellow')
    draw.text((height//2, height//2), f"{i+1}", fill="black", anchor="mm", align="center", font_size=20)
    circle = ImageTk.PhotoImage(im)
    circles.append(circle)

    table.heading(column=column, text="", image=circle)     # 无文字, 只有图片
    table.column(column, width=width, anchor='center', stretch=tk.NO)

# Set color of headings
white, blue, green = 'white', 'blue', 'green'
style = ttk.Style()
style.theme_use('winnative')
style_name = 'Treeview'
"""
print(style.layout(style_name + ".Heading"))
new_style = [('Treeheading.cell', {'sticky': 'nswe'}), ('Treeheading.border', {'sticky': 'nswe', 'children': [('Treeheading.padding', {'sticky': 'nswe', 'children': [('Treeheading.image', {'side': 'left', 'sticky': ''}), ('Treeheading.text', {'sticky': 'we'})]})]})]
style.layout(style_name + ".Heading", new_style)
"""
# Better with extra one space for each column when setting
# 'winnative', 'clam', 'alt', 'default', 'classic', 'vista', 'xpnative'

style.configure(
    style_name + '.Heading',
    foreground=white,
    background=blue,
    borderwidth=1,
    font=font,
)

root.mainloop()

Python

1年前 评论
Jason990420 (作者) 1年前
LiTtianS (楼主) 1年前
LiTtianS (楼主) 1年前
LiTtianS (楼主) 1年前
Jason990420 (作者) 1年前

讨论应以学习和精进为目的。请勿发布不友善或者负能量的内容,与人为善,比聪明更重要!