
Laravel 项目:使用 TDD 构建论坛 Chapter 4
4 / 2 / 创建于 8年前 /
 洛未必达 的个人博客
0.写在前面
- 本系列文章为
laracasts.com的系列视频教程——Let's Build A Forum with Laravel and TDD 的学习笔记。若喜欢该系列视频,可去该网站订阅后下载该系列视频, 支持正版 。 - 视频源码地址:https://github.com/laracasts/Lets-Build-a-Forum-in-Laravel
- *本项目为一个 forum(论坛)项目,与本站的第二本实战教程 Laravel 教程 - Web 开发实战进阶 ( Laravel 5.5 ) 类似,可互相参照
- 项目开发模式为
TDD开发,教程简介为:A forum is a deceptively complex thing. Sure, it's made up of threads and replies, but what else might exist as part of a forum? What about profiles, or thread subscriptions, or filtering, or real-time notifications? As it turns out, a forum is the perfect project to stretch your programming muscles. In this series, we'll work together to build one with tests from A to Z.
- 项目版本为
laravel 5.4,教程后面会进行升级到laravel 5.5的教学 - 视频教程共计 102 个小节,笔记章节与视频教程一一对应
1.本节说明
对应视频第 4 小节:A User May Response To Threads
2.本节内容
上节中我们的..\views\threads\show.blade.php视图文件回复区域的内容为:
.
.
<div class="row">
    <div class="col-md-8 col-md-offset-2">
        @ foreach ($thread->replies as $reply) // 此处 @ 后面有空格
            <div class="panel panel-default">
                <div class="panel-heading">
                    {{ $reply->owner->name }} 回复于
                    {{ $reply->created_at->diffForHumans() }}
                </div>

                <div class="panel-body">
                    {{ $reply->body }}
                </div>
            </div>
        @endforeach
    </div>
</div>
.
.
为了便于维护,我们将回复区域抽离成一个单独的视图。修改如下:
.
.
<div class="row">
    <div class="col-md-8 col-md-offset-2">
        @ foreach ($thread->replies as $reply)  // 此处 @ 后面有空格
            @include('threads.reply')
        @endforeach
    </div>
</div>
.
.新建..\views\threads\reply.blade.php视图文件:
<div class="panel panel-default">
    <div class="panel-heading">
        <a href="#">
            {{ $reply->owner->name }}
        </a>
        回复于 {{ $reply->created_at->diffForHumans() }}
    </div>

    <div class="panel-body">
        {{ $reply->body }}
    </div>
</div>我们可以给话题的内容加上作者的信息:..\views\threads\show.blade.php
.
.
<div class="row">
    <div class="col-md-8 col-md-offset-2">
        <div class="panel panel-default">
            <div class="panel-heading">
                <a href="#">{{ $thread->creator->name }}</a> 发表了:
                {{ $thread->title }}
            </div>

            <div class="panel-body">
                {{ $thread->body }}
            </div>
        </div>
    </div>
</div>
.
.我们需要先行编写单元测试,用来测试$thread->creator。但是在此之前,由于上一节中我们使用了$thread->replies来获取回复,但并未编写单元测试。现在补上单元测试,首先移除Unit文件夹下的示例文件,并新建单元测试文件:
$ php artisan make:test ThreadTest --unit修改如下:
<?php

namespace Tests\Unit;

use Tests\TestCase;
use Illuminate\Foundation\Testing\DatabaseMigrations;

class ThreadTest extends TestCase
{
    use DatabaseMigrations;

    /** @test  */
    public function a_thread_has_replies()
    {
        $thread = factory('App\Thread')->create();

        $this->assertInstanceOf('Illuminate\Database\Eloquent\Collection',$thread->replies);
    }
}
测试一下:
$ phpunit tests/Unit/ThreadTest.php测试通过: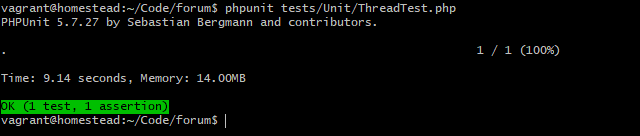
继续编写$thread->creator的测试代码:ThreadTest.php
.
.
public function test_a_thread_has_a_creator()
{
    $this->assertInstanceOf('App\User',$this->thread->creator);
}
.
.我们可以使用--filter来单独测试:
$ phpunit --filter a_thread_has_a_creator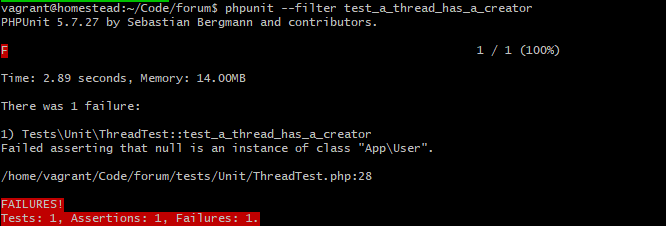
因为我们还未进行模型关联:app\Thread.php
.
.
public function creator()
{
    return $this->belongsTo(User::class,'user_id'); // 使用 user_id 字段进行模型关联
}
.
.
再次测试即可通过,刷新页面即可看到效果: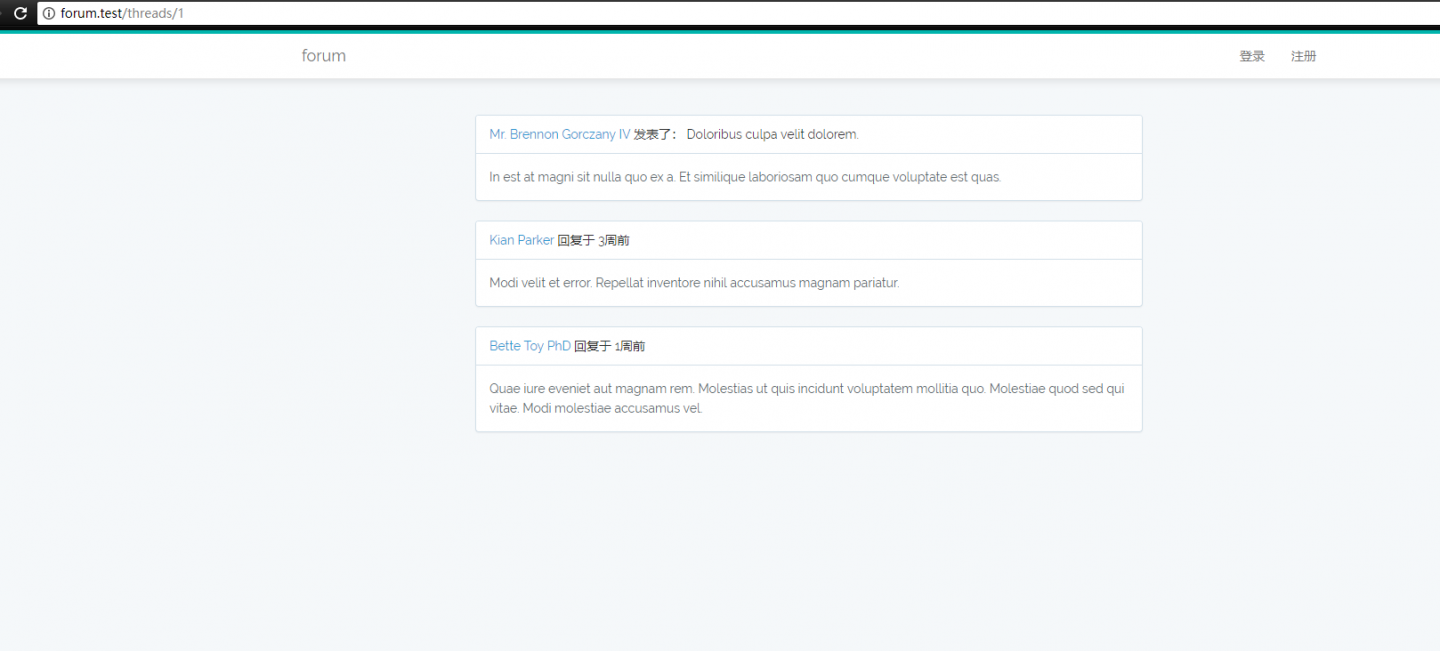
接下来新建测试:
$ php artisan make:test ParticipateInForumTest先编写测试逻辑:
<?php

namespace Tests\Feature;

use Tests\TestCase;
use Illuminate\Foundation\Testing\DatabaseMigrations;

class ParticipateInForumTest extends TestCase
{
    use DatabaseMigrations;

    /** @test */
    function an_authenticated_user_may_participate_in_forum_threads()
    {
        // Given we have a authenticated user
        // And an existing thread
        // When the user adds a reply to the thread
        // Then their reply should be visible on the page
    }
}
再填充具体代码:
<?php

namespace Tests\Feature;

use Tests\TestCase;
use Illuminate\Foundation\Testing\DatabaseMigrations;

class ParticipateInForumTest extends TestCase
{
    use DatabaseMigrations;

    function an_authenticated_user_may_participate_in_forum_threads()
    {
        // Given we have a authenticated user
        $this->be($user = factory('App\User')->create());

        // And an existing thread
        $thread = factory('App\Thread')->create();

        // When the user adds a reply to the thread
        $reply = factory('App\Reply')->create();
        $this->post($thread->path().'/replies',$reply->toArray());

        // Then their reply should be visible on the page
        $this->get($thread->path())
            ->assertSee($reply->body);
    }
}
注意到我们使用$thread->path()来获取 URL ,想起在ReadThreadsTest.php文件中可进行优化:tests\Feature\ReadThreadsTest.php
.
.
/** @test */
public function a_user_can_read_a_single_thread()
{
    $this->get($this->thread->path())  //此处
        ->assertSee($this->thread->title);
}

/** @test */
public function a_user_can_read_replies_that_are_associated_with_a_thread()
{
    // 如果有 Thread
    // 并且该 Thread 有回复
    $reply = factory('App\Reply')
        ->create(['thread_id' => $this->thread->id]);
    // 那么当我们看 Thread 时
    // 我们也要看到回复
    $this->get($this->thread->path())  //还有此处
        ->assertSee($reply->body);

}
.
.
一般而言,当修改已通过的测试时,应该在修改之后(需注释新建的测试)再次测试,确保之前的测试逻辑未被破坏。
$ phpunit当我们测试新写的测试时:
$ phpunit tests/Feature/ParticipateInForumTest.php会得到一大段长长的报错信息,要定位到错误十分困难: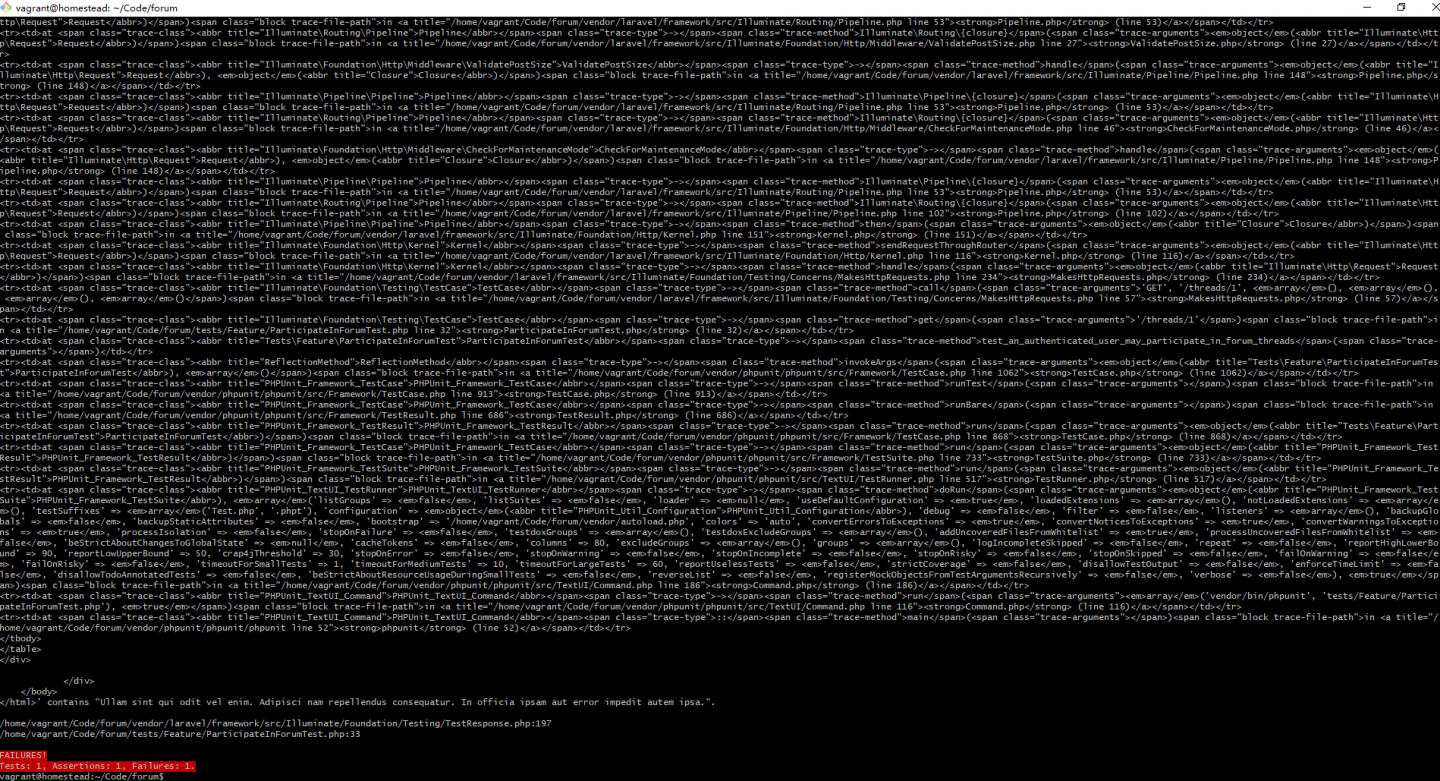
在app\Exceptions\Handler.php中加上一行:
.
.
public function render($request, Exception $exception)
{
    if(app()->environment() === 'local') throw $exception;  // 此处加上一行

    return parent::render($request, $exception);
}
.
.
注1:视频教程中使用的是app()->environment() === 'testing',但经过测试未生效,遂改为以上local。
再次运行测试:
$ phpunit tests/Feature/ParticipateInForumTest.php现在可以十分容易地定位错误: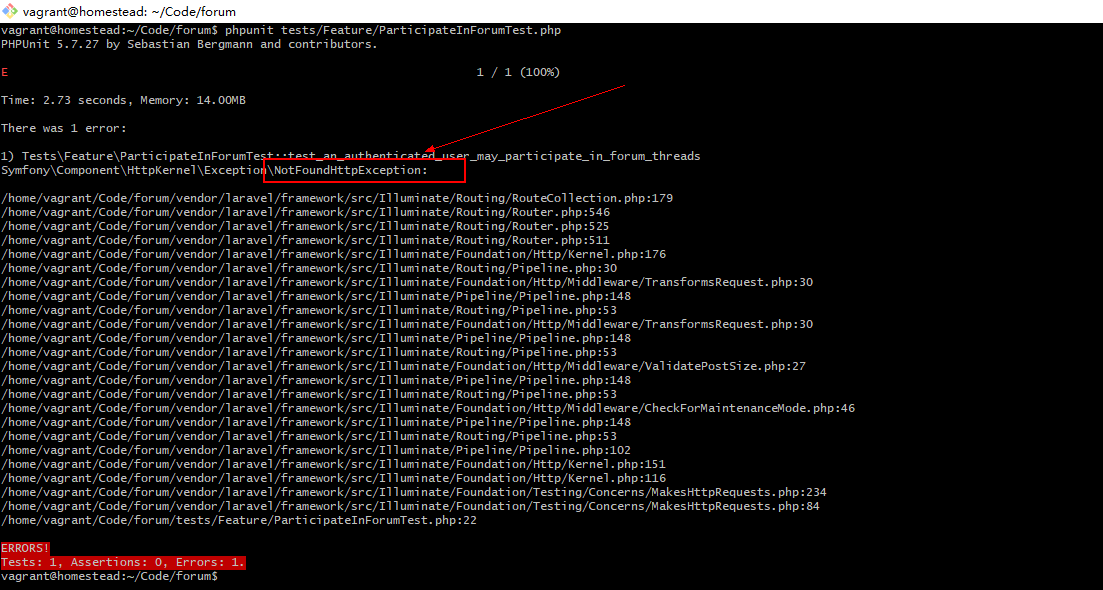
添加路由:
Route::post('/threads/{thread}/replies','RepliesController@store');前往RepliesController增加store方法:
<?php

namespace App\Http\Controllers;

use App\Thread;
use Illuminate\Http\Request;

class RepliesController extends Controller
{
    public function store(Thread $thread)
    {
        $thread->addReply([
            'body' => request('body'),
            'user_id' => auth()->id(),
        ]);
    }
}
为store方法添加单元测试:ThreadTest.php
<?php

namespace Tests\Unit;

use Tests\TestCase;
use Illuminate\Foundation\Testing\DatabaseMigrations;

class ThreadTest extends TestCase
{
    use DatabaseMigrations;

    protected $thread;

    public function setUp()
    {
        parent::setUp(); // TODO: Change the autogenerated stub

        $this->thread = factory('App\Thread')->create();
    }

    /** @test  */
    public function a_thread_has_replies()
    {

        $this->assertInstanceOf('Illuminate\Database\Eloquent\Collection',$this->thread->replies);
    }

    /** @test */
    public function a_thread_has_a_creator()
    {
        $this->assertInstanceOf('App\User',$this->thread->creator);
    }

    /** @test */
    public function a_thread_can_add_a_reply()
    {
        $this->thread->addReply([
           'body' => 'Foobar',
           'user_id' => 1
        ]);

        $this->assertCount(1,$this->thread->replies);
    }
}
测试一下: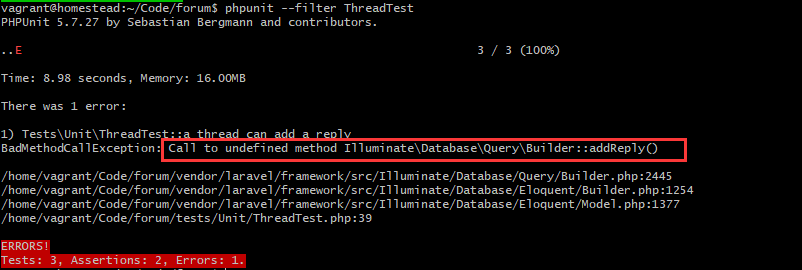
添加addReply方法:app\Thhread.php
.
.
public function addReply($reply)
{
    $this->replies()->create($reply);
}
.
.
再次运行测试
$ phpunit --filter an_authenticated_user_may_participate_in_forum_threads结果报错: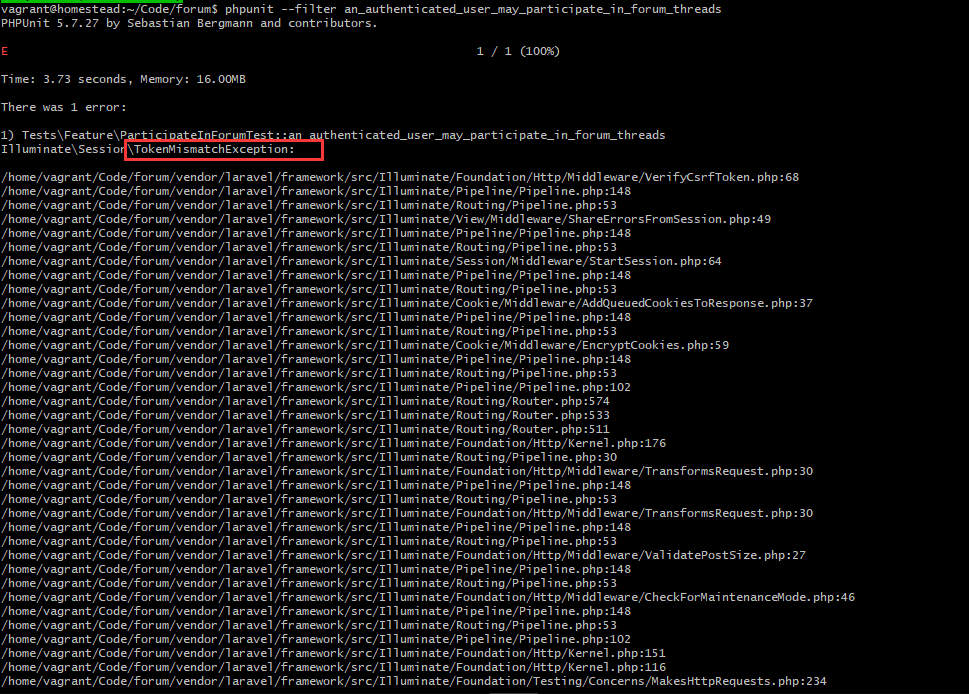
按道理说不应该,根据查阅到的资料,在测试环境应该是不会检验CsrfToken。尝试了诸多办法仍旧无法解决,简单用以下方法临时解决:
$ APP_ENV=testing phpunit --filter an_authenticated_user_may_participate_in_forum_threads即:在运行测试的时候将环境设为testing,未配合使用,应将Hander.php文件中代码改为如下:
.
.
public function render($request, Exception $exception)
{
    if (app()->environment() === 'testing') throw $exception;

    return parent::render($request, $exception);
}
.
.
运行测试:
运行完整测试:
$ APP_ENV=testing phpunit
注1:此处在笔记心得有详细解释。
我们限制只有登录用户才能添加回复,只需利用auth中间件即可:RepliesController.php
public function __construct()
{
    $this->middleware('auth');
}
.
.测试如果我们将单元测试代码更改一下:ParticipateInForumTest.php
<?php

namespace Tests\Feature;

use Tests\TestCase;
use Illuminate\Foundation\Testing\DatabaseMigrations;

class ParticipateInForumTest extends TestCase
{
    use DatabaseMigrations;

    /** @test */
    function an_authenticated_user_may_participate_in_forum_threads()
    {
        // Given we have a authenticated user
//        $this->be($user = factory('App\User')->create()); // 已登录用户
        $user = factory('App\User')->create(); // 未登录用户
        // And an existing thread
        $thread = factory('App\Thread')->create();

        // When the user adds a reply to the thread
        $reply = factory('App\Reply')->create();
        $this->post($thread->path() .'/replies',$reply->toArray()); // 注:此处有修改

        // Then their reply should be visible on the page
        $this->get($thread->path())
            ->assertSee($reply->body);
    }
}
再次运行测试:
$ APP_ENV=testing phpunit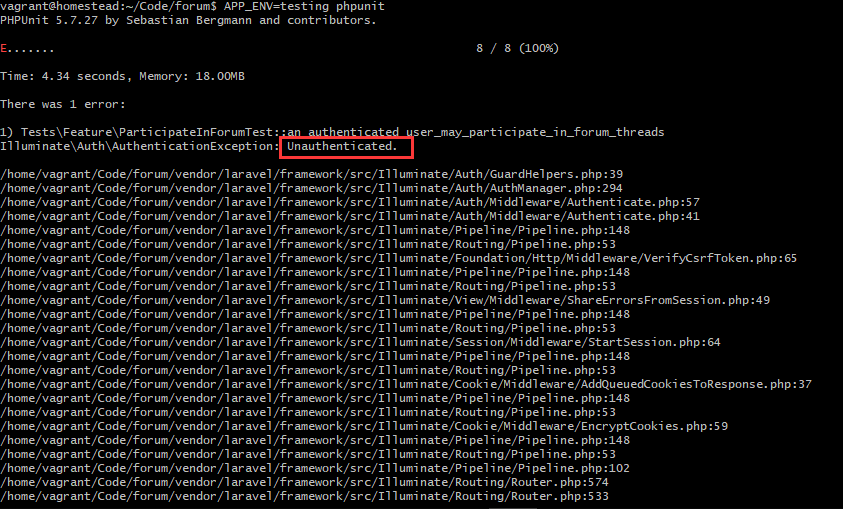
提示用户未认证,说明我们的测试有效。接下来再建立一个测试,测试未登录用户不能添加回复:ParticipateInForumTest.php
<?php

namespace Tests\Feature;

use Tests\TestCase;
use Illuminate\Foundation\Testing\DatabaseMigrations;

class ParticipateInForumTest extends TestCase
{
    use DatabaseMigrations;

    /** @test */
    public function unauthenticated_user_may_no_add_replies()
    {
        $this->expectException('Illuminate\Auth\AuthenticationException');

        $thread = factory('App\Thread')->create();

        $reply = factory('App\Reply')->create();
        $this->post($thread->path().'/replies',$reply->toArray());
    }

    /** @test */
    function an_authenticated_user_may_participate_in_forum_threads()
    {
        // Given we have a authenticated user
        $this->be($user = factory('App\User')->create());
        // And an existing thread
        $thread = factory('App\Thread')->create();

        // When the user adds a reply to the thread
        $reply = factory('App\Reply')->create();
        $this->post($thread->path() .'/replies',$reply->toArray());

        // Then their reply should be visible on the page
        $this->get($thread->path())
            ->assertSee($reply->body);
    }
}
再次测试:
$ APP_ENV=testing phpunit成功通过:
实际上,测试未登录用户的代码可以更加简单,因为我们实际上只用测试未登录用户是否抛出异常即可:ParticipateInForumTest.php
.
.
/** @test */
public function unauthenticated_user_may_no_add_replies()
{
    $this->expectException('Illuminate\Auth\AuthenticationException');

    $this->post('threads/1/replies',[]);
}
.
.最后,需要修改一下an_authenticated_user_may_participate_in_forum_threads:
.
.
/** @test */
function an_authenticated_user_may_participate_in_forum_threads()
{
    // Given we have a authenticated user
    $this->be($user = factory('App\User')->create());
    // And an existing thread
    $thread = factory('App\Thread')->create();

    // When the user adds a reply to the thread
    $reply = factory('App\Reply')->make();  // -->此处有修改
    $this->post($thread->path() .'/replies',$reply->toArray());

    // Then their reply should be visible on the page
    $this->get($thread->path())
        ->assertSee($reply->body);
}
.
.
注2:详见笔记心得处。
3.笔记心得
-
关于
注1的说明:
第四节课经历比较坎坷,主要是遇到了一个问题: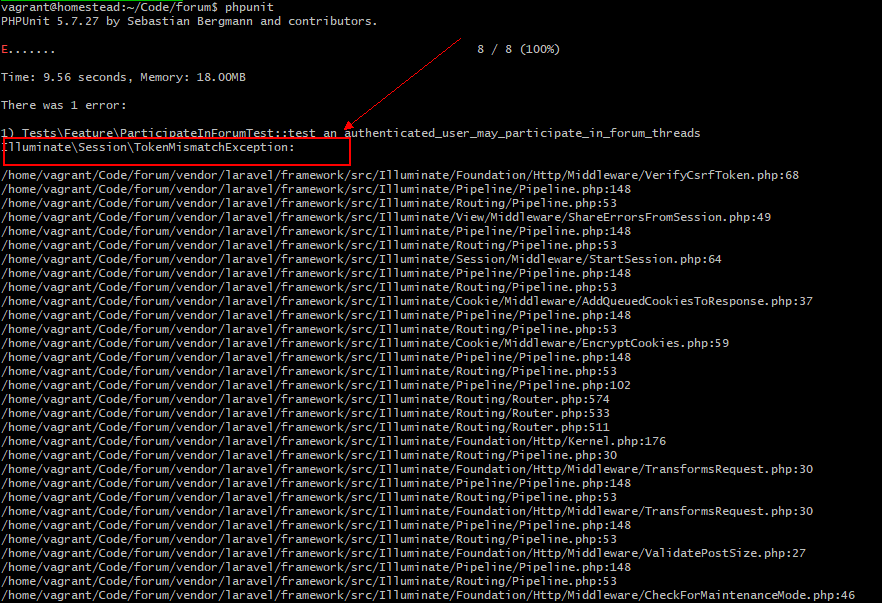
Illuminate\Session\TokenMismatchException:显示的问题应该是
CSRF令牌不符,于是定位到\vendor\laravel\framework\src\Illuminate\Foundation\Http\Middleware\VerifyCsrfToken.php的tokensMatch方法:protected function tokensMatch($request) { $token = $this->getTokenFromRequest($request); return is_string($request->session()->token()) && is_string($token) && hash_equals($request->session()->token(), $token); }发现验证的是
$token跟$request->session()->token()的值,于是将两者的值打印出来看看:protected function tokensMatch($request) { $token = $this->getTokenFromRequest($request); var_dump($token); var_dump($request->session()->token());exit; return is_string($request->session()->token()) && is_string($token) && hash_equals($request->session()->token(), $token); }运行:
$ phpunit
本以为问题就是因为$token的值是null,然而在看了文章 防范 CSRF 跨站请求伪造-以 Laravel 中间件 VerifyCSRFToken 为例 再结合代码发现,在进行测试时是不需要验证CsrfToken的:\vendor\laravel\framework\src\Illuminate\Foundation\Http\Middleware\VerifyCsrfToken.php:. . public function handle($request, Closure $next) { if ( $this->isReading($request) || $this->runningUnitTests() || $this->inExceptArray($request) || $this->tokensMatch($request) ) { return $this->addCookieToResponse($request, $next($request)); } throw new TokenMismatchException; } . .其中的第二条,
$this->runningUnitTests()即意味着在测试时应该放行。于是追溯runningUnitTests方法:protected function runningUnitTests() { return $this->app->runningInConsole() && $this->app->runningUnitTests(); }经过验证,
$this->app->runningInConsole()为true。于是接着追溯runningUnitTests方法:public function runningUnitTests() { return $this['env'] == 'testing'; }然后验证到
$this['env']的值为local,终于定位到错误:运行测试时的环境为local。令人疑惑的是,phpunit.xml的配置与教程相同,但不知为何没有生效:phpunit.xml<phpunit backupGlobals="false" backupStaticAttributes="false" bootstrap="bootstrap/autoload.php" colors="true" convertErrorsToExceptions="true" convertNoticesToExceptions="true" convertWarningsToExceptions="true" processIsolation="false" stopOnFailure="false"> <testsuites> <testsuite name="Feature"> <directory suffix="Test.php">./tests/Feature</directory> </testsuite> <testsuite name="Unit"> <directory suffix="Test.php">./tests/Unit</directory> </testsuite> </testsuites> <filter> <whitelist processUncoveredFilesFromWhitelist="true"> <directory suffix=".php">./app</directory> </whitelist> </filter> <php> <env name="APP_ENV" value="testing"/> -->此处将环境设置为 testing,但未生效 <env name="DB_CONNECTION" value="sqlite"/> <env name="DB_DATABASE" value=":memory:"/> <env name="CACHE_DRIVER" value="array"/> <env name="SESSION_DRIVER" value="array"/> <env name="QUEUE_DRIVER" value="sync"/> </php> </phpunit> -
关于
注2的说明:
先来看一下create()与make()方法的说明:/** * Create a collection of models and persist them to the database. * * @param array $attributes * @return mixed */ public function create(array $attributes = []) { $results = $this->make($attributes); if ($results instanceof Model) { $this->store(collect([$results])); } else { $this->store($results); } return $results; }/** * Create a collection of models. * * @param array $attributes * @return mixed */ public function make(array $attributes = []) { if ($this->amount === null) { return $this->makeInstance($attributes); } if ($this->amount < 1) { return (new $this->class)->newCollection(); } return (new $this->class)->newCollection(array_map(function () use ($attributes) { return $this->makeInstance($attributes); }, range(1, $this->amount))); }create()方法会得到一个实例,并将实例保存到数据库中;make()方法只会得到一个实例。在本节的测试中我们不需要保存$thread实例,因为我们会在RepliesController的store()方法进行保存,故使用make()方法。另外,
create()与make()方法的区别可以参见这篇文章 What does the make() method do in Laravel
4.写在后面
- 如有建议或意见,欢迎指出~
- 如果觉得文章写的不错,请点赞鼓励下哈,你的鼓励将是我的动力!
本作品采用《CC 协议》,转载必须注明作者和本文链接


 关于 LearnKu


推荐文章: