
CentOS7 下使用 rsync+sersync 配置文件自动同步
5 / 5 / 创建于 6年前 /
 晴空 的个人博客
为什么需要文件自动同步功能?
我们平时上传代码,可以通过ftp、sftp等将文件上传至服务器,耗时耗力,而且很容易出错。如果服务器数量少还好,一但服务器数量增加,压力可想而知。
这个时候我们可以使用各种工具进行文件同步,方法很多,这里推荐大家使用rsync+sersync进行文件同步,使用git进行版本控制,本地开发好后提交代码到线上环境,然后通过git提供的钩子自动推送代码,rsync+sersync自动监听差异化文件,同步至各个服务器(git可以使用私有git服务器、gogs、gitlab等,gogs搭建将单独写一篇博客)。
这里使用服务器A和服务器B进行介绍,我们的目的是将A服务器指定的目录自动同步到B服务器指定的目录。
使用rsync+sersync的背景故事
撸了快 3 年的 Laravel 了,尽量这周分享本人使用的多台服务器集群部署方案
配合gogos,使用 Docker 部署版本控制工具 Gogs
,实现自动化部署。
rsync介绍
rsync是linux下同步文件的一个高效算法,用于同步更新两处计算机的文件和目录,并适当利用查找文件中的不同块以减少数据传输。rsync的主要特点就是增量传输,只对变更的部分进行传输。
sersync介绍
sersync利用inotify与rsync对服务器进行实时同步,其中inotify用于监控文件系统事件,其优点是只对文件不同的部分进行操作,所以其优势大大超过使用挂接文件系统的方式进行镜像同步。
正文
关闭服务器selinux
$ vi /etc/selinux/config #编辑防火墙配置文件
#SELINUX=enforcing #注释掉
#SELINUXTYPE=targeted #注释掉
SELINUX=disabled #增加
:wq!  #保存,退出
然后重启服务器生效
B服务器安装rsync
$ yum -y install rsync
$ systemctl start rsyncd.service #启动rsync服务
$ systemctl enable rsyncd.service #将rsync服务 加入开机自启
检查是否已经成功启动,使用ps命令
$ ps -ef | grep rsync编辑B服务器rsync配置文件
$ vim /etc/rsyncd.conflog file = /var/log/rsyncd.log #日志文件位置,启动rsync后自动产生这个文件,无需提前创建
#pid file = /var/run/rsyncd.pid #pid文件的存放位置
lock file = /var/run/rsync.lock #支持max connections参数的锁文件
secrets file = /etc/rsync.pass #用户认证配置文件,里面保存用户名称和密码,后面会创建这个文件
uid = root #设置rsync运行权限为root
gid = root #设置rsync运行权限为root
use chroot = no #默认为true,修改为no,增加对目录文件软连接的备份
max connections = 1200 #最大连接数
timeout = 600 #设置超时时间
[book] #自定义名称
path = /data/book/ #rsync服务端数据目录路径
comment = book #模块名称与[book]自定义名称相同
port=873 #默认端口
read only = no #设置rsync服务端文件为读写权限
list = no #不显示rsync服务端资源列表
auth users = bookuser #执行数据同步的用户名,可以设置多个,用英文状态下逗号隔开
hosts allow = A服务器IP #允许进行数据同步的客户端IP地址,可以设置多个,用英文状态下逗号隔开
hosts deny = 192.168.0.1 #禁止数据同步的客户端IP地址,可以设置多个,用英文状态下逗号隔开创建用户认证文件
$ vi /etc/rsync.pass设置用户名和密码,用户名和密码之间以英文冒号分隔
bookuser:123456设置文件权限
$ chmod 600 /etc/rsyncd.conf  #设置文件所有者读取、写入权限
$ chmod 600 /etc/rsync.pass  #设置文件所有者读取、写入权限
重启rsync
$ systemctl restart rsyncd防火墙开启873端口
centos7默认是firewall,如果防火墙是iptable,对应更换即可
$ firewall-cmd --permanent --add-rich-rule="rule family="ipv4" source address="A服务器IP" port protocol="tcp" port="873" accept" #开放端口
$ systemctl restart firewalld #重启防火墙
$ firewall-cmd --list-all #查看规则是否生效
A服务器安装rsync
参照B服务器安装rsync
A服务器创建密码认证文件
$ vi /etc/passwd.txt  #编辑文件,添加以下内容

123456 #密码 ,B服务器里设置的密码

:wq! #保存退出

$ chmod 600 /etc/passwd.txt #设置文件权限,只设置文件所有者具有读取、写入权限即可
到此,rsync已经配置完毕
测试A、B服务器之间同步
$ rsync -avH --port=873 --progress --delete /www/data/ bookuser@B服务器IP::book --password-file=/etc/passwd.txt #在A服务器下运行如果出现连接失败,基本是端口问题,检查阿里云安全组端口是否开启\
成功的话,见下图
evernotecid://97CFF20F-9983-4C0A-BC5A-6B2E3E6658E1/appyinxiangcom/15428497/ENResource/p438
安装sersync
链接:https://pan.baidu.com/s/1GcIlOIsyM8-E1INpQ...
提取码:p0df
解压文件
$ tar zxvf sersync2.5.4_64bit_binary_stable_final.tar.gz  #解压
$ mv GNU-Linux-x86  /usr/local/sersync  #移动目录到/usr/local/sersync
修改inotify默认参数(inotify默认内核参数值太小)
$ vi /etc/sysctl.conf #添加以下代码

fs.inotify.max_queued_events=99999999
fs.inotify.max_user_watches=99999999
fs.inotify.max_user_instances=65535

:wq! #保存退出
配置sersync
$ cd  /usr/local/sersync #进入sersync安装目录
$ cp confxml.xml confxml.xml-back  #备份原文件
$ vi confxml.xml #编辑,修改下面的代码<?xml version="1.0" encoding="ISO-8859-1"?>
<head version="2.5">
<host hostip="localhost" port="8008"></host>
<debug start="false"/>
<fileSystem xfs="false"/>
<filter start="false">
<exclude expression="(.*)\.svn"></exclude>
<exclude expression="(.*)\.gz"></exclude>
<exclude expression="^info/*"></exclude>
<exclude expression="^static/*"></exclude>
</filter>
<inotify>
<delete start="true"/>
<createFolder start="true"/>
<createFile start="false"/>
<closeWrite start="true"/>
<moveFrom start="true"/>
<moveTo start="true"/>
<attrib start="false"/>
<modify start="false"/>
</inotify>
<sersync>
<localpath watch="/data/book">
<remote ip="192.168.1.200" name="book"/>
<!--<remote ip="192.168.8.40" name="tongbu"/>-->
</localpath>
<rsync>
<commonParams params="-artuz"/>
<auth start="true" users="bookuser" passwordfile="/etc/passwd.txt"/>
<userDefinedPort start="false" port="873"/><!-- port=873 -->
<timeout start="false" time="100"/><!-- timeout=100 -->
<ssh start="false"/>
</rsync>
<failLog path="/tmp/rsync_fail_log.sh"timeToExecute="60"/><!--default every 60mins execute once-->
<crontab start="true" schedule="600"><!--600mins-->
<crontabfilter start="false">
<exclude expression="*.php"></exclude>
<exclude expression="info/*"></exclude>
</crontabfilter>
</crontab>
<plugin start="false" name="command"/>
</sersync>
<plugin name="command">
<param prefix="/bin/sh" suffix="" ignoreError="true"/> <!--prefix /opt/tongbu/mmm.sh suffix-->
<filter start="false">
<include expression="(.*)\.php"/>
<include expression="(.*)\.sh"/>
</filter>
</plugin>
<plugin name="socket">
<localpath watch="/data/book">
<deshost ip="192.168.138.20" port="8009"/>
</localpath>
</plugin>
<plugin name="refreshCDN">
<localpath watch="/data0/htdocs/cms.xoyo.com/site/">
<cdninfo domainname="ccms.chinacache.com" port="80" username="xxxx" passwd="xxxx"/>
<sendurl base="http://pic.xoyo.com/cms"/>
<regexurl regex="false" match="cms.xoyo.com/site([/a-zA-Z0-9]*).xoyo.com/images"/>
</localpath>
</plugin>
</head>参数说明:
<localpath watch="/data/book">  #源服务器同步目录
<remote ip="192.168.1.200" name="book"/>
remote ip="23.225.218.182":  #目标服务器ip,每行一个
name="book":   #目标服务器rsync同步目录模块名称
<auth start="true" users="bookuser" passwordfile="/etc/passwd.txt"/>
start="true"  #设置为true,每隔600分钟执行一次全盘同步
users="bookuser": #目标服务器rsync同步用户名
passwordfile="/etc/passwd.txt": #目标服务器rsync同步用户的密码在源服务器的存放路径
failLog path="/tmp/rsync_fail_log.sh"  #脚本运行失败日志记录
手动测试运行同步命令
/usr/local/sersync/sersync2 -d -r -o /usr/local/sersync/confxml.xml运行后,命令行输出: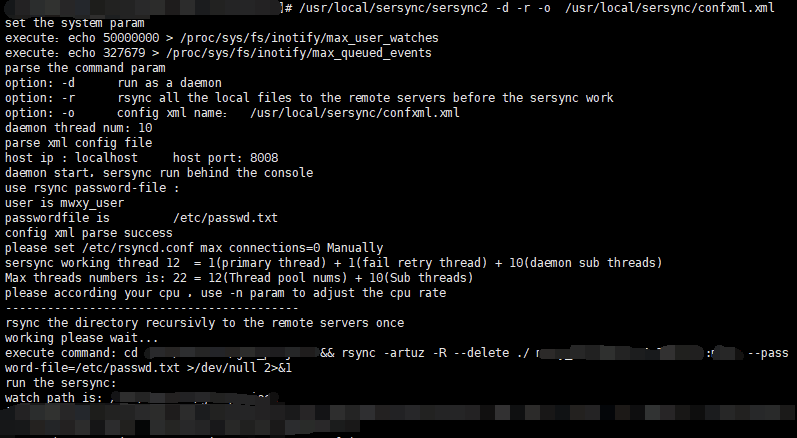
查看execute,复制代码 cd xxxx .txt 手动运行一遍,无误后,基本可以确定成功
如果修改了配置文件,需要杀掉之前的近程再运行上述代码
$ killall sersync2 #杀掉全部近程设置sersync监控开机自动执行
$ vi /etc/rc.d/rc.local  #编辑,在最后添加一行

/usr/local/sersync/sersync2 -d -r -o  /usr/local/sersync/confxml.xml  #设置开机自动运行脚本

:wq!  #保存退出
如果不起作用的话\
进入 /etc/init.d 目录,创建脚本sercync.sh\
编辑内容
#!/bin/bash
 # chkconfig: 2345 10 90
 # description: resind
 /usr/local/sersync/sersync2 -d -r -o  /usr/local/sersync/confxml.xml
然后赋予执行权限
$ chmod +x sersync.sh将脚本添加到系统服务
$ chkconfig --add sersync.sh设置开机自启动:
$ chkconfig sersync.sh至此,文件自动同步部署完成
rsync常见问题及解决办法
附录:rsync常见问题及解决办法(IP以10.10.10.10代替)
错误一:
password file must not be other-accessible
continuing without password file
Password:
rsync客户端路径是否写错,权限设置不对,需要再次输入密码,客户端和服务端的密码文件都应该是600的权限才可以

错误二:
@ERROR: Unknown module ‘bak’
rsync error: error starting client-server protocol (code 5) at main.c(1522) [receiver= 3.0.3]
服务端server的配置中的[bak]名字和客户端client的10.10.10.10::bak不符

错误三:
rsync: failed to connect to 10.10.10.10: Connection timed out (110)
rsync error: error in socket IO (code 10) at clientserver.c(124) [receiver=3.0.6]
检查服务端server服务是否正常启动,检查端口防火墙,iptables打开873端口
如果服务端是windows server则在防火墙入站规则中增加873端口
如果服务端是Linux则先检查服务是否启动#ps aux | grep rsync
然后开启873端口#iptables -A INPUT -p tcp --dport 873 -j ACCEPT开启873端口
附:
安装rsync yum install rsync
启动服务/usr/bin/rsync --daemon
启动服务错误failed to create pid file /var/rsyncd.pid: File exists
看看提示服务错误的路径(这个路径不一定就是这个,看自己的报错路径)这里是/var/rsyncd.pid所以
rm -rf /var/rsyncd.pid;再重新启动Rsync服务
此时在看一下ps aux | grep rsync启动成功

错误四:
@ERROR: access denied to gmz88down from unknown (10.10.10.10)
rsync error: error starting client-server protocol (code 5) at main.c(1503) [receiver=3.0.6]
看看是不是服务端server hosts allow限制了IP,把这里的IP加入到服务端server的hosts allow白名单中,windows rsync不能写多个allow,可以在一个allow中加多个IP,例:hosts allow=10.10.10.10 20.20.20.20

错误五:
@ERROR: chdir failed
rsync error: error starting client-server protocol (code 5) at main.c(1503) [receiver=3.0.6]
服务端server的目录不存在或者没有权限(要同步的那个文件路径),安装windows rsync时候会创建一个SvcCWRSYNC用户,这个用户对要拷贝的目录没有权限,方法一,将这个用户给权限加入到目录中,方法二,修改这个用户隶属于的组,修改后要在管理中重启服务

错误六:
rsync error: error starting clie
nt-server protocol (code 5) at main.c(1524) [Receiver= 3.0.7 ]
/etc/rsyncd.conf配置文件内容有错误,检查下配置文件

错误七:
rsync: ch
own "" failed: Invalid argument (22)
权限无法复制,去掉同步权限的参数即可

错误八:
@ERROR: auth failed on module bak
rsync error: error starting client-server protocol (code 5) at main.c(1530) [receiver=3.0.6]
密码错误或服务器上是否有bak模块

错误九:
rsync: connection unexpectedly closed (5 bytes received so far) [sender]
rsync error: error in rsync protocol data stream (code 12) at io.c(600) [sender=3.0.6]
模块read only = no设置为no false

错误十:
@ERROR: invalid uid nobody
rsync error: error starting client-server protocol (code 5) at main.c(1503) [sender=3.0.6]
设置
uid =0
gid = 0

错误十一:
rsync: failed to connect to 10.10.10.10: No route to host (113)
rsync error: error in socket IO (code 10) at clientserver.c(124) [receiver=3.0.6]
防火墙原因

错误十二:
rsync: read error: Connection reset by peer (104)
rsync error: error in rsync protocol data stream (code 12) at io.c(759) [receiver=3.0.6]
/etc/rsyncd.conf配置文件不存在

错误十三:
rsync: Failed to exec ssh: No such file or directory (2)
rsync error: error in IPC code (code 14) at pipe.c(84) [receiver=3.0.6]
rsync: connection unexpectedly closed (0 bytes received so far) [receiver]
rsync error: error in IPC code (code 14) at io.c(600) [receiver=3.0.6]
需要在客户端安装yum install -y openssh-clients即可
本作品采用《CC 协议》,转载必须注明作者和本文链接


 关于 LearnKu


推荐文章: