
Redux 入门 Demo:TodoList
0 / 0 / 创建于 6年前 /
 Ozzie 的个人博客
Demo说明
- 本次 Demo 使用了 antd 呈现样式,需要通过
npm install antd --save安装该组件库 - 在使用 Redux 之前,需要安装 redux,可以用
npm install redux --save安装
代码以及说明
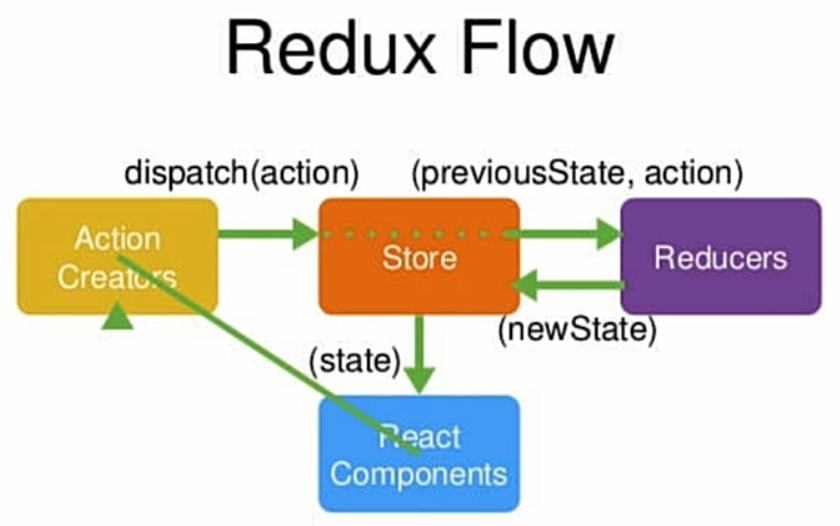
需熟记的图
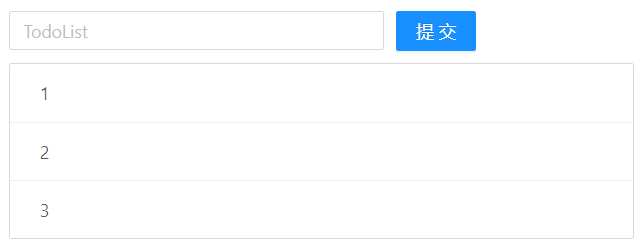
结果样式
代码
目录结构
|-src |-index.js |-TodoList.js |-store |-index.js |-reducer.js/src/index.js//渲染页面 import React from 'react' import ReactDOM from 'react-dom' //引入TodoList组件 import TodoList from './TodoList' ReactDOM.render( <TodoList />, document.getElementById('root') )/src/TodoList.js//TodoList组件 import React, { Component } from 'react' //引入store import store from './store/index' //引入antd样式 import 'antd/dist/antd.css' //按需引入输入框、按钮、列表项样式 import { Input, Button, List } from 'antd' class TodoList extends Component { constructor(props) { super(props); //通过store的getState方法获取公共数据 this.state = store.getState(); this.handleInputChange = this.handleInputChange.bind(this); this.handleStoreChange = this.handleStoreChange.bind(this); this.handleBtnClick = this.handleBtnClick.bind(this); //只要store发生改变,就立即执行handleStoreChange这个方法 store.subscribe(this.handleStoreChange); } render() { return ( <div style={{marginLeft:'30px', marginTop:'10px'}}> <div> <Input placeholder='TodoList' style={{width:'300px', marginRight:'10px'}} value={this.state.inputValue} onChange={this.handleInputChange} /> <Button type='primary' onClick={this.handleBtnClick} > 提交 </Button> </div> <List bordered style={{marginTop:'10px', width:'500px'}} dataSource={this.state.list} renderItem={ (item, index) => ( <List.Item onClick={this.handleItemDelete.bind(this, index)}> {item} </List.Item> ) } /> </div> ) } handleInputChange(e) { //触发功能:改变输入框值 const action = { //将此需求用action表达 type: 'CHANGE_INPUT_VALUE', //type即需求的描述, value: e.target.value //value是要传给sotre的值 }; store.dispatch(action); //将action传给store,store会自动将action对象的内容传给reducer }; handleStoreChange() { //得到新的state值 //用getState方法得到最新的store数据,并通知setState更新 this.setState(store.getState()) }; handleBtnClick() { //触发功能:增加列表项 const action = { type: 'ADD_LIST' }; store.dispatch(action) //传给Store }; handleItemDelete(index) { // 触发功能:删除列表项 const action = { type: 'DELETE_LIST', value: index } store.dispatch(action) //传给store } } export default TodoList;/src/store/index.js//Store部分 //从redux中引入createStore方法 import { createStore } from 'redux'; //引入Reducer import reducer from './reducer'; const store = createStore( //通过createStore()创建一个公共的数据存储仓 reducer, // 将reducer部分传递给store ); export default store;/src/store/reducer.js//Reducer部分 const defaultState = { inputValue: '', list: [1, 2, 3] }; //reducer负责管理整个store中的数据 //reducer里面必须返回一个函数,参数中的state就是整个store仓库里存储的数据 export default (state = defaultState, action) => { //state先定为defaultState if(action.type === 'changeInputValue') { //若需触发改变输入框值的功能 //深拷贝state const newState = JSON.parse(JSON.stringify(state)); //改变state的输入框值,即是改变渲染的输入框值 newState.inputValue = action.value; //由于reducer不能直接修改传递过来的state,所以通过newState返回修改的结果 // store会根据newState替换原来的state值 return newState; } if(action.type === 'addTodoItem') { //若需触发增加列表项的功能 const newState = JSON.parse(JSON.stringify(state)); //深拷贝state newState.list.push(newState.inputValue); //添加列表项 newState.inputValue = ''; //清空输入栏 return newState; } if(action.type === 'DELETE_LIST') { //若需触发删除列表项的功能 const newState = JSON.parse(JSON.stringify(state)); //深拷贝state newState.list.splice(action.value, 1); //删除列表项 return newState; } return state; }
优化
- 之前写 action 的时候,我们会发现诸多不便,比如
type很容易写错之类的,不如将 action 部分拆分出来,这会提高代码的质量,步骤如下:
新建文件:
/src/store/actionTypes.js:用来单独保存 action 的type/src/store/actionCreators.js:用来封装 action 的创建
代码:
/src/store/actionTypes.js export const CHANGE_INPUT_VALUE = 'change_input_value'; export const ADD_LIST = 'add_list'; export const DELETE_LIST = 'delete_list';/src/store/actionCreators.js import { CHANGE_INPUT_VALUE, ADD_LIST, DELETE_LIST } from './actionTypes'; export const changeInputValueAction = (value) => ({ type: CHANGE_INPUT_VALUE, value }); export const addListAction = () => ({ type: ADD_LIST }); export const deleteListAction = (index) => ({ type: DELETE_LIST, index })那么,
/src/TodoList.js可以改为:import React, { Component } from 'react'; import store from './store/index'; import 'antd/dist/antd.css'; import { Input, Button, List } from 'antd'; //引入创建的 action import { changeInputValueAction, addListAction, deleteListAction } from './store/actionCreators'; class TodoList extends Component { constructor(props) { super(props); this.state = store.getState(); this.handleInputChange = this.handleInputChange.bind(this); this.handleBtnClick = this.handleBtnClick.bind(this); this.handleStoreChange = this.handleStoreChange.bind(this); store.subscribe(this.handleStoreChange); } render() { return ( <div style={{marginLeft:'30px', marginTop:'20px'}}> <div> <Input placeholder='TodoList' style={{width:'300px', marginRight:'10px'}} value={this.state.inputValue} onChange={this.handleInputChange} /> <Button type='primary' onClick={this.handleBtnClick} > 提交 </Button> </div> <List bordered style={{marginTop:'10px', width:'500px'}} dataSource={this.state.list} renderItem={ (item, index) => ( <List.Item onClick={this.handleItemDelete.bind(this, index)}> {item} </List.Item> ) } /> </div> ) } handleInputChange(e) { //直接使用 changeInputValueAction,并传入参数 e.target.value const action = changeInputValueAction(e.target.value); store.dispatch(action); } handleBtnClick() { //直接使用 addListAction 这个 action const action = addListAction(); store.dispatch(action) } handleStoreChange() { this.setState(store.getState()) } handleItemDelete(index) { //直接使用 deleteListAction 这个 action const action = deleteListAction(index); store.dispatch(action) } } export default TodoList;
本作品采用《CC 协议》,转载必须注明作者和本文链接


 关于 LearnKu


