
关于Laravel框架中Guard的底层实现
75 / 1 / 创建于 5年前 /
 domain 的个人博客
1. 什么是Guard
在Laravel/Lumen框架中,用户的登录/注册的认证基本都已经封装好了,开箱即用。而登录/注册认证的核心就是:
- 用户的注册信息存入数据库(登记)
- 从数据库中读取数据和用户输入的对比(认证)
上述两步是登录/注册的基本,可以看到都会涉及到数据库的操作,这两步框架底层已经帮我们做好了,而且考虑到了很多情况,比如用户认证的数据表不是user表而是admin_user,认证字段是phone而不是email,等等一些问题都是Guard所要解决的,通过Guard可以指定使用哪个数据表什么字段等,Guard能非常灵活的构建一套自己的认证体系。
通俗地讲,就是这样:Guard就像是小区的门卫大叔,冷酷无情,不认人只认登记信息。进小区之前大叔需要先检查你的身份,验证不通过大叔就不让你进去。如果是走路/骑车进去,大叔1需要检查你的门禁卡,他拿出记录了小区所有业主门禁卡信息的本子查看你这个门禁卡信息有没有在这个本子上;如果你开车进去,大叔2就从记录了所有业主车牌号的本子中检查你的车牌号,所以新业主要小区了需要告知门卫大叔们你的门禁卡信息或者车牌号,要不然大叔2不让你进。如果是物业管理员要进小区,门卫大叔3也只认登记信息,管理员出示他的管理员门禁卡,门卫大叔就会检查记录了管理员门禁卡信息的本子。
上面讲的对应了框架中的多用户认证:
- 走路/骑车的人 -> 门禁卡
- 开车的人 -> 车牌号
- 物业管理员 -> 门禁卡
门禁卡和车牌号都是不同的认证方式,而门卫大叔查看的本子就对应了不同数据库中的用户信息,这样讲是不是更容易理解了。
Lumen/Laravel中以中间件(Middleware)的方式提供了非常灵活的认证,通过简单的配置就可以切换多个认证。
注:本文所讲的都是
Lumen的代码,是Laravel精简版,内部实现原理都大差不差本文所使用的是:Laravel 7.29
2. Guard工作流程
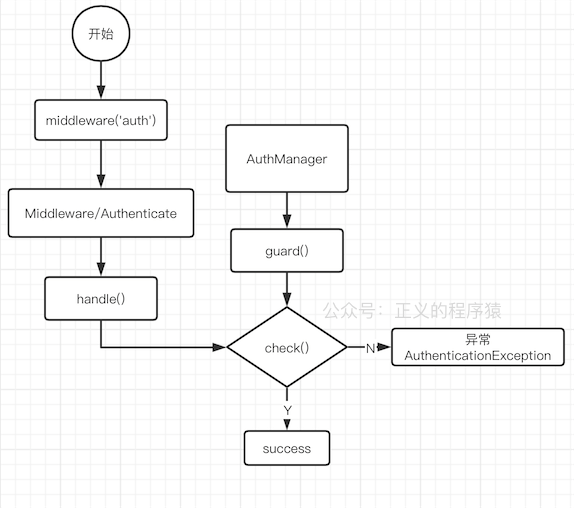
说了这么多,附上一张手工制作的流程图:

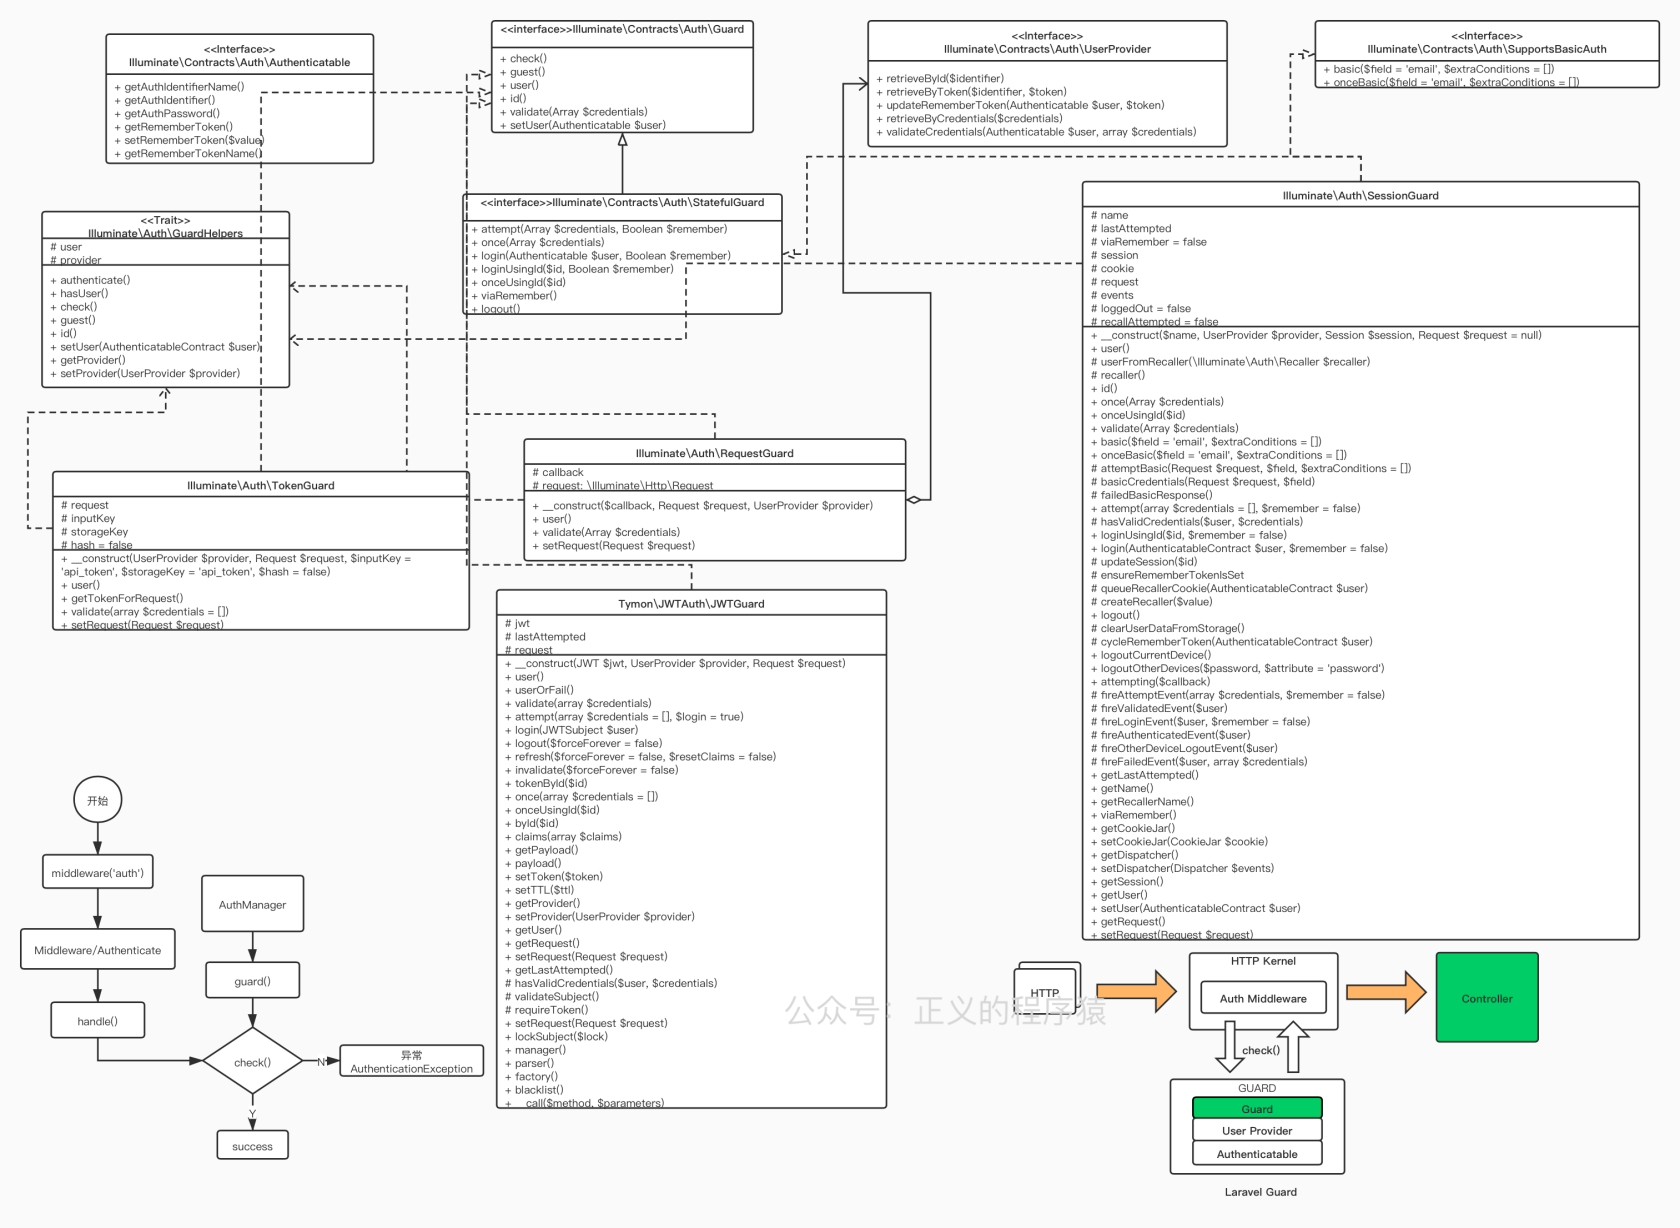
从图中可以看到,一个Guard会涉及到三个部分,分别是:
Guard实现本身User Provider用户提供者,指定哪个数据表以什么方式获取(eloquent/database)Authenticatable接口规定那些东西可以被认证,就是实现它的接口嘛
2. 从配置说起
深入底层代码之前,先从配置文件讲起。认证的配置主要在/config/auth.php中,里面可以定义各种认证的门卫大叔(guard):
// /config/auth.php

'guards' => [
  'user' => [
    'driver' => 'session',
    'provider' => 'users',
   ],
  'admin' => [
    'driver' => 'token',
    'provider' => 'admin_users',
  ],
],

'providers' => [
  'users' => [
    'driver' => 'eloquent',
    'model' => App\Models\User::class,
//    'table' => 'user'
  ],

  'admin_users' => [
    'driver' => 'eloquent',
    'model' => App\Models\AdminUser::class,
  ],
],配置中定义了两个门卫user和admin,driver字段设置门卫的认证系统,默认提供两种sessesion和token,provider定义的就是上面说的本子,保存所有的认证用户,provider下面的drive定义认证用户如何获取,有两种方式database和eloquent方式,一般都是用第二种,model定义eloquent方式使用的数据模型,如果driver是database,就要设置table指定数据库表。如果没有代码中没有指定用哪个门卫,就会使用默认的门卫大爷:
'defaults' => [
  'guard' => 'users',
  'passwords' => 'users',
],
3. 使用Guard例子
我们以Laravel中auth中间件例子来简单说一下:
Route::get('/user/profile', 'UserController@profile')->middleware('auth');4. 分析
当发起/user/profile这个请求时,在进入UserController::profile方法前,会调用auth中间件,auth定义在\app\Http\Kernel.php中:
// \app\Http\Kernel.php

protected $routeMiddleware = [
  'auth' => \App\Http\Middleware\Authenticate::class,
  'auth.basic' => \Illuminate\Auth\Middleware\AuthenticateWithBasicAuth::class,
  'bindings' => \Illuminate\Routing\Middleware\SubstituteBindings::class,
  'cache.headers' => \Illuminate\Http\Middleware\SetCacheHeaders::class,
  ...
];对应处理脚本是\App\Http\Middleware\Authenticate::class,
// \app\Http\Middleware\Authenticate.php

/**
* Handle an incoming request.
*
* @param  \Illuminate\Http\Request  $request
* @param  \Closure  $next
* @param  string[]  ...$guards
* @return mixed
*
* @throws \Illuminate\Auth\AuthenticationException
*/
public function handle($request, Closure $next, ...$guards)
{
  $this->authenticate($request, $guards);

  return $next($request);
}Laravel中中间件的处理入口都是handle方法,参数中会一数组形式传过来多个使用的guard,比如这样:
Route::get('/user/profile', 'UserController@profile')->middleware('auth:session,foo,bar');middleware()中冒号前后分别是中间件和参数。
handle方法很简单嘛,就是调用了authenticate():
// \Illuminate\Auth\Middleware\Authenticate.php

/**
* Determine if the user is logged in to any of the given guards.
*
* @param  \Illuminate\Http\Request  $request
* @param  array  $guards
* @return void
*
* @throws \Illuminate\Auth\AuthenticationException
*/
protected function authenticate($request, array $guards)
{
  if (empty($guards)) {
    $guards = [null];
  }

  foreach ($guards as $guard) {
    if ($this->auth->guard($guard)->check()) {
      return $this->auth->shouldUse($guard);
    }
  }

  $this->unauthenticated($request, $guards);
}authenticate()方法遍历传过来的guard,然后check(),只要满足其中一个,就直接返回,否则就会抛出AuthenticationException异常。
⚠️注意
$this->auth->guard($guard)->check()这个是关键,它是通过在auth属性上链式调用的,我们来一步一步分析下:
// \Illuminate\Auth\Middleware\Authenticate.php

namespace Illuminate\Auth\Middleware;

use Closure;
use Illuminate\Auth\AuthenticationException;
use Illuminate\Contracts\Auth\Factory as Auth;
use Illuminate\Contracts\Auth\Middleware\AuthenticatesRequests;

class Authenticate implements AuthenticatesRequests
{
    /**
     * The authentication factory instance.
     *
     * @var \Illuminate\Contracts\Auth\Factory
     */
    protected $auth;

    /**
     * Create a new middleware instance.
     *
     * @param  \Illuminate\Contracts\Auth\Factory  $auth
     * @return void
     */
    public function __construct(Auth $auth)
    {
        $this->auth = $auth;
    }

  ...
}这里的$auth其实是\Illuminate\Contracts\Auth\Factory接口的一个实例,通过构造函数注入进来,通过dd($this->auth)方式发现这个其实就是Illuminate\Auth\AuthManager实例,它实现了Illuminate\Contracts\Auth\Factory接口:
// \Illuminate\Contracts\Auth\Factory.php

namespace Illuminate\Contracts\Auth;

interface Factory
{
    /**
     * Get a guard instance by name.
     *
     * @param  string|null  $name
     * @return \Illuminate\Contracts\Auth\Guard|\Illuminate\Contracts\Auth\StatefulGuard
     */
    public function guard($name = null);

    /**
     * Set the default guard the factory should serve.
     *
     * @param  string  $name
     * @return void
     */
    public function shouldUse($name);
}这个接口有guard()方法,所以上面可以直接链式调用。
通过接口定义的声明,我们可以知道guard()返回\Illuminate\Contracts\Auth\Guard或者\Illuminate\Contracts\Auth\StatefulGuard这两个接口,具体在AuthManager中的实现是这样的:
// \Illuminate\Auth\AuthManager.php

/**
* Attempt to get the guard from the local cache.
*
* @param  string|null  $name
* @return \Illuminate\Contracts\Auth\Guard|\Illuminate\Contracts\Auth\StatefulGuard
*/
public function guard($name = null)
{
  $name = $name ?: $this->getDefaultDriver();

  return $this->guards[$name] ?? $this->guards[$name] = $this->resolve($name);
}通过我们在middleware()中传过来的参数创建对应的guard实例,没有就是默认driver对应的guard,最后check()。
这节最后讲一下
AuthManager是什么时候创建的?
Laravel框架初始化时,很多服务都是以服务提供者(ServiceProvider)的形式创建的,AuthManager就是AuthServiceProvider创建的:
// \Illuminate\Auth\AuthServiceProvider.php

namespace Illuminate\Auth;

class AuthServiceProvider extends ServiceProvider
{
    /**
     * Register the service provider.
     *
     * @return void
     */
    public function register()
    {
      $this->registerAuthenticator();
      ....
    }

    /**
     * Register the authenticator services.
     *
     * @return void
     */
    protected function registerAuthenticator()
    {
      $this->app->singleton('auth', function ($app) {
        // Once the authentication service has actually been requested by the developer
        // we will set a variable in the application indicating such. This helps us
        // know that we need to set any queued cookies in the after event later.
        $app['auth.loaded'] = true;

        return new AuthManager($app);
      });

      ....
    }

  ....
}AuthServiceProvider中在注册时调用registerAuthenticator(),创建auth单例指向AuthManager实例。
通过上面的一波分析,我们知道guard的创建是受AuthManager管理的,AuthManager在这里的指责就是解析driver并创建guard。
所以现在整个middleware('auth')的流程大致如下:
5. Guard接口
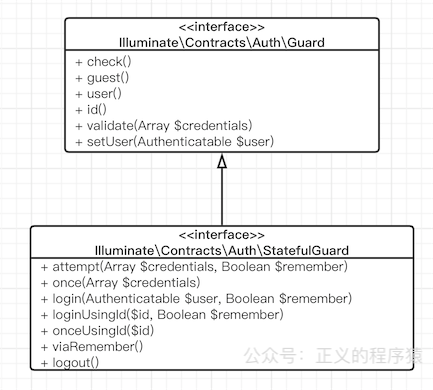
上面说到AuthManager创建了guard,然后调用check(),我先现在来分析下Guard。还是那句话,不管上层业务代码多么复杂,底层的接口往往是很简单的。Lumen/Laravel框架中大部分接口被设计成是一种契约(Contracts),Guard也一样的,它的代码在\vendor\illuminate\contracts\Auth\Guard.php文件中,只有6个方法:
// \Illuminate\Contracts\Auth\Guard.php

namespace Illuminate\Contracts\Auth;

interface Guard
{
  // 判断当前用户是否登录
  public function check();
  // 判断当前用户是否是游客(未登录)
  public function guest();
  // 获取当前认证的用户
  public function user();
  // 获取当前认证用户的 id,严格来说不一定是 id,应该是这个模型中的主键字段
  public function id();
  // 用户验证
  public function validate(array $credentials = []);
  // 设置当前认证过的用户
  public function setUser(Authenticatable $user);
}很简单,有木有~同样,还有一个StatefulGuard接口,继承自Guard接口并加了几个有状态的方法,代表有状态,就是每次请求都带有用户的状态信息比如session,代码如下:
// Illuminate\Contracts\Auth\StatefulGuard.php

namespace Illuminate\Contracts\Auth;

interface StatefulGuard extends Guard
{
  // 指定数据验证
  public function attempt(array $credentials = [], $remember = false);
  // 将这一次request验证通过登录,不会保存session/cookie
  public function once(array $credentials = []);
  // 登录
  public function login(Authenticatable $user, $remember = false);
  // 使用id登录
  public function loginUsingId($id, $remember = false);
  // 和once()一样,不过是用id
  public function onceUsingId($id);
  // 通过remember cookie登录
  public function viaRemember();
  // 注销
  public function logout();
}UML图大致如下:
6. Guard接口的相关实现
底层接口着实简单,再来分析下上层的实现代码,框架中默认实现了几个Guard,比如Web开发用到的SessionGuard,接口开发用到的TokenGuard,这些都实现自\Illuminate\Contracts\Auth或者\Illuminate\Contracts\Auth\StatefulGuard,已经满足我们日常所需了。
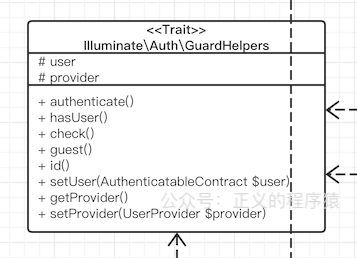
几个Guard的check()方法都是一样的,都定义在GuardHelpers这个Trait中:
// \Illuminate\Auth\GuardHelpers.php

/**
* Determine if the current user is authenticated.
*
* @return bool
*/
public function check()
{
  return ! is_null($this->user());
}user()就是在不同的Guard中实现了,后面也主要看这个方法。
什么是Trait:
你可以理解成一系列方法的集合,就是把经常使用到的重复方法整合起来,在class里面直接use使用,上下文还是引用它的那个class,减少了重复代码量,而且比class更轻量,不需要new在使用。
6.1 RequestGuard.php
RequestGuard认证一个http请求,具体怎么认证,它是通过callback实现的,认证逻辑在callback中直接放到了上层让用户自定义,UML图:
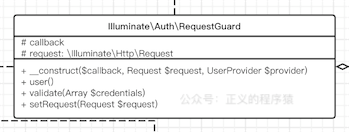
看代码实现也很简单:
// \Illuminate\Auth\RequestGuard.php

/**
* Get the currently authenticated user.
*
* @return \Illuminate\Contracts\Auth\Authenticatable|null
*/
public function user()
{
  // If we've already retrieved the user for the current request we can just
  // return it back immediately. We do not want to fetch the user data on
  // every call to this method because that would be tremendously slow.
  if (! is_null($this->user)) {
    return $this->user;
  }

  return $this->user = call_user_func(
    $this->callback, $this->request, $this->getProvider()
  );
}RequestGuard很多文章都是一笔带过,这里我说一下,通常我们使用不到RequestGuard,只有在自定义Guard时才用得上。
使用方式如下
AuthServiceProvider中注册自定义的guard,设置名称和callback:
// App\Providers\AuthServiceProvider.php

use App\User;
use Illuminate\Http\Request;
use Illuminate\Support\Facades\Auth;

/**
 * Register any application authentication / authorization services.
 *
 * @return void
 */
public function boot()
{
    $this->registerPolicies();

    Auth::viaRequest('custom-token', function ($request) {
        return User::where('my-token', $request->my_token)->first();
    });
}auth.php中配置自定义guard
'guards' => [
    'my-api' => [
        'driver' => 'custom-token',
    ],
],- 使用
还是上面的例子:
Route::get('/user/profile', 'UserController@profile')->middleware('auth:my-api');最后在认证的时候就会直接使用我们设置的callback了。
上面viaRequest()也是定义AuthManager中:
// \Illuminate\Auth\AuthManager.php

/**
* Register a new callback based request guard.
*
* @param  string  $driver
* @param  callable  $callback
* @return $this
*/
public function viaRequest($driver, callable $callback)
{
  return $this->extend($driver, function () use ($callback) {
    $guard = new RequestGuard($callback, $this->app['request'], $this->createUserProvider());

    $this->app->refresh('request', $guard, 'setRequest');

    return $guard;
  });
}
6.2 SessionGuard
见名知义,此guard是基于session的,一般最常用的就是这个了。由于是基于session所以是有状态的,所以这个类定义的时候实现了StatefulGuard接口,而且加了更多逻辑代码和注释加起来有800+行,
// \Illuminate\Auth\SessionGuard.php

namespace Illuminate\Auth;

use Illuminate\Contracts\Auth\StatefulGuard;
use Illuminate\Contracts\Auth\SupportsBasicAuth;

class SessionGuard implements StatefulGuard, SupportsBasicAuth
{
  ...
}UML图:
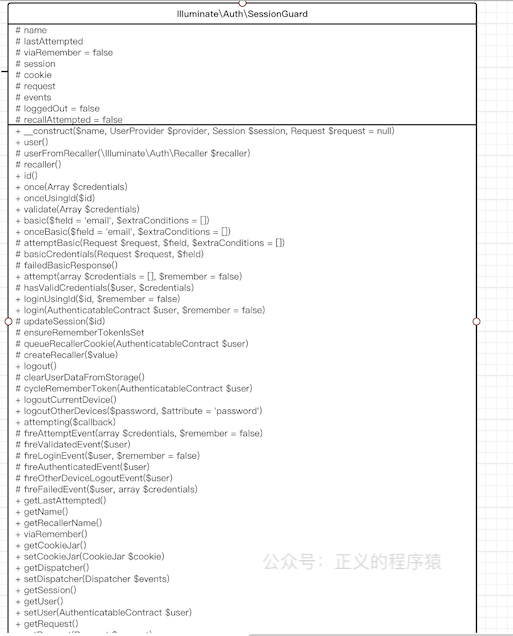
用户认证的代码稍微复杂一点,如下:
// \Illuminate\Auth\SessionGuard.php

/**
* Get the currently authenticated user.
*
* @return \Illuminate\Contracts\Auth\Authenticatable|null
*/
public function user()
{
  if ($this->loggedOut) {
    return;
  }

  // If we've already retrieved the user for the current request we can just
  // return it back immediately. We do not want to fetch the user data on
  // every call to this method because that would be tremendously slow.
  if (! is_null($this->user)) {
    return $this->user;
  }

  $id = $this->session->get($this->getName());

  // First we will try to load the user using the identifier in the session if
  // one exists. Otherwise we will check for a "remember me" cookie in this
  // request, and if one exists, attempt to retrieve the user using that.
  if (! is_null($id) && $this->user = $this->provider->retrieveById($id)) {
    $this->fireAuthenticatedEvent($this->user);
  }

  // If the user is null, but we decrypt a "recaller" cookie we can attempt to
  // pull the user data on that cookie which serves as a remember cookie on
  // the application. Once we have a user we can return it to the caller.
  if (is_null($this->user) && ! is_null($recaller = $this->recaller())) {
    $this->user = $this->userFromRecaller($recaller);

    if ($this->user) {
      $this->updateSession($this->user->getAuthIdentifier());

      $this->fireLoginEvent($this->user, true);
    }
  }

  return $this->user;
}梳理下,大致是先从session获取用户的主键id,然后通过特定的UserProvider查找用户,查找成功说明验证成功,如果没有,就用recaller查询用户,这里就是remember token查找,就是登录时“记住我”的那个选项,remember token是保存在cookie当中的,如果remember token查找成功,就说明验证成功,否则验证失败。
6.3 TokenGuard
TokenGuard也实现了Guard接口,适用于无状态的api认证,UML图:
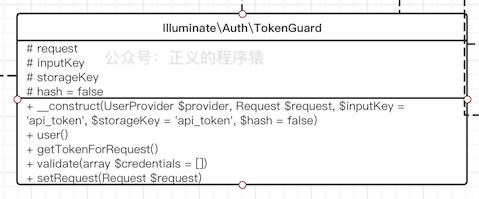
由于不要维护状态整个代码就简单很多:
// \Illuminate\Auth\TokenGuard.php

namespace Illuminate\Auth;

use Illuminate\Contracts\Auth\Guard;
use Illuminate\Contracts\Auth\UserProvider;
use Illuminate\Http\Request;

class TokenGuard implements Guard
{
  ...

  /**
  * Get the currently authenticated user.
  *
  * @return \Illuminate\Contracts\Auth\Authenticatable|null
  */
  public function user()
  {
    // If we've already retrieved the user for the current request we can just
    // return it back immediately. We do not want to fetch the user data on
    // every call to this method because that would be tremendously slow.
    if (! is_null($this->user)) {
      return $this->user;
    }

    $user = null;

    $token = $this->getTokenForRequest();

    if (! empty($token)) {
      $user = $this->provider->retrieveByCredentials([
        $this->storageKey => $this->hash ? hash('sha256', $token) : $token,
      ]);
    }

    return $this->user = $user;
  }

  ...
}先从请求中获取api_token,再用api_token从指定的UserProvider查找api_token对应的用户信息。
至此,Laravel中Guard相关的分析已经差不多了,通过分析它的源码,我们深入了解了框架背后的思想,梳理的过程也是学习的过程,对新手而言能快速掌握guard的相关知识并快速上手,对老鸟而言,我觉得这篇文章写的已经很细了,能更好地了解框架背后的精髓写出更优雅的代码。
总结
在深入学习Guard源码后,了解到底层归纳为两个核心,一是UserProvider,认证用户数据来源,通常是本地数据库,二是认证逻辑,逻辑这块主要就是Guard来做了。对于自定义Guard,上面也稍微讲了一点,通过AuthManager的viaRequest来做,对于用户数据源我们也不必拘泥于现有的,我们也可以将数据源指向redis或者远程接口,只要实现相关接口,比如这样:
namespace app\Providers;


use Illuminate\Contracts\Auth\Authenticatable;
use Illuminate\Contracts\Auth\UserProvider;

class RedisUserProvider implements UserProvider
{

    /**
     * Retrieve a user by their unique identifier.
     *
     * @param  mixed $identifier
     * @return \Illuminate\Contracts\Auth\Authenticatable|null
     */
    public function retrieveById($identifier)
    {
        // TODO: 通过id取redis中对应的用户
    }

    ....
}
也可以从远程接口获取:
class ApiUserProvider implements UserProvider
{

    /**
     * Retrieve a user by their unique identifier.
     *
     * @param  mixed $identifier
     * @return \Illuminate\Contracts\Auth\Authenticatable|null
     */
    public function retrieveById($identifier)
    {
        // TODO: 通过id构造curl请求结果
    }
}最后,附上一张我在学习过程中总结的UML图:
文章如果有误,还请大家指正。
本作品采用《CC 协议》,转载必须注明作者和本文链接


 关于 LearnKu


推荐文章: