
 Administrator 开发文档
主配置文件
文档尚未来得及翻译,欢迎以改进的方式提交译文。
Configuration
Introduction
Once the package is installed, you can publish the config file with:
Laravel 5
php artisan vendor:publish --provider='Frozennode\Administrator\AdministratorServiceProvider'Laravel 4
php artisan config:publish frozennode/administratorThis will create the file app/config/packages/frozennode/administrator/administrator.php and seed it with some defaults. This config file is the primary way you interact with Administrator.
If you've installed the Laravel 3 bundle, you can either edit the bundles/administrator/config/administrator.php file directly, or you can create an administrator.php at application/config.
All of the configuration options are used, but not all of them must be supplied.
Options
Below is a list of all the available options:
- Uri
- Domain
- Title
- Model Config Path
- Settings Config Path
- Menu
- Permission
- Use Dashboard
- Dashboard View
- Home Page
- Back To Site Path
- Login Path
- Logout Path
- Redirect Key
- Global Rows Per Page
- Locales
Uri
/**
 * Package URI
 *
 * @type string
 */
'uri' => 'admin',
This is the base route for the administrator package to be called on.
Domain
/**
 * Page domain
 *
 * @type string
 */
'domain' => '',
This is the base domain for the administrator route. This can allow you to lock down the admin to just a certain domain/subdomain.
Title
/**
 * Page title
 *
 * @type string
 */
'title' => 'Admin',
This is the title of the administrative interface displayed to the user at the top left of the page.
Model Config Path
/**
 * The path to your model config directory
 *
 * @type string
 */
'model_config_path' => app('path') . '/config/administrator',
This is the directory location of your application's model config files. It's recommended to use a subdirectory of your application config called administrator, but you can put it anywhere you like.
Settings Config Path
/**
 * The path to your settings config directory
 *
 * @type string
 */
'settings_config_path' => app('path') . '/config/administrator/settings',
This is the directory location of your application's settings config files. If you want to create settings pages for your admins, you'll store each settings config file in the path above. As with the model_config_path, it's up to you how to organize this. The recommended approach is above, but you may just find a more sensible way to organize your config directories.
Menu
/**
* The menu structure of the site. For models, you should either supply the name of a model config file or an array of names of model config
* files. The same applies to settings config files, except you must prepend 'settings.' to the settings config file name. You can also add
* custom pages by prepending a view path with 'page.'. By providing an array of names, you can group certain models or settings pages
* together. Each name needs to either have a config file in your model config path, settings config path with the same name, or a path to a
* fully-qualified Laravel view. So 'users' would require a 'users.php' file in your model config path, 'settings.site' would require a
* 'site.php' file in your settings config path, and 'page.foo.test' would require a 'test.php' or 'test.blade.php' file in a 'foo' directory
* inside your view directory.
*
* @type array
*
* array(
* 'E-Commerce' => array('collections', 'products', 'product_images', 'orders'),
* 'homepage_sliders',
* 'users',
* 'roles',
* 'colors',
* 'Settings' => array('settings.site', 'settings.ecommerce', 'settings.social'),
* 'Analytics' => array('E-Commerce' => 'page.ecommerce.analytics'),
* )
*/
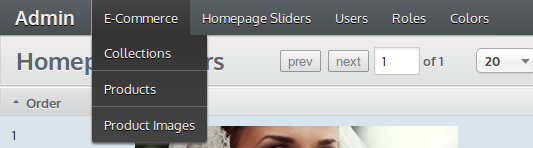
'menu' => array(),The menu option is where you set the menu structure of the site. If you don't want any submenus, simply provide the name of your model or settings config file. The value has to be exactly equal (if you're using Linux, that means case-sensitive) to the name of the model or settings config php file.
So in the above example, there would need to be (in the directory you specified in the model_config_path), config files called collections.php, orders.php, products.php, product_images.php, users.php, roles.php, and colors.php.
There would also need to be (in the directory you specified in the settings_config_path), config files called site.php, ecommerce.php, and social.php.
You can also specify custom view pages that preserve the header navigation of Administrator, but give you complete control over the content section. For these you simply need to prefix page. to your view path and pass that to the menu array. You can use view composers to add JS or CSS assets to your custom page:
View::composer(array('administrator::layouts.default'), function($view)
{
    //first check if this is a custom page
    if ($view->page === 'ecommerce.analytics')
    {
        //add page-specific assets
        $view->js += array(
            'highcharts' => '/path/to/highcharts.js'
        );

        $view->css += array(
            'mycss' => '/path/to/my.css'
        );
    }
});
If you want to have a submenu, instead of passing in a string, pass in an array of strings. The index of this slot will be the submenu's title in the UI. Submenus can themselves have submenus and there is no depth limit.
For a detailed description of all the model configuration options, see the model configuration docs
For a detailed description of all the settings configuration options, see the settings configuration docs
Permission
/**
 * The permission option is the highest-level authentication check that lets you define a closure that should return true if the current user
 * is allowed to view the admin section. Any "falsey" response will send the user back to the 'login_path' defined below.
 *
 * @type closure
 */
'permission'=> function()
{
    return Auth::check();
},
The permission option lets you define a closure that determines whether or not the current user can access all of Administrator. You can also define per-model permissions in each model's config. A user will only be given access if this resolves to a truthy value. If this fails, the user will be redirected to the login_path.
Use Dashboard
/**
 * This determines if you will have a dashboard (whose view you provide in the dashboard_view option) or a non-dashboard home
 * page (whose menu item you provide in the home_page option)
 *
 * @type bool
 */
'use_dashboard' => false,
Administrator doesn't pretend that it can solve all of your dashboard needs. Sometimes it makes sense to have a bunch of widget-type modules in a dashboard, sometimes it makes sense to have a bunch of buttons, and other times it doesn't make any sense to even have a dashboard. There are two general options: you can either create a dashboard view in your application where you can set up the dashboard however you like, or you can use a location from the menu option as your general "home" page.
If you set use_dashboard to true, it will look for the value in the dashboard_view option below and load that view into the Administrator content area.
If you set use_dashboard to false, it will look for the value in the home_page option below and load up that page when a user goes to the Administrator home.
In either case, if the value (either the view or the menu item) can't be found, an error will be raised.
Dashboard View
/**
 * If you want to create a dashboard view, provide the view string here.
 *
 * @type string
 */
'dashboard_view' => 'administrator.dashboard',
If the use_dashboard option is set to true, Administrator will attempt to load up this view into the Administrator content area. You can set this up however you like, and by using View Composers, you can insert any data into this view that you need.
Home Page
/**
 * The menu item that should be used as the default landing page of the administrative section
 *
 * @type string
 */
'home_page' => 'products',
If the use_dashboard option is set to false, Administrator will redirect the user to the above page when they visit the Administrator base URL. This must match an item in the menu option.
Back To Site Path
/**
 * The route to which the user will be taken when they click the "back to site" button
 *
 * @type string
 */
'back_to_site_path' => '/',
Provide any value that would work with Laravel's URL::to() method.
Login Path
/**
 * This is the path where Administrator will send the user if they fail the permission check
 *
 * @type string
 */
'login_path' => 'user/login',
Provide any value that would work with Laravel's URL::to() method.
Logout Path
/**
* The logout path is the path where Administrator will send the user when they click the logout link
*
* @type string
*/
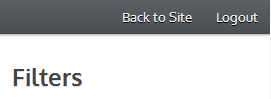
'logout_path' => URL::route('logout'),If you would like to give your administrative users the option to log out from the admin interface, you can specify a string logout_path. When provided, an anchor will show up at the top right of the screen that will send the user to your specified path. By default, the logout_path option is set to false.
Redirect Key
/**
 * The input key of the return url sent to the login_path. You can get this by doing Input::get('redirect')
 *
 * @type string
 */
'login_redirect_key' => 'redirect',
When a user is redirected to the login_path, the redirect path is sent with them. This option lets you define the key. Using the above as an example, you would retrieve the redirect url by doing Session::get('redirect').
Global Rows Per Page
/**
 * This is the fallback value to use if the user hasn't set a custom rows per page in a model
 *
 * @type NULL|int
 */
'global_rows_per_page' => 20,
Your admin users have the ability to set the rows per page in each model with this dropdown:
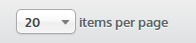
This is persistent across page loads until the user's session expires. The global_rows_per_page option is the default value for when the user hasn't yet set the number they want for any particular model.
Locales
/**
 * An array of available locale strings. This determines which locales are available in the languages menu at the top right of the Administrator
 * interface.
 *
 * @type array
 */
'locales' => array('en', 'de', 'tr'),
When provided, this array of locale strings gives the administrative user the choice of various locales in the locales menu at the top right of the Administrator interface:

The user's choice of locale will persist across page loads until a user's session expires.


 关于 LearnKu


推荐文章: