
使用 Flask 和 ChatterBot 构建聊天机器人
机器人很酷,你可以通过终端交谈。 今天,让我们使用 Flask 做一个机器人。
我们将使用 ChatterBot 创建聊天机器人,这是一个机器学习、会话对话引擎。
这是我上一篇文章的 入口。
安装 ChatterBot
$ pip install ChatterBot
安装 Flask
$ pip install Flask
创建一个文件
app.py
# 导入 文件
from flask import Flask, render_template, request
from chatterbot import ChatBot
from chatterbot.trainers import ChatterBotCorpusTrainer
from chatterbot.trainers import ListTrainer
创建一个 Flask 应用:
app = Flask(__name__)
正如我们在我的上一篇文章中所见上一篇。
bot = ChatBot("Candice")
bot.set_trainer(ListTrainer)
bot.set_trainer(ChatterBotCorpusTrainer)
bot.train("chatterbot.corpus.english")
在此之后:
@app.route("/")
def home():
    return render_template("home.html")
@app.route("/get")
def get_bot_response():
    userText = request.args.get('msg')
    return str(bot.get_response(userText))
if __name__ == "__main__":
    app.run()
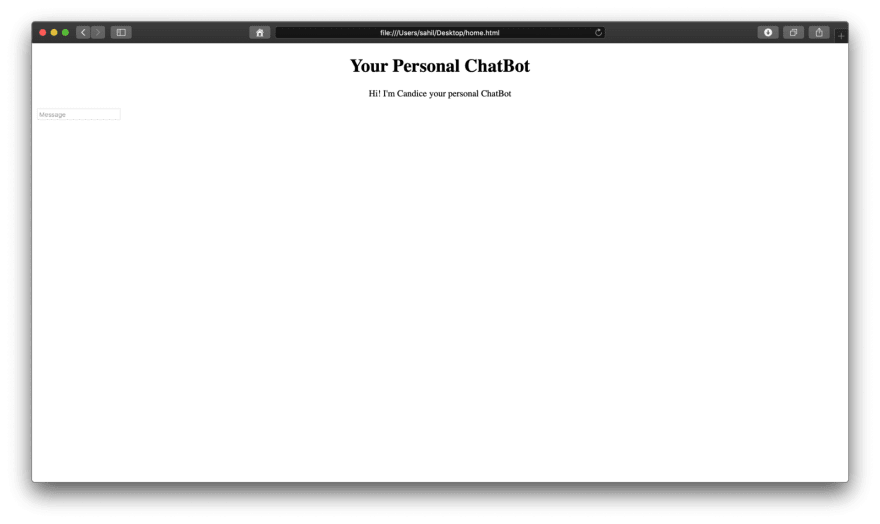
因此,正如我们所看到的,我们需要创建一个home.html 文件作为前端。
创建一个文件夹 templates,并在其中创建文件 home.html。
templates/home.html
打开 home.html:
  <!DOCTYPE html>
<html>
  <title>Candice</title>
  <body>
    <center>
      <h1>
        Your Personal ChatBot
      </h1>
    </center>
      <div>
       <p>
          <center><span>Hi! I'm Candice your personal ChatBot</span></center>
          </p>
       </div>
       <div id="userInput">
          <input id="textInput" type="text" name="msg" placeholder="Message" />
       </div>
  </body>
</html>
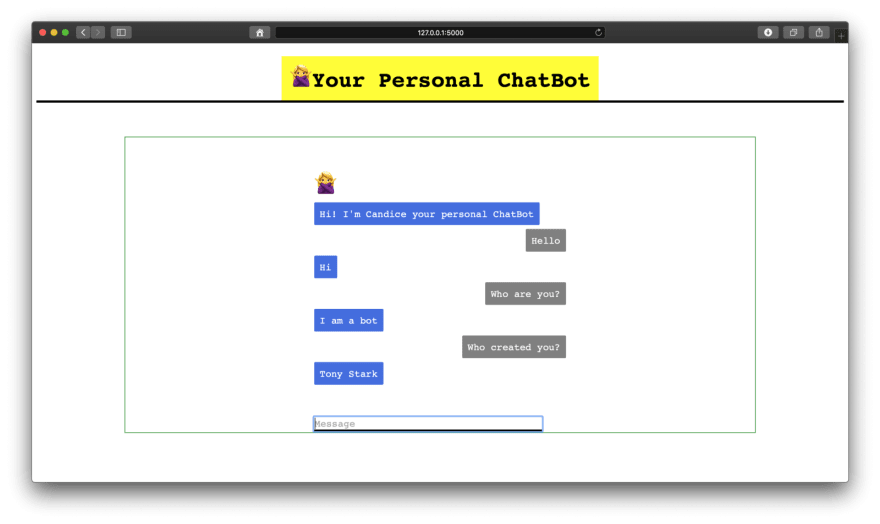
因此,这只是一个基本结构,让我们添加一些CSS。我们不会为CSS创建另一个文件,我们只是在home.html 中添加样式。
<head>
    <link
      rel="shortcut icon"
      type="image/x-icon"
      href="https://user-images.githubusercontent.com/20112458/49326597-773b7280-f57a-11e8-853d-20ed61d18b0d.png"
    />
    <script src="https://ajax.googleapis.com/ajax/libs/jquery/3.2.1/jquery.min.js"></script>
    <style>
      body {
        font-family: monospace;
      }
      h1 {
        background-color: yellow;
        display: inline-block;
        font-size: 3em;
        margin: 0;
        padding: 14px;
      }
      h3 {
        color: black;
        font-size: 20px;
        margin-top: 3px;
        text-align: center;
      }
      #chatbox {
        margin-left: auto;
        margin-right: auto;
        width: 40%;
        margin-top: 60px;
      }
      #userInput {
        margin-left: auto;
        margin-right: auto;
        width: 40%;
        margin-top: 60px;
      }
      #textInput {
        width: 90%;
        border: none;
        border-bottom: 3px solid black;
        font-family: monospace;
        font-size: 17px;
      }
      .userText {
        color: white;
        font-family: monospace;
        font-size: 17px;
        text-align: right;
        line-height: 30px;
      }
      .userText span {
        background-color: #808080;
        padding: 10px;
        border-radius: 2px;
      }
      .botText {
        color: white;
        font-family: monospace;
        font-size: 17px;
        text-align: left;
        line-height: 30px;
      }
      .botText span {
        background-color: #4169e1;
        padding: 10px;
        border-radius: 2px;
      }
      #tidbit {
        position: absolute;
        bottom: 0;
        right: 0;
        width: 300px;
      }
      .boxed {
        margin-left: auto;
        margin-right: auto;
        width: 78%;
        margin-top: 60px;
        border: 1px solid green;
      }
      .box {
        border: 2px solid black;
      }
    </style>
</head>
现在,在此之后,我们更改 body 结构。
<body>
    <center>
      <h1>
        <img
          src="https://user-images.githubusercontent.com/20112458/49326597-773b7280-f57a-11e8-853d-20ed61d18b0d.png"
          alt="CANDICE"
          style="width:40px;height:40px;"
        />Your Personal ChatBot
      </h1>
    </center>
<div class="box"></div>
    <div class="boxed">
      <div>
        <div id="chatbox">
          <img
            src="https://user-images.githubusercontent.com/20112458/49326597-773b7280-f57a-11e8-853d-20ed61d18b0d.png"
            alt="CANDICE"
            style="width:40px;height:40px;"
          />
          <p class="botText">
            <span>Hi! I'm Candice your personal ChatBot</span>
          </p>
        </div>
        <div id="userInput">
          <input id="textInput" type="text" name="msg" placeholder="Message" />
        </div>
      </div>
    </div>
  </body>

现在,如果我们键入任何内容,将不会发生任何事情。因此,让我们添加一些 js 代码。
<script>
        function getBotResponse() {
          var rawText = $("#textInput").val();
          var userHtml = '<p class="userText"><span>' + rawText + "</span></p>";
          $("#textInput").val("");
          $("#chatbox").append(userHtml);
          document
            .getElementById("userInput")
            .scrollIntoView({ block: "start", behavior: "smooth" });
          $.get("/get", { msg: rawText }).done(function(data) {
            var botHtml = '<p class="botText"><span>' + data + "</span></p>";
            $("#chatbox").append(botHtml);
            document
              .getElementById("userInput")
              .scrollIntoView({ block: "start", behavior: "smooth" });
          });
        }
        $("#textInput").keypress(function(e) {
          if (e.which == 13) {
            getBotResponse();
          }
        });
</script>
现在,您将看到您写的任何内容都将显示在ChatBox上,但您的聊天机器人将不会给出任何答复。
先让我们运行一下机器人🤖app.py:
$ python app.py
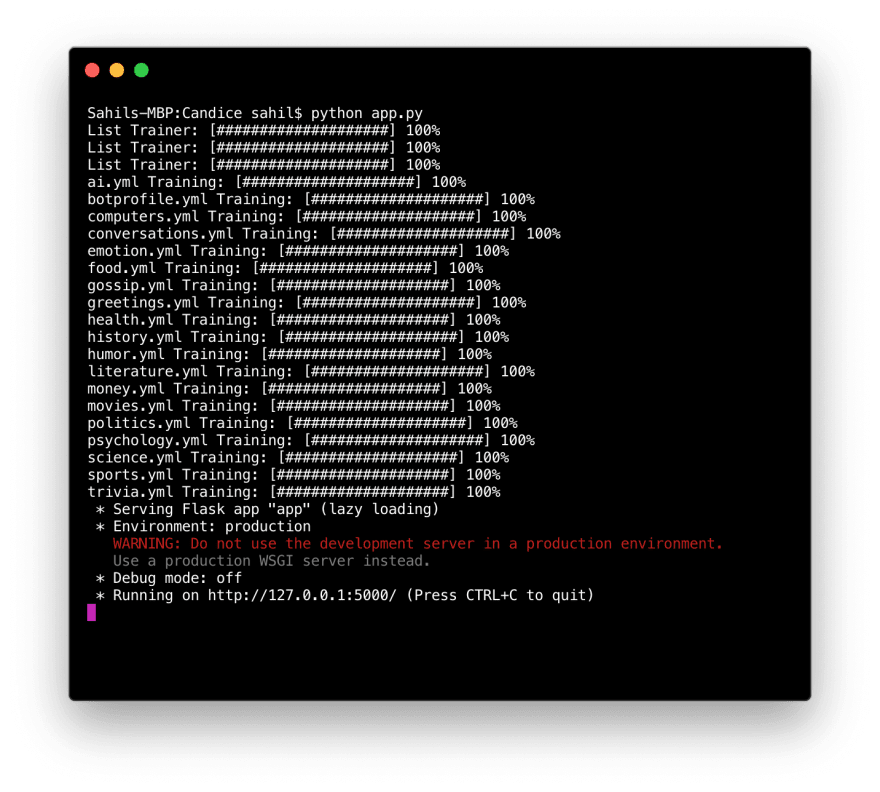
接下来,我们可以转到链接并与您的个人 ChatBot 聊天
您可以在我的 Github 上看到完整地源码。
本文中的所有译文仅用于学习和交流目的,转载请务必注明文章译者、出处、和本文链接
我们的翻译工作遵照 CC 协议,如果我们的工作有侵犯到您的权益,请及时联系我们。


 关于 LearnKu


推荐文章: