
Laravel 项目如何实现 GitHub 登录
9 / 3 / 创建于 6年前 /
 SevDot 的个人博客
为了让用户更好的使用网站,简化用户注册流程,很多网站都支持第三方登录,包括微信、QQ、微博、Github等,我的个人网站--SevDot,也需要支持 Github 登录,本文以我的个人网站为例,介绍如何在 laravel 项目中实现 github 登录。
安装 laravel 扩展包
Laravel 已提供 laravel/socialite 解决社会化登录问题,使用起来也非常简单,但是仅支持一些国外的应用,比 Facebook、 Twitter、 LinkedIn、 Google、GitHub 和 Bitbucke等,对微信、QQ、微博等国内的一些应用并不支持,但幸运的是安正超大神已开源了支持国内应用的 Laravel 扩展包 overtrue/laravel-socialite。我们就使用 overtrue/laravel-socialite 来实现 Github 登录。
安装
通过 Composer 将 overtrue/laravel-socialite 包添加到你的项目依赖里面:
composer require "overtrue/laravel-socialite:~2.0"配置
安装 overtrue/laravel-socialite 完以后,在你的 config/app.php 文件中注册 Laravel\Socialite\SocialiteServiceProvider 。
'providers' => [
    // Other service providers...
    Overtrue\LaravelSocialite\ServiceProvider::class,
],
同时,在你的 app 配置文件中,把 Socialite facade 加入到 aliases 数组中。
'Socialite' => Laravel\Socialite\Facades\Socialite::class,使用 laravel-socialite 前,需要先添加上应用程序所使用的 OAuth 服务的凭证。这些凭据应该放在你的 config/services.php 文件中,并且使用 facebook , twitter , linkedin , google , github 或 bitbucket 作为键名,具体取决于在你的应用中由哪个程序来提供验证服务,比如:
'github' => [
    'client_id' => 'your-github-app-id',
    'client_secret' => 'your-github-app-secret',
    'redirect' => 'http://your-callback-url',
],
Github 申请应用
要实现 Github 登录,我需要到 Github 上为网站申请应用,点击链接到申请页面:
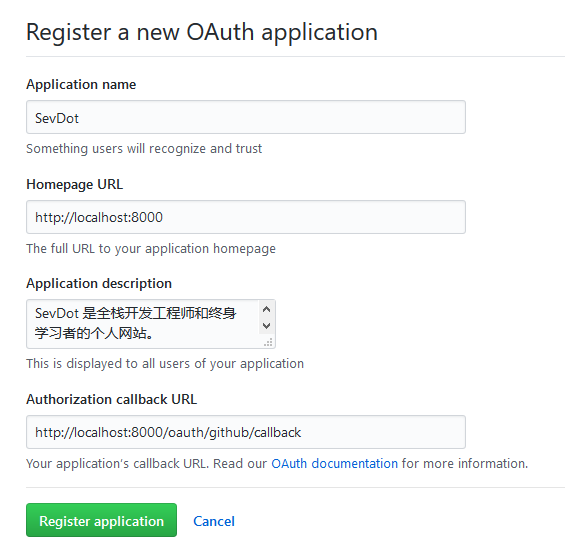
以我的个人网站为例做选项说明:
- 应用名称(Application name):SevDot
- 应用主页地址(Homepage URL):http://localhost:8000
- 应用描述(Application decription):SevDot 是全栈开发工程师和终身学习者的个人网站。
- 授权回调地址(Authorization callback URL):http://localhost:8000/oauth/github/callbac...
点击 Register application 按钮后会看到如下页面:

注意!我是在本地开发,使用的是 php artisan serve 命令等到的本地访问地址:http://localhost:8000,线上服务或者已经配置好虚拟域名的请替换。
实现 Github 登录
我们为用户表添加一个 github_name 字段来存储用户的 Github 账号,用户表迁移文件 [timestamp]_create_users_table.php 的代码如下:
<?php

use Illuminate\Support\Facades\Schema;
use Illuminate\Database\Schema\Blueprint;
use Illuminate\Database\Migrations\Migration;

class CreateUsersTable extends Migration
{
    /**
     * Run the migrations.
     *
     * @return void
     */
    public function up()
    {
        Schema::create('users', function (Blueprint $table) {
            $table->increments('id');
            $table->string('name');
            $table->string('email')->unique();
            $table->string('sex')->nullable();
            $table->string('phone')->unique()->nullable();
            $table->string('password')->nullable();
            $table->string('avatar')->nullable();
            $table->string('real_name')->comment('真实姓名')->nullable();
            $table->string('city')->comment('城市')->nullable();
            $table->string('company')->comment('公司')->nullable();
            $table->string('github_name')->comment('github')->nullable();
            $table->string('weibo_name')->comment('微博用户名')->nullable();
            $table->string('weibo_link')->comment('微博主页')->nullable();
            $table->string('twitter_account')->comment('Twitter 帐号')->nullable();
            $table->string('linkedin')->comment('LinkedIn')->nullable();
            $table->string('personal_website')->comment('个人网站')->nullable();
            $table->string('wechat_qrcode')->comment('微信账号二维码')->nullable();
            $table->string('wechat_payment_qrcode')->comment('微信支付二维码')->nullable();
            $table->string('introduction')->comment('个人简介')->nullable();
            $table->text('signature')->comment('署名')->nullable();
            $table->rememberToken();
            $table->timestamps();
        });
    }

    /**
     * Reverse the migrations.
     *
     * @return void
     */
    public function down()
    {
        Schema::dropIfExists('users');
    }
}
我们需要两个路由:一个重定向用户到 Github 授权,另一个在 Github 验证之后接收回调,路由如下:
// 第三方登录
Route::get('/oauth/github', 'Auth\LoginController@redirectToProvider');
Route::get('/oauth/github/callback', 'Auth\LoginController@handleProviderCallback');
接下来给 LoginController 控制添加两个方法,redirectToProvider 方法重定向到 Github 授权页面,handleProviderCallback 方法在 Github 验证之后接收回调,代码如下:
 public function redirectToProvider()
    {
        return Socialite::driver('github')->redirect();
    }

    public function handleProviderCallback()
    {
        $github_user = Socialite::driver('github')->user();

        $user=User::where('github_name',$github_user->name)->first();
        if(empty($user)){
            $user=User::create([
                'name'=>$github_user->name,
                'email'=>$github_user->email,
                'github_name'=>$github_user->name,
                'avatar'=>$github_user->avatar,
                'verified'=>1,
            ]);
        }
        Auth::login($user);
        return Redirect()->guest('/');
    }
FAQ
cURL error 60: SSL certificate problem: unable to get local issuer certificate (see http: curl.haxx.se libcurl c libcurl errors.html)
在本地开发的时候会遇到这个问题,意思是无法获得本地颁发者证书,解决方案就是给本地添加一个 SSL 证书。步骤如下:
- 点击链接下载最新的 curl 认可证书。
- 将 cacert.pem 文件保存到任意一个文件夹下,建议保存到 PHP 文件夹下,比如我的保存在 php7.1 文件夹下。
- 然后,在 php.ini 文件中,向下滚动到找到 [curl] 的位置。,然后修改 php.ini 文件,找到 curl.cainfo,你应该看到 curl.cainfo 项已被注释,取消注释并指向 cacert.pem 文件,最后应该是这样的一行:
curl.cainfo ="d:\webserver\php\php7.1\cacert.pem"
注意! d:\webserver\php\php7.1 修改为你的地址。
本作品采用《CC 协议》,转载必须注明作者和本文链接


 关于 LearnKu


推荐文章: