
Java并发编程——深入理解线程间的协作方式
1 / 0 / 创建于 5年前 /
 it_was 的个人博客
1.线程间的协作
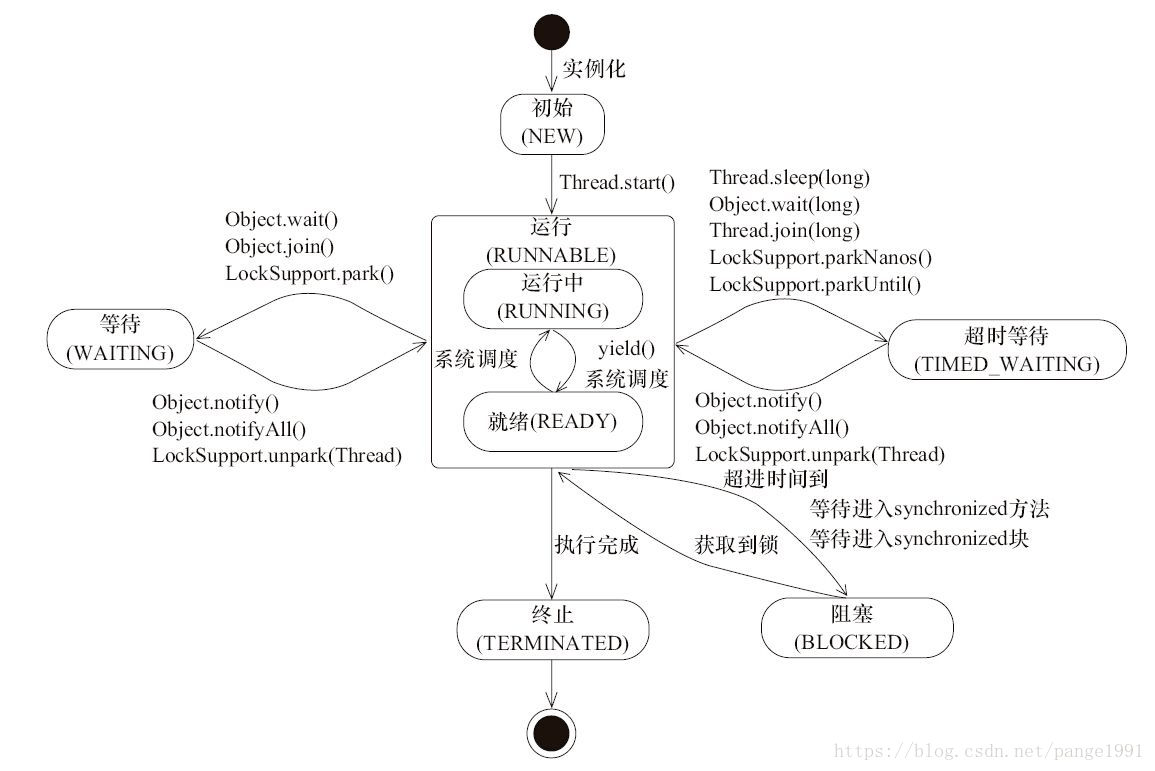
多线程环境下,我们可以通过加锁(互斥)来同步各个线程之间的行为,使得共享资源被正确的访问!同步的方法有很多种,本章主要介绍Java提供的wait,notify和sleep方法来实现这种协作!附一张线程状态转换图
2.wait,notify以及notifyAll
- wait方法是基类Object中的,释放当前线程所占的对象的锁,将线程由运行状态转为等待状态,即将当前线程扔入目标对象的等待池中
- notify方法是基类Object中的,将目标对象的等待池随即唤醒一个线程,将唤醒的线程扔进目标对象的锁池,然后去竞争该对象的锁!
- notifyAll方法是基类Object中的,将目标对象的等待池唤醒全部线程,将唤醒的全部线程扔进目标对象的锁池,然后去竞争该对象的锁!
ok 通过以上的描述我们先来解决两个问题: 锁池和等待池的概念
锁池:假设线程A已经拥有了某个对象(注意:不是类)的锁,而其它的线程想要调用这个对象的某个synchronized方法(或者synchronized块),由于这些线程在进入对象的synchronized方法之前必须先获得该对象的锁的拥有权,但是该对象的锁目前正被线程A拥有,所以这些线程就进入了该对象的锁池中。
等待池:假设一个线程A调用了某个对象的wait()方法,线程A就会释放该对象的锁后,进入到了该对象的等待池中
 notify和notifyALL的区别
notify和notifyAll都是将等待池中的线程转移到锁池中,去竞争对象的锁!最大的区别在于notify是随机唤醒一个线程,而notifyAll是唤醒全部的等待池中的线程!
试想一种情况,有一个生产者A和两个消费者B与C,某时刻只有消费者B消费资源,而生产者A和消费者C则处于wait状态,即进入对象的等待池中。假如此时B恰好消费完资源,此时如果执行的是notify的方法,ok,又恰好唤醒了消费者线程C,导致C因没有资源而活活饿死(即进入等待池中,此时锁池是空的!因为生产者A是在等待池中!)此时如果执行的是notifyAll方法呢?那就不一样了,就算B消耗没了资源,在执行notifyAll之后会将A和C一并转入锁池中!!!生产者此时是在锁池中的!
从以上区别及对情况的分析我们可以得出以下结论 在多生产者和多消费者的环境下,不能用notify,因为根据分析可能会导致线程饿死。但是在一个生产者和一个消费者的情况下是没问题的!
3.生产者消费者模型
这里主要通过生产者消费者模型来介绍wait,notify和notifyAll的用法
wait和notify以及notifyAll一般都是组合出现的,因为wait之后的线程不能自己改变状态,必须依赖于其他线程调用notify或者notifyAll方法!
话不多说,上代码:
package ddx.多线程;

import java.util.concurrent.Executor;
import java.util.concurrent.ExecutorService;
import java.util.concurrent.Executors;
import java.util.concurrent.TimeUnit;

//生产者消费者问题
public class Bounded_Buffer_roblem {

    public static void main(String[] args){
        Food food = new Food(3);
        ExecutorService pro_executor = Executors.newCachedThreadPool(); //消费者线程池
        ExecutorService con_executor = Executors.newCachedThreadPool(); //生产者线程池

        for(int i = 0;i <3;i++){
            pro_executor.execute(new producer(food));
            con_executor.execute(new consumer(food));
        }
        try{
            TimeUnit.SECONDS.sleep(2);
        }catch (Exception e){
            e.printStackTrace();
        }
        con_executor.shutdown();
        pro_executor.shutdown();
    }
}
//资源
class Food{
    private int count; //当前食物总量
    private final int MAX_COUNT = 5; //最大食物量
    Food(int count){
        this.count = count;
    }

    //减少食物
    public  void  food_down(){
        if(!isEmpty()) {
            count--;
        }

    }
    //添加食物
    public  void food_up(){
        if(!isFull()) {
            count++;
        }
    }

    public int getCount(){
        return  this.count;
    }
    //食物满了吗
    public boolean isFull(){
        return count == MAX_COUNT;
    }
    //食物空着吗?
    public boolean isEmpty(){
        return count == 0 ;
    }
}
//生产者
class consumer implements Runnable{
    private Food food;
    int i =20;
    consumer(Food food){
        this.food  = food;
    }
    public void consume(){
        try {
            synchronized (food) {
                while (food.isEmpty()) {
                    food.wait();
                }
                food.food_down();
                System.out.println("消费者" + Thread.currentThread().getName() + "正在消费 1个食物,目前食物剩余量" + food.getCount());
                food.notifyAll();
            }
        }catch (Exception e){
            e.printStackTrace();
        }
    }

    @Override
    public void run() {
        while(i-->=0) {
            consume();
        }
    }
}
//消费者
class producer implements Runnable{
    private Food food;
    int i = 20;
    producer(Food food){
        this.food  = food;
    }
    public void produce(){
        try {
            synchronized (food) { //注意此处上锁的对象!不是this!因为this是给当前这个线程对象上锁!而不是给目标资源food上锁!如果用的是this,那么谁来唤醒这个线程呢?没有其他线程拥有这个线程对象的锁,因而也就没线程唤醒,最终导致所有线程饿死!
                while (food.isFull()) {
                    food.wait();
                }
                food.food_up();
                System.out.println("生产者" + Thread.currentThread().getName() + "正在生产 1个食物,目前食物剩余量" + food.getCount());
                food.notifyAll();
            }
        }catch (Exception e){
            e.printStackTrace();
        }
    }

    @Override
    public void run() {
        while(i-->=0) {
            produce();
        }
    }
}
4. wait和sleep方法
当谈及wait方法时,一般和sleep方法一起比较。 wait,notify和notifyAll方法是属于基类Object的,而sleep方法则属于Thread方法!
为什么线程有关的方法要放在基类中呢?
因为wait,notify和notifyAll方法操作的锁也是所有对象的一部分。所以你可以将这些方法放在任何一个同步方法或者是同步代码块中,而不必去考虑他是否继承自Thread类或者实现了Runnable接口!
wait方法必须放在同步代码块或同步控制方法中,并且由指定加锁对象调用!而sleep方法则无所谓,无需操作锁,所以放在哪都可以
public static void main(String[] args) {
        new test1().func();
    }
    Object obj = new Object();
    public void func(){
        synchronized (obj){
            try {
                obj.wait(1100);
                //wait(1100);
                //报错! IllegalMonitorStateException!因为这种调用方法隐式的指明是由当前这个类的对象调用的,即this.wait(100),而非指定obj对象调用,所以出错!
            } catch (InterruptedException e) {
                e.printStackTrace();
            }
        }
    }
wait方法本质上是将当前线程持有的锁释放,并将自己转为等待状态(超时等待)。而sleep方法则不操作锁(即对锁的状态不变),只是将当前线程休眠,转为超时等待状态,让出cpu资源!
 wait方法转为等待状态(或者指定时间转为超时等待状态)之后,必须通过notify或者notifyAll方法将其唤醒!而sleep方法不需额外的操作,经过指定时间之后就自动返回运行状态!
5.假如一个线程需要等待另外N个线程执行完毕之后才能继续执,请尽可能的想出多的方法(这个问题面试问过好多遍!!!)
2.1 join方法 
join方法的主要作用就是同步,它可以使得线程之间的并行执行变为串行执行。在A线程中调用了B线程的join()方法时,表示只有当B线程执行完毕时,A线程才能继续执行。
先对join进行下理解,以下是join的源码
public final synchronized void join(long millis)
    throws InterruptedException {
        long base = System.currentTimeMillis();
        long now = 0;

        if (millis < 0) {
            throw new IllegalArgumentException("timeout value is negative");
        }

        if (millis == 0) { //如果没有指定等待时间,则默认为0
            while (isAlive()) { //如果当前线程处于运行状态,则进入当前线程对象的等待池!
                wait(0);
            }
        } else {
            while (isAlive()) {
                long delay = millis - now;
                if (delay <= 0) {
                    break;
                }
                wait(delay);
                now = System.currentTimeMillis() - base;
            }
        }
}通过源码我们可以发现,其实join方法最终是调用wait方法的,那么问题来了,谁来唤醒呢?
good question ! 是Java虚拟机唤醒的!
// 位于/hotspot/src/share/vm/runtime/thread.cpp中
void JavaThread::exit(bool destroy_vm, ExitType exit_type) {

    // Notify waiters on thread object. This has to be done after exit() is called
    // on the thread (if the thread is the last thread in a daemon ThreadGroup the
    // group should have the destroyed bit set before waiters are notified).

    ensure_join(this);

}
static void ensure_join(JavaThread* thread) {
    // We do not need to grap the Threads_lock, since we are operating on ourself.
    Handle threadObj(thread, thread->threadObj());
    assert(threadObj.not_null(), "java thread object must exist");
    ObjectLocker lock(threadObj, thread);
    // Ignore pending exception (ThreadDeath), since we are exiting anyway
    thread->clear_pending_exception();
    // Thread is exiting. So set thread_status field in  java.lang.Thread class to TERMINATED.
    java_lang_Thread::set_thread_status(threadObj(), java_lang_Thread::TERMINATED);
    // Clear the native thread instance - this makes isAlive return false and allows the join()
    // to complete once we've done the notify_all below
    java_lang_Thread::set_thread(threadObj(), NULL);

    //重点在这!当这个thread执行结束之后,将获得这个threa对象的锁的线程唤醒,也就是主线程!!!
    lock.notify_all(thread);

    // Ignore pending exception (ThreadDeath), since we are exiting anyway
    thread->clear_pending_exception();
}
理解了这些,我们就可以实现这个问题啦,代码如下:
package ddx.多线程;

public class wait_main {
    public static void main(String[] args){
        Thread[] threads = new Thread[10];
        for(int i = 0;i<10;i++){
            threads[i] = new Thread(new task());
            threads[i].start();
        }
        for(Thread thread : threads){
            try {
                thread.join(); //重点在这!!!将所有线程都加入当前主线程!直到所有线程完成,主线程才能返回执行
            } catch (InterruptedException e) {
                e.printStackTrace();
            }
        }
        //其实我在这是利用了主线程来做的,也可以不用再开一个线程,直接在主线程中做就好
        new Thread(new Runnable() {
            @Override
            public void run() {
                System.out.println("最终线程执行");
                //do something
                System.out.println("最终线程结束");
            }
        }).start();

    }
}

class task implements Runnable {
    @Override
    public void run() {
        System.out.println(Thread.currentThread().getName() + "正在执行!");
        try {
           for(int i = 0;i<20;i++){
               Thread.sleep(5);
           }
        } catch (InterruptedException e) {
            e.printStackTrace();
        }
        System.out.println(Thread.currentThread().getName() + "执行结束!");
    }
}
执行结果如下:
Thread-0正在执行!
Thread-2正在执行!
Thread-3正在执行!
Thread-1正在执行!
Thread-4正在执行!
Thread-5正在执行!
Thread-6正在执行!
Thread-7正在执行!
Thread-8正在执行!
Thread-9正在执行!
Thread-2执行结束!
Thread-3执行结束!
Thread-1执行结束!
Thread-5执行结束!
Thread-4执行结束!
Thread-0执行结束!
Thread-9执行结束!
Thread-8执行结束!
Thread-7执行结束!
Thread-6执行结束!
最终线程执行
最终线程结束
由上面的执行结果可以看到,虽然开始顺序和结束顺序不一样,但是最终的线程都是等到上面线程全部结束之后执行的!
2.2 wait/notifyAll
我们可以通过等待通知机制(wait和notifyAll)来实现。即维护一个整型值代表当前正在执行的线程的数量,每当执行完一个就自减一,直到为0的时候,通过notifyAll去唤醒最终线程!!
话不多说上代码:
package ddx.多线程;

import java.util.concurrent.Executor;
import java.util.concurrent.ExecutorService;
import java.util.concurrent.Executors;
import java.util.concurrent.atomic.AtomicInteger;

public class wait_main_1 {
    private static Object obj = new Object();
    private static  AtomicInteger count = new AtomicInteger(10); //初始线程数
    public static void main(String[] args){
        ExecutorService executorService = Executors.newCachedThreadPool();
        for(int i = 0;i < 10;i++){
            executorService.execute(new task11(count,obj));
        }
        new Thread() {
            @Override
            public void run() {
                synchronized (obj) {
                    try {
                        if(count.get() != 0){ //加个判断!避免所有线程执行完才开启这个线程而导致线程永远阻塞!
                            obj.wait();
                        }
                    } catch (InterruptedException e) {
                        e.printStackTrace();
                    }
                }
                System.out.println("最终线程开始执行");
                System.out.println("最终线程结束执行");
            }
        }.start();
        executorService.shutdown();
    }
}
class task11 implements Runnable{
    private Object obj;
    private AtomicInteger count;
    task11(AtomicInteger count, Object obj){
        this.count = count;
        this.obj  = obj;
    }
    @Override
    public void run() {
        System.out.println(Thread.currentThread().getName() + "开始执行");
        for(int i = 0; i< 3;i++){
            System.out.println(Thread.currentThread().getName() + "is running!");
        }
        synchronized (obj) {
            if (count.decrementAndGet() == 0) { //自减一判断!其实这里也可以用一个整形值来做,毕竟进入对象obj永远是互斥的!操作都是原子的!这里用Java包装好了的AtomicInteger原子类!
                obj.notifyAll();
            }
        }
        System.out.println(Thread.currentThread().getName() + "结束执行" + count);
    }
}
运行结果:
pool-1-thread-1开始执行
pool-1-thread-2开始执行
pool-1-thread-2is running!
pool-1-thread-2is running!
pool-1-thread-1is running!
pool-1-thread-1is running!
pool-1-thread-1is running!
pool-1-thread-3开始执行
pool-1-thread-3is running!
pool-1-thread-2is running!
pool-1-thread-3is running!
pool-1-thread-1结束执行9
pool-1-thread-4开始执行
pool-1-thread-5开始执行
pool-1-thread-5is running!
pool-1-thread-5is running!
pool-1-thread-5is running!
pool-1-thread-3is running!
pool-1-thread-2结束执行8
pool-1-thread-3结束执行6
pool-1-thread-5结束执行7
pool-1-thread-4is running!
pool-1-thread-6开始执行
pool-1-thread-4is running!
pool-1-thread-6is running!
pool-1-thread-6is running!
pool-1-thread-6is running!
pool-1-thread-4is running!
pool-1-thread-6结束执行5
pool-1-thread-7开始执行
pool-1-thread-7is running!
pool-1-thread-7is running!
pool-1-thread-7is running!
pool-1-thread-8开始执行
pool-1-thread-8is running!
pool-1-thread-8is running!
pool-1-thread-8is running!
pool-1-thread-8结束执行2
pool-1-thread-4结束执行4
pool-1-thread-10开始执行
pool-1-thread-10is running!
pool-1-thread-10is running!
pool-1-thread-9开始执行
pool-1-thread-7结束执行3
pool-1-thread-9is running!
pool-1-thread-9is running!
pool-1-thread-9is running!
pool-1-thread-9结束执行1
pool-1-thread-10is running!
pool-1-thread-10结束执行0
最终线程开始执行
最终线程结束执行
2.3 CountDownLatch
CountDownLatch是一个非常实用的多线程控制工具类。常用的就下面几个方法:
CountDownLatch(int count) //实例化一个倒计数器,count指定计数个数
countDown() // 计数减一
await() //等待,当计数减到0时,所有线程并行执行
话不多说上演示代码
public class test1 {
    public static void main(String[] args) {
        CountDownLatch countDownLatch = new CountDownLatch(3);
        ExecutorService executorService = Executors.newFixedThreadPool(3);
        for(int i = 0; i< 3;i++) {
            executorService.execute(new process(countDownLatch));
        }

        try{
            System.out.println("主线程"+Thread.currentThread().getName()+"等待子线程执行完成...");
            countDownLatch.await();//阻塞当前线程,直到计数器的值为0
            System.out.println("主线程"+Thread.currentThread().getName()+"开始执行...");
        } catch (InterruptedException e) {
            e.printStackTrace();
        }
        executorService.shutdown();
    }
class process implements Runnable {
        CountDownLatch countDownLatch;
        process(CountDownLatch countDownLatch){
            this.countDownLatch = countDownLatch;
        }
        @Override
        public void run() {
            try {
                for (int i = 0; i < 20; i++) {
                    System.out.println(Thread.currentThread().getName() + " 正在运行:" + i);
                }
            }catch (Exception e){

            }finally {
                countDownLatch.countDown();
            }
        }
}
运行结果
主线程main等待子线程执行完成...
pool-1-thread-1 正在运行:0
pool-1-thread-1 正在运行:1
pool-1-thread-1 正在运行:2
pool-1-thread-1 正在运行:3
pool-1-thread-1 正在运行:4
pool-1-thread-1 正在运行:5
pool-1-thread-1 正在运行:6
pool-1-thread-1 正在运行:7
pool-1-thread-1 正在运行:8
pool-1-thread-1 正在运行:9
pool-1-thread-1 正在运行:10
pool-1-thread-1 正在运行:11
pool-1-thread-1 正在运行:12
pool-1-thread-1 正在运行:13
pool-1-thread-1 正在运行:14
pool-1-thread-1 正在运行:15
pool-1-thread-1 正在运行:16
pool-1-thread-1 正在运行:17
pool-1-thread-1 正在运行:18
pool-1-thread-1 正在运行:19
pool-1-thread-2 正在运行:0
pool-1-thread-2 正在运行:1
pool-1-thread-3 正在运行:0
pool-1-thread-2 正在运行:2
pool-1-thread-3 正在运行:1
pool-1-thread-2 正在运行:3
pool-1-thread-3 正在运行:2
pool-1-thread-2 正在运行:4
pool-1-thread-3 正在运行:3
pool-1-thread-2 正在运行:5
pool-1-thread-2 正在运行:6
pool-1-thread-2 正在运行:7
pool-1-thread-2 正在运行:8
pool-1-thread-2 正在运行:9
pool-1-thread-2 正在运行:10
pool-1-thread-3 正在运行:4
pool-1-thread-2 正在运行:11
pool-1-thread-2 正在运行:12
pool-1-thread-2 正在运行:13
pool-1-thread-3 正在运行:5
pool-1-thread-3 正在运行:6
pool-1-thread-3 正在运行:7
pool-1-thread-3 正在运行:8
pool-1-thread-3 正在运行:9
pool-1-thread-2 正在运行:14
pool-1-thread-2 正在运行:15
pool-1-thread-3 正在运行:10
pool-1-thread-2 正在运行:16
pool-1-thread-2 正在运行:17
pool-1-thread-2 正在运行:18
pool-1-thread-2 正在运行:19
pool-1-thread-3 正在运行:11
pool-1-thread-3 正在运行:12
pool-1-thread-3 正在运行:13
pool-1-thread-3 正在运行:14
pool-1-thread-3 正在运行:15
pool-1-thread-3 正在运行:16
pool-1-thread-3 正在运行:17
pool-1-thread-3 正在运行:18
pool-1-thread-3 正在运行:19
主线程main开始执行...
2.4 ExecutorService
不多比比直接上代码
package ddx.多线程;

import java.util.concurrent.Executor;
import java.util.concurrent.ExecutorService;
import java.util.concurrent.Executors;
import java.util.concurrent.TimeUnit;

public class wait_main_2 {
    public static void main(String[] args) {
        ExecutorService executorService = Executors.newCachedThreadPool();
        for (int i = 0; i < 10; i++) {
            executorService.execute(new task3());
        }
        executorService.shutdown();
        new Thread(() -> {
            try {
                while (!executorService.awaitTermination(100, TimeUnit.MILLISECONDS)){
                    /*
                    这个awaitTermination(100, TimeUnit.MILLISECONDS)的逻辑是,
                    在100毫秒的时间内executorService的所有线程执行结束时返回true
                    若超过100毫秒还没有结束则返回false
                    通过放一个循环拦截所有线程池中的任务没有完成的可能!直到全部完成才返回!!!
                    其实这里让这个线程处于循环并不是一件好事,毕竟空转是浪费cpu资源的,其实可以稍微控制下等待时间这样减少循环次数!
                     */
                }
                System.out.println("最终线程执行!");
                System.out.println("最终线程结束!");

            } catch (InterruptedException e) {
                e.printStackTrace();
            }


        }).start();
    }
}

class task3 implements Runnable {

    @Override
    public void run() {
        System.out.println(Thread.currentThread().getName() + "开始执行");
        for (int i = 0; i < 4; i++) {
            System.out.println(Thread.currentThread().getName() + "is running!");
        }
        System.out.println(Thread.currentThread().getName() + "结束执行");
    }
}
运行结果
pool-1-thread-1开始执行
pool-1-thread-1is running!
pool-1-thread-1is running!
pool-1-thread-1is running!
pool-1-thread-1is running!
pool-1-thread-1结束执行
pool-1-thread-2开始执行
pool-1-thread-2is running!
pool-1-thread-2is running!
pool-1-thread-2is running!
pool-1-thread-2is running!
pool-1-thread-2结束执行
pool-1-thread-3开始执行
pool-1-thread-3is running!
pool-1-thread-3is running!
pool-1-thread-3is running!
pool-1-thread-3is running!
pool-1-thread-3结束执行
pool-1-thread-4开始执行
pool-1-thread-4is running!
pool-1-thread-4is running!
pool-1-thread-4is running!
pool-1-thread-4is running!
pool-1-thread-4结束执行
pool-1-thread-6开始执行
pool-1-thread-6is running!
pool-1-thread-6is running!
pool-1-thread-6is running!
pool-1-thread-6is running!
pool-1-thread-6结束执行
pool-1-thread-7开始执行
pool-1-thread-7is running!
pool-1-thread-7is running!
pool-1-thread-7is running!
pool-1-thread-7is running!
pool-1-thread-7结束执行
pool-1-thread-9开始执行
pool-1-thread-9is running!
pool-1-thread-9is running!
pool-1-thread-9is running!
pool-1-thread-9is running!
pool-1-thread-9结束执行
pool-1-thread-10开始执行
pool-1-thread-10is running!
pool-1-thread-10is running!
pool-1-thread-10is running!
pool-1-thread-10is running!
pool-1-thread-10结束执行
pool-1-thread-5开始执行
pool-1-thread-8开始执行
pool-1-thread-8is running!
pool-1-thread-8is running!
pool-1-thread-8is running!
pool-1-thread-8is running!
pool-1-thread-8结束执行
pool-1-thread-5is running!
pool-1-thread-5is running!
pool-1-thread-5is running!
pool-1-thread-5is running!
pool-1-thread-5结束执行
最终线程执行!
最终线程结束
2.5 Semaphore
通过信号量也可以!其实包括这种方法,本质上都是通过对一个状态位的原子操作,当所有线程执行完毕的时候,这个状态位达到某种情况,而最终线程发现状态位达到自己想要的状态,进而可以执行!
话不多说,看看信号量如何实现的:
package ddx.多线程;

import java.util.concurrent.ExecutorService;
import java.util.concurrent.Executors;
import java.util.concurrent.Semaphore;
import java.util.concurrent.TimeUnit;

public class wait_main_3 {
    private  static  final Semaphore semaphore = new Semaphore(10);
    public static void main(String[] args) {
        ExecutorService executorService = Executors.newCachedThreadPool();
        for (int i = 0; i < 10; i++) {
            executorService.execute(new task4(semaphore));
        }

        new Thread(() -> {
            try {
                semaphore.acquireUninterruptibly(10);
                //从这个信号量获得给定数量的许可,阻塞直到所有许可都可用。
                System.out.println("最终线程执行!");
                System.out.println("最终线程结束!");
                semaphore.release();
            } catch (Exception e){
                e.printStackTrace();
            }

        }).start();
    }
}

class task4 implements Runnable {
    private Semaphore semaphore;

    task4(Semaphore semaphore) {
        this.semaphore = semaphore;
    }

    @Override
    public void run() {
        try {
            semaphore.acquire();
            System.out.println(Thread.currentThread().getName() + "开始执行");
            for (int i = 0; i < 4; i++) {
                System.out.println(Thread.currentThread().getName() + "is running!");
            }
            System.out.println(Thread.currentThread().getName() + "结束执行");
            semaphore.release();
        } catch (InterruptedException e) {
            e.printStackTrace();
        }
    }
}
运行结果:
pool-1-thread-1开始执行
pool-1-thread-1is running!
pool-1-thread-1is running!
pool-1-thread-1is running!
pool-1-thread-1is running!
pool-1-thread-1结束执行
pool-1-thread-2开始执行
pool-1-thread-2is running!
pool-1-thread-2is running!
pool-1-thread-2is running!
pool-1-thread-2is running!
pool-1-thread-2结束执行
pool-1-thread-3开始执行
pool-1-thread-3is running!
pool-1-thread-3is running!
pool-1-thread-3is running!
pool-1-thread-3is running!
pool-1-thread-3结束执行
pool-1-thread-4开始执行
pool-1-thread-4is running!
pool-1-thread-4is running!
pool-1-thread-4is running!
pool-1-thread-4is running!
pool-1-thread-4结束执行
pool-1-thread-5开始执行
pool-1-thread-5is running!
pool-1-thread-5is running!
pool-1-thread-5is running!
pool-1-thread-5is running!
pool-1-thread-5结束执行
pool-1-thread-6开始执行
pool-1-thread-6is running!
pool-1-thread-6is running!
pool-1-thread-6is running!
pool-1-thread-8开始执行
pool-1-thread-8is running!
pool-1-thread-6is running!
pool-1-thread-8is running!
pool-1-thread-8is running!
pool-1-thread-6结束执行
pool-1-thread-8is running!
pool-1-thread-8结束执行
pool-1-thread-9开始执行
pool-1-thread-9is running!
pool-1-thread-9is running!
pool-1-thread-9is running!
pool-1-thread-9is running!
pool-1-thread-9结束执行
pool-1-thread-10开始执行
pool-1-thread-10is running!
pool-1-thread-10is running!
pool-1-thread-10is running!
pool-1-thread-10is running!
pool-1-thread-10结束执行
pool-1-thread-7开始执行
pool-1-thread-7is running!
pool-1-thread-7is running!
pool-1-thread-7is running!
pool-1-thread-7is running!
pool-1-thread-7结束执行
最终线程执行!
最终线程结束!本作品采用《CC 协议》,转载必须注明作者和本文链接


 关于 LearnKu


推荐文章: