
Dcat-Admin笔记
173 / 1 / 创建于 3年前 /
 slqgenius 的个人博客
no-gutters
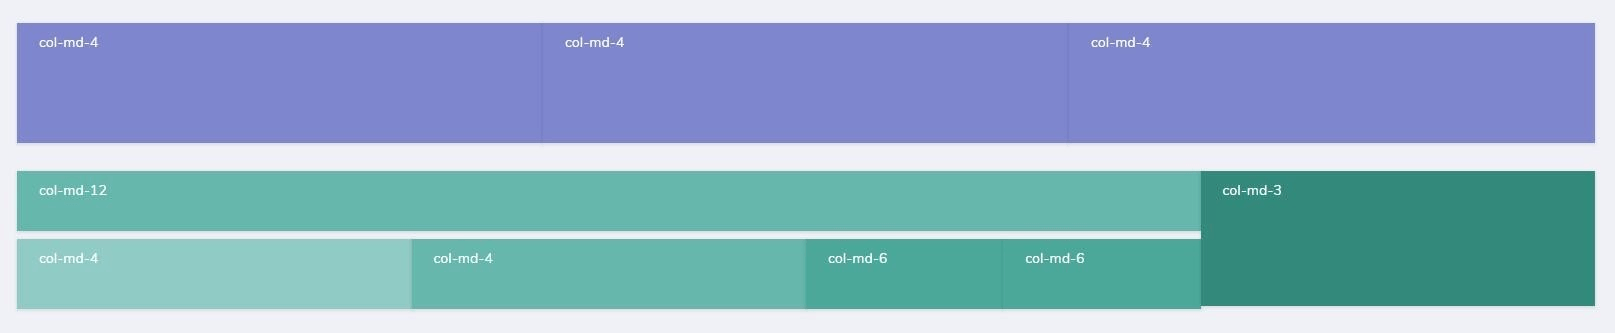
.row 上带有 margin-left: -15px;margin-right: -15px; 属性,你可以在.row 上上定义.no-gutters 属性,从而消除这个属性,使页面不会额外宽出 30px,即 <div class="row no-gutters"...
$content->row(function (Row $row) {
// 启用 no-gutters
$row->noGutters();
$row->column(9, function (Column $column) {
$column->row($this->card(['col-md-12', 20], '#4DB6AC'));
$column->row(function (Row $row) {
// 启用 no-gutters
$row->noGutters();
$row->column(4, $this->card(['col-md-4', 30], '#80CBC4'));
$row->column(4, $this->card(['col-md-4', 30], '#4DB6AC'));
$row->column(4, function (Column $column) {
$column->row(function (Row $row) {
// 启用 no-gutters
$row->noGutters();
$row->column(6, $this->card(['col-md-6', 30], '#26A69A'));
$row->column(6, $this->card(['col-md-6', 30], '#26A69A'));
});
});
});
});
});效果如下
$grid->column('picture')->image();
//设置服务器和宽高
$grid->column('picture')->image('http://xxx.com',  100,  100);  // 显示多图
$grid->column('pictures')->display(function  ($pictures)  {          return  json_decode($pictures,  true);
})->image('http://xxx.com',  100,  100);

$grid->column('state')->using([1  =>  '未处理',  2  =>  '已处理',  ...])
显示 badge 标签
$grid->column('name')->badge();

// 设置颜色,直接传别名
$grid->column('name')->badge('danger');

// 也可以这样使用
$grid->column('name')->badge(Admin::color()->danger());

// 也可以直接传颜色代码
$grid->column('name')->badge('#222');
布尔值显示 (bool)#
将这一列转为 bool 值之后显示为✓和✗。
$grid->column('approved')->bool();你也可以按照这一列的值指定显示,比如字段的值为 Y 和 N 表示 true 和 false
$grid->column('approved')->bool(['Y' => true, 'N' => false]);圆点前缀 (dot)
通过 dot 方法可以在列文字前面加上一个带颜色的圆点
use Dcat\Admin\Admin;

$grid->column('state')
    ->using([1 => '未处理', 2 => '已处理', ...])
    ->dot(
        [
            1 => 'primary',
            2 => 'danger',
            3 => 'success',
            4 => Admin::color()->info(),
        ],
        'primary' // 第二个参数为默认值
    );
expand 方法可以把内容隐藏,点击按钮的时候显示在表格下一行
use Dcat\Admin\Widgets\Card;

$grid->column('content')->expand(function (Grid\Displayers\Expand $expand) {
    // 设置按钮名称
    $expand->button('详情');

    // 返回显示的详情
    // 这里返回 content 字段内容,并用 Card 包裹起来
    $card = new Card(null, $this->content);

    return "<div style='padding:10px 10px 0'>$card</div>";
});
// 可以在闭包内返回异步加载类的实例
$grid->post->expand(function () {
// 允许在闭包内返回异步加载类的实例
return Post::make(['title' => $this->title]);
});异步加载#
定义渲染类,继承 Dcat\Admin\Support\LazyRenderable
use App\Models\Post as PostModel;
use Dcat\Admin\Support\LazyRenderable;
use Dcat\Admin\Widgets\Table;
class Post extends LazyRenderable
{
public function render()
{
// 获取ID
$id = $this->key;
// 获取其他自定义参数
$type = $this->post_type;
$data = PostModel::where('user_id', $id)
->where('type', $type)
->get(['title', 'body', 'body', 'created_at'])
->toArray();
$titles = [
'User ID',
'Title',
'Body',
'Created At',
];
return Table::make($titles, $data);
}
}使用
$grid->post->display('View')->expand(Post::make(['post_type' => 1]));
// 可以在闭包内返回异步加载类的实例
$grid->post->expand(function () {
    // 允许在闭包内返回异步加载类的实例

    return Post::make(['title' => $this->title]);
});弹出模态框 (modal)
modal 方法可以把内容隐藏,点击按钮的时候显示在模态框中
use Dcat\Admin\Widgets\Card;
$grid->column('content')
->display('查看') // 设置按钮名称
->modal(function ($modal) {
// 设置弹窗标题
$modal->title('标题 '.$this->username);
// 自定义图标
$modal->icon('feather icon-x');
//$this->content指的是当前字段的内容
$card = new Card(null, $this->content);
return "<div style='padding:10px 10px 0'>$card</div>";
});
// 也可以通过这种方式设置弹窗标题
$grid->column('content')
->display('查看') // 设置按钮名称
->modal('弹窗标题', ...);异步加载
定义渲染类,继承 Dcat\Admin\Support\LazyRenderable
use App\Models\Post as PostModel;
use Dcat\Admin\Support\LazyRenderable;
use Dcat\Admin\Widgets\Table;

class Post extends LazyRenderable
{
    public function render()
    {
        // 获取ID
        $id = $this->key;

        // 获取其他自定义参数
        $type = $this->post_type;

        $data = PostModel::where('user_id', $id)
            ->where('type', $type)
            ->get(['title', 'body', 'body', 'created_at'])
            ->toArray();

        $titles = [
            'User ID',
            'Title',
            'Body',
            'Created At',
        ];

        return Table::make($titles, $data);
    }
}
使用
$grid->post->display('View')->modal('Post', Post::make(['post_type' => 2]));

// 可以在闭包内返回异步加载类的实例
$grid->post->modal(function ($modal) {
    $modal->title('自定义弹窗标题');

    // 允许在闭包内返回异步加载类的实例
    return Post::make(['title' => $this->title]);
});
异步加载工具表单#
<?php

namespace App\Admin\Forms;

use Dcat\Admin\Contracts\LazyRenderable;
use Dcat\Admin\Traits\LazyWidget;
use Dcat\Admin\Widgets\Form;

class UserProfile extends Form implements LazyRenderable
{
    use LazyWidget;

    public function handle(array $input)
    {
        // 接收外部传递参数
        $type = $this->payload['type'] ?? null;

        return $this->response()->success('保存成功');
    }

    public function form()
    {
        // 接收外部传递参数
        $type = $this->payload['type'] ?? null;

        $this->text('name', trans('admin.name'))->required()->help('用户昵称');
        $this->image('avatar', trans('admin.avatar'))->autoUpload();

        $this->password('old_password', trans('admin.old_password'));

        $this->password('password', trans('admin.password'))
            ->minLength(5)
            ->maxLength(20)
            ->customFormat(function ($v) {
                if ($v == $this->password) {
                    return;
                }

                return $v;
            })
            ->help('请输入5-20个字符');
        $this->password('password_confirmation', trans('admin.password_confirmation'))
            ->same('password')
            ->help('请输入确认密码');
    }
}
使用
$grid->user->display('View')->modal(UserProfile::make(['type' => 1]));进度条 (progressBar)
$grid->rate->progressBar();

//设置颜色,默认`primary`,可选`danger`、`warning`、`info`、`primary`、`success`
$grid->rate->progressBar('success');

// 设置进度条尺寸和最大值
$grid->rate->progressBar('success', 'sm', 100);
showTreeInDialog#
showTreeInDialog 方法可以把一个带有层级关系的数组呈现为树形弹窗,比如权限就可以用此方法展示
// 查出所有的权限数据
$nodes = (new $permissionModel)->allNodes();

// 传入二维数组(未分层级)
$grid->permissions->showTreeInDialog($nodes);

// 也可以传入闭包
$grid->permissions->showTreeInDialog(function (Grid\Displayers\DialogTree $tree) use (&$nodes, $roleModel) {
    // 设置所有节点
    $tree->nodes($nodes);

    // 设置节点数据字段名称,默认"id","name","parent_id"
    $tree->setIdColumn('id');
    $tree->setTitleColumn('title');
    $tree->setParentColumn('parent_id');

    // $this->roles 可以获取当前行的字段值
    foreach (array_column($this->roles, 'slug') as $slug) {
        if ($roleModel::isAdministrator($slug)) {
            // 选中所有节点
            $tree->checkAll();
        }
    }
});
数组操作
如果当前列输出的是数组,可以直接链式调用 Illuminate\Support\Collection 方法。
比如 tags 列是从一对多关系取出来的数组数据:
$grid->tags();

array (
  0 =>
  array (
    'id' => '16',
    'name' => 'php',
    'created_at' => '2016-11-13 14:03:03',
    'updated_at' => '2016-12-25 04:29:35',

  ),
  1 =>
  array (
    'id' => '17',
    'name' => 'python',
    'created_at' => '2016-11-13 14:03:09',
    'updated_at' => '2016-12-25 04:30:27',
  ),
)
调用 Collection::pluck() 方法取出数组的中的 name 列
$grid->tags()->pluck('name');
array (
0 => 'php',
1 => 'python',
),比如 images 字段是存储多图片地址数组的 JSON 格式字符串类型:
$grid->images();
// "['foo.jpg', 'bar.png']"
// 链式方法调用来显示多图
$grid->images()->display(function ($images) {
return json_decode($images, true);
})->map(function ($path) {
return 'http://localhost/images/'. $path;
})->image();扩展类
如果列显示逻辑比较复杂,可以通过扩展类来实现。
扩展类 app/Admin/Extensions/Popover.php:
<?php
namespace App\Admin\Extensions;
use Dcat\Admin\Admin;
use Dcat\Admin\Grid\Displayers\AbstractDisplayer;
class Popover extends AbstractDisplayer
{
public function display($placement = 'left')
{
Admin::script("$('[data-toggle=\"popover\"]').popover()");
return <<<EOT
<button type="button"
class="btn btn-secondary"
title="popover"
data-container="body"
data-toggle="popover"
data-placement="$placement"
data-content="{$this->value}"
>
弹出提示
</button>
EOT;
}
}
然后在 app/Admin/bootstrap.php 注册扩展类:
use Dcat\Admin\Grid\Column;
use App\Admin\Extensions\Popover;
Column::extend('popover', Popover::class);
Copy
然后就能在 model-grid 中使用了:
$grid->desciption()->popover('right');切换行操作按钮显示方式
全局默认的行操作按钮显示方式可以通过配置参数 admin.grid.grid_action_class 参数进行配置,目前支持的行操作按钮显示方式有以下两种:
Dcat\Admin\Grid\Displayers\DropdownActions 下拉菜单方式
Dcat\Admin\Grid\Displayers\Actions 图标展开方式
Dcat\Admin\Grid\Displayers\ContextMenuActions 鼠标右键显示下拉菜单 (Since v1.4.5)
...
'grid' => [
/*
|--------------------------------------------------------------------------
| The global Grid action display class.
|--------------------------------------------------------------------------
*/
'grid_action_class' => Dcat\Admin\Grid\Displayers\DropdownActions::class,
],
...
Copy
在控制器中切换显示方式
use Dcat\Admin\Grid;
public function grid()
{
return Grid(new Model(), function (Grid $grid) {
$grid->setActionClass(Grid\Displayers\Actions::class);
...
});
}
获取行序号 (index)
序号从 0 开始计算
// 在 display 回调中使用
$grid->column('序号')->display(function () {
return $this->_index + 1;
});
// 在行操作 action 中使用
$grid->actions(function ($actions) {
$index = $this->_index;
...
});
获取当前行数据
可以通过传入的 $actions 参数来获取当前行的数据:
use Dcat\Admin\Grid;
$grid->actions(function (Grid\Displayers\Actions $actions) {
// 当前行的数据数组
$rowArray = $actions->row->toArray();
// 当前行的某个字段的数据
$email = $actions->row->email;
// 获取当前行主键值
$id = $actions->getKey();
});添加自定义按钮
如果有自定义的操作按钮,可以通过下面的方式添加:
use Dcat\Admin\Grid;
$grid->actions(function (Grid\Displayers\Actions $actions) {
// append一个操作
$actions->append('<a href=""><i class="fa fa-eye"></i></a>');
// prepend一个操作
$actions->prepend('<a href=""><i class="fa fa-paper-plane"></i></a>');
});添加复杂操作按钮
如果有比较复杂的操作,可以参考下面的方式:
先定义行操作类继承 Dcat\Admin\Grid\RowAction
{tip} 动作类更详细的用法,请参考动作基本使用以及数据表格动作。
<?php
namespace App\Admin\Extensions;
use Dcat\Admin\Grid\RowAction;
class CheckRow extends RowAction
{
/**
* 返回字段标题
*
* @return string
*/
public function title()
{
return 'Check row';
}
/**
* 添加JS
*
* @return string
*/
protected function script()
{
return <<<JS
$('.grid-check-row').on('click', function () {
// Your code.
console.log($(this).data('id'));
});
JS;
}
public function html()
{
// 获取当前行数据ID
$id = $this->getKey();
// 获取当前行数据的用户名
$username = $this->row->username;
// 这里需要添加一个class, 和上面script方法对应
$this->setHtmlAttribute(['data-id' => $id, 'email' => $username, 'class' => 'grid-check-row']);
return parent::html();
}
}
然后添加操作:
$grid->actions(new CheckRow());
// 也可以通过这种方式添加
$grid->actions(function (Grid\Displayers\Actions $actions) {
$actions->append(new CheckRow());
});
操作按钮需要与 API 交互
如果你的操作类需要与后台接口交互,则可以在你的操作类中加上 handle 方法,这样就可以很方便的在同一个类里面处理完所有逻辑
{tip} 动作类更详细的用法,请参考动作基本使用以及数据表格动作。
<?php
namespace App\Admin\RowActions;
use Dcat\Admin\Grid\RowAction;
use Illuminate\Http\Request;
use Illuminate\Database\Eloquent\Model;
class Copy extends RowAction
{
protected $model;
public function __construct(string $model = null)
{
$this->model = $model;
}
/**
* 标题
*
* @return string
*/
public function title()
{
return 'Copy';
}
/**
* 设置确认弹窗信息,如果返回空值,则不会弹出弹窗
*
* 允许返回字符串或数组类型
*
* @return array|string|void
*/
public function confirm()
{
return [
// 确认弹窗 title
"您确定要复制这行数据吗?",
// 确认弹窗 content
$this->row->username,
];
}
/**
* 处理请求
*
* @param Request $request
*
* @return \Dcat\Admin\Actions\Response
*/
public function handle(Request $request)
{
// 获取当前行ID
$id = $this->getKey();
// 获取 parameters 方法传递的参数
$username = $request->get('username');
$model = $request->get('model');
// 复制数据
$model::find($id)->replicate()->save();
// 返回响应结果并刷新页面
return $this->response()->success("复制成功: [{$username}]")->refresh();
}
/**
* 设置要POST到接口的数据
*
* @return array
*/
public function parameters()
{
return [
// 发送当前行 username 字段数据到接口
'username' => $this->row->username,
// 把模型类名传递到接口
'model' => $this->model,
];
}
}
使用
use App\Models\User;
$grid->actions([new Copy(User::class)]);
// 也可以通过这种方式添加
$grid->actions(function (Grid\Displayers\Actions $actions) {
$actions->append(new Copy(User::class));
});表单弹窗
请参考文档工具表单 - 弹窗
多对多#
users 和 roles 表通过中间表 role_users 产生多对多关系

CREATE TABLE `users` (
  `id` int(10) unsigned NOT NULL AUTO_INCREMENT,
  `username` varchar(190) COLLATE utf8_unicode_ci NOT NULL,
  `password` varchar(60) COLLATE utf8_unicode_ci NOT NULL,
  `name` varchar(255) COLLATE utf8_unicode_ci NOT NULL,
  `created_at` timestamp NULL DEFAULT NULL,
  `updated_at` timestamp NULL DEFAULT NULL,
  PRIMARY KEY (`id`),
  UNIQUE KEY `users_username_unique` (`username`)
) ENGINE=InnoDB DEFAULT CHARSET=utf8 COLLATE=utf8_unicode_ci

CREATE TABLE `roles` (
  `id` int(10) unsigned NOT NULL AUTO_INCREMENT,
  `name` varchar(50) COLLATE utf8_unicode_ci NOT NULL,
  `slug` varchar(50) COLLATE utf8_unicode_ci NOT NULL,
  `created_at` timestamp NULL DEFAULT NULL,
  `updated_at` timestamp NULL DEFAULT NULL,
  PRIMARY KEY (`id`),
  UNIQUE KEY `roles_name_unique` (`name`)
) ENGINE=InnoDB DEFAULT CHARSET=utf8 COLLATE=utf8_unicode_ci

CREATE TABLE `role_users` (
  `role_id` int(11) NOT NULL,
  `user_id` int(11) NOT NULL,
  `created_at` timestamp NULL DEFAULT NULL,
  `updated_at` timestamp NULL DEFAULT NULL,
  KEY `role_users_role_id_user_id_index` (`role_id`,`user_id`)
) ENGINE=InnoDB DEFAULT CHARSET=utf8 COLLATE=utf8_unicode_ci
对应的数据模和数据仓库分别为:

User 模型

<?php

namespace App\Models;

use Illuminate\Database\Eloquent\Model;

class User extends Model
{
    public function roles()
    {
        return $this->belongsToMany(Role::class);
    }
}
Role 模型

<?php

namespace App\Models;

use Illuminate\Database\Eloquent\Model;

class Role extends Model
{
    public function users()
    {
        return $this->belongsToMany(User::class);
    }
}
数据仓库

<?php

namespace App\Admin\Repositories;

use App\Models\User as UserModel;
use Dcat\Admin\Repositories\EloquentRepository;

class User extends EloquentRepository
{
    protected $eloquentClass = UserModel::class;
}
同样这里支持上述的三种方式关联数据,限于篇幅这里不再重复写所有用法

use App\Admin\Repositories\User;

// 关联 role 表数据
$grid = Grid::make(new User('roles'), function (Grid $grid) {
    $grid->id('ID')->sortable();
    $grid->username();
    $grid->name();

    $grid->roles()->pluck('name')->label();

    $grid->created_at();
    $grid->updated_at();
});本作品采用《CC 协议》,转载必须注明作者和本文链接


 关于 LearnKu


推荐文章: