
 爪哇笔记
爪哇笔记13.详解 Collection
一:Collection 体系原理与常用实现
Collection 接口(java.util.Collection)是 Java 集合类的顶级接口之一。
Collection 接口下又有三种子类型接口:List、Set、Queue,再下面是一些抽象类,最后是具体的实现类,常用的集合实现类有:ArrayList,LinkedList,HashSet,TreeSet,LinkedBlockingQueue,ArrayBlockingQueue 等。
集合 Collection 的继承树:
ArrayList
ArrayList 是 Java 集合框架中几乎使用最频繁的数据结构。其继承自 AbstractList,实现了 List 接口。底层基于数组实现容量大小的动态变化。同时还实现了 RandomAccess,Cloneable,Serializable 接口,所以 ArrayList 支持快速随机访问,复制并且可序列化。
成员变量
private int size; // 实际元素的个数

transient Object[] elementData;
size 是指 elementData 数组中实际有多少个元素,而 elementData.length 为集合容量,表示最多可容纳多少个元素。
初始化一个 ArrayList ,其默认的初始容量大小为 10
/**
* Default initial capacity.
*/
private static final int DEFAULT_CAPACITY = 10;
以下的两个变量用于构造函数中
/**
* Shared empty array instance used for empty instances.
*/
private static final Object[] EMPTY_ELEMENTDATA = {};

/**
* Shared empty array instance used for default sized empty instances. We
* distinguish this from EMPTY_ELEMENTDATA to know how much to inflate when
* first element is added.
*/
private static final Object[] DEFAULTCAPACITY_EMPTY_ELEMENTDATA = {};
构造器
无参构造器
/**
* Constructs an empty list with an initial capacity of ten.
*/
public ArrayList() {
    this.elementData = DEFAULTCAPACITY_EMPTY_ELEMENTDATA;
}
构造函数只是给 elementData 赋值给了一个空数组,但是在第一次添加元素时就会将容量扩大到 10
有参构造器
public ArrayList(int initialCapacity) {
    if (initialCapacity > 0) {
        this.elementData = new Object[initialCapacity];
    } else if (initialCapacity == 0) {
        this.elementData = EMPTY_ELEMENTDATA;
    } else {
        throw new IllegalArgumentException("Illegal Capacity: "+
                                       initialCapacity);
    }
}
public ArrayList(Collection<? extends E> c) {
elementData = c.toArray();
if ((size = elementData.length) != 0) {
// c.toArray might (incorrectly) not return Object[] (see 6260652)
if (elementData.getClass() != Object[].class)
elementData = Arrays.copyOf(elementData, size, Object[].class);
} else {
// replace with empty array.
this.elementData = EMPTY_ELEMENTDATA;
}
}有参数的构造器有两种,第一个是可以指定 ArrayList 的初始化容量大小的构造器,第二个是向构造器中传递一个集合,如果传入的集合 size 为 0 ,则直接把 EMPTY_ELEMENTDATA 赋值给 elementData,否则就将传入的 Collection 中的所有元素复制给 elementData。
ArrayList 的扩容机制
我们来看下向 ArrayList 中添加元素的方法 add:
public boolean add(E e) {
    ensureCapacityInternal(size + 1);  // Increments modCount!!
    elementData[size++] = e;
    return true;
}

private void ensureCapacityInternal(int minCapacity) {
    if (elementData == DEFAULTCAPACITY_EMPTY_ELEMENTDATA) {
        minCapacity = Math.max(DEFAULT_CAPACITY, minCapacity);
    }
    ensureExplicitCapacity(minCapacity);
}

private void ensureExplicitCapacity(int minCapacity) {
    modCount++;
    // overflow-conscious code
    if (minCapacity - elementData.length > 0)
        grow(minCapacity);
}
在每次添加元素之前,都有一个 ensureCapacityInternal 方法;如果 minCapacity ≤ 10,则直接将 10 赋值给 minCapacity ,然后执行 ensureExplicitCapacity(minCapacity) 方法。
在 ensureExplicitCapacity 方法中,会判断 minCapacity 与 elementData.length 的大小,如果 minCapacity - elementData.length > 0 则执行扩容方法 grow。
grow
private void grow(int minCapacity) {
    // overflow-conscious code
    int oldCapacity = elementData.length;
    int newCapacity = oldCapacity + (oldCapacity >> 1);
    if (newCapacity - minCapacity < 0)
        newCapacity = minCapacity;
    if (newCapacity - MAX_ARRAY_SIZE > 0)
        newCapacity = hugeCapacity(minCapacity);
    // minCapacity is usually close to size, so this is a win:
    elementData = Arrays.copyOf(elementData, newCapacity);
}
grow 方法中,会声明一个新的数组容量 newCapacity ,默认将容量扩大为原数组容量的 1.5倍,然后将原数组的所有元素写入到新数组。
至于为何扩容 1.5 倍,这要先从 C++ STL 中 vector 内存用尽后,扩容增长因子设计为 2 说起
说明:因为LearnKu 不支持 LaTeX 语法,所以下面的数学推导过程使用截图
如果您想拥有更好的阅读体验,请移步原文:
www.yuque.com/dobbykim/java-basic/...

为什么 Java 选择了 1.5 作为扩容增长因子,是因为 1.5 可以充分利用位运算(右移),节省运算时间和运算次数。
为什么建议使用 ArrayList 代替 Vector?
ArrayList 的扩容机制要优于 Vector ,ArrayList 每次 resize 增加 1.5 倍容量,Vector每次增加 2 倍的容量, ArrayList 要比 Vector 有很大的存储空间上的节省
Vector 添加元素,删除元素及迭代器遍历的方法都是 synchronized 修饰的,在线程安全的情况下使用效率要低于 ArrayList
可以使用
Collections.synchronized(List<E> list)的线程同步集合,保证多线程下的安全性。
LinkedList
LinkedList 集合底层是一个双向链表,它不仅实现了 List 接口,还实现了 Deque 与Queue 接口。
LinkedList 维护三个成员变量:
transient int size = 0;
/**
 * Pointer to first node.
 */
transient Node<E> first;

/**
 * Pointer to last node.
 */
transient Node<E> last;
size 为双向链表的长度,first 和 last 分别是双向链表的首节点与尾节点的指针。
我们来看下节点 Node 的定义:
private static class Node<E> {
    E item;
    Node<E> next;
    Node<E> prev;

    Node(Node<E> prev, E element, Node<E> next) {
        this.item = element;
        this.next = next;
        this.prev = prev;
    }
}
一个节点中,除了存储当前元素 item,还保存着前后节点的指针(引用)。
ArrayList 与 LinkedList
ArrayList 的底层实现为动态数组,因为具有数组“索引”的这一概念,所以,ArrayList 随机访问元素的方法 get 时间复杂度为 O(1)
ArrayList 常用方法的时间复杂度:
add(E e):需要考虑到底层数组扩容,均摊复杂度为 O(1)
add(int index,E element):需要考虑到底层数组扩容,均摊复杂度为O(N)
get(int index):O(1)
remove(index):O(N)
remove(Object o):O(N)
LinkedList 的底层实现为双向链表,链表并非向数组一样在连续的内存单元中保存数据,所以不具有“索引”这一特性,增删改查都是依靠着节点指针。
LinkedList 常用操作的时间复杂度:
add(E e):O(1)
add(int index,E element):O(N)
get(int index):O(N)
remove(index):O(N)
remove(Object o):O(N)
我们来看下对 ArrayList 和 LinedList 的性能测试用例:
对 ArrayList 与 LinkedList 的 Get 方法进行测试:
package com.github.test;

import java.util.ArrayList;
import java.util.LinkedList;
import java.util.Random;

public class Test {
    private static ArrayList<Integer> arrayList = new ArrayList<>();
    private static LinkedList<Integer> linkedList = new LinkedList<>();

    public static void main(String[] args) {
        // 测试 ArrayList 与 LinkedList 查找性能
        int num = 10_0000;
        // init
        for (int i = 0; i < num; i++) {
            int r = new Random().nextInt();
            arrayList.add(r);
            linkedList.add(r);
        }
        testArrayListGetMethod(num);
        testLinkedListGetMethod(num);
    }

    private static void testArrayListGetMethod(int num) {
        long start = System.currentTimeMillis();
        for (int i = 0; i < num; i++) {
            arrayList.get(i);
        }
        long end = System.currentTimeMillis();
        System.out.println("ArrayList 随机查找 " + num + "个元素,耗时:" + (end - start) + "ms.");
    }

    private static void testLinkedListGetMethod(int num) {
        long start = System.currentTimeMillis();
        for (int i = 0; i < num; i++) {
            linkedList.get(i);
        }
        long end = System.currentTimeMillis();
        System.out.println("LinkedList 随机查找 " + num + "个元素,耗时:" + (end - start) + "ms.");
    }
}
我使用的是 JDK11,在我的电脑上该程序的运行结果:
ArrayList 随机查找 100000个元素,耗时:3ms.
LinkedList 随机查找 100000个元素,耗时:12375ms.
可以看到十万这个级别的数据已经能看到相当大的差异了。
对 ArrayList 和 LinkedList 向尾部添加元素进行测试:
package com.github.test;

import java.util.ArrayList;
import java.util.LinkedList;
import java.util.Random;

public class Test {

    private static ArrayList<Integer> arrayList = new ArrayList<>();
    private static LinkedList<Integer> linkedList = new LinkedList<>();

    public static void main(String[] args) {
        testArrayListAddTailMethod();
        testLinkedListAddTailMethod();
    }

    private static void testArrayListAddTailMethod() {
        long start = System.currentTimeMillis();
        for (int i = 0; i < 1000000; i++) {
            arrayList.add(new Random().nextInt());
        }
        long end = System.currentTimeMillis();
        System.out.println("ArrayList 向尾部添加 100万个元素,共耗时 : " + (end - start) + "ms");
    }

    private static void testLinkedListAddTailMethod() {
        long start = System.currentTimeMillis();
        for (int i = 0; i < 1000000; i++) {
            linkedList.add(new Random().nextInt());
        }
        long end = System.currentTimeMillis();
        System.out.println("LinkedList 向尾部添加 100万个元素,共耗时 : " + (end - start) + "ms");
    }

}
在我的电脑上,该程序的运行结果为:
ArrayList 向尾部添加 100万个元素,共耗时 : 136ms
LinkedList 向尾部添加 100万个元素,共耗时 : 193ms
可以看到,二者的区别并不是很大,虽然 ArrayList 要进行扩容,但是 LinkedList 每次创建一个新的节点也是要消耗时间的。
对 ArrayList 和 LinkedList 向首部添加元素进行测试:
package com.github.test;

import java.util.ArrayList;
import java.util.LinkedList;
import java.util.Random;

public class Test {

    private static ArrayList<Integer> arrayList = new ArrayList<>();
    private static LinkedList<Integer> linkedList = new LinkedList<>();

    public static void main(String[] args) {
        testArrayListAddFirstMethod();
        testLinkedListAddFirstMethod();
    }

    private static void testArrayListAddFirstMethod() {
        long start = System.currentTimeMillis();
        for (int i = 0; i < 100_0000; i++) {
            arrayList.add(0,new Random().nextInt());
        }
        long end = System.currentTimeMillis();
        System.out.println("ArrayList 向首部添加 100万个元素,共耗时 : " + (end - start) + "ms");
    }

    private static void testLinkedListAddFirstMethod() {
        long start = System.currentTimeMillis();
        for (int i = 0; i < 100_0000; i++) {
            linkedList.add(0,new Random().nextInt());
        }
        long end = System.currentTimeMillis();
        System.out.println("LinkedList 向首部添加 100万个元素,共耗时 : " + (end - start) + "ms");
    }
}
在我的电脑上,该程序的运行结果为:
ArrayList 向首部添加 100万个元素,共耗时 : 91091ms
LinkedList 向首部添加 100万个元素,共耗时 : 237ms
对于 ArrayList 向首部添加元素,add 方法就会变成一个 O(N²) 级别的时间复杂度算法,所以它消耗的时间要远超 LinkedList 向首部添加元素。
ArrayList 与 LinkedList 如何选择 ?
从上述测试中,我们可以看出:
- 如果要频繁地进行查找操作,而添加删除操作相对比较少,那么应该使用 ArrayList
- 如果要频繁地添加或删除元素,查找操作几乎没有时,应该使用 LinkedList
ArrayList 与 LinkedList 是线程安全的么?
ArrayList 与 LinkedList 都不是线程安全的,如果它们的内存空间被多个线程共享,有可能出现脏读的情况(一个线程正在修改数据的时候,被另一个线程读取到原来的值)。
在多线程的环境下,有两种方案:
- 使用线程安全的 Vector
- 使用
List<Integer> list = Collections.synchronizedList(new ArrayList<>()), 每次在写操作的时候,锁住临界区,保证数据的一致性。
HashSet
Set 的特点是集合里的多个对象之间没有明显的顺序,且不能包含重复元素。
HashSet 是 Set 接口的一个实现类。
HashSet 的实现基于 HashMap, 默认构造函数是构建一个初始容量为 16,负载因子为 0.75的 HashMap 。所有放入 HashSet 中的元素实际上由底层的 HashMap 的 Key 来保存,而 HashMap 的 Value 则存储了一个 PRESENT,它是一个静态的 Object 对象。
HashSet 是如何保证没有重复元素的?
HashSet 添加元素的 add 方法:
public boolean add(E e) {
    return map.put(e, PRESENT)==null;
}
我们看到,在向 HashSet 添加一个元素,实际上就是调用了 HashMap 的 put 方法:
public V put(K key, V value) {
    if (key == null)
        return putForNullKey(value);
    int hash = hash(key.hashCode());
    int i = indexFor(hash, table.length);
    for (Entry<K,V> e = table[i]; e != null; e = e.next) {
        Object k;
        if (e.hash == hash && ((k = e.key) == key || key.equals(k))) {
            V oldValue = e.value;
            e.value = value;
            e.recordAccess(this);
            return oldValue;
        }
    }
    modCount++;
    addEntry(hash, key, value, i);
    return null;
}
向 map 中添加一个元素时:
首先会调用该对象的 hashCode 方法计算出 hash 值 ,通过该对象的 hash 值可以快速定位到 map 中存储相同 hash 值的桶
如果该桶中没有任何元素,那么说明要添加的元素在原来的 map 中不存在,所以,存储该元素
如果该桶中已经有元素,那么遍历桶中的所有元素,并调用 equals 方法与该桶中的每个元素进行比对,如果两个元素的 hashCode 方法返回值相同,且 equals 方法返回 true,则认为这两个元素相等,不存储新的元素,否则就向集合中添加新的元素。
这样我们就可以保证 HashSet 中元素不重复,且大大优化了时间复杂度。
既然 HashSet 只使用了底层 HashMap 的key,那么直接使用 null 作为 HashMap 的 value 不就好了,还节省了内存空间,为何要使用 PRESENT 作为 value 呢?
private transient HashMap<E,Object> map;

// Dummy value to associate with an Object in the backing Map
private static final Object PRESENT = new Object();

/**
 * Constructs a new, empty set; the backing <tt>HashMap</tt> instance has
 * default initial capacity (16) and load factor (0.75).
 */
public HashSet() {
    map = new HashMap<>();
}通过源码可知,HashSet 的底层是通过 HashMap 来实现的,并且 HashMap 的 key 存储的是向 HashSet 插入的元素,value 存储的是一个静态的常量 PRESENT 。
我们来看下HashSet 的 add 与 remove 方法:
add
public boolean add(E e) {
    return map.put(e, PRESENT)==null;
}
remove
public boolean remove(Object o) {
    return map.remove(o)==PRESENT;
}
假设 map 当中已经有一个 (e,value1) 的键值对存储进去了,如果再去添加一个 (e,value2) 的值,map 会替换掉原本的 (e,value1) 更新为 (e,value2) 并返回新的 value 值 value2,value2 != null,结果返回 false。
但是,如果 map 的 value 存储的是 null 值,那么 map 会替换掉原本的 (e,null) 更新为 (e,null),结果返回新的 value值 null,最后 null == null,结果返回 true,这样的话,我们向Set 中添加一个重复的元素,最终的结果返回 true,就会矛盾,使用 PRESENT 作为 map的 value 就可以避免这种歧义。
remove 方法同 add 方法。
LinkedHashSet
LinkedHashSet 的实现基于 LinkedHashMap,LinkedHashMap较 HashMap 而言,内部多了一个双向链表用来维护元素的添加顺序。
LinkedHashSet 存储元素是无序的,但是由于双向链表的存在,迭代时获取元素的顺序等于元素的添加顺序。
示例程序:
public class Test {
    public static void main(String[] args) {
        Set<Integer> linkedHashSet = new LinkedHashSet<>();
        linkedHashSet.add(1);
        linkedHashSet.add(2);
        linkedHashSet.add(3);
        linkedHashSet.add(4);

        Iterator<Integer> iterator = linkedHashSet.iterator();
        while(iterator.hasNext()){
            System.out.println(iterator.next());
        }
    }
}
程序输出结果:
1
2
3
4
TreeSet
public class TreeSet<E> extends AbstractSet<E>
    implements NavigableSet<E>, Cloneable, java.io.Serializable
{
    /**
     * The backing map.
     */
    private transient NavigableMap<E,Object> m;

    // Dummy value to associate with an Object in the backing Map
    private static final Object PRESENT = new Object();

    /**
     * Constructs a set backed by the specified navigable map.
     */
    TreeSet(NavigableMap<E,Object> m) {
        this.m = m;
    }

    /**
     * Constructs a new, empty tree set, sorted according to the
     * natural ordering of its elements.  All elements inserted into
     * the set must implement the {@link Comparable} interface.
     * Furthermore, all such elements must be <i>mutually
     * comparable</i>: {@code e1.compareTo(e2)} must not throw a
     * {@code ClassCastException} for any elements {@code e1} and
     * {@code e2} in the set.  If the user attempts to add an element
     * to the set that violates this constraint (for example, the user
     * attempts to add a string element to a set whose elements are
     * integers), the {@code add} call will throw a
     * {@code ClassCastException}.
     */
    public TreeSet() {
        this(new TreeMap<E,Object>());
    }

    /**
     * Constructs a new, empty tree set, sorted according to the specified
     * comparator.  All elements inserted into the set must be <i>mutually
     * comparable</i> by the specified comparator: {@code comparator.compare(e1,
     * e2)} must not throw a {@code ClassCastException} for any elements
     * {@code e1} and {@code e2} in the set.  If the user attempts to add
     * an element to the set that violates this constraint, the
     * {@code add} call will throw a {@code ClassCastException}.
     *
     * @param comparator the comparator that will be used to order this set.
     *        If {@code null}, the {@linkplain Comparable natural
     *        ordering} of the elements will be used.
     */
    public TreeSet(Comparator<? super E> comparator) {
        this(new TreeMap<>(comparator));
    }

    /**
     * Constructs a new tree set containing the elements in the specified
     * collection, sorted according to the <i>natural ordering</i> of its
     * elements.  All elements inserted into the set must implement the
     * {@link Comparable} interface.  Furthermore, all such elements must be
     * <i>mutually comparable</i>: {@code e1.compareTo(e2)} must not throw a
     * {@code ClassCastException} for any elements {@code e1} and
     * {@code e2} in the set.
     *
     * @param c collection whose elements will comprise the new set
     * @throws ClassCastException if the elements in {@code c} are
     *         not {@link Comparable}, or are not mutually comparable
     * @throws NullPointerException if the specified collection is null
     */
    public TreeSet(Collection<? extends E> c) {
        this();
        addAll(c);
    }

    /**
     * Constructs a new tree set containing the same elements and
     * using the same ordering as the specified sorted set.
     *
     * @param s sorted set whose elements will comprise the new set
     * @throws NullPointerException if the specified sorted set is null
     */
    public TreeSet(SortedSet<E> s) {
        this(s.comparator());
        addAll(s);
    }
    // ... ...
}
上面是 TreeSet 的源码,我们可以看到,TreeSet 默认的构造器是在内部初始化一个 TreeMap作为底层结构。并且 TreeSet 的构造器中可以传入比较器来定制排序方式。
HashSet 与 TreeSet 的区别
TreeSet的底层实现是 TreeMap,而 TreeMap是一个有序的 key-value 集合,它是通过红黑树(Red-Black Tree)来实现的。
HashSet 与 TreeSet 的区别如下:
TreeSet底层实现为 TreeMap即(红黑树),HashSet底层实现为 HashMap(数组 + 链表 & 红黑树)
TreeSet增删改查的复杂度为 O(logN);HashSet增删改查的复杂度为 O(1)
TreeSet和HashSet都是无重复元素的集合,但是 TreeSet是一个有序集合,HashSet则是无序集合
二:Map 与常用实现
什么是 Map ? 简单说,Map 是映射表,是一种存储 K:V 对儿的数据结构,映射表中的键(key)不重复。

Map 的继承体系如上图所示;它的常用实现类为:HashMap,LinkedHashMap,TreeMap 以及Hashtable。
HashMap
Map 的初始化方式
最常见的初始化方式为:
public class Test {
    public static void main(String[] args) {
        Map<String, String> map = new HashMap<>();
        map.put("name", "Jack");
        map.put("gender", "male");
    }
}
Java8特性引入的双括号初始化:
public class Test {
    public static void main(String[] args) {
        Map<String, String> map = new HashMap<>(){{
            put("name", "Jack");
            put("gender", "male");
        }};
    }
}
Java9 的 Map.of():
public class Test {
    public static void main(String[] args) {
          // 不可变,无法向map中添加或删除元素
        Map<String, String> map = Map.of(
          "name","Jack",
          "gender","male"
        );
    }
}需要说明的是,Map.of() 初始化的是一个不可变的集合,既不能添加元素,也不能删除及修改。
Map 的遍历
方法一:在 foreach 循环中使用 Entry 对象进行遍历
public class IterateMap {

    public static void main(String[] args) {
        Map<Integer,String> map = new HashMap<>();
        map.put(1,"Jack");
        map.put(2,"Rose");
        map.put(3,"Tom");
        map.put(4,"Jerry");

        for(Map.Entry<Integer,String> entry : map.entrySet()){
            System.out.println("key : " + entry.getKey() + "," + "value : " + entry.getValue());
        }
    }
}
方法二:在 foreach循环中遍历 Key或者 Value
public class IterateMap {

    public static void main(String[] args) {
        Map<Integer, String> map = new HashMap<>();
        map.put(1, "Jack");
        map.put(2, "Rose");
        map.put(3, "Tom");
        map.put(4, "Jerry");

        for (Integer key : map.keySet()) {
            System.out.println("key : " + key);
        }

        for (String value : map.values()) {
            System.out.println("value : " + value);
        }
    }
}
方法三:使用 Iterator迭代器
public class IterateMap {

    public static void main(String[] args) {
        Map<Integer, String> map = new HashMap<>();
        map.put(1, "Jack");
        map.put(2, "Rose");
        map.put(3, "Tom");
        map.put(4, "Jerry");

        Iterator<Map.Entry<Integer, String>> iterator = map.entrySet().iterator();
        while(iterator.hasNext()){
            Map.Entry<Integer, String> entry = iterator.next();
            System.out.println("Key = " + entry.getKey() + ", Value = " + entry.getValue());
        }
    }
}
迭代器遍历是一种老旧的方式,目前不推荐使用。
接下来,我们来看一道面试题:
package com.github.test;

import java.util.HashMap;
import java.util.Map;
import java.util.Set;

public class Test {

    public static void main(String[] args) {
        Map<String,Integer> map = new HashMap<>();
        map.put("Jack",1);
        map.put("Tom",2);
        Set<String> keySet = map.keySet();
        map.remove("Jack");
        System.out.println(keySet.size());
    }
}
问,该程序输出的结果为?
该问题的答案是:1
这个结果是否出乎你的意料?如果你的答案是 2,那么你肯定觉得 keySet 与 map 是两个独立的对象,而事实是:keySet 这个对象与 map 是相互绑定的,也就是说 keySet 是动态变化的,所以 map 删除了一个元素之后,keySet 的大小也发生了变化。本题当中的 map.keySet() 同样适用于 map.values() 以及 map.entrySet() ,它们都是动态变化的,与 map 对象绑定。
HashMap 常见面试题
你了解 HashMap 的底层实现么?HashMap 从 JDK 8 开始发生了怎样的改变?
Java 8 之前的 HashMap 简单来说就是 “数组 + 链表”

我们先要了解一些概念,capacity,loadfactor,threshold;
capacity 指的就是 HashMap 中桶的数量,这里面理解为数组的长度。HashMap 初始化默认的 capacity 为 16,一般第一次扩容会扩容到 64,之后每次扩容扩容到原来的 2 倍。
loadfactor 为负载因子,默认值为 0.75f,threshold = capacity × loadfactor;当HashMap 的 size > threshold 时,HashMap 发生扩容 (resize) 。
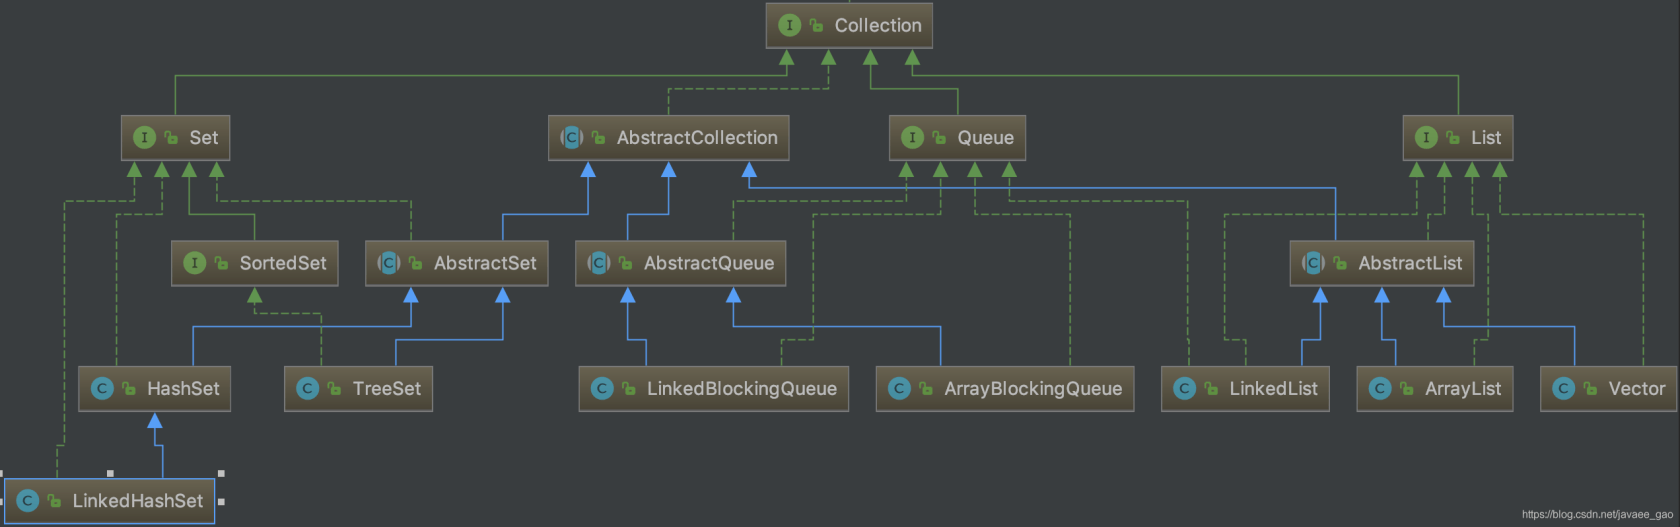
接下来我们介绍 Java8 之前的 HashMap 是如何解决哈希冲突的
如上图所示
我们第一次向 HashMap 中插入了一个元素 {k1,v1}, 首先,HashMap 的 put 方法会计算该元素的 hashCode,在这里我们假设该元素的 hashCode 为 115,使用除留余数法(115%16),得到该元素所在桶的下标 3,该桶的位置没有元素,直接将该元素放入到桶内;
第二次向 HashMap 中插入一个元素 {k2,v2}, 在这里我们假设该元素的 hashCode 为 119,使用除留余数法(119%16),得到该元素所在桶的下标 7,该桶的位置没有元素,直接将该元素放入到桶内;
第三次向 HashMap 中插入一个元素 {k3,v3},在这里我们假设该元素的 hashCode 为 119,和第二次插入的元素发生哈希冲突,使用除留余数法(119%16),得到该元素所在桶的下标 7,该桶的位置已经有元素,Java8 之前会使用 头插法,将 {k3,v3} 插入到链表的头部,而非{k2,v2} 的后面,于是形成了链表。
以上就是 Java8 以前,HashMap 是如何插入元素,解决哈希冲突的原理。不过在 Java8 以后,HashMap 就作出了改变。
Java8 后,HashMap 变成了 “数组+链表+红黑树”

Java8 之后,哈希表的改进主要有两点:
第一点是:当指向哈希桶的链表长度超过 8 时,链表就会进化成红黑树,因为“链表 + 数组”作为底层的哈希表存在一个问题,如果所有的元素都落在一个哈希桶上,那么哈希表的查找效率就会变低,将链表进化为红黑树可以改进复杂度,因为红黑树是一颗近似平衡的二叉搜索树。
第二点是:头插法到尾插法的改进;Java8 之前使用头插法式考虑到了热点数据这一因素,即:新插入的数据可能会更早地被使用,但是这个考虑本来就是伪命题,再加上更重要的原因:头插法会导致 HashMap 死链问题(实际上,尾插法也会导致 HashMap 的死链问题,如果多线程并发应该避免使用 HashMap)。所以,在之后,也就弃用了头插法,改成尾插法。
HashMap 是线程安全的么?
以下为 CoolShell 博客《疫苗:JAVA HASHMAP的死循环》内容的整理,强烈推荐左耳朵耗子的原文《疫苗:JAVA HASHMAP的死循环》
首先,HashMap 不是线程安全的,如果在多线程并发的环境下,推荐使用 ConcurrentHashMap。
接下来,我来解释为什么 HashMap 在多线程的情况下有可能导致死循环。
使用版本为 Java 1.7 的代码,注意,这里面使用的是头插法。
HashMap 的 put 方法:
public V put(K key, V value)
{
    ......
    //算Hash值
    int hash = hash(key.hashCode());
    int i = indexFor(hash, table.length);
    //如果该key已被插入,则替换掉旧的value (链接操作)
    for (Entry<K,V> e = table[i]; e != null; e = e.next) {
        Object k;
        if (e.hash == hash && ((k = e.key) == key || key.equals(k))) {
            V oldValue = e.value;
            e.value = value;
            e.recordAccess(this);
            return oldValue;
        }
    }
    modCount++;
    //该key不存在,需要增加一个结点
    addEntry(hash, key, value, i);
    return null;
}
addEntry
void addEntry(int hash, K key, V value, int bucketIndex)
{
    Entry<K,V> e = table[bucketIndex];
    table[bucketIndex] = new Entry<K,V>(hash, key, value, e);
    //查看当前的size是否超过了我们设定的阈值threshold,如果超过,需要resize
    if (size++ >= threshold)
        resize(2 * table.length);
}
resize
void resize(int newCapacity)
{
    Entry[] oldTable = table;
    int oldCapacity = oldTable.length;
    ......
    //创建一个新的Hash Table
    Entry[] newTable = new Entry[newCapacity];
    //将Old Hash Table上的数据迁移到New Hash Table上
    transfer(newTable);
    table = newTable;
    threshold = (int)(newCapacity * loadFactor);
}
transfer
void transfer(Entry[] newTable)
{
    Entry[] src = table;
    int newCapacity = newTable.length;
    //下面这段代码的意思是:
    //  从OldTable里摘一个元素出来,然后放到NewTable中
    for (int j = 0; j < src.length; j++) {
        Entry<K,V> e = src[j];
        if (e != null) {
            src[j] = null;
            do {
                Entry<K,V> next = e.next;
                int i = indexFor(e.hash, newCapacity);
                e.next = newTable[i];
                newTable[i] = e;
                e = next;
            } while (e != null);
        }
    }
}
如果,我们在单线程下,该操作可以用如下示意图表示:
假设,我们的哈希表如下
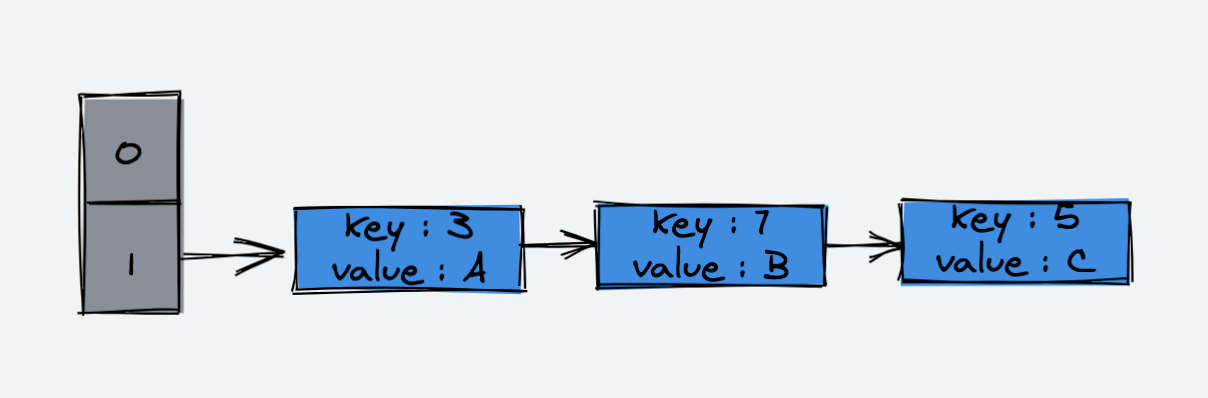
单线程下,进行 rehash
第一步:

第二步:
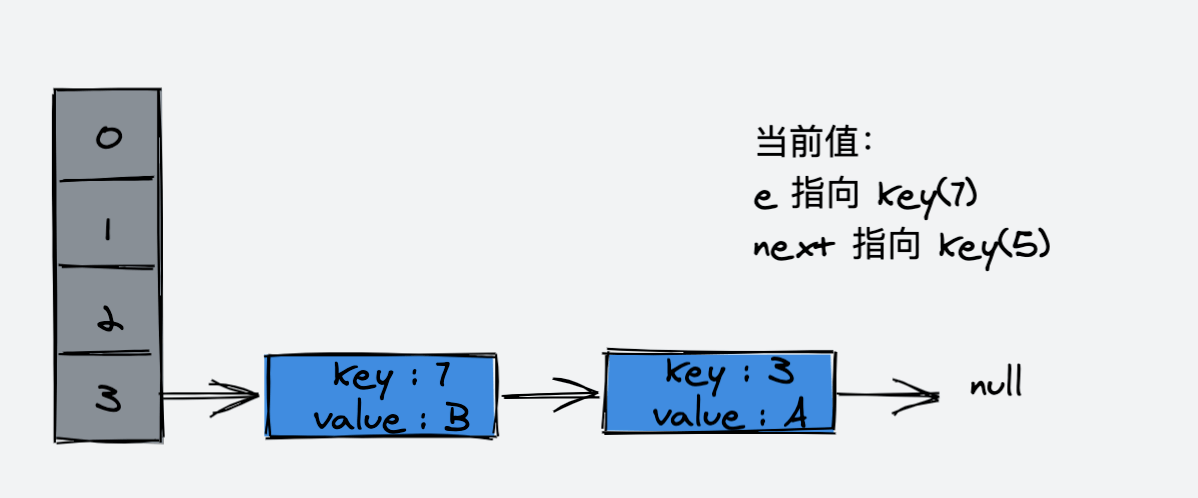
第三步:

rehash 完成。
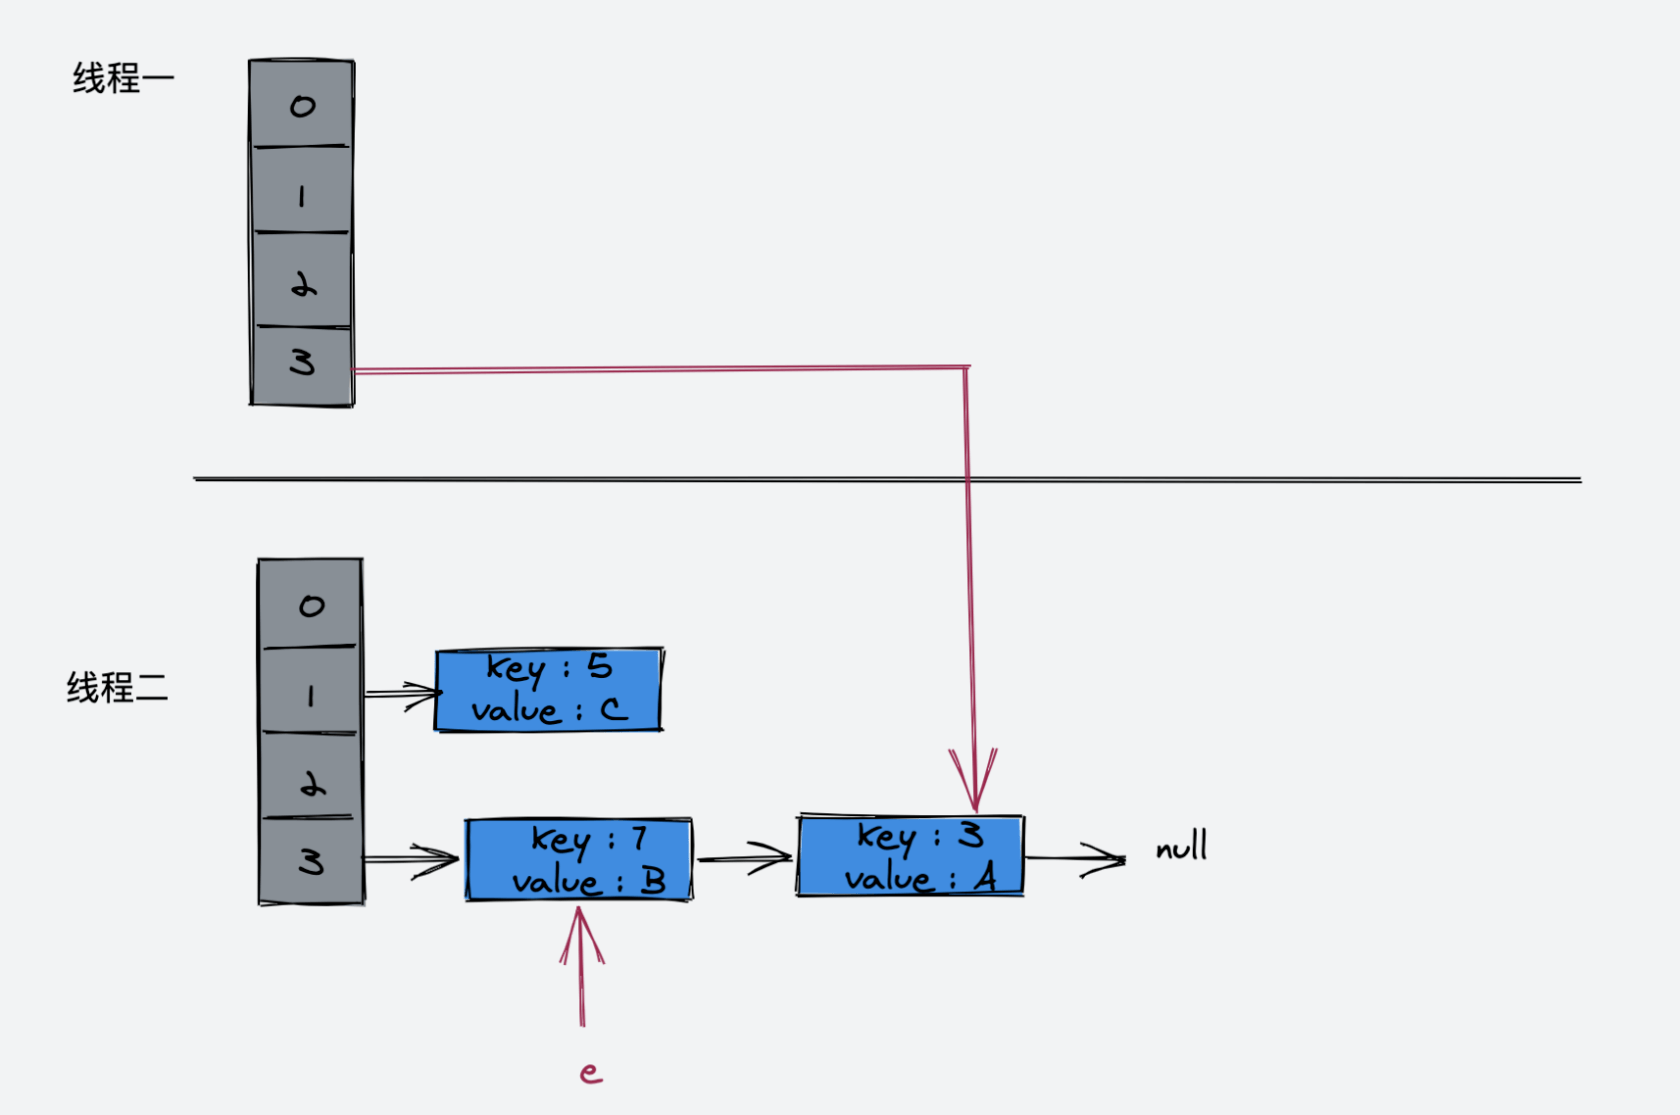
如果是多线程的情况下:
线程一
do {
    Entry<K,V> next = e.next; // <--假设线程一执行到这里就被调度挂起了
    int i = indexFor(e.hash, newCapacity);
    e.next = newTable[i];
    newTable[i] = e;
    e = next;
} while (e != null);
线程二已经执行完成。于是,我们有下面的样子:
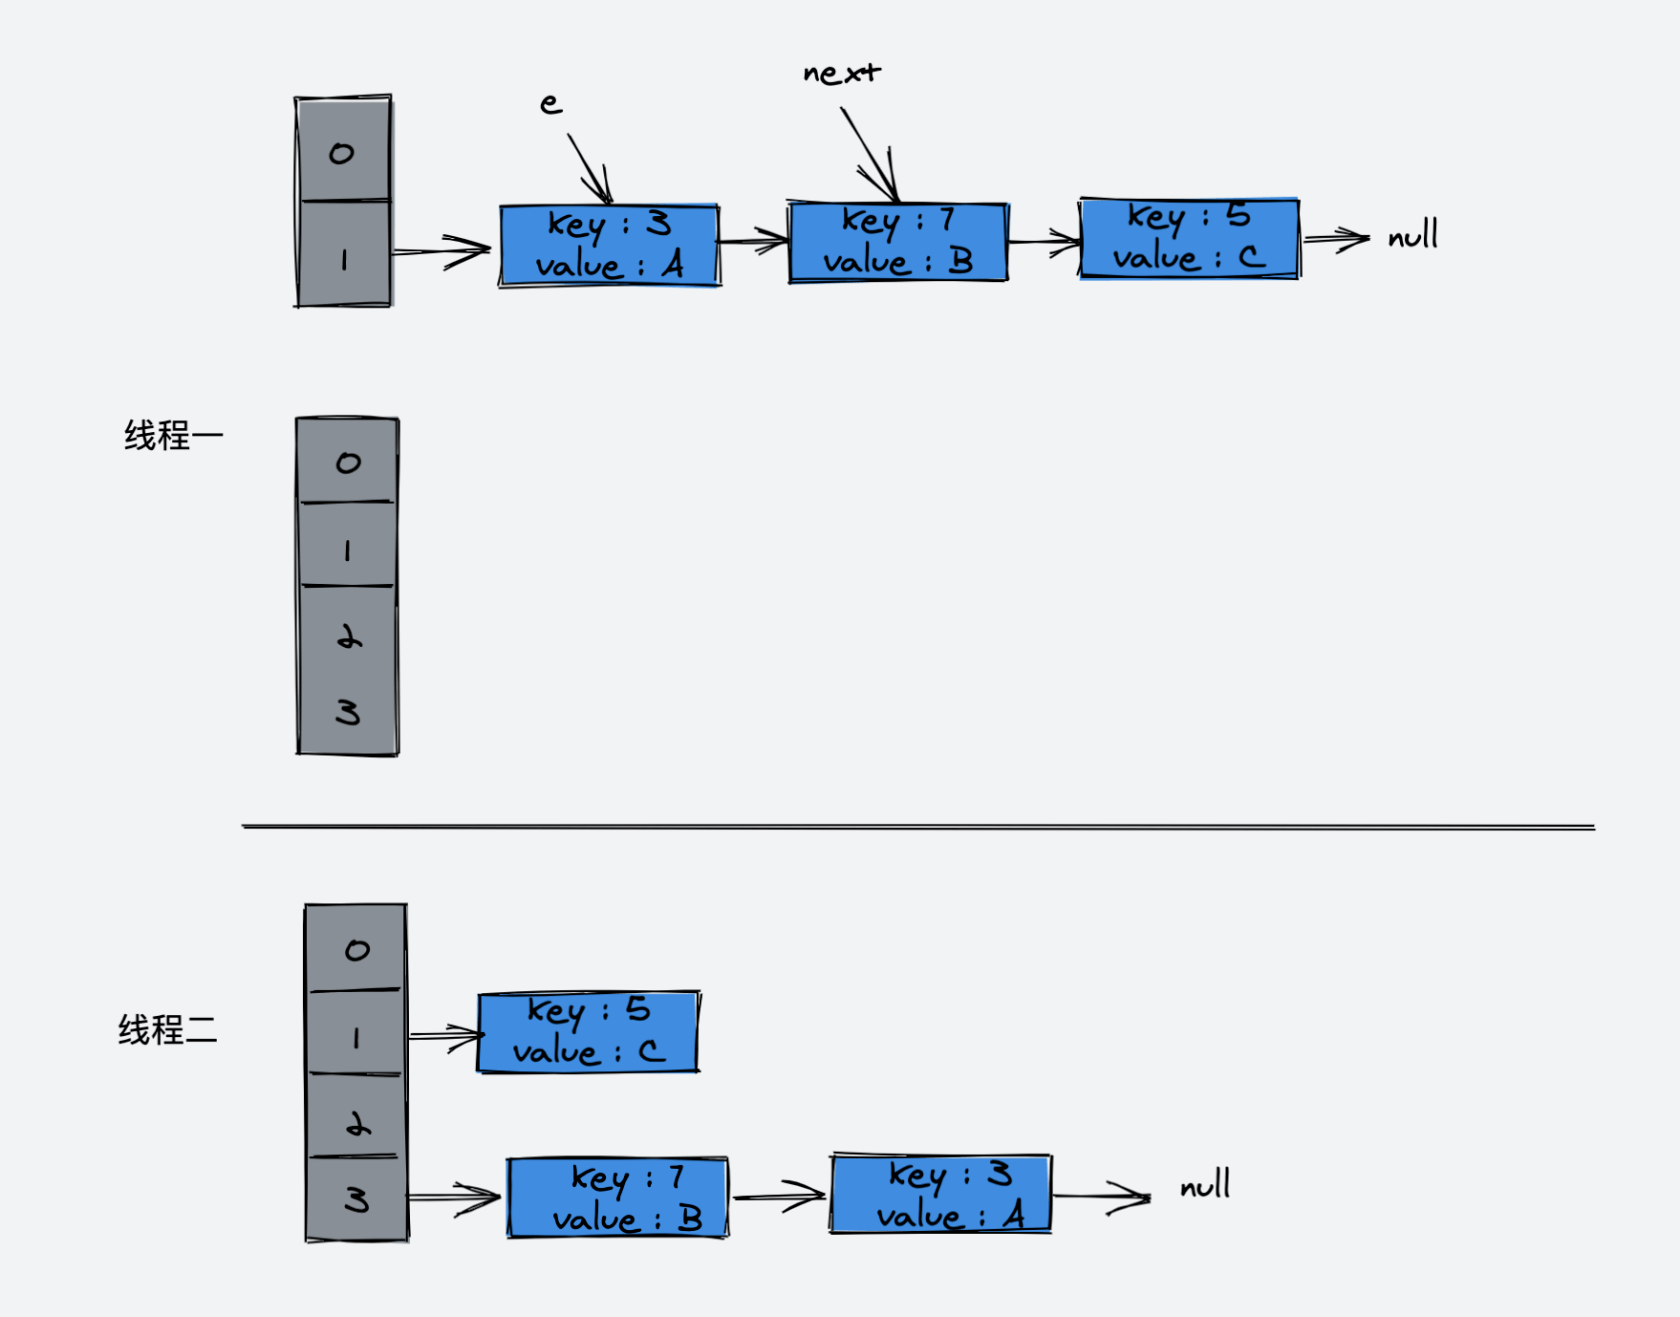
接下来,线程一被调度回来执行:

接着:
- 先是执行
newTable[i] = e; - 然后是
e = next;
执行完这一步的示意图:
接下来的循环Entry<K,V> next = e.next; 使得 next 又指向了 key(3)
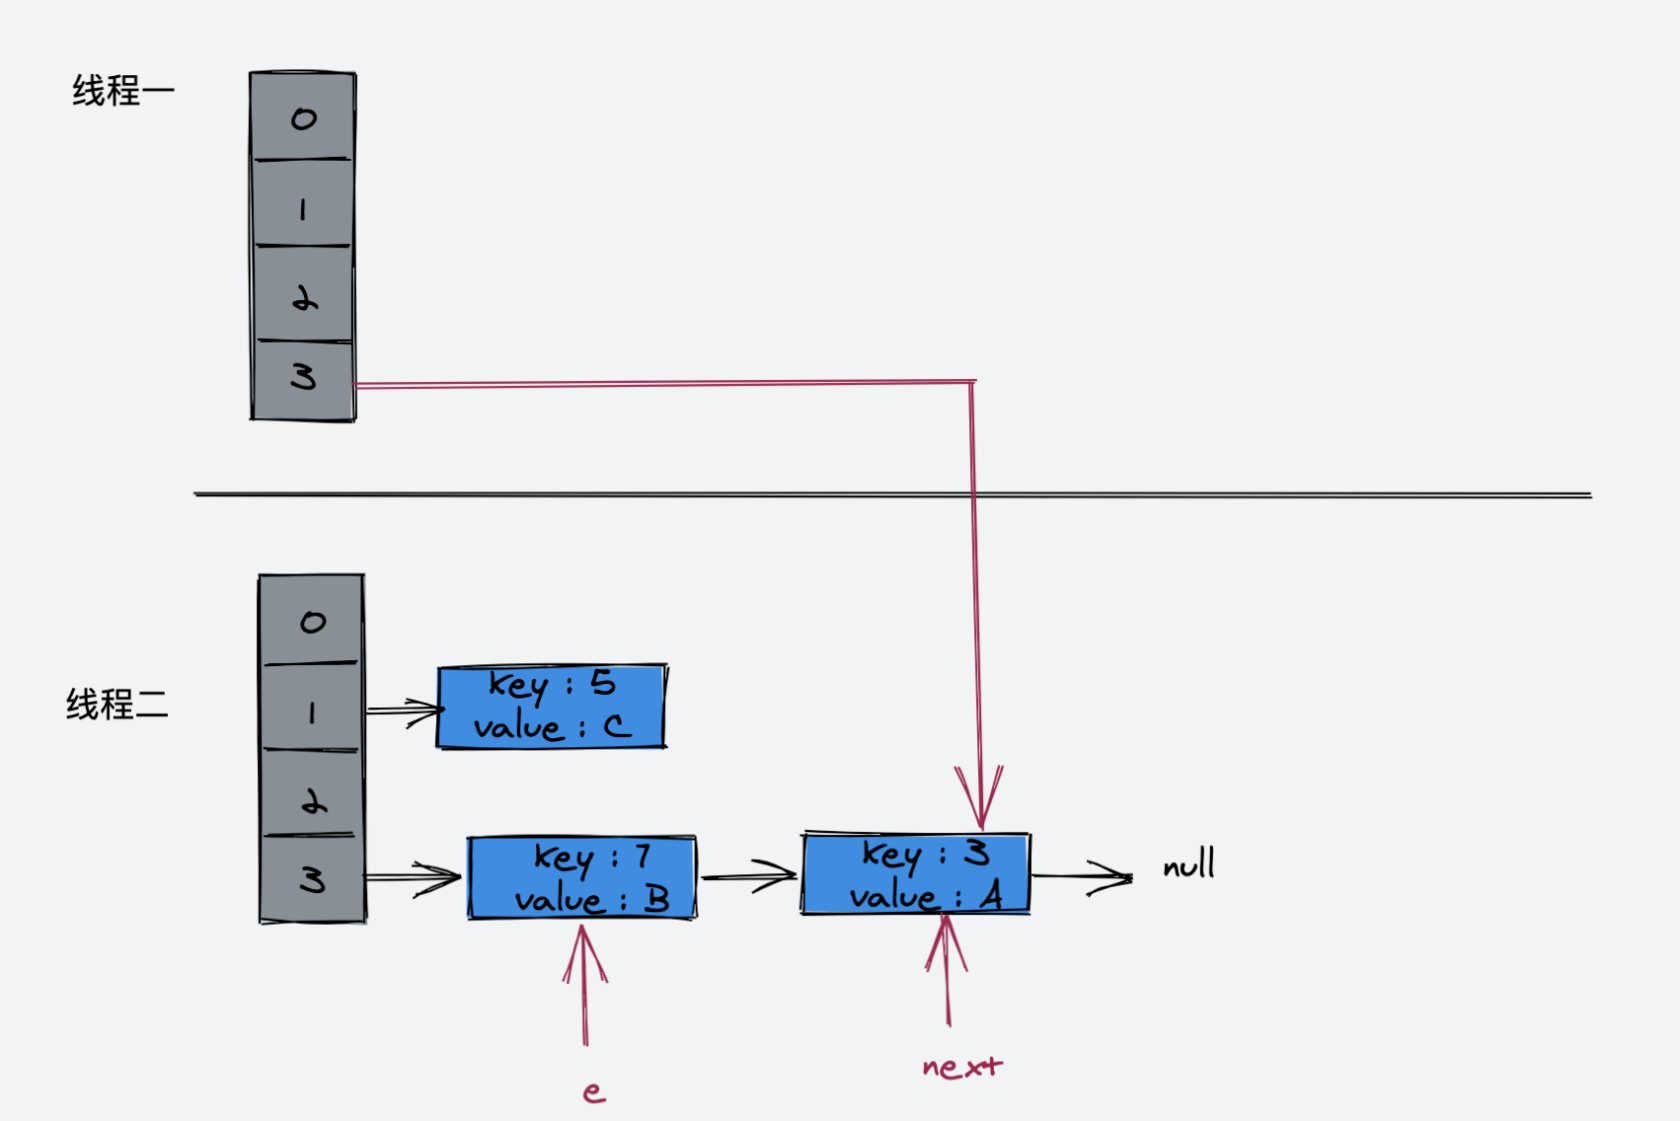
接着执行如下代码:
e.next = newTable[i];
newTable[i] = e;
e = next;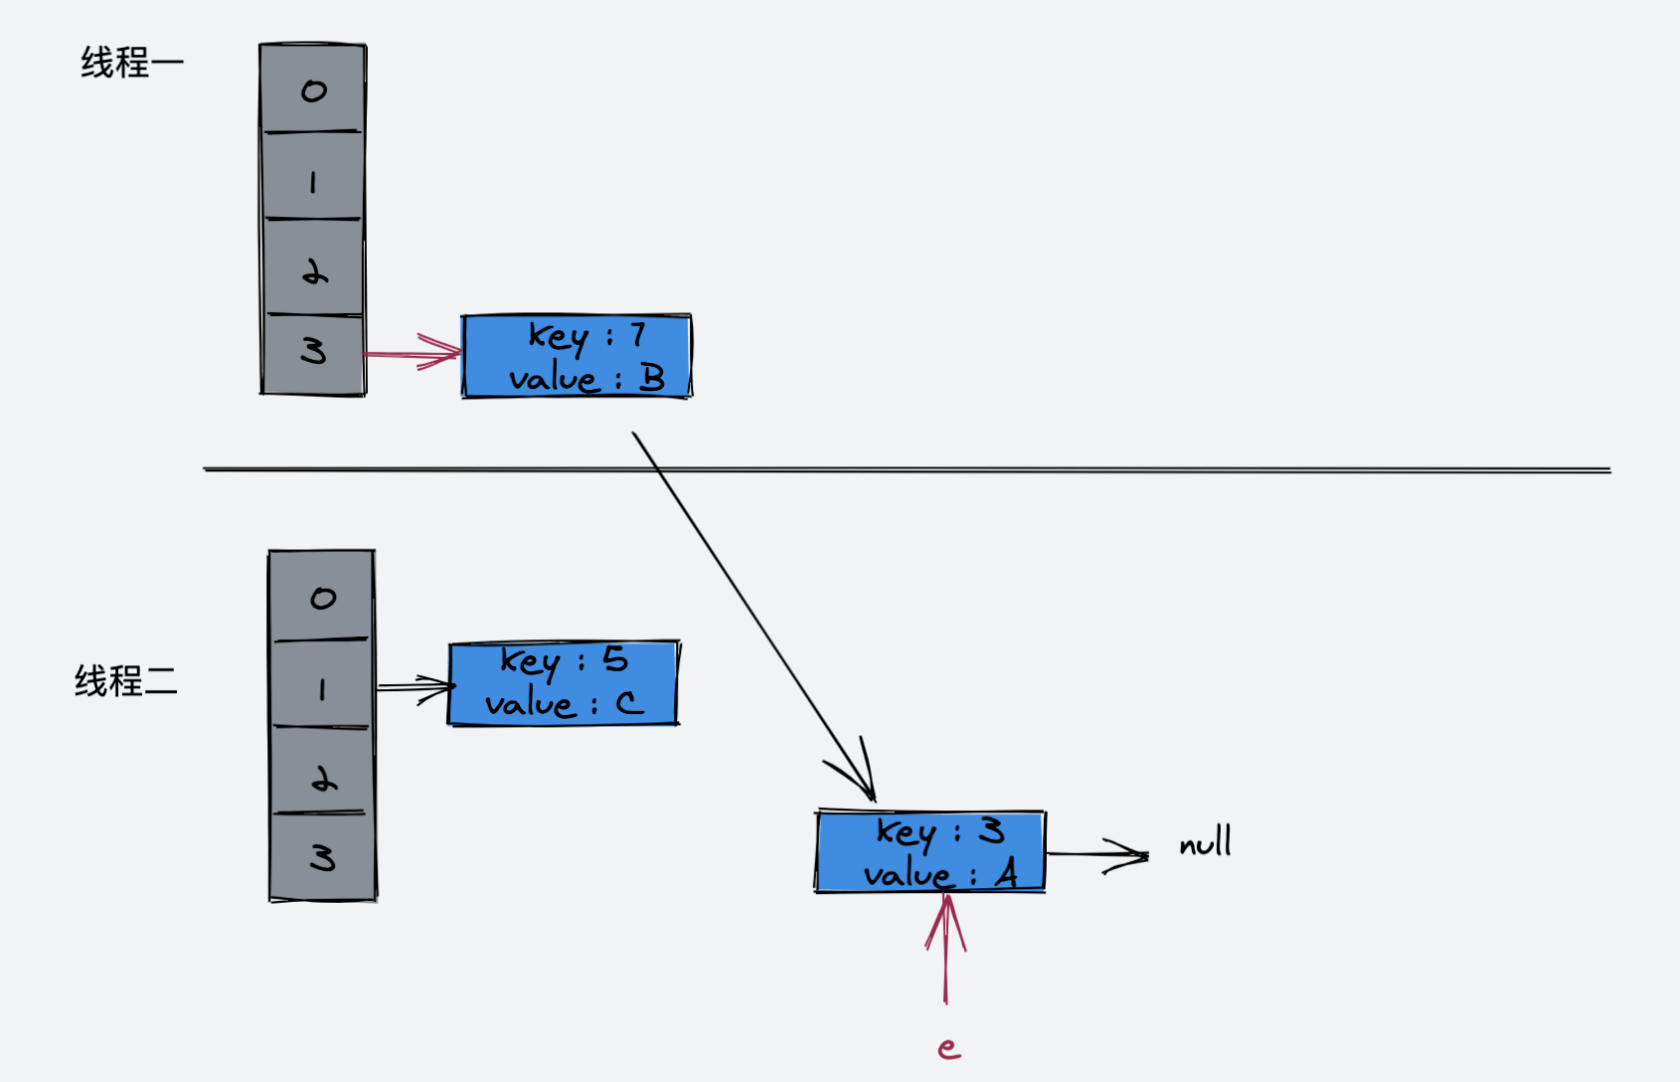
接着执行:
Entry<K,V> next = e.next;此时,next 指向为空
e.next = newTable[i];
newTable[i] = e;
e = next;
此时 e 指向 key(3),key(3).next 指向 key(7),因为 key(7) 已经指向了 key(3),所以环形链表出现了!

HashMap 的初始化容量为什么是 16?为什么 HashMap 的初始化容量要设计成 2 的幂?
我们知道,HashMap是由 数组 + 链表(红黑树) 构成,所谓 HashMap的容量指的就是哈希桶的数量,当我们向 HashMap中添加一个元素时,我们需要知道该元素应该放入到哪个哈希桶中。最直观的想法就是,调用该对象的 hashCode方法,该方法会返回一个整数,然后使用这个数对 HashMap的容量取模即可知道该元素在哈希桶数组中对应的位置。但 HashMap为了考虑各种性能效率等问题,实际内部的处理要复杂得多。
HashMap中的 hash方法就是用来解决这个问题的——新添加的元素该放进哪个桶中。
在JDK 1.7 ,HashMap会先使用 hash函数(方法)获取一个 hash值。hash方法传入元素的 key的 hashCode,返回一个 int值,然后调用 indexFor方法,indexFor方法传入 hash值和容器容量,计算出元素在哈希桶的数组中存放的位置。
hash 方法将 key.hashCode 转换成一大串数字
indexFor 方法将 hash 方法生成的一大串数字转换成哈希桶数组的下标
我们来看下源码:
hash
static int hash(int h) {
    return h ^ (h >>> 7) ^ (h >>> 4);
}
indexFor
static int indexFor(int h, int length) {
    return h & (length-1);
}
需要说明的是在 Java8 以后,就没有 indexFor方法了,而且 hash 方法变成了这个样子:
static final int hash(Object key) {
    int h;
    return (key == null) ? 0 : (h = key.hashCode()) ^ (h >>> 16);
}
不过,探究 JDK 1.7 的 indexFor方法会更直观一些,因为 JDK以后的版本中虽然没有 indexFor这样一个单独的方法,但是查询哈希桶数组的下标算法实际上是一样的。
indexFor
static int indexFor(int h, int length) {
    return h & (length-1);
}
我们先来了解一下这件事情:
k = pow(2,n)
h % (k) = h & (k - 1)假设,n = 3,那么 k = pow(2,3) = 8,假设 h = 6 ,那么6 % 8 = 6。h 表示为二进制数字即:0110,k - 1 = 7, 表示为二进制数字即:0111 ,0111 & 0110 = 0110 = 6 我们惊奇地发现表达式成立。
但是表达式成立的前提是:k = pow(2,n)
关于这个位运算的技巧,我们并不需要了解它是怎么成立的,毕竟这是一个数学问题,我们只需要记住该结论即可。
回到问题:h & (length-1) 是什么含义呢?实际上就是 取模运算 !因为位运算要比取模运算的效率更高,对于 HashMap 的设计来讲,效率是要高于一切的,所以在 indexFor 方法中,使用了位运算代替了取模运算,不过前提是,HashMap 的容量一定要是 2 的幂!
首先,HashMap 的初始化容量 16 满足 2 的幂这一要求;另外 16 作为初始化容量是一个效率与内存之间权衡考量的值,这个值既不能太大,又不能太小。所以,16 最终被 HashMap设计者所采纳。
HashMap 的负载因子为什么是 0.75?为什么要设计成链表长度超过 8 的时候转换为红黑树?
首先我们先了解下负载因子(loadFactor)的作用。
threshold = capacity * load factor再来回顾一下,这三个词的含义:threshold 翻译为:阈值 ,loadFactor 翻译为:负载因子, capacity翻译为:容量。
当向 HashMap 中添加元素的个数超过阈值时,HashMap 就会发生扩容操作:
if (++size > threshold)
    resize();
也就是说,当 HashMap 的 capacity 为 16 时,我们向 HashMap 中添加超过12 (16 * 0.75)个元素,HashMap 就会发生 resize (扩容)。
为何不将 loadFactor设置为 1或者是0.5 ? 因为,设计者必须要找到 resize 和 hash collision(哈希冲突)之间的平衡。
如果要降低 HashMap resize 的次数,那么,发生哈希冲突的概率就会增加;反之,要减少哈希冲突,我们就需要增加扩容的次数,这本身就是鱼和熊掌不可兼得的问题。
如果将 loadFactor 设置为 1,那么扩容的次数减少了,不过发生哈希冲突的概率就增加了;如果将 loadFactor 设置为 0.5,哈希冲突发生的概率减少了,但是扩容的次数增加,影响了性能。
所以,0.75 是一种平衡的结果。值得一提的是,不同语言的取值都不太一样,比如:Go 中为 0.65,Python 为 0.762 等等。
大家可以看一看 StackOverflow 上面的优秀解答,以数学的角度分析了原因:What is the significance of load factor in HashMap?
那么,为什么要设计成链表长度超过 8 的时候转换为红黑树呢?
答案就在 HashMap 的注释中:
* Ideally, under random hashCodes, the frequency of
* nodes in bins follows a Poisson distribution
* (http://en.wikipedia.org/wiki/Poisson_distribution) with a
* parameter of about 0.5 on average for the default resizing
* threshold of 0.75, although with a large variance because of
* resizing granularity. Ignoring variance, the expected
* occurrences of list size k are (exp(-0.5) * pow(0.5, k) /
* factorial(k)). The first values are:
*
* 0:    0.60653066
* 1:    0.30326533
* 2:    0.07581633
* 3:    0.01263606
* 4:    0.00157952
* 5:    0.00015795
* 6:    0.00001316
* 7:    0.00000094
* 8:    0.00000006
* more: less than 1 in ten million
我们从上表中可以看到,根据泊松分布,当哈希桶中的元素达到 8 的时候,概率是非常非常低的,也就是说,在使用 0.75 作为负载因子,哈希碰撞导致桶链表长度超过 8 的概率极低,所以,HashMap 设计为当哈希桶链表长度超过 8 时,进化为红黑树。
HashTable
HashTable 目前基本已经被淘汰了,在早前作为一种线程安全的 Hash 算法容器。目前不建议使用 HashTable,如果需要在多线程环境下使用 ,建议使用 ConcurrentHashMap。
HashTable 与 HashMap 的区别?
HashTable 是如何实现线程安全的呢?答案就是,HashTable 在几乎所有的方法上都加了 synchronized 锁,当然这么做的代价就是致使 HashTable 操作效率低下。
HashTable 与 HashMap 的区别主要有以下几点:
HashTable 线程安全,HashMap 非线程安全
HashMap 允许有一个键为 null,允许多个值为 null;而 HashTable 不允许键或值为 null
HashMap 的初始容量大小为 16;HashTable 初始容量大小为 11
那么,为什么HashTable 的初始容量大小是 11 呢?
是因为,HashTable 默认初始容量为 11 时,除(近似)质数的分散效果好。
详情请参考回答:为什么HashTable的默认大小和HashMap不一样?
ConcurrentHashMap
在上面我们提到 HashMap 在多线程并发的情况下可能会导致出现死循环问题,而 ConcurrentHashMap 就是为了解决这个问题而生。HashMap 从 JDK 1.7 到 JDK 8(1.8)出现了里程碑式的改变,即:从 “数组 + 链表” 进化至 “数组 + 链表 + 红黑树”。而 ConcurrentHashMap 的实现也是在这两个版本上略有不同。
ConcurrentHashMap(JDK 1.7)
JDK 1.7 中,ConcurrentHashMap 是由一个 Segment 数组和多个 HashEntry 数组组成:

其实就是将 HashMap 分成了多个小 HashMap,每个 Segment 元素维护一个小 HashMap , 目的是锁分离,HashTable 的加锁机制是对整个 table 这个粒度上加锁,导致严重影响并发的性能;而 ConcurrentHashMap 则是仅对 Segment 加锁,降低锁的粒度,从而提高并发性能。
Segment 是 ConcurrentHashMap 的一个内部类:
 static final class Segment<K,V> extends ReentrantLock implements Serializable {

     private static final long serialVersionUID = 2249069246763182397L;
      // 和 HashMap 中的 HashEntry 作用一样,真正存放数据的桶
     transient volatile HashEntry<K,V>[] table;

     transient int count;

     transient int modCount;

     transient int threshold;

     final float loadFactor;

     // ...

}我们看到,Segment 继承了 ReentrantLock 类。
ConcurrentHashMap(JDK 1.7) put
向 ConcurrentHashMap 中 put 一个元素首先需要通过 key 定位到 Segment 数组的具体位置,然后,在对应的 Segment 中进行具体的 put 操作。
我们来看一下 Segment 中的 put 方法:
final V put(K key, int hash, V value, boolean onlyIfAbsent) {
    HashEntry<K,V> node = tryLock() ? null :
    scanAndLockForPut(key, hash, value);
    V oldValue;
    try {
        HashEntry<K,V>[] tab = table;
        int index = (tab.length - 1) & hash;
        HashEntry<K,V> first = entryAt(tab, index);
        for (HashEntry<K,V> e = first;;) {
            if (e != null) {
                K k;
                if ((k = e.key) == key ||
                    (e.hash == hash && key.equals(k))) {
                    oldValue = e.value;
                    if (!onlyIfAbsent) {
                        e.value = value;
                        ++modCount;
                    }
                    break;
                }
                e = e.next;
            }
            else {
                if (node != null)
                    node.setNext(first);
                else
                    node = new HashEntry<K,V>(hash, key, value, first);
                int c = count + 1;
                if (c > threshold && tab.length < MAXIMUM_CAPACITY)
                    rehash(node);
                else
                    setEntryAt(tab, index, node);
                ++modCount;
                count = c;
                oldValue = null;
                break;
            }
        }
    } finally {
        //释放锁
        unlock();
    }
    //返回旧值
    return oldValue;
}
我们重点来看下第一段代码:
HashEntry<K,V> node = tryLock() ? null :
    scanAndLockForPut(key, hash, value);
tryLock 为 Segement 父类 ReetrantLock 的方法,在进入到 put 方法时,首先会尝试获取锁,如果获取成功,后续会将数据插入到相应的位置,如果有其他线程在获取该 Segment 的锁,当前线程就会调用方法 scanAndLockForPut 以自旋的方式继续获取锁,超过指定的次数就挂起,等待被唤醒。
我们看到 put 操作是加锁的。
ConcurrentHashMap(JDK 1.7) get
我们来看下 ConcurrentHashMap get 方法的源代码:
public V get(Object key) {
    Segment<K,V> s; // manually integrate access methods to reduce overhead
    HashEntry<K,V>[] tab;
    int h = hash(key);
    long u = (((h >>> segmentShift) & segmentMask) << SSHIFT) + SBASE;
    if ((s = (Segment<K,V>)UNSAFE.getObjectVolatile(segments, u)) != null &&
        (tab = s.table) != null) {
        for (HashEntry<K,V> e = (HashEntry<K,V>) UNSAFE.getObjectVolatile
                 (tab, ((long)(((tab.length - 1) & h)) << TSHIFT) + TBASE);
             e != null; e = e.next) {
            K k;
            if ((k = e.key) == key || (e.hash == h && key.equals(k)))
                return e.value;
        }
    }
    return null;
}
在 get 方法中,我们发现并不涉及到任何锁的操作,首先将 key 通过 hash 方法定位到具体的 segment 上,然后再调用一次 hash 方法定位到具体的元素上。因为 HashEntry 中的 value 属性通过 volatile 关键字修饰,保证对所有线程可见,所以 get 方法能够保证任何线程获取的都是最新值。
我们看到 get 方法是无锁的。
ConcurrentHashMap 为何比 HashTable 高效呢?
因为 HashTable 几乎所有的方法都使用了 synchronized 锁 ,在 JDK 8 还没有对 synchronized 优化之前,synchronized 的性能效率是十分低的;而 ConcurrentHashMap 使用分段锁的思想,大大优化了性能。
ConcurrentHashMap(JDK 1.8)
ConcurrentHashMap 在 JDK 8(1.8)的改变与提升是巨大的。
JDK 1.7 中,ConcurrentHashMap 实现并发可用的原理为 Segment 分段锁;
而在 JDK 8 中,ConcurrentHashMap 设计者 Doug Lea 抛弃了 Segment ,将原本的 HashEntry 改为了 Node,采用 CAS + synchronized+ 红黑树实现了并发下可用。

我们看到,ConcurrentHashMap 的结构示意图和 HashMap 的示意图差不太多。
Doug Lea 采用 synchronized 抛弃了* Segment 的原因是,JDK* 8 对 sychronized 的优化是巨大的,原本 Segment 继承 ReentrantLock 的实现,现在只需要在 Node 这个粒度上加锁就可以获得差不多的性能。JDK 8 ConcurrentHashMap 的设计是极其复杂的,可以说是并发大师 Doug Lea 的艺术作品。
至于 CAS 是什么,我们后话再说,在本章节中,我们只需要先知道 JDK 8 相较于 1.7 做出了哪些改变点即可。
LinkedHashMap
LinkedHashMap 的实现原理为 HashMap + 双向链表。
HashMap 是无序的,当我们希望有顺序地存储 key-value 时,就需要使用 LinkedHashMap 。
LinkedHashMap 默认为元素的插入顺序,示例程序:
package com.github.test;

import java.util.Iterator;
import java.util.LinkedHashMap;
import java.util.Map;

public class Test {

    public static void main(String[] args) {
        Map<String, Integer> linkedHashMap = new LinkedHashMap<>();
        linkedHashMap.put("zhangsan", 21);
        linkedHashMap.put("lisi", 22);
        linkedHashMap.put("wangwu", 23);
        Iterator<Map.Entry<String, Integer>> iterator = linkedHashMap.entrySet().iterator();
        while (iterator.hasNext()) {
            Map.Entry entry = iterator.next();
            System.out.println(entry.getKey() + ":" + entry.getValue());
        }
    }
}
代码执行结果:
zhangsan:21
lisi:22
wangwu:23
在本章节中,我们只对 LinkedHashMap 基本用法做一个简单介绍。
TreeMap
TreeMap 即 红黑树,也是一个有序的 Map。不过 TreeMap 和 LinkedHashMap 的有序不太一样,LinkedHashMap 是按照插入顺序进行排序的,而 TreeMap 是按照 Key 的自然顺序排序或者按照自定义的 Comparator 比较器进行排序的。
关于红黑树,我们会在 数据结构与算法初级 这一部分进行详解。
示例程序:
package com.github.test;

import java.util.Iterator;
import java.util.Map;
import java.util.TreeMap;

public class Test {

    public static void main(String[] args) {
        Map<Integer, String> map = new TreeMap<>();
        map.put(3, "zhangsan");
        map.put(1, "lisi");
        map.put(2, "wangwu");

        Iterator<Map.Entry<Integer, String>> iterator = map.entrySet().iterator();
        while (iterator.hasNext()) {
            Map.Entry<Integer, String> entry = iterator.next();
            System.out.println(entry.getKey() + ":" + entry.getValue());
        }
    }
}
程序输出结果:
1:lisi
2:wangwu
3:zhangsan我们看到,TreeMap 默认会将添加元素的 key 按照自然序进行排序。
我们还可以为 TreeMap 自定义比较器,如示例程序:
package com.github.test;

import java.util.Comparator;
import java.util.Iterator;
import java.util.Map;
import java.util.TreeMap;

public class Test {

    public static void main(String[] args) {
        Map<Integer, String> map = new TreeMap<>((o1, o2) -> o2 - o1);
        map.put(3, "zhangsan");
        map.put(1, "lisi");
        map.put(2, "wangwu");

        Iterator<Map.Entry<Integer, String>> iterator = map.entrySet().iterator();
        while (iterator.hasNext()) {
            Map.Entry<Integer, String> entry = iterator.next();
            System.out.println(entry.getKey() + ":" + entry.getValue());
        }
    }
}
程序输出结果:
3:zhangsan
2:wangwu
1:lisi
我们初始化 TreeMap 时,向其中传入了一个比较器:
Map<Integer, String> map = new TreeMap<>((o1, o2) -> o2 - o1);这是 Java lambda 表达式的简化写法,现在我们还原成匿名内部类的写法:
Map<Integer, String> map = new TreeMap<>(new Comparator<Integer>() {
    @Override
    public int compare(Integer o1, Integer o2) {
        return o2 - o1;
    }
});
我们向 TreeMap 中 传入了一个 Comparator 比较器,说白了就是我们让 TreeMap 听我们的话,使用我们自定义比较规则。Comparator 与 Comparable 这两个接口我们已经重点介绍过,这里就不再重复赘述了。
三:Collections 常用方法
Collection 是集合类,而 Collections 是集合的工具类,提供了一系列方便的静态方法。我们来看下几个比较常用的方法
Collections.sort(List list,Comparator<? super T> c)
Collections.sort()方法支持对实现 Comparable 接口的类的 List 集合进行排序,也可以自定义比较器。示例程序:
package com.github.test;

import java.util.*;

public class Test {

    public static void main(String[] args) {
        List<Integer> list = new ArrayList<>();
        list.add(5);
        list.add(4);
        list.add(3);
        list.add(6);
        list.add(1);
        list.add(0);
        Collections.sort(list);
        System.out.println(list);
    }
}
程序输出结果:
[0, 1, 3, 4, 5, 6]Collections.emptyXXX()
Collections.emptyXXX()方法可以返回一个空集合,以方便我们使用。示例程序:
package com.github.test;

import java.util.*;

public class Test {

    public static void main(String[] args) {
        List<Object> list = Collections.emptyList();
        Set<Object> set = Collections.emptySet();
        Map<Object, Object> map = Collections.emptyMap();
        SortedMap<Object, Object> sortedMap = Collections.emptySortedMap();
        SortedSet<Object> sortedS = Collections.emptySortedSet();
    }
}
Collections.synchronizedCollection(Collection c)
Collections.synchronizedCollection方法可以将一个集合变成线程安全的集合示例程序:
package com.github.test;

import java.util.*;

public class Test {

    public static void main(String[] args) {
        List<Object> list = Collections.emptyList();
        Collection<Object> synchronizedCollection = Collections.synchronizedCollection(list);
    }
}
Collections.unmodifiableCollection(Collection<? extends T> c)
Collections.unmodifiableCollection()方法的作用是将一个集合变成不可变的示例程序:
package com.github.test;

import java.util.*;

public class Test {

    public static void main(String[] args) {
        List<Integer> list = new ArrayList<>();
        list.add(1);
        list.add(2);
        list.add(3);
        Collection<Integer> unmodifiableList = Collections.unmodifiableCollection(list);
        unmodifiableList.add(4);
        System.out.println(unmodifiableList);
    }
}
程序运行结果:
Exception in thread "main" java.lang.UnsupportedOperationException at java.base/java.util.Collections$UnmodifiableCollection.add(Collections.java:1060) at com.github.test.Test.main(Test.java:13)可以看到,上述程序报错,原因就在于,unmodifiableList 是一个不可变的集合,无法对该集合进行任何添加元素或删除元素的操作,所以程序会抛出一个 UnsupportedOperationException 。
四:参考文章
coolshell.cn/articles/9606.html
www.cnblogs.com/hollischuang/p/120...
stackoverflow.com/questions/109017...
www.zhihu.com/question/271137476/a...
stackoverflow.com/questions/941396...
www.zhihu.com/question/29587252
blog.csdn.net/weixin_44460333/arti...
blog.csdn.net/weixin_28965739/arti...


 关于 LearnKu


