
 Django Girls 教程
扩展您的应用
我们已经完成了所有创建网站所需的各项步骤:我们知道如何写一个模型,URL ,视图和模板。我们也知道如何让我们网站更漂亮。
现在到了实践时间!
我们需要在博客里做的第一件事情显然是,一个展现一篇博客的页面,对吗?
我们已经有了 Post 模型,所以我们不需要再添加任何内容到 models.py 文件中。
创建一个模板链接到博文的详情页
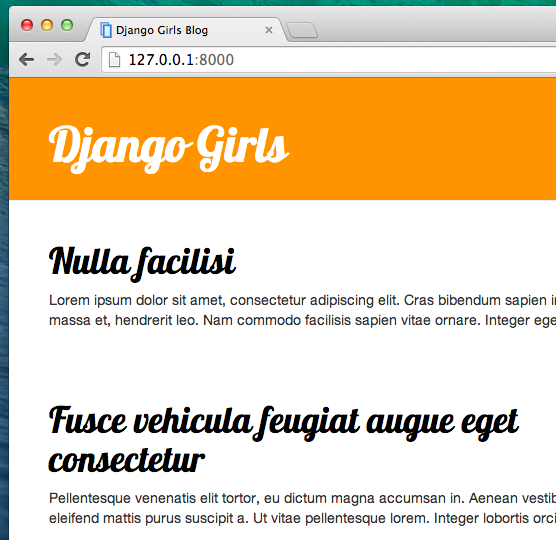
最初,我们将在 blog/templates/blog/post_list.html 里添加一个链接。目前它应该看起来像这样:
{% extends 'blog/base.html' %}

{% block content %}
    {% for post in posts %}
        <div class="post">
            <div class="date">
                {{ post.published_date }}
            </div>
            <h2><a href="">{{ post.title }}</a></h2>
            <p>{{ post.text|linebreaksbr }}</p>
        </div>
    {% endfor %}
{% endblock %}
对于博文列表的博文,我们想在其标题处添加一个链接到它的详情页面。让我们修改<h2><a href="">{{ post.title }}</a></h2> ,使它可以链接到博文的详情页:
<h2><a href="{% url 'post_detail' pk=post.pk %}">{{ post.title }}</a></h2>
是时候解释一下神秘的 {% url 'post_detail' pk=post.pk %}了。 正如你所猜想的,{% %} 标记意味着我们正在使用 Django 模板标签。 这一次我们将使用一个能为我们创建 URL 的!
post_detail 部分表示 Django 将会在 blog/urls.py 看到一个 name=post_detail 的 URL。
那 pk=post.pk呢? pk 是 primary key(主键)的缩写,是数据库表中每条记录的唯一标识符。由于我们无法在 Post 模型内实例化一个主键, Django 为我们创建了一个(默认情况下,每条记录的数字是逐次增1的,如 1, 2, 3) 并将它添加到每个博文的 pk 字段。我们通过定义 post.pk 获得主键,并通过同样的方式获取我们的Post对象的其他字段!
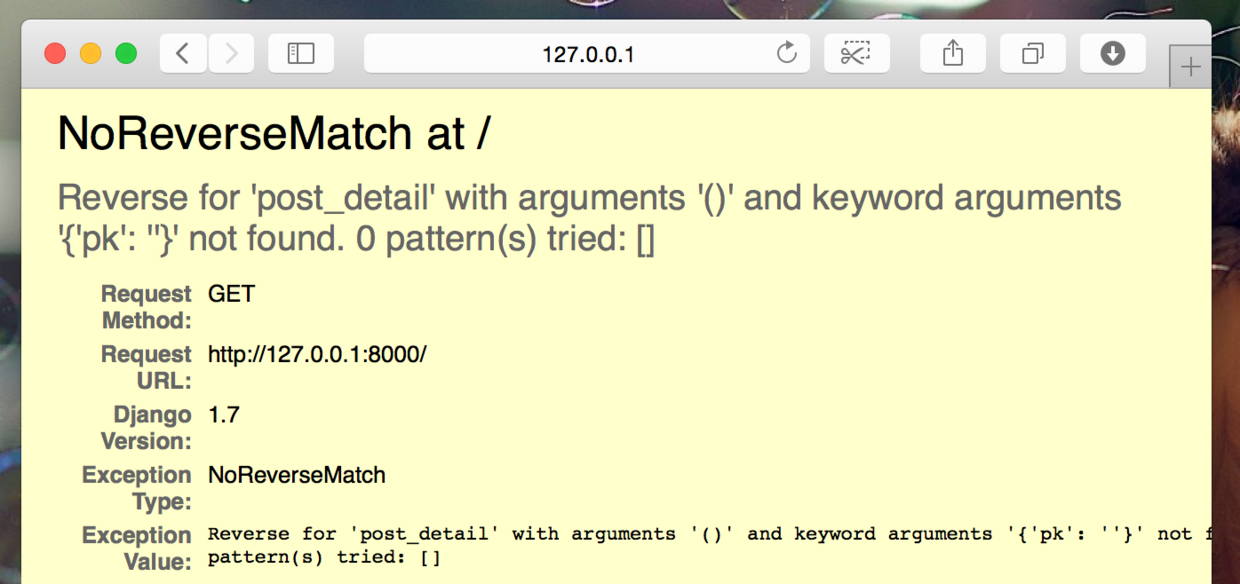
现在当我们访问 127.0.0.1:8000/ 会得到一个错误(这是预料之中的,因为我们没有 post_detail对应的 URL 或 视图)。看起来会像这样:
创建一个到博文详情页的 URL
让我们在 urls.py 里为我们的 post_detail view(视图) 创建一个 URL!
我们想让我们的第一个博文的详情页面显示在这个 URL:127.0.0.1:8000/post/1/
让我们在 blog/urls.py 文件中增加一个 URL 引导 Django 到名为 post_detail 的 view(视图),来显示整篇文章。 在代码编辑器中打开 blog/urls.py 文件,添加如下代码: path('post/<int:pk>/', views.post_detail, name='post_detail'), 它现在看起来应该是:
from django.urls import path
from . import views

urlpatterns = [
    path('', views.post_list, name='post_list'),
    path('post/<int:pk>/', views.post_detail, name='post_detail'),
]
post/<int:pk>/ 定义了一个 URL 模式 – 我们做如下解释:
post/意为 URL 将从 post 开始,后面是 /。目前还不错。<int:pk>– 这一部分更棘手。它表示 Django 要求的是一个 integer 类型的值,并会将该值作为一个名为pk的变量传递到视图。/– 在 URL 结束之前我们还需要一个/ 。
这就意味着如果你从浏览器进入 http://127.0.0.1:8000/post/5/ , Django 会知道你在查找一个名为 post_detail的视图 并将 pk 等于 5 的信息传递到 视图。
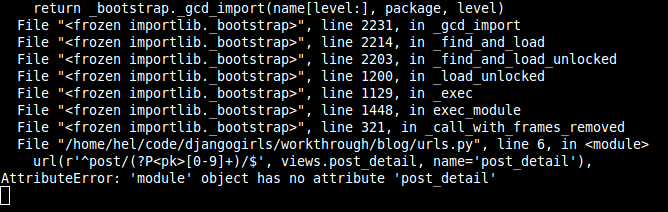
OK, 我们已经将一个新的 URL 模式添加到 blog/urls.py了!让我们刷新页面: 127.0.0.1:8000/ 嘭!服务器有一次停止运行了。看看控制台 - 意料之中,还有一个错误!
记得下一步是什么吗?添加一个视图!
添加一个博客详情页面的视图
这一次我们的视图有一个附加的参数,pk。我们的视图需要捕获它,对吗?所以我们将函数定义为 def post_detail(request, pk):。注意,这里的pk需要使用与定义在urls(pk)中的相同的名字。 忽视这个变量是不对的,这会导致一个错误!
现在,我们只想得到一篇博文。为此,我们可以使用 querysets(查询集合),像这样:
Post.objects.get(pk=pk)
但是这个代码有一个问题。假如没有与给出的primary key (pk) 匹配的Post ,我们将得到一个糗糗的错误!
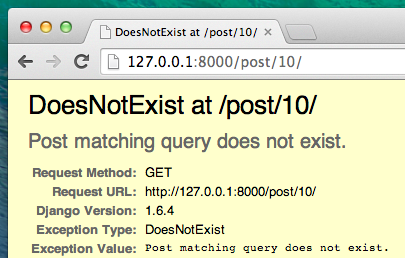
我们不想要那个! 不过,幸运的是,Django 已经为我们处理好了这些:get_object_or_404。 如果给定的 pk没有 Post ,它将展现更多有趣的页面(称作 Page Not Found 404 页面)。
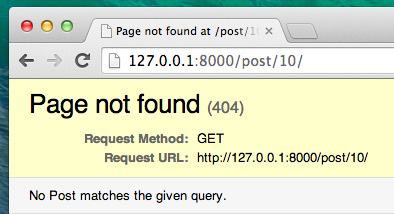
好消息是你实际上可以创建你自己 Page not found 的页面,并按照自己的心意使它漂亮。但现在它不是超级重要的,所以我们将跳过它。
OK ,是时候将 视图 添加到我们的 views.py 文件了!
在 blog/urls.py中,我们创建一个 URL 匹配模式 ,名为 post_detail 。它指向一个名为 views.post_detail的视图。这意味着 Django 要求在blog/views.py中定义一个名为 post_detail 的函数。
我们应该在代码编辑器中打开 blog/views.py ,在另一个 from 行添加如下代码:
from django.shortcuts import render, get_object_or_404
在文本结尾添加我们的视图:
def post_detail(request, pk):
    post = get_object_or_404(Post, pk=pk)
    return render(request, 'blog/post_detail.html', {'post': post})
好了。这时刷新页面:127.0.0.1:8000/
它工作得不错!但是当你点击博文标题的链接会发生什么呢?
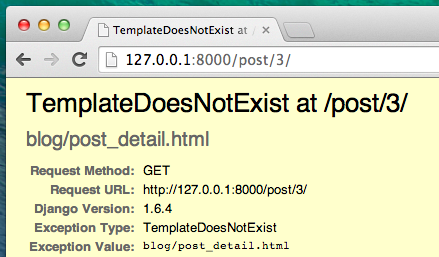
Oh no! 另一个错误!不过我们已经知道如何处理它了,对吗?我们需要添加一个模板!:blush:
为文章详情页面创建一个模板
我们将在 blog/templates/blog 中创建一个文件,名为 post_detail.html 。
它看起来会像这样:
{% extends 'blog/base.html' %}

{% block content %}
    <div class="post">
        {% if post.published_date %}
            <div class="date">
                {{ post.published_date }}
            </div>
        {% endif %}
        <h2>{{ post.title }}</h2>
        <p>{{ post.text|linebreaksbr }}</p>
    </div>
{% endblock %}
我们将再一次扩展 base.html。 在 content 块中,我们想要显示一篇文章的 published_date(发布日期,如果存在的话), 标题和文本。 但我们应该先讨论一些重要的东西,对吗?
{% if ... %} ... {% endif %} 是当我们想检查(还记得 Python 简介里的 if ... else ... 吗?)时可以使用的一种模板标记 。 在这个例子中,我们想要检查文章的 published_date 是否非空。
好的,我们可以刷新我们的页面并查看TemplateDoesNotExist 现在是不是已经不见了。
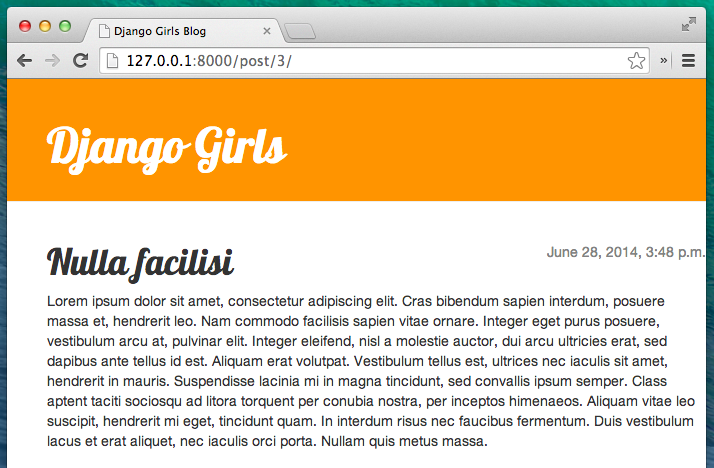
耶!成功了!
部署时间!
你的网站如果还能在 PythonAnywhere 正常运转就好了,对吧?让我们再次尝试部署。
$ git status
$ git add --all .
$ git status
$ git commit -m "Added view and template for detailed blog post as well as CSS for the site."
$ git push
然后,在 PythonAnywhere Bash console:
$ cd ~/<your-pythonanywhere-domain>.pythonanywhere.com
$ git pull
[...]
(记得用你实际的 PythonAnywhere 域名替换 <your-pythonanywhere-domain> ,去掉尖括号)。
更新服务器上的静态文件
像 PythonAnywhere 这些服务器处理 "static files(静态文件)" (比如 CSS 文件) 不同于 Python 文件, 因为它们可以为其(静态文件)做出优化,使它们的加载更快。因此,只要我们修改了 CSS 文件,我们就需要在服务器上运行额外的命令,让它更新这些静态文件。这个命令名为 collectstatic。
从激活你的虚拟环境开始,如果之前没有激活的话。(PythonAnywhere 使用一个名为 workon 的命令进行激活,类似在你的计算机上使用的命令 source myenv/bin/activate ):
$ workon <your-pythonanywhere-domain>.pythonanywhere.com
(ola.pythonanywhere.com)$ python manage.py collectstatic
[...]
manage.py collectstatic 命令有点像manage.py migrate命令。 我们对代码做出一些修改,然后告诉 Django 应用这些修改到服务器静态文件集,或者到数据库。
无论怎样,我们已经准备好快速访问 "Web" page(“网”页) (从控制台的右上角的菜单按钮) 然后点击 Reload(重新加载),然后查看 https://subdomain.pythonanywhere.com 页面来观察结果。
这样就可以了!祝贺你!:blush:
本译文仅用于学习和交流目的,转载请务必注明文章译者、出处、和本文链接
我们的翻译工作遵照 CC 协议,如果我们的工作有侵犯到您的权益,请及时联系我们。


 关于 LearnKu


推荐文章: