
 Django Girls 教程
HTML 简介
这是一篇协同翻译的文章,你可以点击『我来翻译』按钮来参与翻译。
《Django Girls》的 中文翻译 1.8 版本 已经翻译完成,请在参考 1.8 版本的基础上进行校正和翻译。
什么是模板,你也许会问?
模板是一个可以复用的文件,以一致的格式来展示不同的信息 — — 例如,你可以使用模板来帮助你写一封信,虽然每封信可以包含不同的消息和发送给不同的人,但它们使用相同的格式。
Django 模板的格式是由 HTML(也就是我们在第一章 互联网是如何工作的 中提到的 HTML )语言来描述的)。
HTML 是什么?
HTML 是一种由 Web 浏览器解释的代码 — 如 Chrome、 火狐或 Safari— 为用户显示一个网页。
HTML 代表 “HyperText Markup Language(超文本标记语言)”。 超文本 是指它是一种支持网页之间的超链接的文本。 标记( Markup ) 是指我们将一份文件用代码标记组织起来,告诉某个东西(如在这里,浏览器) 如何解释网页。 HTML 代码是由标记构成的,每一个都是由 < 开始,由 >结束。 这些标签表示元素标记。

你的第一个模板!
创建一个模板是指创建一个模板文件。一切都是文件,对吧?你可能已经注意到这点了。
模板保存在 blog/templates/blog 目录中。 因此,首先在你的 blog 目录内创建一个 templates 目录。 然后创建另一个blog 的目录到你的 templates 目录:
blog
└───templates
    └───blog
(你可能会疑惑为什么我们的两个目录都命名为 blog — 你以后会发现这是实用的命名规则,当事情开始变得更加复杂的时候,它使生活更容易。)
现在创建一个叫做 post_list.html 的文件 (现在先让它空着)到 blog/templates/blog 目录下。
看看你的网站现在是什么样子:127.0.0.1:8000/
如果你的程序依然报错
TemplateDoesNotExist,尝试重启你的服务器。前往命令行,按下 Ctrl+C (控制键和 C 键同时) 停止服务器,执行python manage.py runserver重新运行它。
没有报错了!祝贺你!:blush:不过,你的网站实际上并没有发布任何东西,除了一个空白页,因为你的模板也是空的。我们需要解决这个问题。
在代码编辑器打开新文件,添加下面的代码:
<html>
<body>
    <p>Hi there!</p>
    <p>It works!</p>
</body>
</html>
那么现在你的网站看起来怎么样呢?访问并查看: 127.0.0.1:8000/
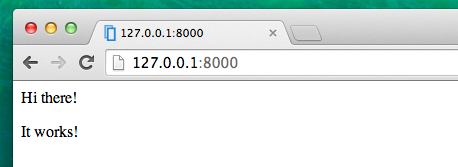
它正常工作!这里做的不错!:blush:
- 最基础的标记,任何网页总是以
<html>开始,以</html>结尾。正如你所见,整个网站的内容都在开始标记<html>和闭合标记</html>之间 <p>是段落元素的标记;</p>闭合每一个段落。
Head and body
每个 HTML 页面也分为两个元素: head 和 body。
-
head 是一个包含文档未显示在屏幕上的有关信息的元素。
-
body 是包含 web 页中所有显示的元素。
我们使用 <head> 告诉浏览器这个页面的配置,以及 <body> 来告诉它在页面上的实际上有什么。
例如,你可以把网页标题元素放到 <head> 里,像这样:
<html>
    <head>
        <title>Ola's blog</title>
    </head>
    <body>
        <p>Hi there!</p>
        <p>It works!</p>
    </body>
</html>
保存该文件并刷新您的网页。
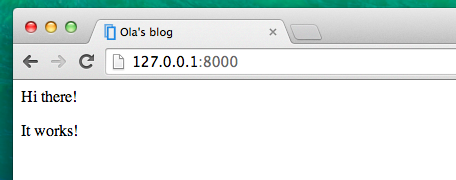
注意浏览器怎么理解 "Ola's blog" 是你的网页的标题的呢? 它解释了 <title>Ola's blog</title> 并将其放置到浏览器的标题栏(它也用于书签,等等) 中。
可能你也注意到每个开始标记匹配一个结束标记,用 / 和那个元素 嵌套 (即你不能关闭该标记,除非里面的所有标记都关闭了)。
这就像把东西放进盒子里。 你有一个大箱子,<html></html> ;在它里面还有 <body></body>小箱子:小箱子还包括更小的箱子 <p></p>。
你需要遵循这些 关闭 标签和 嵌套 元素的规则 —— 如果你不这样做,浏览器可能不能正确地解释它们,并且页面将无法正常显示。
自定义你的模板
现在,你可以找点乐子,尝试自定义您的模板 !为此这里有几个有用的标签:
<h1>A heading(标题)</h1>最重要的标题<h2>A sub-heading(副标题)(</h2>次级标题<h3>A sub-sub-heading(二级副标题)</h3>…到<h6>等等<p>A paragraph of text</p><em>text</em>文本强调(斜体)<strong>text</strong>文本强调(加粗)<br>跳转到下一行(你不能放任何东西在 br 里面)<a href="https://djangogirls.org">link(链接)</a>创建一个链接<ul><li>first item(第一项)</li><li>second item(第二项)</li></ul>像这样创建一个列表!<div></div>定义页面上的一个区段
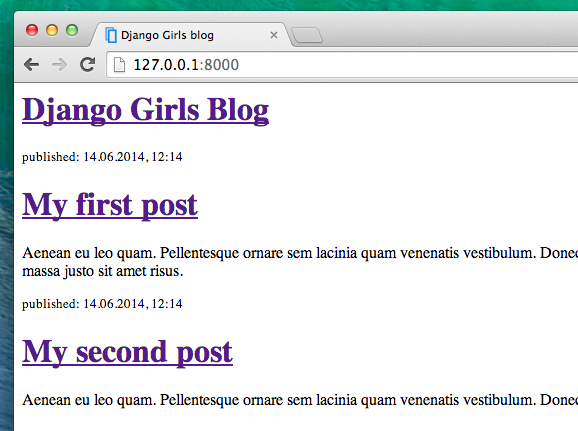
下面是模板的一个完整示例,拷贝并粘贴在blog/templates/blog/post_list.html:
<html>
    <head>
        <title>Django Girls blog</title>
    </head>
    <body>
        <div>
            <h1><a href="/">Django Girls Blog</a></h1>
        </div>

        <div>
            <p>published: 14.06.2014, 12:14</p>
            <h2><a href="">My first post</a></h2>
            <p>Aenean eu leo quam. Pellentesque ornare sem lacinia quam venenatis vestibulum. Donec id elit non mi porta gravida at eget metus. Fusce dapibus, tellus ac cursus commodo, tortor mauris condimentum nibh, ut fermentum massa justo sit amet risus.</p>
        </div>

        <div>
            <p>published: 14.06.2014, 12:14</p>
            <h2><a href="">My second post</a></h2>
            <p>Aenean eu leo quam. Pellentesque ornare sem lacinia quam venenatis vestibulum. Donec id elit non mi porta gravida at eget metus. Fusce dapibus, tellus ac cursus commodo, tortor mauris condimentum nibh, ut f.</p>
        </div>
    </body>
</html>
在这里我们已经创建了三个区段 div :
- 第一个
div元素包含博客的标题 — — 这是一个标题和一个链接 - 另两个
div元素包含博客文章和发表的日期。h2是可点击的文章标题;两个p(段落) 的文本,一个包含日期,另一个包含文章。
效果如下:
耶! 只是到目前为止,我们的模板永远只显示完全 相同的信息 — — 而我们之前谈到的模板允许我们以相同的格式显示不同的信息.
我们真正想要做的是的显示实际添加到我们 Django admin 里面的文章:这是我们接下来要做的。
One more thing: deploy!
It'd be good to see all this out and live on the Internet, right? Let's do another PythonAnywhere deploy:
Commit, and push your code up to GitHub
First off, let's see what files have changed since we last deployed (run these commands locally, not on PythonAnywhere):
$ git status
Make sure you're in the djangogirls directory and let's tell git to include all the changes in this directory:
$ git add --all .
--allmeans thatgitwill also recognize if you've deleted files (by default, it only recognizes new/modified files). Also remember (from chapter 3) that.means the current directory.
Before we upload all the files, let's check what git will be uploading (all the files that git will upload should now appear in green):
$ git status
We're almost there, now it's time to tell it to save this change in its history. We're going to give it a "commit message" where we describe what we've changed. You can type anything you'd like at this stage, but it's helpful to type something descriptive so that you can remember what you've done in the future.
$ git commit -m "Changed the HTML for the site."
Make sure you use double quotes around the commit message.
Once we've done that, we upload (push) our changes up to GitHub:
$ git push
Pull your new code down to PythonAnywhere, and reload your web app
- Open up the PythonAnywhere consoles page and go to your Bash console (or start a new one). Then, run:
$ cd ~/<your-pythonanywhere-domain>.pythonanywhere.com
$ git pull
[...]
You'll need to substitute <your-pythonanywhere-domain> with your actual PythonAnywhere subdomain name, without the angle-brackets. Your subdomain name is normally your PythonAnywhere user name, but in some cases it might be a bit different (such as if your user name contains capital letters). So if this command doesn't work, use the ls (list files) command to find your actual subdomain/folder name, and then cd to there.
Now watch your code get downloaded. If you want to check that it's arrived, you can hop over to the "Files" page and view your code on PythonAnywhere (you can reach other PythonAnywhere pages from the menu button on the console page).
- Finally, hop on over to the "Web" page and hit Reload on your web app.
Your update should be live! Go ahead and refresh your website in the browser. Changes should be visible. :)
本文中的所有译文仅用于学习和交流目的,转载请务必注明文章译者、出处、和本文链接
我们的翻译工作遵照 CC 协议,如果我们的工作有侵犯到您的权益,请及时联系我们。


 关于 LearnKu


