
 TDD 构建 Laravel 论坛笔记
72.邮箱认证(二)
- 本系列文章为
laracasts.com的系列视频教程——Let's Build A Forum with Laravel and TDD 的学习笔记。若喜欢该系列视频,可去该网站订阅后下载该系列视频, 支持正版 ;- 视频源码地址:github.com/laracasts/Lets-Build-a-...;
- 本项目为一个 forum(论坛)项目,与本站的第二本实战教程 《Laravel 教程 - Web 开发实战进阶》 类似,可互相参照。
本节说明
- 对应视频教程第 72 小节:Users Must Confirm Their Email Address: #2 - Confirmation
邮件发送
新建测试
本节我们继续完成邮箱认证的功能。首先我们来新建一个测试文件并添加我们的第一个测试:
forum\tests\Feature\RegistrationTest.php
<?php

namespace Tests\Feature;

use App\Mail\PleaseConfirmYourEmail;
use Illuminate\Auth\Events\Registered;
use Illuminate\Support\Facades\Mail;
use Tests\TestCase;
use Illuminate\Foundation\Testing\DatabaseMigrations;

class RegistrationTest extends TestCase
{
    use DatabaseMigrations;

    /** @test */
    public function a_confirmation_email_is_sent_upon_registration()
    {
        Mail::fake();

        event(new Registered(create('App\User')));

        Mail::assertSent(PleaseConfirmYourEmail::class);
    }
}
监听事件
我们在测试邮件发送时,并不会真的发送邮件,而是利用 Laravel 测试模拟器的 邮件模拟 功能来模拟邮件发送功能。在上面的测试中,我们的逻辑是监听Registered事件,然后执行PleaseConfirmYourEmail。但是现在PleaseConfirmYourEmail的相关逻辑还没建立,我们一步步来建立。首先我们注册事件:
forum\app\Providers\EventServiceProvider.php
<?php

namespace App\Providers;

use Illuminate\Auth\Events\Registered;
use Illuminate\Support\Facades\Event;
use Illuminate\Foundation\Support\Providers\EventServiceProvider as ServiceProvider;

class EventServiceProvider extends ServiceProvider
{
    protected $listen = [
        'App\Events\ThreadReceivedNewReply' => [
            'App\Listeners\NotifyMentionedUsers',
            'App\Listeners\NotifySubscribers',
        ],

        Registered::class => [
            'App\Listeners\SendEmailConfirmationRequest'
        ]
    ];

    public function boot()
    {
        parent::boot();

        //
    }
}
接着我们新增监听器SendEmailConfirmationRequest:
$ php artisan event:generateforum\app\Listeners\SendEmailConfirmationRequest.php
<?php

namespace App\Listeners;

use App\Mail\PleaseConfirmYourEmail;
use Illuminate\Auth\Events\Registered;
use Illuminate\Queue\InteractsWithQueue;
use Illuminate\Contracts\Queue\ShouldQueue;
use Illuminate\Support\Facades\Mail;

class SendEmailConfirmationRequest
{
    public function __construct()
    {
        //
    }

    public function handle(Registered $event)
    {
        Mail::to($event->user)->send(new PleaseConfirmYourEmail());
    }
}
接着新增 Markdown 格式的 Mailable 类(PleaseConfirmYourEmail ):
$ php artisan make:mail PleaseConfirmYourEmail --markdown="emails.confirm-email"然后编写我们想要发送的 Markdown 格式的消息:
forum\resources\views\emails\confirm-email.blade.php
@component('mail::message')
# One Last Step

We just need you to confirm your email address to prove that you're a human.

@component('mail::button', ['url' => '#'])
Confirm Email
@endcomponent

Thanks,<br>
{{ config('app.name') }}
@endcomponent
邮件通知相关配置
现在我们运行测试已经通过:
如果我们想要发送邮件,我们还需要做些配置:
开启 QQ 邮箱的 SMTP 支持
首先我们需要在 QQ 邮箱的账号设置里开启 POP3/SMTP 服务。具体请查看 如何打开POP3/SMTP/IMAP功能? 。只需要开启 POP3/SMTP 服务即可,然后我们复制方框里的『授权码』作为我们的密码使用.
邮箱发送配置
Laravel 中邮箱发送的配置存放于 config/mail.php 中。不过 mail.php 中我们所需的配置,都可以通过 .env 来配置:
forum.env
.
.
.
MAIL_DRIVER=smtp
MAIL_HOST=smtp.qq.com
MAIL_PORT=25
MAIL_USERNAME=xxxxxxxxxxxxxx@qq.com
MAIL_PASSWORD=xxxxxxxxx
MAIL_ENCRYPTION=tls
MAIL_FROM_ADDRESS=xxxxxxxxxxxxxx@qq.com
MAIL_FROM_NAME=LaraBBS
.
.
.
选项讲解:
- MAIL_DRIVER=smtp —— 使用支持 ESMTP 的 SMTP 服务器发送邮件;
- MAIL_HOST=smtp.qq.com —— QQ 邮箱的 SMTP 服务器地址,必须为此值;
- MAIL_PORT=25 —— QQ 邮箱的 SMTP 服务器端口,必须为此值;
- MAIL_USERNAME=xxxxxxxxxxxxxx@qq.com —— 请将此值换为你的 QQ +
@qq.com;- MAIL_PASSWORD=xxxxxxxxx —— 密码是我们第一步拿到的授权码;
- MAIL_ENCRYPTION=tls —— 加密类型,选项 null 表示不使用任何加密,其他选项还有 ssl,这里我们使用 tls 即可。
- MAIL_FROM_ADDRESS=xxxxxxxxxxxxxx@qq.com —— 此值必须同 MAIL_USERNAME 一致;
- MAIL_FROM_NAME=LaraBBS —— 用来作为邮件的发送者名称。
测试邮件发送
我们注册一个用户,来测试邮件发送功能。如果你已经正确进行如上配置,那么你将接收到邮件: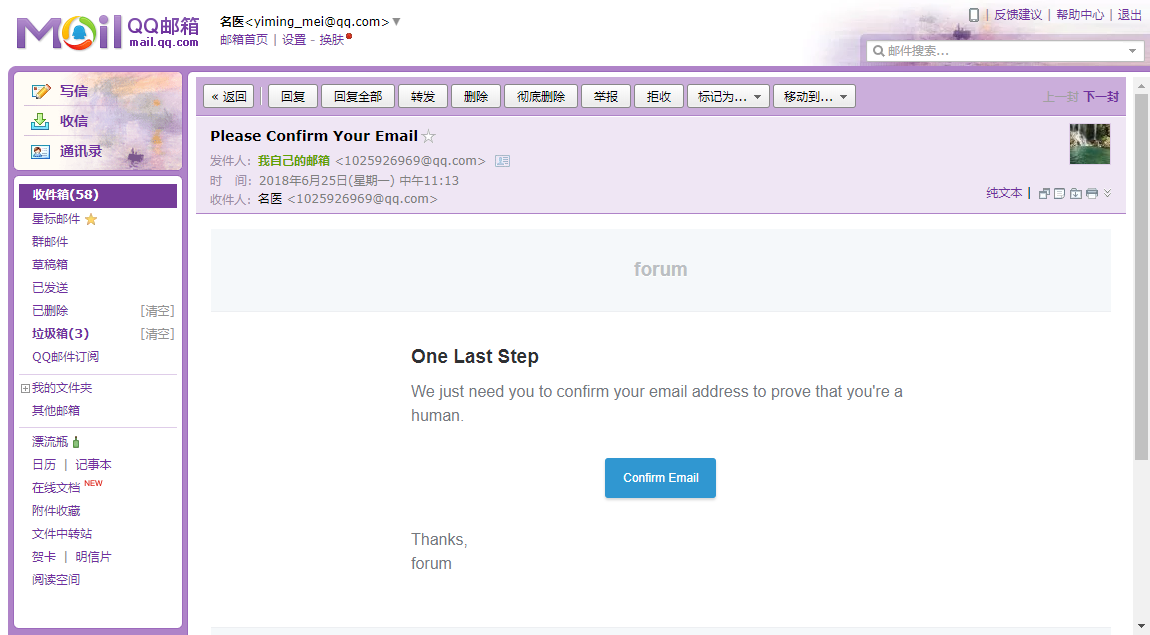
用户认证
添加测试
接下来我们增加另一个测试,即用户从认证邮箱点击链接,然后成功认证:
forum\tests\Feature\RegistrationTest.php
    .
    .
    /** @test */
    public function user_can_fully_confirm_their_email_addresses()
    {
        $this->post('/register',[
            'name' => 'NoNo1',
            'email' => 'NoNo1@example.com',
            'password' => '123456',
            'password_confirmation' => '123456'
        ]);

        $user = User::whereName('NoNo1')->first();

        $this->assertFalse($user->confirmed);
    }
}
如果我们运行测试: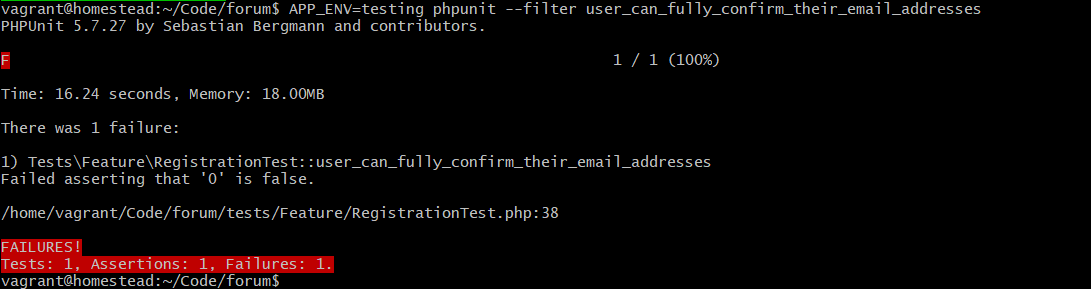
这是因为我们在数据库的字段用 0 代表 false,1 代表true。我们可以 Laravel 提供的 属性类型转换很方便地进行转换:
forum\app\User.php
.
.
protected $hidden = [
    'password', 'remember_token','email'
];

protected $casts = [
  'confirmed' => 'boolean'
];
.
.
再次运行测试:
我们继续来完善测试:
    .
    .
    /** @test */
    public function user_can_fully_confirm_their_email_addresses()
    {
        $this->post('/register',[
            'name' => 'NoNo1',
            'email' => 'NoNo1@example.com',
            'password' => '123456',
            'password_confirmation' => '123456'
        ]);

        $user = User::whereName('NoNo1')->first();

        // 新注册用户未认证,且拥有 confirmation_token
        $this->assertFalse($user->confirmed);
        $this->assertNotNull($user->confirmation_token);

        $response = $this->get('/register/confirm?token=' . $user->confirmation_token);

        // 当新注册用户点击认证链接,用户变成已认证,且跳转到话题列表页面
        $this->assertTrue($user->fresh()->confirmed);
        $response->assertRedirect('/threads');
    }
}
想要测试通过,我们还要增加相关逻辑:
修改表结构
首先我们要加上confirmation_token字段:
forum\database\migrations\2014_10_12_000000_create_users_table.php
    .
    .
    public function up()
    {
        Schema::create('users', function (Blueprint $table) {
            $table->increments('id');
            $table->string('name');
            $table->string('email')->unique();
            $table->string('password');
            $table->string('avatar_path')->nullable();
            $table->boolean('confirmed')->default(false);
            $table->string('confirmation_token',25)->nullable();
            $table->rememberToken();
            $table->timestamps();
        });
    }
    .
    .
运行迁移:
$ php artisan migrate:refresh进入Tinker:
$ php artisan tinker填充数据:
>>> factory('App\Thread',30)->create();初始化 confirmation_token
我们在用户注册是为confirmation_token字段赋值:
forum\app\Http\Controllers\Auth\RegisterController.php
    .
    .
    protected function create(array $data)
    {
        return User::forceCreate([
            'name' => $data['name'],
            'email' => $data['email'],
            'password' => bcrypt($data['password']),
            'confirmation_token' => str_random(25)
        ]);
    }
}
注:因
confirmation_token字段不在User模型的$fillable属性组内,所以此处我们使用forceCreate
新建路由与控制器
到现在为止,当我们注册一个用户时,用户未认证并且会发送邮件。我们接下来需要进行的操作是:当我们点击邮件中的认证链接时,用户认证通过。让我们来完成这个逻辑。首先我们要新增路由:
forum\routes\web.php
.
.
Route::get('/register/confirm','Api\RegisterConfirmationController@index');

Route::get('api/users','Api\UsersController@index');
Route::post('api/users/{user}/avatar','Api\UserAvatarController@store')->middleware('auth')->name('avatar');
接着我们新建控制器:
$ php artisan make:controller "Api\RegisterConfirmationController"forum\app\Http\Controllers\Api\RegisterConfirmationController.php
<?php

namespace App\Http\Controllers\Api;

use App\User;
use Illuminate\Http\Request;
use App\Http\Controllers\Controller;

class RegisterConfirmationController extends Controller
{
    public function index()
    {
        User::where('confirmation_token',request('token'))
            ->firstOrFail()
            ->confirm();

        return redirect('/threads')
            ->with('flash','Your account is now confirmed! You may post to the forum.');
    }
}注意,为了简洁,我们将更新confirmed字段的逻辑放在了模型文件的confirm()方法中:
forum\app\User.php
    .
    .
    protected $casts = [
      'confirmed' => 'boolean'
    ];

    public function confirm()
    {
        $this->confirmed = true;

        $this->save();
    }

    .
    .
在之前,我们已经能够发送消息,现在让我们为认证按钮加上链接:
forum\resources\views\emails\confirm-email.blade.php
@component('mail::message')
# One Last Step

We just need you to confirm your email address to prove that you're a human.

@component('mail::button', ['url' => url('/register/confirm?token=' . $user->confirmation_token)])
Confirm Email
@endcomponent

Thanks,<br>
{{ config('app.name') }}
@endcomponent我们使用了$user实例,但这个实例我们没有绑定到视图上。我们来进行绑定:
forum\app\Listeners\SendEmailConfirmationRequest.php
    .
    .
    public function handle(Registered $event)
    {
        Mail::to($event->user)->send(new PleaseConfirmYourEmail($event->user));
    }
    .
    .
forum\app\Mail\PleaseConfirmYourEmail.php
<?php

namespace App\Mail;

use Illuminate\Bus\Queueable;
use Illuminate\Mail\Mailable;
use Illuminate\Queue\SerializesModels;
use Illuminate\Contracts\Queue\ShouldQueue;

class PleaseConfirmYourEmail extends Mailable implements ShouldQueue
{
    use Queueable, SerializesModels;

    public $user;

    public function __construct($user)
    {
        $this->user = $user;
    }

    public function build()
    {
        return $this->markdown('emails.confirm-email');
    }
}
进行测试
现在我们的认证功能的相关逻辑已经全部完成了,首先让我们来运行测试:
接着我们新注册一个用户进行测试:
同时我们会收到邮件:
我们点击认证按钮,会跳转到话题列表页面,同时有消息提示:
用户变成已认证状态: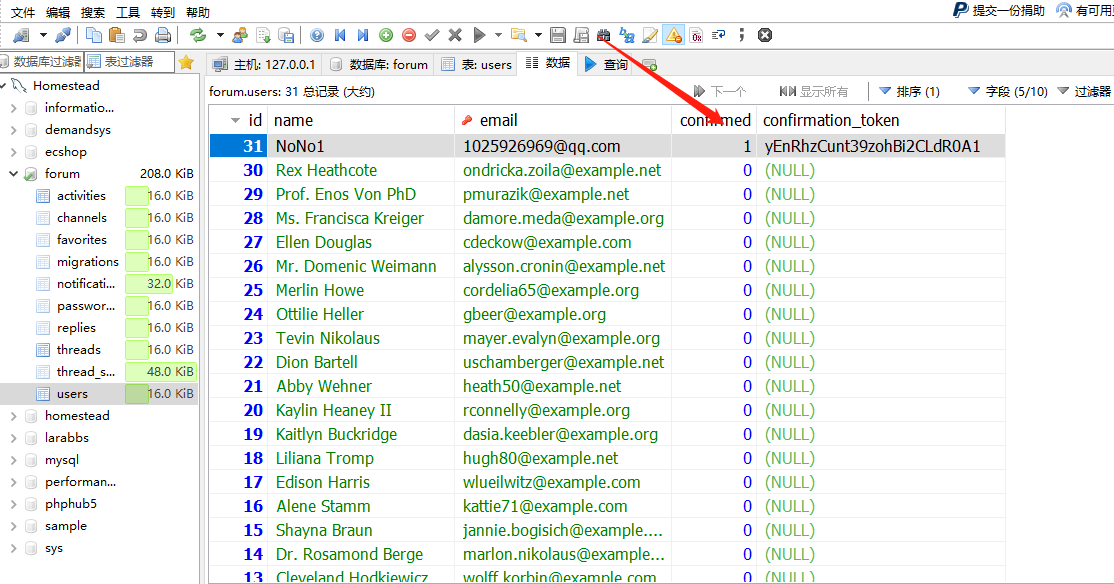


 关于 LearnKu


推荐文章: